Building a bird aviary is one of the most rewarding DIY projects you can take on, and it is more achievable than most people think. Whether you want a small outdoor flight cage for a pair of budgies, a walk-in backyard aviary for parrots, or an indoor room-sized enclosure, the core process is the same: plan your dimensions around your birds, choose the right materials, build a solid frame, enclose it safely, and set it up so your birds thrive from day one. This guide walks you through every stage, with real measurements, material choices, and honest advice about where things can go wrong.
How to Build a Bird Aviary: DIY Indoor and Outdoor Plans

Marcus Thornton
9 Apr 2026
Pick your aviary type first
Before you buy a single piece of timber or roll of mesh, you need to decide what kind of aviary you are building. This decision shapes every material and dimension choice that follows.
Outdoor aviaries are the most popular for backyard bird keepers. They give birds natural light, fresh air, and room to fly in a way that almost no indoor cage can match. The trade-off is that you are designing against rain, wind, predators, and temperature swings. A well-built outdoor aviary handles all of those, but you do need to think about them from the start.
Indoor aviaries work best for people who want to keep birds close, live in climates with harsh winters, or are building an enriched bird room rather than a garden structure. If you are thinking about converting a whole room, it is worth reading up on how to build a bird room as a dedicated space, since that approach has its own planning considerations around ventilation and flooring.
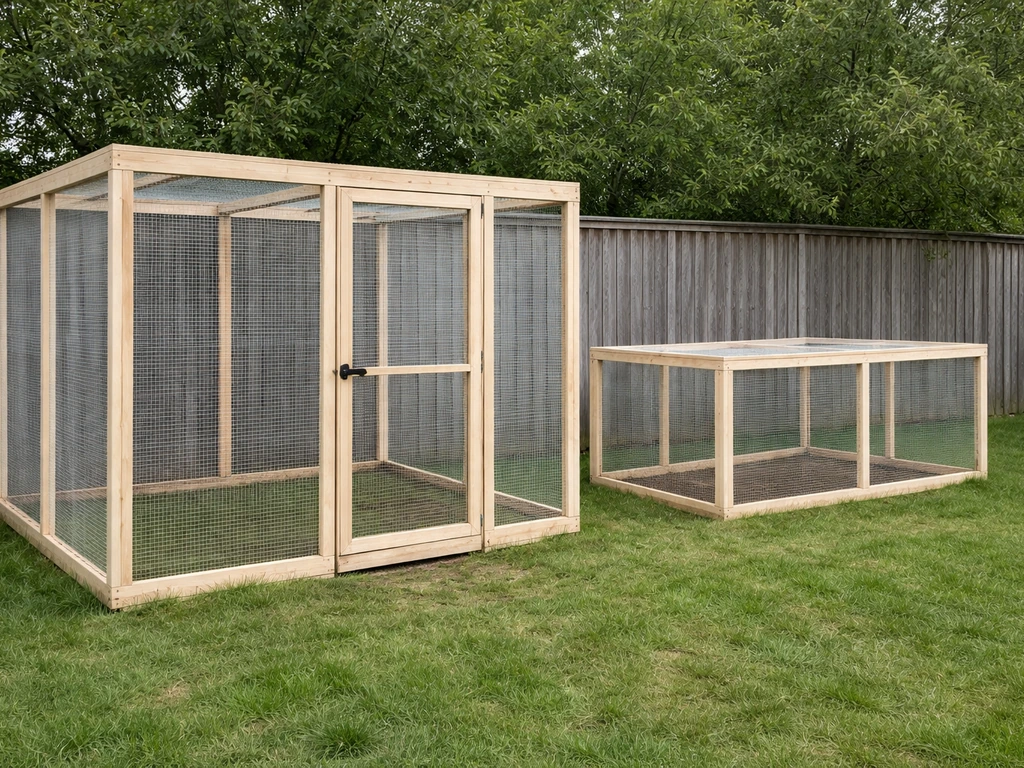
Walk-in aviaries are simply large enough for a person to step inside, usually at least 6 feet tall and 6 feet wide. They can be indoors or outdoors. The main advantages are easier cleaning, better bird interaction, and the ability to add real plants, branches, and enrichment structures. If you are planning a large flock or larger bird species, go walk-in from the start. Retrofitting a small cage to add headroom later is a pain.
Small aviaries, sometimes called flight cages, work well for a pair or small group of finches, canaries, budgies, or lovebirds. They are faster to build, cheaper, and easier to move or modify. If you want to try a simpler starting point, a compact bird hotel or multi-compartment nesting structure is a good confidence builder before you take on a full aviary. You can find ideas by looking at how to build a bird hotel as a stepping stone project.
Plan your dimensions and layout around your birds
Size matters more than most beginners realize. A cramped aviary causes stress, limits flight, and makes cleaning nearly impossible. The practical rule is that the minimum dimension in any direction should not be less than 60 cm (about 24 inches), and even that is a bare minimum for the smallest species. For budgerigars and cockatiels, recommended cage sizes start at around 20 inches long by 20 inches wide by 24 inches tall per bird, with bar or mesh spacing of no more than half an inch (12.7 mm) to prevent head entrapment. For an aviary housing multiple birds, multiply generously.
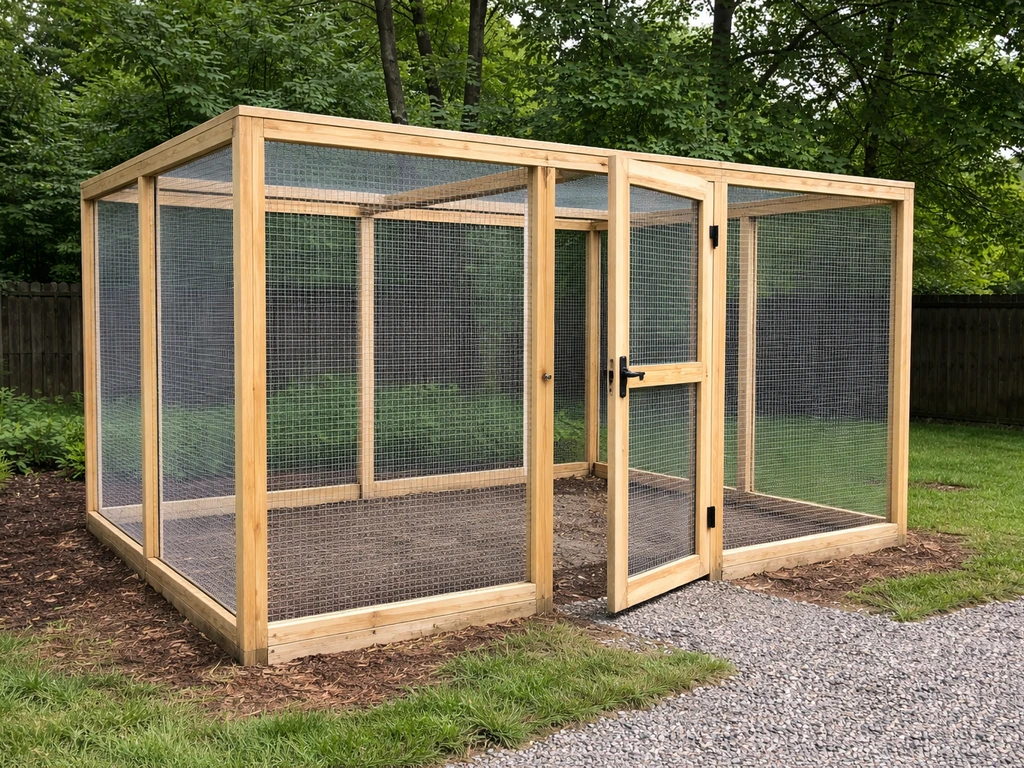
For a walk-in outdoor aviary housing small parrots or a mixed finch collection, a good starting size is 8 feet long by 6 feet wide by 7 feet tall. That gives birds meaningful flight distance (length matters more than height for most species), gives you room to walk in and clean, and leaves space for perches, feeders, and planting without making the space feel crowded. For larger parrots like amazons or cockatoos, go bigger: 12 feet long is a reasonable target.
Layout planning means deciding where the door goes, how birds flow through the space, and whether you want a safety porch (a small antechamber between the outer door and the aviary interior so birds cannot escape if you accidentally leave a door open). A safety porch adds only a couple of feet to your total length but is genuinely worth building in from the start.
Sketch your layout on paper before cutting anything. Mark where perches will go (away from feeding stations so droppings do not contaminate food), where feeders and water will sit, and where the sun hits the structure at different times of day. In outdoor builds, you want some shade and some sun, which usually means at least one solid roof panel and one mesh roof panel, or a structure positioned to get morning sun and afternoon shade.
| Bird Type | Minimum Mesh/Bar Spacing | Suggested Aviary Length (pair) | Walk-in Recommended? |
|---|---|---|---|
| Budgerigars / Lovebirds | 0.5 in (12.7 mm) | 6–8 ft | Optional |
| Cockatiels / Conures | 0.5–0.625 in | 8–10 ft | Yes for groups |
| Small parrots (Caiques, Senegals) | 0.5–0.75 in | 10–12 ft | Yes |
| Finches / Canaries | 0.5 in or finer | 6 ft | Optional |
| Large parrots (Amazons, Cockatoos) | 1 in (25 mm) | 12+ ft | Yes |
Choosing your materials and hardware
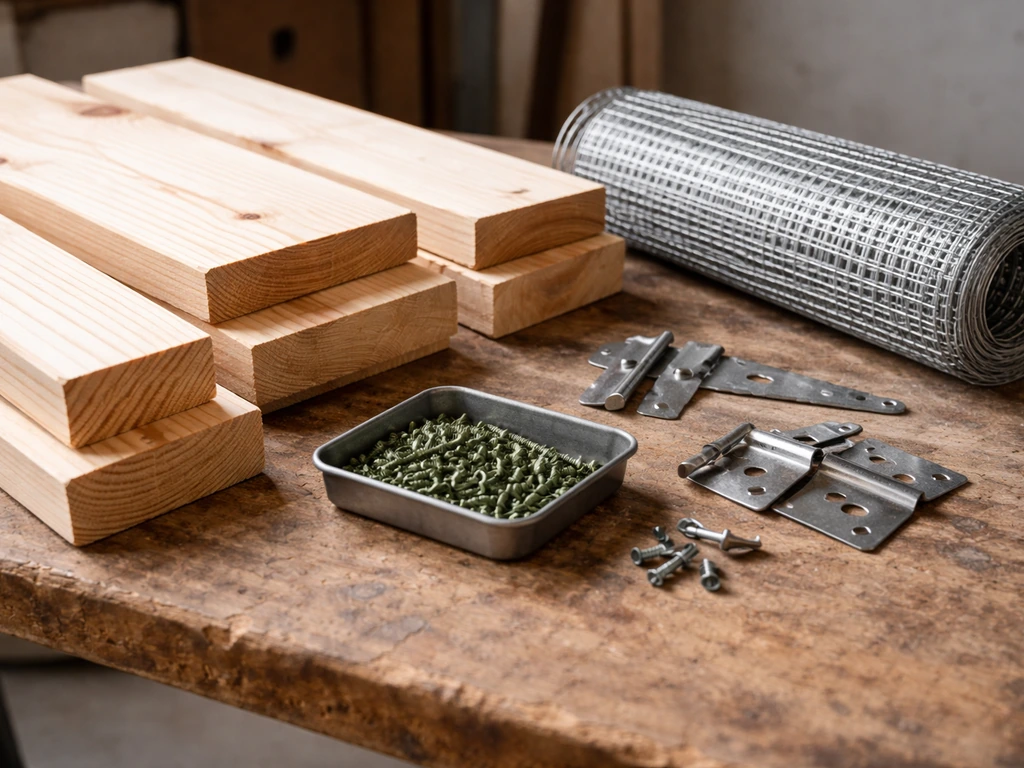
Wood is the most beginner-friendly framing material and the one most DIY builders reach for first. It is easy to cut, easy to fasten, widely available, and it looks great. The important rule with wood is to avoid anything chemically treated or pressure-treated. Pressure-treated timber contains preservatives that are genuinely toxic to birds, and there is no safe way to seal them well enough to use in a bird enclosure. Stick to untreated pine, cedar, or Douglas fir for framing. Cedar is naturally weather-resistant and a great choice for outdoor builds if you can get it.
If you are sourcing repurposed timber, be equally careful. Old wood that has been painted with lead-based paint, treated with preservative stains, or that you cannot identify the history of should stay out of your aviary. The same applies to any wood finishes you apply yourself: water-based finishes like Polycrylic are much safer than oil-based or solvent-heavy products, but even those need at least 24 hours to dry before birds come near them, and ideally you want to let the finished timber air out for several days before the aviary goes into use.
For the mesh, galvanized welded wire hardware cloth is the standard choice. For small parrots and finches, use 0.5-inch by 0.5-inch mesh openings. Be aware that mesh smaller than half an inch starts to meaningfully reduce airflow through the structure, which creates ventilation problems (more on that in the build sections below). For the frame fasteners, use galvanized or stainless steel screws and bolts. Standard steel fasteners will rust outdoors within a season, and rust edges are a foot and beak hazard.
Doors need a solid latch that cannot be nudged open by a curious parrot or a determined raccoon. Use a two-step latch, a carabiner-style clip, or a padlock-compatible hasp. Raccoons have been documented opening simple single-action latches, so anything less than a two-step mechanism on an outdoor aviary is asking for trouble. Hinges should be heavy-duty, galvanized, and fastened with screws long enough to grip the full thickness of the door frame.
Wood vs. metal framing: a quick comparison
| Factor | Untreated Wood Frame | Powder-Coated Steel Frame | Aluminum Frame |
|---|---|---|---|
| Beginner friendliness | High (basic tools) | Low (welding or bolt assembly) | Medium |
| Cost | Low to medium | High | Medium to high |
| Weather resistance | Medium (needs sealing) | High | Very high |
| Bird safety | High (untreated/sealed) | High (powder-coated) | High |
| Repurposed material potential | High | Low | Low |
| Weight | Medium | Heavy | Light |
For most DIY builders, untreated wood is the right call. It is affordable, forgiving to work with, and easy to repair. Seal it well, use the right mesh, and it will last years without issue.
Building an outdoor aviary: weatherproofing, drainage, and security
Outdoor aviaries live in the elements year-round, so building for weather from the start is not optional. The four things to get right are: a roof that sheds rain, a floor that drains, walls that block wind from the worst direction, and predator-proof perimeter. Get those four right and the structure will work well for years.
Roof design and weatherproofing
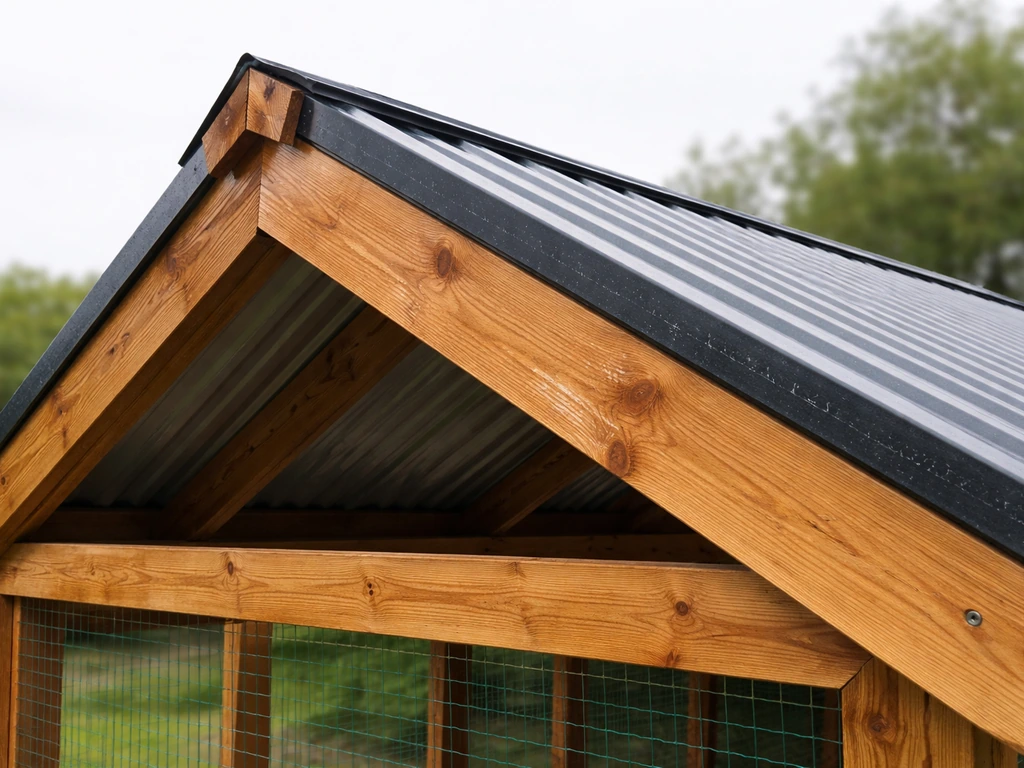
A pitched roof is better than a flat one. A steeper angle sheds rain faster, reduces pooling, and makes it harder for cats or other predators to perch on top of the aviary. A simple single-pitch (lean-to) roof at a 15-to-30-degree angle is easy to build and works well for most aviary sizes. Cover at least half the roof with a solid weatherproof panel, either corrugated polycarbonate (which lets in light) or treated plywood with roofing felt on top. The other half can remain open mesh to allow airflow and natural light.
Treat all exposed timber with a water-based exterior wood sealant. Apply it before assembly where possible so you can coat all faces of each piece. Reapply the sealant on joints and end grain every year or two. End grain absorbs water faster than any other surface and is the first place rot starts.
Drainage and flooring
The aviary floor is where most outdoor builds go wrong. A solid concrete floor is easy to clean but needs a drain built in. A gravel floor laid over hardware cloth mesh lets water drain naturally through into the soil and is one of the easier options for a first build: lay 1/4-inch hardware cloth flat on the ground, cover it with 2 to 3 inches of pea gravel, and water drains right through while the mesh below stops burrowing predators. Avoid bare soil floors without mesh underneath, since rats, foxes, and mink can dig under walls surprisingly quickly.
Predator-proofing
Predator-proofing is the part of the outdoor build that beginners underestimate most. Dig your perimeter wire at least 12 inches into the ground or bend it outward at a 90-degree angle underground so that anything digging toward the wall hits the buried mesh and gives up. Use heavy gauge galvanized hardware cloth (at least 16-gauge, preferably 14-gauge) for the lower 24 inches of the aviary walls where the pressure is greatest. Reinforce door frames and any wooden wall sections with mesh on the inside. Check every join point for gaps: a gap that fits a finger can be a problem. And use that two-step latch on every door.
If you are building in Australia where predator and climate pressures can differ significantly from northern hemisphere setups, the design considerations around mesh gauge, flooring, and ventilation shift somewhat. There is a dedicated breakdown of those regional specifics in this guide on how to build a bird aviary in Australia, which is worth reading alongside this one if that applies to you.
Building an indoor aviary: ventilation, safety, and easy maintenance
Indoor aviaries have a completely different set of challenges. You are not fighting rain or predators, but you are managing air quality, fumes, noise containment, and the practicalities of cleaning inside a house. Get the ventilation wrong and your birds will have respiratory problems, potentially within weeks. Poor ventilation is one of the most frequently cited causes of respiratory infection in indoor and aviary birds.
The target is fresh air circulating through the aviary space without cold drafts blowing directly on the birds. A mesh panel on two opposite walls is the minimum for passive ventilation in a small indoor aviary. For larger indoor setups, add a low-power USB or inline fan to push air through gently. Follow ASHRAE standards as a reference point: around 10 to 15 air changes per hour is a reasonable target for a bird enclosure, though even a modest fan will usually hit that in a small aviary. ASHRAE’s ventilation guidance discusses air change rate as air changes per hour (h−1) to support ventilation targets such as these blank" rel="noopener noreferrer">about 10 to 15 air changes per hour is a reasonable target for a bird enclosure.
Placement matters enormously indoors. Keep the aviary away from the kitchen: nonstick cookware fumes (PTFE) are lethal to birds even in tiny concentrations, and even normal cooking smoke, aerosol sprays, scented candles, and cleaning product fumes can cause serious harm. A spare bedroom, a dedicated utility room, or a sunroom are better locations than a kitchen-adjacent living room.
For the floor under an indoor aviary, lay down a waterproof liner or tray and use removable substrate trays inside the structure so you can slide them out, clean them, and replace them without disturbing the birds. Lining the area below the aviary with vinyl flooring or a plastic drop sheet makes clean-up fast. If you love the idea of a dedicated bird space and want to think bigger, building a full bird room is the logical next step and gives you the most flexibility for enrichment and flock size.
One thing I learned the hard way with my first indoor build: do not finish the interior wood with oil-based stains or heavy solvent finishes. The off-gassing lingers far longer indoors than it does outside, and birds can have reactions before you even realize the smell is still present. Use water-based coatings, let them dry for the full 24-hour cure time, and then air the space out for at least another 48 hours before introducing birds. Even better, do all the finishing work outdoors or in a ventilated garage before bringing panels inside.
Step-by-step construction: frame to finish
This process works for both indoor and outdoor builds. The differences are mostly in the material choices and finishing steps covered above. For a standard walk-in outdoor aviary (8 ft x 6 ft x 7 ft), here is how to approach the build from start to finish.
Step 1: Build the base frame
Start with a rectangular base frame from 2x4 lumber. For an outdoor build, set this on concrete footings, paving slabs, or a gravel bed so it is not sitting directly on soil where it will wick moisture and rot. Use galvanized joist hanger brackets at the corners for a strong, square base. Check for square by measuring diagonals: both diagonals should be equal. This is the step most beginners rush, and a base that is out of square makes every subsequent step harder.
Step 2: Raise the corner posts and wall frames
Cut your corner posts to your target height (7 feet for a walk-in build). Stand them up and brace them temporarily while you fasten them to the base frame. Add horizontal rails at mid-height (around 3.5 feet) on each wall panel: these add rigidity and give you a fastening line for the mesh. For wall panels that will be solid (usually the back wall and one side wall for weather protection in an outdoor build), cut sheet material to fit and fasten it before moving to the roof.
Step 3: Add the roof frame
Build the roof frame separately on the ground, then lift it into place. A simple lean-to roof uses a ridge board at the high side and a lower plate at the front, with rafters spanning between them at your chosen pitch. For an 8-foot-wide aviary, rafters every 24 inches are sufficient with standard lumber. Once the roof frame is up, attach your solid roof panels on the shelter half and leave the other half open for mesh.
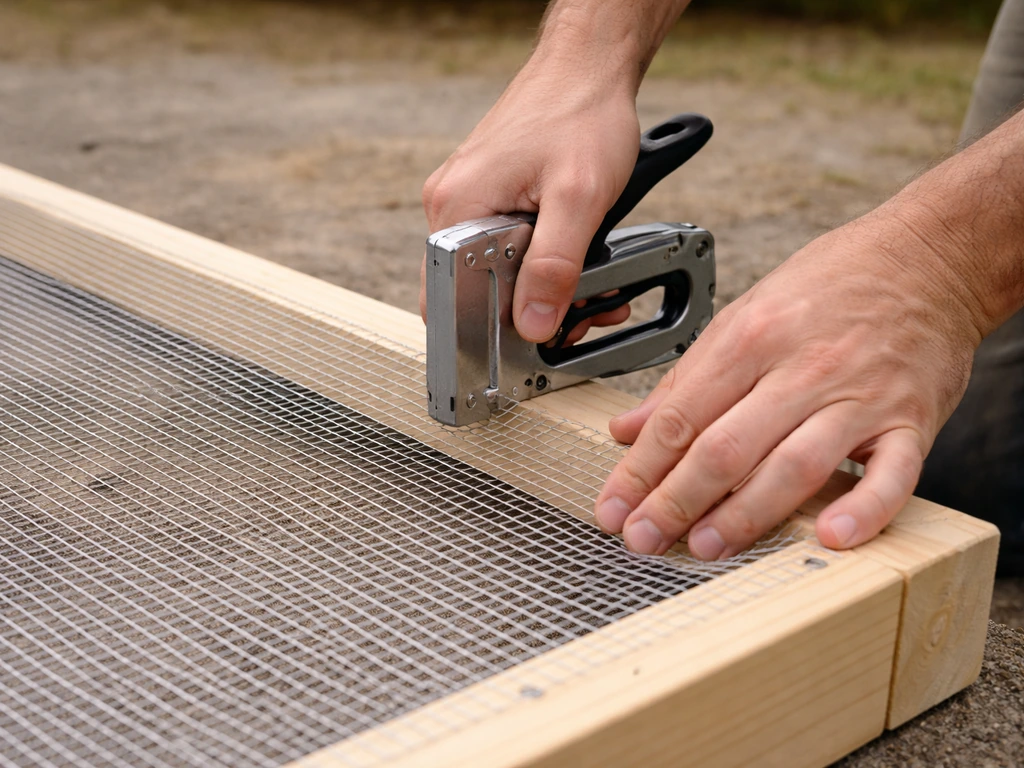
Step 4: Attach the mesh
Unroll the hardware cloth and cut it to panel size with heavy-duty tin snips or an angle grinder with a cutting disc. Staple it to the frame with a heavy-duty staple gun using 1/2-inch galvanized staples, then add a batten of thin timber over the stapled edge and screw it down. This sandwich method (mesh between frame and batten) is far more secure than staples alone and stops birds from picking at exposed mesh edges. Work from the top of each panel down so you can keep tension in the mesh as you go. Overlap mesh at corners by at least 3 inches.
Step 5: Build and hang the door
Frame the door opening before you attach mesh to that wall panel. Build the door itself as a separate frame, the same depth as your wall timber, and attach mesh to it the same way as the wall panels. Use at least three heavy-duty hinges for a walk-in door. The door should open inward into the aviary so it cannot be pushed open by anything pressing against the outside. Fit your two-step latch at handle height and a second latch at the bottom near ground level so there is no gap for anything to squeeze under.
Step 6: Finish the wood
Once the structure is complete, apply your bird-safe finish to any uncoated timber surfaces. For outdoor builds, a water-based exterior deck or fence sealant works well. For indoor builds, a water-based polyurethane or Polycrylic finish is a safe option: apply it, let it dry for at least 24 hours before light use, and ventilate thoroughly before birds are introduced. Touch up all cut edges and joints where raw wood is exposed. This is also the right moment to check every single fastener and make sure nothing sharp is protruding inside the enclosure.
Step 7: Install the floor (outdoor builds)
Lay your hardware cloth flat inside the base frame perimeter, staple it to the base frame, then cover with pea gravel. For a concrete floor, pour it slightly sloped toward a central drain point. Concrete gets slippery when wet and wet concrete is hard on bird feet over time, so add a layer of river sand or outdoor substrate on top if birds will be spending time at ground level.
If you want a deeper look at the full process including alternative panel approaches and quick-build variations, there is a companion piece covering how to make a bird aviary that goes into additional build methods worth cross-referencing.
Getting the aviary ready for your birds
A finished structure is not yet a finished aviary. Setting it up correctly for the birds takes another few hours but makes a significant difference to how quickly they settle in and how easy the space is to manage long-term.
Perches
Install perches at different heights and diameters. Variety is important because using only one diameter perch over time can cause foot muscle imbalances and pressure sores. Natural branches from bird-safe tree species are ideal: fruit tree branches, willow, and grapevine are all good options. Grapevine in particular is frequently recommended by avian vets as one of the best perch materials available for foot health. Avoid dowel-only setups if you can. And please skip sandpaper perches entirely: they are too abrasive for bird feet and cause painful abrasions over time, a point that avian vets consistently make in clinical guidance.
Feeders, water, and enrichment
Position feeders away from perches above them so droppings do not contaminate food. Use stainless steel or ceramic dishes rather than plastic: they are easier to clean properly and do not hold bacteria in surface scratches the way plastic does. Install at least two water stations so there is always access if one gets fouled. For enrichment, add foraging toys, rope swings, and branches at varying heights. Think of enrichment as ongoing: rotate items in and out every week or two to keep things mentally stimulating. If you want ideas for how a planted outdoor space can complement your aviary, building a bird garden around the structure is a great way to expand the habitat value.
Plants inside the aviary
If you want to add living plants inside the aviary, research every species before it goes in. Many common garden and houseplants are toxic to birds. When in doubt, leave it out. Your avian vet or a bird-specific poison reference is the right resource to check before introducing any plant you are not certain about. If you ever suspect a bird has been poisoned, Pet Poison Helpline® offers 24/7 guidance and lists 855-764-7661 for immediate help Contact Pet Poison Helpline®.
Cleaning and maintenance routine
Set up the aviary so cleaning is easy from day one. Droppings trays that slide out, substrate that can be spot-cleaned daily and fully replaced weekly, and feeders that are simple to remove and soak are all worth designing in. The harder an aviary is to clean, the less often it gets cleaned, and that directly affects bird health. Plan for a full disinfection of the structure every few months: remove birds to a safe temporary space, clean all surfaces with an avian-safe disinfectant, rinse thoroughly, and let it dry completely before birds go back in.
Introducing new birds safely
Do not skip quarantine. Any new bird joining an existing flock should be housed separately for at least six weeks before introduction. Disease status can take that long to become apparent, and putting a sick bird directly into your aviary can wipe out a flock that was previously healthy. Keep the quarantine space in a separate room with separate air circulation if possible, and wash hands between handling quarantine birds and your main flock.
A few more aviary ideas worth exploring
Once you have the main aviary built, it is natural to start thinking about expanding or adding related structures. A multi-compartment bird condo structure is a great way to house breeding pairs separately while keeping them within the same overall setup. And if you are building in a cold climate, the question of insulation becomes important quickly: there is a full guide on how to insulate a bird aviary that covers materials, placement, and how to add insulation without compromising ventilation.
One more thing worth mentioning for anyone who is still in the planning phase and wants to experiment with layout ideas before committing to a build: it sounds unusual, but building a bird aviary in Minecraft is actually a surprisingly useful way to prototype layout, door placement, and proportions before you start cutting real timber. More than a few builders have used it exactly that way.
The most important thing is to start. A good aviary does not need to be perfect on the first try. It needs to be safe, well-ventilated, predator-proof, and built around the birds that will live in it. Get those four things right and everything else can be adjusted, improved, or expanded over time. Grab your measuring tape, sketch out your dimensions, and get building.
FAQ
Can I use repurposed wood if I sand it down first?
If you cannot confirm a wood’s history, don’t use it. Painted or stained boards can contain lead, and preservative treatments are not always identifiable visually. When in doubt, buy new untreated framing stock, or only use reclaimed wood with documentation you trust and sand back to bare wood to assess what is actually on the surface.
Is any bird-safe sealant okay for finishing the wood, especially for indoor aviaries?
Yes, but you should treat it as a chemistry and curing problem, not just a structural one. Even water-based coatings need full cure before birds are exposed, and indoor air can stay saturated with fumes longer than outdoors. Run finishing work outdoors or in a ventilated space, then keep birds out until the coating is fully cured and the aviary has had time to air out.
Do I have to avoid a concrete floor completely, or is it workable?
For outdoor aviaries, both feet safety and drainage matter. A fully concrete floor without a proper drain can become slick and uncomfortable, plus moisture can increase rot around the perimeter. If you do use concrete, slope it toward a drain and plan a non-slip top layer (for example river sand or an outdoor substrate) where birds spend time.
What happens if I choose mesh that’s too small (or too large) for my birds?
Don’t assume larger mesh always means better airflow. Very small openings reduce airflow and can raise humidity, which often worsens respiratory issues. Conversely, larger gaps can increase risk of head entrapment for small birds and can allow predators to reach through. Match the opening size to the birds you keep, and keep at least moderate airflow in mind.
How can I reliably check whether my aviary is truly predator-proof?
If you find gaps you can fit a finger through, treat them immediately. Birds can get toes caught, and small predators often exploit even narrow openings. Rework the join, add internal mesh reinforcement, and re-check corners, door frames, and any place where timber meets metal.
Can I add a fan to improve ventilation indoors, and how do I place it?
Yes, but only if you can keep airflow gentle and consistent. A fan that points directly at birds can create chill and stress. Use it to move air through the space, aim it so it circulates without blowing directly on perches, and avoid blocking vent areas with solid panels or heavy coverings.
What’s the most common latch mistake builders make on outdoor aviaries?
If your plan uses only a single-door latch action, upgrades are worth it. Raccoons and other opportunistic animals have learned simple mechanisms. Use a two-step latch or a design that requires two independent actions, and install latches at both handle height and lower near-ground level to prevent squeeze-through gaps.
How strict does quarantine need to be, and where should it be located?
Quarantine should be separate enough that air and handling cross-contamination is minimized. Keeping birds in the same room but “across the house” is usually not sufficient. Use separate ventilation if possible, handle quarantine birds before touching your main flock, and wash hands and tools between tasks.
What flooring mistakes lead to problems over time, not just at the start?
At ground level, slipping is only one risk. Uneven or bare surfaces can also increase foot stress and make cleaning harder. If you use gravel or sand, make sure it is contained, stable underfoot, and easy to spot-clean daily, otherwise droppings build up and smell can increase.
Is it ever worth starting with a smaller aviary and upgrading later?
You usually can, but the safest approach is to plan the changes around access and airflow. Retrofitting headroom often means cutting frames or moving mesh, which can compromise fit and leave gaps. If you might upgrade to walk-in later, design your early build with enough door and frame dimensions to support the change, or start walk-in when large birds are the goal.
Can I place an indoor aviary in a living room if it’s near a window?
Small indoor aviaries can still work, but avoid kitchens and fume sources because bird lungs are extremely sensitive. Also control aerosol exposure, cooking residues, and scented products. If you must place near living areas, keep distance from cooking, sprays, and cleaners, and add a dedicated ventilation strategy rather than relying on open windows alone.
Why do perches matter for health beyond just giving birds something to stand on?
Use multiple perch diameters and different heights to reduce repetitive pressure on feet. Include branches that are smooth enough to be safe but natural enough to vary grip, and avoid abrasive perch surfaces like sandpaper types that can cause painful abrasions. Also ensure perches are positioned so droppings do not fall into feeders.
Can I put store-bought plants inside the aviary, like houseplants?
Yes, but treat plant selection as a risk-management task. Many common garden and household plants are toxic, and “small amounts” are not a guarantee of safety. Only add living plants after verifying they are safe for your specific bird species, and remove anything you cannot confirm.
Next Articles

How to Build a Chimney Swift Bird House DIY Guide
Step-by-step DIY plans to build a chimney swift bird house, with correct dimensions, placement, and weatherproofing for

How to Build an Oriole Bird House: Step-by-Step DIY
Step-by-step DIY for building an oriole bird house with right dimensions, weatherproofing, predator-safe placement, and

How to Build a Chickadee Bird House Step by Step
Step-by-step DIY chickadee bird house with cut list, chickadee entry sizing, ventilation, drainage, and mounting tips.