You can build a bird sanctuary model two ways: as a scaled display or diorama that represents a habitat (great for school projects or visual planning), or as an actual functional backyard setup with real shelters, feeders, and water that local birds can use today. Both are worth doing, and this guide covers both. If you want birds to actually show up and thrive, the functional backyard version is the one to focus on, and it is more achievable than most people expect with basic tools, some repurposed materials, and a weekend afternoon.
How to Make a Bird Sanctuary Model Step by Step

Marcus Thornton
1 May 2026
Display model vs. real backyard sanctuary: pick your goal first

Before you buy a single piece of wood or glue gun stick, decide what you are actually building. The phrase 'bird sanctuary model' covers two very different projects, and mixing them up wastes time and materials.
| Type | What it is | Who it's for | Core materials |
|---|---|---|---|
| Scaled display model | A miniature or diorama representation of a bird habitat, not meant for real birds | Students, planners, hobbyist crafters, or anyone designing a backyard layout before building it | Foam board, balsa wood, craft paint, polymer clay, fake moss, hot glue |
| Functional backyard sanctuary | A real, bird-supporting setup with working shelters, feeders, and water features | Backyard birders, wildlife gardeners, DIY builders who want to attract real birds | Untreated cedar or pine, galvanized screws, food-safe containers, natural plantings |
A scaled display is perfect if you are planning your backyard layout visually before committing to permanent structures, or if you are working on a school or community project. Build it at roughly 1:10 scale (so a 6-foot post becomes 7.2 inches tall) and use it as a blueprint you can physically move around. If you are building a functional sanctuary, the rest of this guide is your roadmap. The construction steps below include notes for both approaches wherever they differ.
Site, safety, and bird-friendly design basics
Where you place everything matters almost as much as what you build. I learned this the hard way when I mounted my first nest box on a wooden fence post. Raccoons figured it out in about three days. Placement and design choices that seem small to you are genuinely life-or-death for nesting birds.
Placement and light
- Face nest box entrances away from prevailing wind and driving rain, typically north or east in most of North America.
- Place feeders and shelters near natural cover (shrubs, hedges) so birds have an escape route from predators, but keep feeders at least 10 feet from dense brush that could hide cats.
- Aim for partial shade: morning sun is fine, but avoid full afternoon sun exposure, especially in hotter climates.
- Keep feeding stations either within 3 feet of a window or more than 30 feet away. At 3 feet or closer, a bird that startles and hits the glass is moving too slowly to injure itself. Beyond 30 feet, birds have time to see the reflection and veer away.
- Minimize artificial lights near the sanctuary at night. Bright nighttime lighting disorients birds, particularly during migration, so use motion-activated lights if you need them.
Predator protection from the start
Mount every nest box on a smooth metal pole with a baffle, not on a tree or wooden fence post. A baffle is a cone or stovepipe-style guard that prevents raccoons, snakes, squirrels, and chipmunks from climbing up to raid the box. NestWatch data backs this up: nests in boxes equipped with predator guards succeed at a rate about 6.7% higher than unguarded boxes. That number sounds modest, but across a breeding season it translates to meaningfully more fledglings. A basic cone baffle costs a few dollars in materials or can be cut from a sheet of galvanized metal.
Airflow, drainage, and weather resilience
- Drill 4 to 6 small ventilation holes (about 1/4 inch diameter) near the top of each shelter's side walls so heat can escape in summer.
- Drill 4 drainage holes in the floor of every nest box so rain that blows in can drain out rather than soaking the nest.
- Slope the roof with at least a 1-inch overhang over the entrance hole to shed rain.
- Use exterior-grade, waterproof wood glue on all joints and seal exterior surfaces with raw linseed oil or a water-based outdoor sealant (never lead paint or creosote).
Planning your layout: shelters, nesting areas, feeders, and water
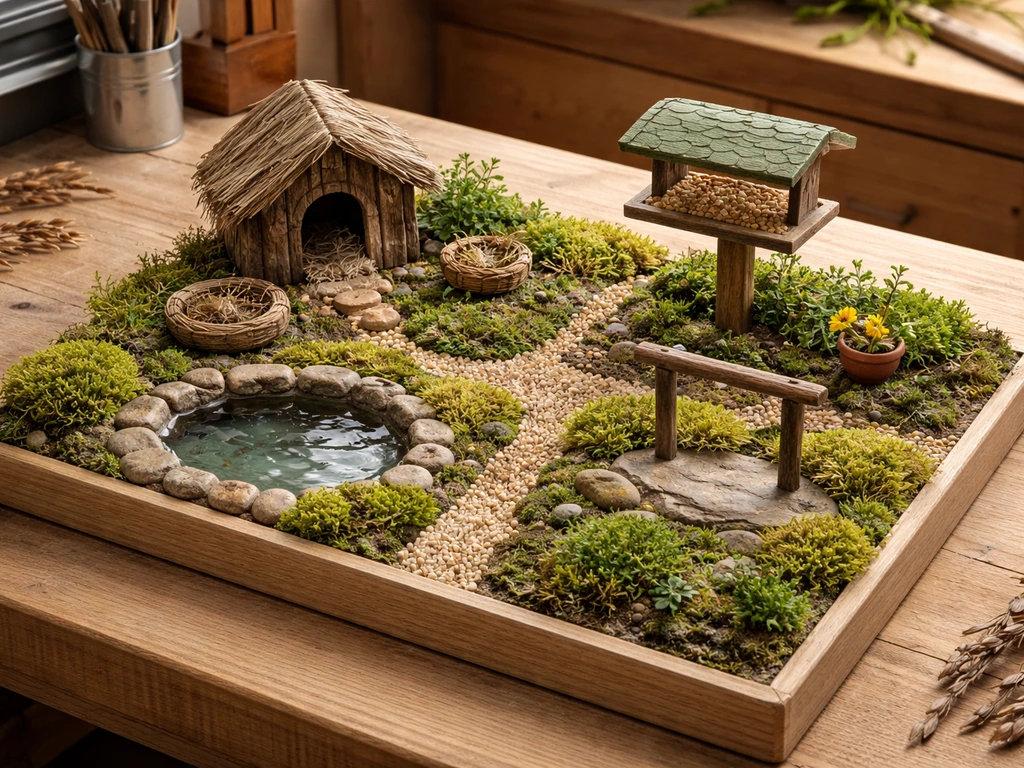
Think of your sanctuary as having four zones that work together. Sketch this on paper or build a quick display model first so you can see how everything fits before you start cutting wood.
- Shelter and roosting zone: Dense plantings, a roosting box, or a brush pile in a sheltered corner where birds can rest and hide from predators and weather.
- Nesting zone: One or two nest boxes mounted on baffled poles, spaced at least 25 feet apart (or farther for territorial species like bluebirds, which prefer 100-plus feet of spacing between boxes).
- Feeding zone: A seed feeder, a suet cage, and optionally a nyjer (thistle) tube feeder, grouped loosely but not so close together that they create crowding and disease risk.
- Water zone: A shallow birdbath or small pond feature positioned in open ground where birds can see approaching predators, ideally with a drip or mister to attract attention.
For a small suburban backyard, even a 15 by 20 foot area can include all four zones if you plan deliberately. Put the shelter zone at the back, the nesting boxes on the perimeter, the feeders in the middle ground where you can see them from a window, and the water feature slightly forward and in the open. If you are building a scaled display model, this same four-zone layout translates directly: use foam board sections for each zone and label them at scale.
Materials that work (and what to skip entirely)
Bird-safe materials to use
- Untreated cedar or pine: Naturally weather-resistant, no chemical off-gassing, easy to work with hand tools. Cedar is the top choice for longevity.
- Galvanized or stainless steel screws and hardware: Rust-resistant and structurally sound. Avoid standard zinc-plated screws outdoors; they corrode fast.
- Raw linseed oil: A safe, natural exterior finish for wood. Let it cure fully (48 hours minimum) before birds have access.
- Terracotta, ceramic, or heavy-duty plastic (food-safe): Good for water features and feeder dishes.
- Repurposed wooden pallets or crates: Check that they are marked HT (heat-treated), not MB (methyl bromide-treated). HT pallets are safe; MB pallets are not.
- Natural fiber rope (untreated jute or sisal): Safe for perch wrapping or hanging feeders.
- Recycled tin cans and glass jars: Can be used for simple feeder platforms if edges are smoothed and sealed.
Materials to avoid
- Pressure-treated lumber (older CCA-treated wood): Contains arsenic compounds toxic to birds. Modern ACQ-treated lumber is safer but still worth avoiding for interior nest box surfaces.
- Lead paint or any oil-based paint on interior surfaces: Toxic to nestlings and adults.
- Creosote-treated wood: Extremely toxic to birds.
- PVC pipe as a nest box: Holds heat dangerously in summer and is not breathable.
- Rough-cut metal with sharp edges: Cuts feet and bills; always file or sand metal edges smooth.
- Nylon or synthetic rope: Can entangle and trap birds. Use only natural fiber rope.
- Polystyrene foam (for functional sanctuaries): Breaks into beads that birds can ingest. Fine for display models only.
- Teak or treated plywood with urea-formaldehyde binders: Off-gasses chemicals harmful in enclosed nest box spaces.
Step-by-step: building your bird sanctuary
Here is how to actually put it together. I will walk through building one of each core component: a basic nest box, a simple platform feeder, and a birdbath station. These are the three structures that form the backbone of any functional sanctuary. If you are building a display model, follow the same steps but scale dimensions down by a factor of 10 and use balsa wood, foam board, and craft paint instead. For additional ideas beyond the nest box, platform feeder, and birdbath basics, see how to make a wild bird shelter as a related setup option.
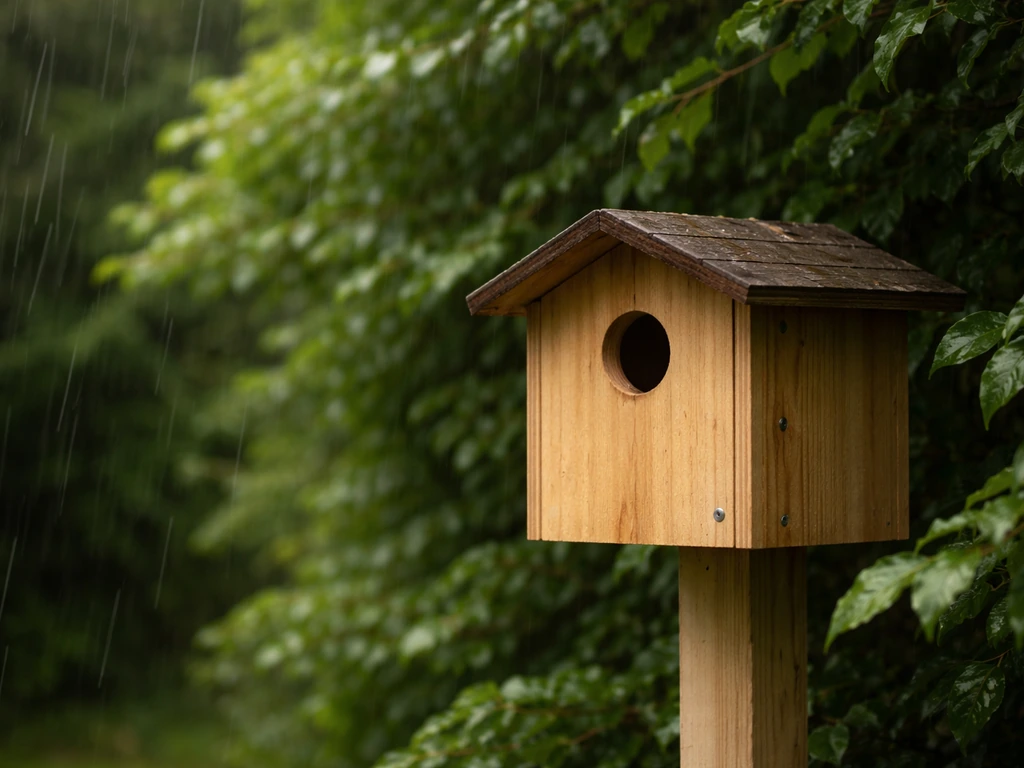
Step 1: Build a basic nest box
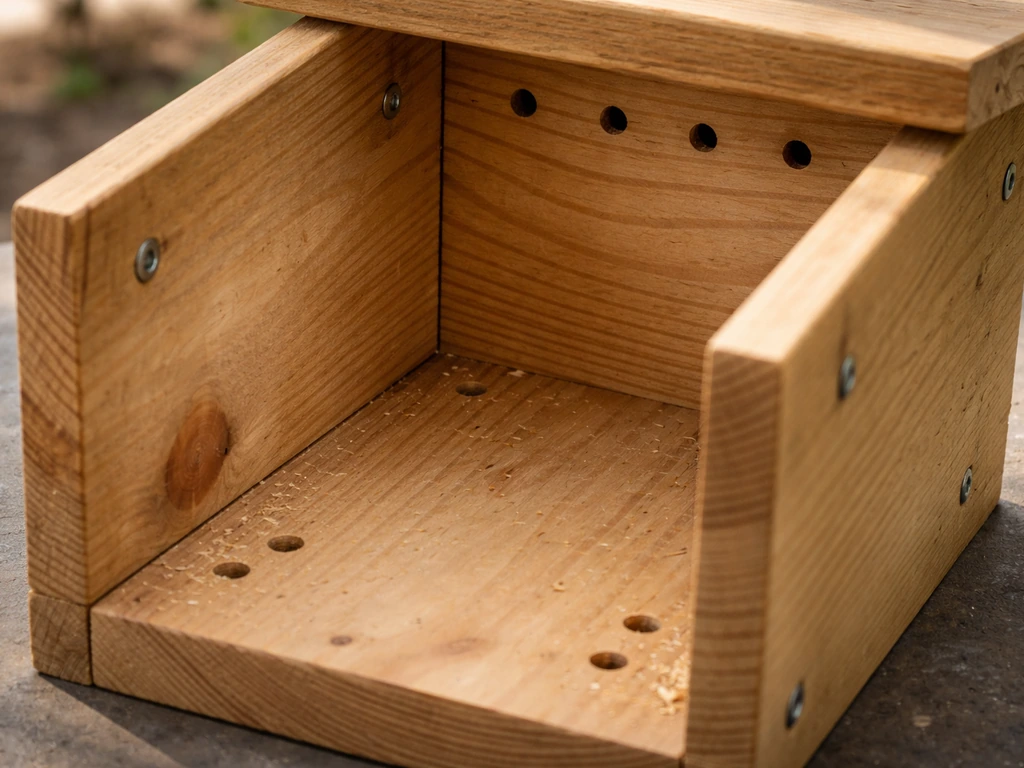
- Cut your pieces from 3/4-inch untreated cedar: a front panel (8 inches wide by 10 inches tall), a back panel (8 inches wide by 14 inches tall for mounting), two side panels (6 inches wide, with a sloped top cut from 9 inches tall on the front edge to 10.5 inches on the back), a floor (6 by 6 inches), and a sloped roof (8.5 by 9 inches).
- Drill the entrance hole in the front panel using a spade bit or hole saw. For chickadees and wrens, use 1-1/8 inches. For eastern bluebirds, use 1-1/2 inches. For tree swallows, also 1-1/2 inches. Entrance hole size is the single most important dimension; it controls which species can enter and helps exclude larger predatory birds.
- Drill 4 drainage holes in each corner of the floor piece and 3 to 4 ventilation holes near the top of each side panel.
- Assemble the box using galvanized screws (not nails, which work loose over time). Attach the floor to the sides first, then the front and back panels. Leave one side panel hinged or use a pivot screw at top and bottom so you can swing it open for cleaning.
- Attach the roof with a slight overhang at the front and sides. Do not add a perch below the entrance hole. Perches help predators and competing house sparrows access the box more easily.
- Mount on a smooth metal conduit pole (1/2-inch EMT conduit works well) at 5 to 6 feet off the ground for most cavity-nesting species. Install a cone baffle 4 feet up the pole, below the box.
Step 2: Build a simple platform feeder
- Cut a 12 by 14 inch floor from 3/4-inch cedar. This gives enough room for several birds without overcrowding.
- Add low rails around three sides using 1 by 1 inch strips, about 1 inch tall. Leave one or two sides open for easy cleaning and so seed husks can be swept off.
- Drill several 1/4-inch drainage holes across the floor so rain does not pool and spoil seed.
- Sand all edges smooth. Do not apply any finish to the interior feeding surface.
- Mount on a pole with a baffle, hang from a branch with galvanized S-hooks and natural fiber cord, or attach to a post at roughly 4 to 5 feet off the ground.
Step 3: Set up a birdbath station
- Choose a basin with a gradual slope from the edge to a maximum depth of about 2 to 3 inches at the center. Birds need to wade in, not drop into deep water. A wide terracotta saucer (14 to 18 inches diameter) works perfectly and costs almost nothing.
- Place it on a stable pedestal, a flat rock, or directly on the ground if you want ground-feeding species to use it. Elevate it slightly on a surface with clear sightlines so birds can watch for cats.
- Add a few flat stones to the center to create shallow wading spots and give birds something to grip.
- If you want to attract more species faster, add a solar-powered dripper or wiggler. Moving water catches bird attention far better than still water.
- Position the bath in partial shade to slow algae growth and keep water cooler in summer.
For the scaled display model
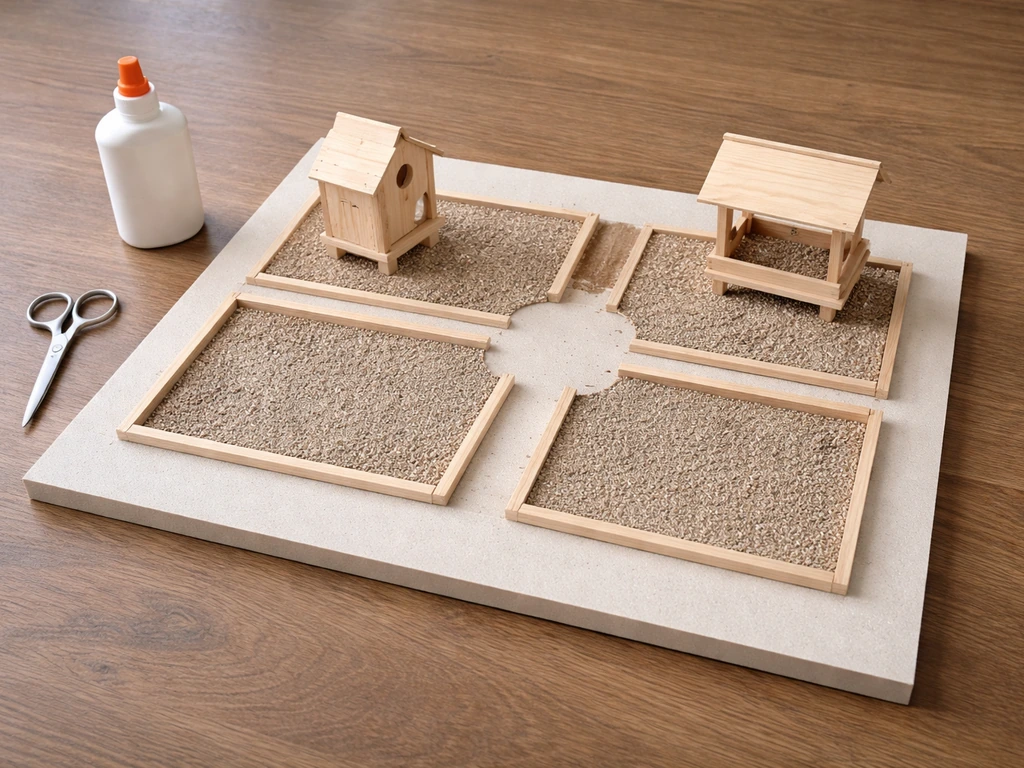
Build the same four-zone layout on a foam board base (about 18 by 24 inches works well for a tabletop display). Use balsa wood for the nest box and feeder structures, polymer clay or painted stones for the birdbath, fake moss or lichen for ground cover, and small twigs for perching branches. Paint with non-toxic craft acrylics. Label each zone with small flags or printed tags. This becomes a genuinely useful planning tool you can photograph and reference when building the real thing outdoors.
Enrichment, species awareness, and keeping it all maintained
Adding enrichment features
Enrichment means giving birds more reasons to stay and behave naturally, not just eat and leave. A brush pile in the corner of the yard gives wrens and sparrows cover to forage through. A log with drilled holes packed with suet or peanut butter attracts woodpeckers and nuthatches. Native plantings (coneflowers, sunflowers, native grasses) provide seeds, insects, and nesting material that no store-bought product can replicate. If you want to go a step further, a small pond or water garden takes your setup into genuinely habitat-level territory, and it works alongside everything described here.
Think about which birds you are actually inviting
Different species need different things, and designing without thinking about this leads to accidentally favoring invasive species like house sparrows and European starlings. These birds compete aggressively with native cavity nesters. A few things that help: use entrance hole sizes matched to target species (as noted in the nest box steps above), avoid open platform feeders filled only with millet (house sparrow favorites), and monitor boxes weekly during breeding season so you can respond to invasive species activity. Offer black-oil sunflower seed for a wide range of native species, nyjer seed for finches, and suet for woodpeckers and chickadees. This kind of species-aware feeding and nesting design is the difference between a bird sanctuary and just a bunch of boxes in the yard.
Maintenance routines that actually matter
A sanctuary you do not maintain becomes a disease vector, not a habitat. Here is the realistic schedule that keeps things safe and functional:
| Task | Frequency | Why it matters |
|---|---|---|
| Change birdbath water | Every 1 to 2 days | Prevents algae, mosquito larvae, and bacterial buildup that can sicken birds |
| Scrub the birdbath basin | Weekly | Removes biofilm and algae that daily water changes alone do not eliminate |
| Clean seed and suet feeders | Every 2 weeks minimum; more often in heat or humidity, or if sick birds appear | Moldy seed and contaminated surfaces spread avian disease rapidly |
| Fully disinfect feeders | Between seasons or after any disease outbreak | A 9:1 water-to-bleach solution, full scrub, and complete drying before refilling |
| Inspect nest boxes | Monthly during breeding season; after each storm | Check for damage, wasp nests, and invasive species activity |
| Clean out nest boxes | After breeding season ends and birds have left | Removes old nest material that harbors parasites and pests; makes the box ready for the next season |
| Check pole baffles and hardware | Each spring before breeding season | Corrosion, shifting soil, or animal damage can make baffles ineffective |
The nest box cleaning note is worth repeating: wait until birds have fully left before cleaning, then remove all old nesting material. This gives next season's occupants a clean, parasite-free start. Let feeders dry completely before refilling, every single time. Wet seed molds within 24 hours in warm weather, and moldy seed is genuinely dangerous for birds.
Seasonal adjustments
- Winter: Add a roosting box (a nest box with the entrance hole near the bottom to trap heat) and a heated birdbath element to keep water liquid in freezing temperatures.
- Spring: Clean and inspect all nest boxes before the first cavity nesters return, typically February to March depending on your region.
- Summer: Increase birdbath water change frequency in hot weather; check feeders for mold after every rain.
- Fall: Deep-clean all feeders and nest boxes, apply a fresh coat of raw linseed oil to any weathered wood, and consider adding a brush pile for overwintering cover.
Building a bird sanctuary model is genuinely one of the most rewarding DIY projects you can do in a backyard, both for what you build and for what it brings to you. Start with a single nest box and a birdbath if you are just getting going. The Washington Department of Fish & Wildlife recommends birdbath water that is shallow, typically about 1 to 3 inches at the deepest point, with edges that slope gradually so birds can wade in blank" rel="noopener noreferrer">shallow birdbath water (about 1 to 3 inches deep) with sloped edges. For the birdbath, Audubon recommends shaping the basin so birds can enter confidently with gradual depth or edge design instead of abrupt deep areas Start with a single nest box and a birdbath. Add a feeder and some native planting once you have those dialed in. Within a season or two you will have a working habitat that real birds return to year after year, and that is a lot more satisfying than anything you can buy flat-packed.
FAQ
Should I build the bird sanctuary model as a diorama first, or jump straight into the real backyard version?
If you want birds to use it, focus on the functional backyard setup (real shelters, real feeders, and clean water) rather than a diorama. A scaled display helps planning, but it will not provide warmth, nesting structure durability, or reliable food and water access in real conditions.
How do I choose the best location in my yard for each of the four zones?
Placement depends on predators, sun, and human access. Avoid mounting near easy climbing routes (fences, rough posts, or nearby branches) and keep feeders and water where you can observe them from a window. For nesting boxes, prioritize predator-guarded mounting over aesthetic symmetry.
Can I build one nest box design to attract multiple species?
Yes, but the design has to match the target species and their typical nesting behavior. Many nest boxes are not universal, so use appropriate entrance hole dimensions, box interior dimensions, and placement height rather than copying a “one size fits all” box from a model.
Are the materials and finishes used for a display model safe to use outdoors with real birds?
Do not just “paint and hang.” Ensure any nesting box surfaces are safe for birds (no fumes from fresh finishes), the box can drain and dry, and the entrance and mounting hardware do not create gaps predators can exploit. If you use craft paints on a model, treat it as a planning tool only.
What’s the easiest way to keep a birdbath station safe and attractive?
Birds rely on clean water, not just any container. Use a water bowl or bath that can be cleaned easily, keep it in a semi-open area so you can access it quickly, and refresh water regularly. In warm weather, evaporation and contamination happen fast, so plan for frequent topping off.
What should I do if birds do not visit my sanctuary after I set it up?
Start with fewer stations, then add based on what you observe. If birds are not visiting after setup, check three common issues: seed type suitability, water cleanliness, and whether feeders are positioned so birds can land and leave safely. Changing everything at once makes it hard to diagnose.
How often should I inspect nest boxes and feeders, and what should I look for?
A weekly inspection is especially important during breeding season. Watch for increased predator activity, aggressive non-native species, and signs of a failing nest attempt, then adjust access and remove obvious attractants for intruders.
Which feeder foods most often cause problems in a backyard bird sanctuary?
Avoid “mystery seed” mixes and be picky about seed types. Open platform feeders loaded primarily with millet can favor invasive house sparrows, while using black-oil sunflower for broad native appeal, nyjer for finches, and suet for insect and cavity-associated species helps match feeding preferences.
Is adding a small pond or water garden worth it, and what maintenance should I expect?
Yes, but only if you are willing to maintain it. A pond can increase habitat value, yet stagnant water can become a health risk if you do not keep it clean. Plan for ongoing cleaning and water management, not a one-time setup.
How do I prevent moldy seed and keep feeders hygienic?
The biggest common mistake is letting seed get wet or stale. Dry completely before refilling, because wet seed can mold quickly in warm weather. Also, empty and clean beneath feeders if you see clumping seed or dark, sour-smelling material.
Next Articles

How to Build a Chimney Swift Bird House DIY Guide
Step-by-step DIY plans to build a chimney swift bird house, with correct dimensions, placement, and weatherproofing for

How to Build an Oriole Bird House: Step-by-Step DIY
Step-by-step DIY for building an oriole bird house with right dimensions, weatherproofing, predator-safe placement, and

How to Build a Chickadee Bird House Step by Step
Step-by-step DIY chickadee bird house with cut list, chickadee entry sizing, ventilation, drainage, and mounting tips.