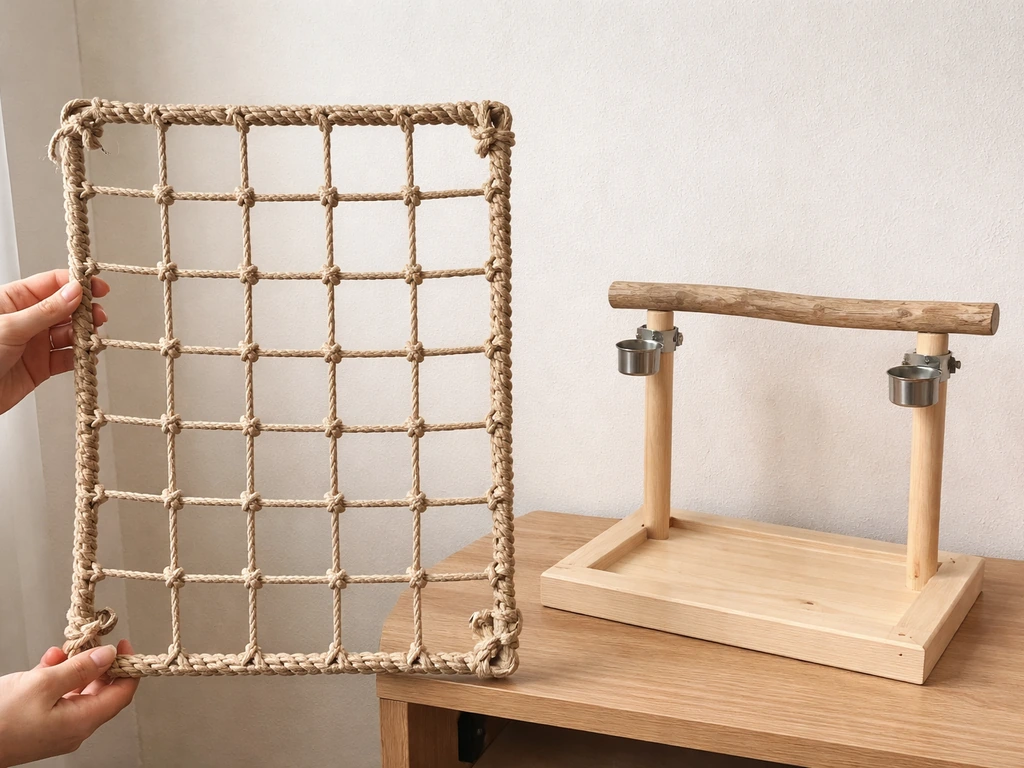
You can build a safe bird climbing net using natural-fiber rope (untreated Manila, sisal, or cotton), a simple frame or set of eye hooks, and basic knotting skills. The whole project takes a few hours, costs very little, and gives your birds something genuinely engaging to climb, hang from, and explore. The most important things to get right are material choice, mesh spacing for your specific bird, and making sure every knot and connection point is locked down so nothing can snag a toe or wrap around a neck.
How to Make a Bird Climbing Net Step by Step DIY

Marcus Thornton
18 May 2026
What a bird climbing net is and where you'd use one
A bird climbing net is essentially a cargo-net-style grid of rope or cord stretched across a frame, between posts, or hung from wall/ceiling anchors so birds can grip, climb, and forage across the surface. It works as enrichment inside a large cage or aviary, as a divider panel between sections of an outdoor flight pen, or as a free-hanging feature in a dedicated bird room. The design is flexible: you can build a rigid-framed version that mounts flat against a wall, or a softer tensioned version that hangs slightly loose and sways a little when birds use it.
Indoors, these nets are most popular for parrots and parakeets that need more physical stimulation than a static perch provides. Outdoors, the same basic structure pulls double duty as a climbing enrichment feature and a visual barrier inside an aviary. If you are already building branch perches or a bird ladder for your setup, a climbing net is a natural companion piece that fills vertical space those other elements do not.
Picking safe materials
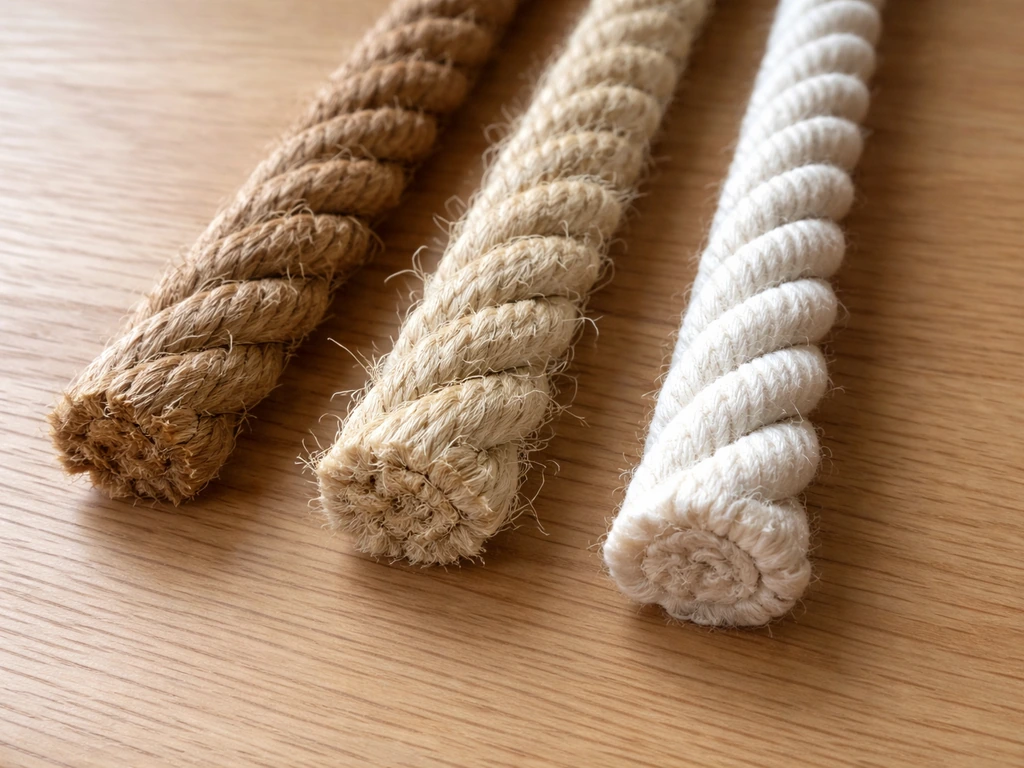
This is where most DIY builds either succeed or fail, so spend real time here. The rope birds touch must be a natural, untreated fiber. The two best options are untreated Manila rope and natural sisal. Cotton rope works too and is softer underfoot, though it frays faster than Manila or sisal. What you absolutely want to avoid is synthetic fiber rope: nylon, polypropylene, and similar materials break down into small filaments that birds chew off and ingest, and they tend to fray into long loose strands that can wrap around toes and legs. Avian vets routinely flag synthetic rope as a hazard for exactly this reason.
For the rope diameter, match it to your bird's foot. A budgie or cockatiel grips comfortably around 6 mm (about 1/4 inch) rope. Larger parrots like African greys or amazons do well with 10 to 12 mm. Macaws can handle 16 mm and thicker. Thinner than these ranges and a bird's toe can slip through a loop; thicker and small birds struggle to grip.
For the frame, the simplest option is a wooden dowel or branch border. Use untreated hardwood: maple, oak, or birch are all good. Avoid pine, cedar, and pressure-treated lumber anywhere near birds. If you want a more permanent or weather-resistant frame for an outdoor aviary, 19 mm (3/4 inch) galvanized or stainless-steel conduit works well and lasts years. PVC pipe is structurally fine for light indoor use but tends to get chewed and is not ideal for long-term outdoor builds.
For hardware, you will need eye hooks or eye bolts to anchor the net to a structure. Go with stainless steel wherever possible. Avoid zinc-plated or galvanized hardware where birds will directly contact or chew it. Skip split rings, dog-clip style fasteners, and anything with a gap a beak can get wedged into. For a tensioned outdoor version, stainless steel wire rope clamps and a turnbuckle give you clean, adjustable tension without complicated rigging.
Sizing, mesh spacing, and layout for your bird
Mesh spacing is probably the most critical dimension in the whole build. Get it wrong and you either have a net birds cannot climb effectively or, worse, one where a foot or head can slip through and get trapped. Here is a simple rule: the mesh opening should be large enough for a bird to grip comfortably with its toes spread, but small enough that its head cannot pass through. For budgies and cockatiels, target mesh openings of about 25 to 30 mm (roughly 1 inch square). For mid-size parrots (conures, caiques, African greys), 40 to 50 mm (1.5 to 2 inches) works well. For large parrots and macaws, you can go up to 75 mm (3 inches) safely.
| Bird Type | Recommended Mesh Opening | Recommended Rope Diameter |
|---|---|---|
| Budgies / Parakeets | 25 mm (1 in) | 6 mm (1/4 in) |
| Cockatiels / Lovebirds | 25–30 mm (1–1.25 in) | 6–8 mm (1/4–5/16 in) |
| Conures / Caiques | 40–50 mm (1.5–2 in) | 8–10 mm (5/16–3/8 in) |
| African Greys / Amazons | 50–60 mm (2–2.5 in) | 10–12 mm (3/8–1/2 in) |
| Macaws / Large Cockatoos | 65–75 mm (2.5–3 in) | 14–16 mm (9/16–5/8 in) |
For overall net dimensions, a good indoor panel for a single bird runs about 45 cm x 60 cm (18 x 24 inches). For an aviary feature, 60 cm x 90 cm (24 x 36 inches) is a more useful size that lets multiple birds use it at the same time. Plan your rope lengths before you cut anything: each strand needs to span the full frame width or height plus about 15 cm (6 inches) extra on each end for knotting and tensioning.
Tools and supplies checklist
- Natural-fiber rope (untreated Manila, sisal, or cotton) in the diameter appropriate for your bird
- Tape measure and a permanent marker
- Sharp scissors or a rope-cutting knife (a hot knife or lighter tip works best for Manila to seal cut ends)
- Wooden frame pieces or metal conduit cut to your desired panel size
- 4 to 8 stainless steel eye hooks (size depends on frame material and net weight)
- Stainless steel wire or zip ties in a bird-safe material (for lashing rope to the frame border)
- Turnbuckles and wire rope clamps if building a tensioned outdoor version
- Sandpaper (120-grit) for smoothing any rough wood frame edges
- A drill with a bit sized for your eye hooks
- A ruler or straight-edge for marking consistent knot spacing
- Pliers for tightening eye hooks and wire clamps
- Optional: a net-making shuttle or card bobbin to manage long rope lengths while knotting
Building the net: frame first, then the knotting
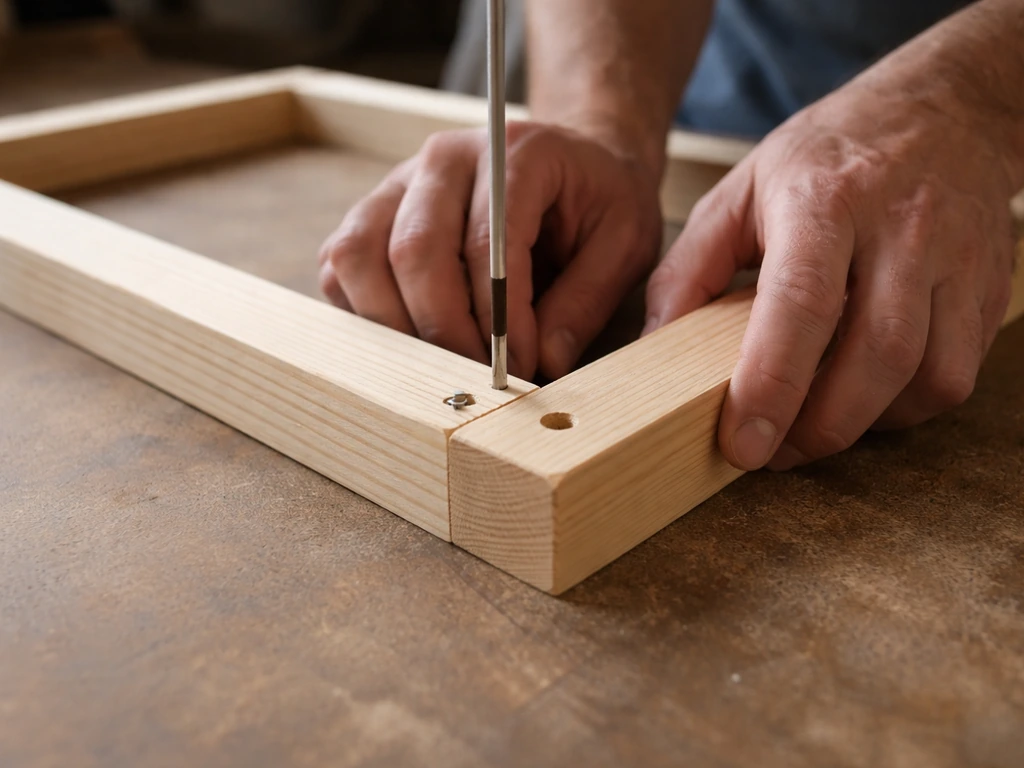
Step 1: Build or prep the frame
If you are using a wooden frame, cut your four border pieces to size and sand every edge and corner smooth. Drill pilot holes at each corner and screw the frame together with exterior-grade wood screws. Then drill a small pilot hole every 50 mm (2 inches) along the inside face of all four frame pieces. These holes are where the border rope strands will attach. If you are using conduit, cut it to length, deburr all cut ends thoroughly, and connect the corners with 90-degree elbow fittings.
Step 2: Attach the warp strands (vertical lines)
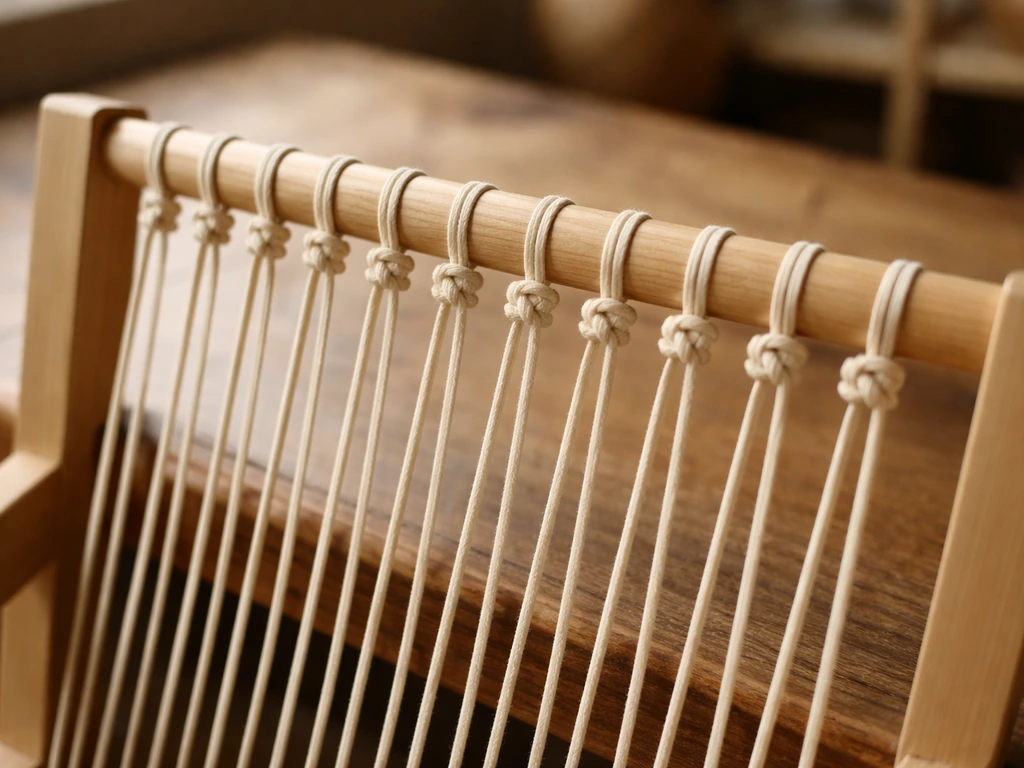
Cut your vertical rope strands first. Each one should be the full height of the frame interior plus 30 cm (12 inches) for knotting top and bottom. Tie a fixed loop (a figure-eight loop knot works perfectly) at one end of each strand and hook it onto the top frame border at your pre-drilled spacing marks. Pull each strand taut to the bottom border and tie it off with another fixed loop or a lark's head knot. You want light tension here, not super tight, because the horizontal strands will add tension when you weave them in.
Step 3: Weave and knot the weft strands (horizontal lines)
Cut your horizontal strands the same way: frame width plus 30 cm extra. Starting from the top, pass the first horizontal strand across all vertical strands. At every intersection, tie a square knot (right over left, left over right) around both strands. Pull each knot firmly so it does not slide. Work your way down the net, row by row, keeping your mesh spacing consistent by measuring every two or three rows. When you reach the bottom, tie off each horizontal strand to the side frame border. This is the slow part of the build, but take your time. Loose or inconsistent knots are the number-one cause of sagging and entanglement risk.
Step 4: Secure all loose ends
Every cut rope end needs to be sealed and tucked. For Manila and sisal, briefly pass the cut end through a flame to fuse the fibers and prevent fraying, then fold the end back on itself and wrap it tightly with a few half-hitches of the same rope, or a small strip of natural cotton twine. Do not leave any tails longer than about 1.5 cm (half an inch) hanging free. Long loose fibers are exactly what can catch a toe or, in a worst case, wrap around a bird's neck.
Step 5: Mount the eye hooks and hang the panel
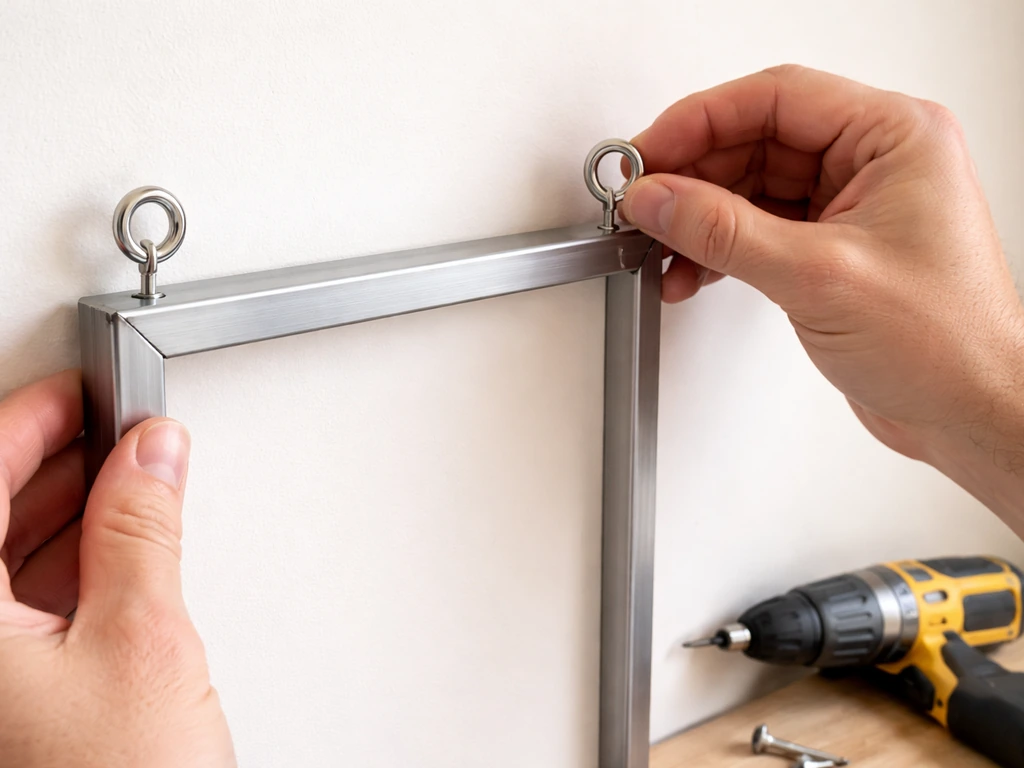
Screw a stainless steel eye hook into each corner of the frame (or into each corner of your mounting surface if the net hangs freely). For a wall or aviary mount, use M-6 or larger eye bolts with a washer and nut on the back side so they cannot pull out under load. Clip the net frame to the eye hooks using stainless steel S-hooks or short lengths of the same natural rope. For a tensioned version across a wider span (say, more than 60 cm / 24 inches), add a turnbuckle on one or two sides so you can dial in the tension after hanging.
Safety checks before you let a bird near it
Before the net sees a single bird, run through this check every time you build or reassemble one. I made the mistake of skipping this step on my first build and found a loose knot the hard way when one of my conures got a toe wedged in it within the first hour.
- Pull every knot firmly by hand. If it slides even slightly, retie it with a locking variation like a double square knot.
- Check every mesh opening with your fingers. If your own finger can pass through easily, your bird's head probably can too. For small birds especially, err on the tighter side.
- Run your hand across the entire frame. There should be zero sharp edges, splinters, or exposed screw tips. Sand or file anything rough.
- Inspect all eye hooks and hardware. Every screw should be fully seated, with no gap between the hook and the wood or wall. A hook that can spin or wobble is a snagging hazard.
- Check for any rope length that could loop. No single strand or tail should be long enough to wrap around your bird's neck. A budgie's neck is roughly 5 to 6 cm in circumference, a cockatiel around 8 cm. Keep all free tails shorter than those measurements.
- Give the whole panel a firm shake. The frame should not rattle or flex significantly, and no knots should loosen under light stress.
- Inspect for any lead-containing hardware or painted components. Avoid anything with a flaking painted or coated finish near birds.
Installing it, finishing touches, and keeping it clean
Mount the finished panel at a height your bird can reach from a familiar perch but high enough that it has room to climb upward without hitting the cage ceiling immediately. For aviary use, a diagonal or angled installation tends to get more use than a perfectly vertical one because it gives birds a resting surface as well as a climbing challenge.
For outdoor installations, position the net so it gets some sun exposure to dry out after rain, and avoid spots where standing water will collect on the rope. You can also apply the same approach to a bird shower perch by using safe, grip-friendly materials and placing it so water can drain instead of pooling. Wet rope rots faster and becomes a mold risk. If you live somewhere with harsh UV exposure, natural Manila will fade and weaken after about 12 to 18 months of full sun. Building a replacement panel every season is easier than trying to repair a deteriorated one in place.
Cleaning is straightforward: take the panel down monthly for a scrub with warm water and a small amount of unscented dish soap. Rinse very thoroughly because soap residue is an irritant. Let it dry completely in open air before rehinging. Never use bleach, pine-based cleaners, or any essential-oil sprays near the net. For spot cleaning between full washes, a damp cloth wipe-down works fine for droppings on the rope surface.
Troubleshooting and design variations
Common problems and fixes
Sagging is the most common issue after a few weeks of use. It usually means the border rope attachment points are not tight enough, or the frame itself has flexed. Tighten turnbuckles if you have them, or add a midpoint support rope across the center of the panel. If multiple knots in the same section are loosening, that part of the net has been over-chewed and should be replaced rather than re-knotted repeatedly.
Fraying at knot points is normal wear, but heavy fraying means replacement time. If a section has three or more frayed or broken intersections within a 15 cm square area, cut that section out entirely and patch in fresh rope, or replace the full panel. Trying to patch small sections of a heavily worn net is rarely worth the effort and creates uneven tension that makes the rest of the structure less reliable.
Uneven tension across the panel usually comes from inconsistent knot tightness during the build. The fix for a finished net is to add a few bridging ties at the loose areas using short lengths of the same rope, pulling slack toward the nearest anchor point. Going forward, measuring and checking knot spacing every three rows during the build prevents this almost entirely.
Design variations for different birds and spaces
For small birds like budgies and parakeets, consider building two smaller panels (roughly 30 x 30 cm each) instead of one large one. Smaller panels sway less, which reduces the risk of a small bird getting a foot caught in a shifting mesh. These work great hung from the cage ceiling at an angle, like a hammock with grip texture.
For large parrots that chew aggressively, switch from knotted rope to a welded stainless steel mesh panel with the same mesh spacing guidelines. It is not as tactile or naturalistic, but it lasts years without the replacement cycle. You can add short rope tassels or foraging pockets to the mesh to give it texture and interest without introducing long fiber hazards.
For outdoor aviaries, a tensioned cable-and-net system (using corner eye bolts, turnbuckles, and a pre-made polypropylene bird net with appropriately sized mesh) is often more practical than a hand-knotted rope panel for spanning large distances. In that context, the polypropylene is okay because birds are not directly mouthing or chewing the structure the way they do with an enrichment net inside a cage. Keep the mesh spacing appropriate for your bird size: around 20 mm for small finches and canaries, up to 50 mm for larger parrots in a flight pen.
If you have already built branch perches or a bird ladder for your aviary, a climbing net panels very well alongside those structures: position the net between two perch anchor points so birds can transition from a branch to the net and back again. If you are also planning branch perches, you can combine this climbing-net approach with a branch-perch project (how to make bird perches out of branches) so the transitions feel natural and safe. If you want perches to match the same climbing feel, you can also use the same untreated rope and safe spacing ideas to make manzanita bird perches for your aviary branch perches. That kind of connected enrichment layout makes the whole space feel active and inviting rather than just a collection of isolated elements.
Your first net will not be perfect. Mine had three knots that needed retying after the first week, and the frame was slightly too wide for the cage door, which meant ten minutes of creative angling to get it in. Build one, hang it, watch how your birds actually use it, and adjust the next version. The materials are cheap, the skills transfer directly to other rope projects, and watching a bird that usually just sits on a perch suddenly start exploring vertically makes the whole afternoon of knotting completely worth it.
FAQ
Can I reuse a bird climbing net after my bird outgrows it or after it’s been used elsewhere?
Yes, but only if you can keep the net from being chewed or damaged. Choose a fresh, untreated rope from the start, run a thorough inspection for broken intersections, and replace any section that develops multiple frayed or loose knots in the same small area. If the bird is a strong chewer, consider swapping the rope panel for a welded stainless mesh with the same mesh spacing and add small foraging elements that do not rely on loose fibers.
How do I prevent knots and rope ends from catching toes or wrapping around a leg?
For safety, aim to remove all contact with sharp or rough surfaces. When you cut rope ends and create loops, ensure there are no long tails beyond about 1.5 cm (half an inch). Also sand and round any frame edges, and check that knots sit flat at the intersections so a toe cannot catch on a raised knot ridge.
What’s the best way to test tension before letting birds use the net?
After assembly, check that you cannot shift a strand by hand more than a small amount. If the net noticeably sags or “shifts” when you gently push it, it usually means the border attachments or a row of intersection knots is not locked. Retighten or rebuild only the affected section where tension is uneven, because repeatedly retying the same worn nodes can leave slack pockets.
My net is starting to fray, when should I patch vs replace the whole panel?
If you see fraying only at a few intersections, sealed ends or knot burnishing usually is not enough. As a rule, if there are three or more frayed or broken intersections within about a 15 cm square area, cut that section out and patch with fresh rope, or replace the full panel if damage is widespread. Patching can create uneven tension, which can increase the risk of toe catching.
What should I check first if a bird seems like it’s getting a foot caught in the net?
If a bird is getting a toe stuck, the most common causes are mesh openings that are too large for that species, loose intersection knots that allow gaps to widen, or sagging that changes the way the grid flexes. Confirm your rope diameter and your mesh spacing for the bird size, and fix sagging by tightening anchors or adding a midpoint support so the net stays under controlled tension.
Will the rope stretch or shrink after washing or rain, and how do I manage that?
Natural materials can shrink and loosen slightly after wetting and drying cycles. For outdoor and shower-adjacent setups, use a sun-and-drain location (avoid standing water), and expect periodic re-tensioning of the border attachments. Indoors, monthly wash and full dry helps prevent stiffness changes that can also cause slack in knots.
How should I choose the mounting height and placement so birds don’t hit the ceiling or bars?
Yes, you can add a perimeter safety behavior by keeping the net away from hard structures where a bird could jam a toe or head. In practice, leave clearance from cage ceilings and adjacent bars, and avoid mounting so low that the net top edge becomes a “trap” when the bird climbs up. Angled installs also reduce direct impacts compared with a fully vertical mount.
How long will a natural rope climbing net last outdoors, especially in strong sun?
If the net is in an area with harsh UV, natural Manila typically weakens after about 12 to 18 months of full sun. Plan for seasonal replacement rather than attempting repeated repairs in place, and consider using a weather-resistant frame and better drying flow after rain so the rope does not spend long periods wet.
What cleaning products are safe, and what cleaning routine works best?
Limit chemical exposure. Avoid bleach, pine-based cleaners, and essential-oil sprays near the net, and do not soak the rope for long periods. For routine care, use warm water with a small amount of unscented dish soap, rinse very thoroughly to remove residue, then dry completely before rehanging.
Can I use one large net for multiple birds, or is a modular approach safer?
For multiple birds, the main risk is crowding and increased chewing on the same sections. Increase overall net size only if you can keep consistent mesh spacing and maintain controlled tension at all anchors. In many homes, two smaller panels (or a modular layout) reduces localized stress and makes replacement easier if one section is damaged.
Citations
A common DIY-style design in bird enrichment is a “cargo net”-shaped climbing net mounted in an aviary (or hanging from ceiling/walls), and this specific product uses all-natural untreated Manila rope plus hardware including eye hooks.
https://parrotwizard.com/Climbing_Net/
This climbing net design explicitly lists components: all-natural untreated Manila rope and “4x Eye Hooks,” showing a typical mounting approach via eye hooks into an attachment structure.
https://parrotwizard.com/Climbing_Net/
Mesh netting sold as bird netting commonly specifies a square mesh size; for example, PollyNet lists mesh size of approximately 0.79 in x 0.79 in (about 20 mm x 20 mm), illustrating how DIY builders can choose openings by measured mesh size.
https://www.nixalite.com/product/pollynet-lightweight-bird-netting
Outdoor aviary netting mesh guidance (to prevent birds escaping) often varies by bird category; one source lists recommended mesh sizes like 1/2 inch (~12 mm) for budgies/cockatiels and ~3/4 inch (18–20 mm) or larger for parrots/macaws.
https://www.critternets.com/Blog/-outdoor-aviary-nets-what-to-look-for
Bird-toy safety checklists commonly state “No loose or sharp metal parts” and warn against “no long strings, ropes, or threads that can entangle feet or neck,” which directly applies to building a bird climbing net with secure terminations and no hanging fibers.
https://messybeaks.com/pages/bird-toy-safety-checklist
VCA advises avoiding easily dismantled toys and “toys with metal clips…,” and also notes avoiding “lead weights,” which generalizes to: avoid detachable/chewable hazardous hardware and avoid lead-containing components.
https://vcahospitals.com/foster/know-your-pet/toys-for-birds
Lafeber’s rope-toy guidance includes a key safety rule: the rope length should not be long enough to wrap around the bird’s neck.
https://lafeber.com/pet-birds/questions/rope-toys/
Lafeber’s client education on toy safety says to “always use a natural fiber” and notes that plastic/synthetic fibers can do harm if ingested or if they wrap around toes/limbs.
https://lafeber.com/vet/wp-content/uploads/Toy_Safety.pdf
Omlet’s budgie safety guidance warns rope may be a hazard for budgies and recommends the best approach is to check rope condition and remove any long loose fibres; it also advises ensuring nothing can become wedged or locked.
https://www.omlet.co.uk/guide/budgies/toys_for_budgies/unsafe_toys
VCA notes that fraying is a particular problem with synthetic fiber rope (and nesting materials), and says avian veterinarians do not recommend these types of rope perches—supporting the avoidance of fray-prone synthetic rope in climbing nets.
https://vcahospitals.com/know-your-pet/perches-for-birds
This product states the climbing net is made from “all natural untreated Manila rope,” providing a concrete example of a natural-fiber rope choice used for a bird climbing net.
https://parrotwizard.com/Climbing_Net/
A typical tensioned-net approach uses a cable tightened with hardware such as corner/turnbuckle eyelets; Nixalite’s guide describes steps like using a thimble onto an eyelet and using wire rope clamps to secure cable ends—useful as an analogue for tensioning a bird net safely.
https://www.nixalite.com/Tensioned-Cable-Hardware-Install
Nixalite’s tensioned cable installation procedure includes explicit components: “corner hardware and turnbuckle eyelets,” plus wire rope clamps for securing net cable after installation.
https://www.nixalite.com/Tensioned-Cable-Hardware-Install
The same safety checklist emphasizes inspection and maintenance; it flags entanglement/strangulation hazards and recommends keeping toys free of loose fibers and sharp parts.
https://messybeaks.com/pages/bird-toy-safety-checklist
Best Friends recommends avoiding toys with twisted/tangled hazards and avoiding attachments like split rings or dog-clip type fasteners that birds can get beaks stuck in—relevant to net-edge/attachment hardware selection.
https://bestfriends.org/node/546883
CPSC’s toy safety guidance references lead limits (e.g., products intended for children 12 and under must not bear paint/coatings with more than 0.009% lead), supporting the broader lead-avoidance principle when selecting coatings/paints on components near birds.
https://www.cpsc.gov/FAQ/Toy-Safety
The “Safety First – Bird Toy Tips” PDF identifies entanglement/strangulation hazards as a major risk category and recommends supervising and assessing toy safety with proper sizing.
https://gccbc.org/interface/links/birdtoys_Safety%20First.pdf
Bonka identifies key rope-toy risks: loose strands, heavy fraying, swallowed fibers, trapped toes, and birds over-chewing rope; it also stresses rope toys are not “set it and forget it” and should be monitored/removed before wear becomes unsafe.
https://bonkabirdtoys.com/blogs/default-blog/are-rope-toys-safe-for-birds-what-you-need-to-know
Omlet warns that rope can be a hazard for parakeets (compared with some stonger rope use cases in larger parrots), highlighting that mesh/rope-net designs must be sized and selected per bird species.
https://www.omlet.us/guide/parakeets/toys_for_parakeets/unsafe_toys
EnduraNet small bird netting specifies a mesh size of 0.6 in (15 mm) square mesh and is designed for keeping out small pest birds—useful as a measured reference for what “small-appropriate” mesh sizes look like in real products.
https://www.nixalite.com/product/enduranet-small-bird-netting
Bird B Gone’s bird-net installation instructions recommend specific anchoring/tensioning practices such as using eye bolts (e.g., an M-6 eye bolt for long runs over 30’), providing a reference model for secure mounting and managing slack/sag.
https://www.birdbgone.com/media/PDFs/Bird-net-Installation-Instructions-2016.pdf
A climbing-cargo-net safety guide lists common construction hardware and approach: heavy-duty eye bolts plus turnbuckles (or tensioners) for fine-tuning net tautness.
https://engineerfix.com/how-to-hang-a-climbing-cargo-net-safely/
Messy Beaks’ bird-toy safety checklist includes a specific inspection/maintenance focus (ensuring no loose/sharp metal parts and reducing entanglement risks), which maps to periodic net inspection for frayed rope and loose knots/fasteners.
https://messybeaks.com/pages/bird-toy-safety-checklist
A net maintenance guidance article states that patching may be limited and that full replacement is more effective if a section has multiple holes, sagging, or broken mesh; it also calls out inspecting connection points and replacing rusted/stretched items.
https://www.elitebirdmanagement.com/bird-net-maintenance-tips-to-keep-it-effective-year-round/
A parrot toy safety PDF advises using a natural fiber rope with short fiber and specifically mentions untreated sisal or cotton as the natural-fiber options, aligning with bird-safe material selection for climbing nets.
https://peac.org/wp-content/uploads/2022/12/Parrot-Toys-Toy-Safety.pdf
VCA recommends replacing perches that are chewed up and splintered to prevent injury—analogous best practice for replacing or repairing a climbing-net frame if wooden parts splinter.
https://vcahospitals.com/know-your-pet/perches-for-birds
This DIY-style climbing-net product specifies natural fiber construction (untreated Manila rope), reinforcing that bird enrichment nets often use natural rope rather than coated/synthetic fibers in the parts birds contact.
https://parrotwizard.com/Climbing_Net/
Next Articles
How to Build a Chimney Swift Bird House DIY Guide
Step-by-step DIY plans to build a chimney swift bird house, with correct dimensions, placement, and weatherproofing for
How to Build an Oriole Bird House: Step-by-Step DIY
Step-by-step DIY for building an oriole bird house with right dimensions, weatherproofing, predator-safe placement, and

How to Build a Chickadee Bird House Step by Step
Step-by-step DIY chickadee bird house with cut list, chickadee entry sizing, ventilation, drainage, and mounting tips.