You can make a working wooden bird call today with a small piece of hardwood, a thin reed cut from a coffee stirrer or brass shim, and basic hand tools. The most beginner-friendly style is a single-reed call: a short wooden barrel with a mouthpiece at one end that directs air over a flexible reed tongue. Wikipedia’s “Reed (mouthpiece)” describes single-reed instruments as those where a blank" rel="noopener noreferrer">vibrating reed tongue against a mouthpiece produces sound, and it discusses reed materials such as cane in the general reed-instrument mechanism context. When air flows past the reed it vibrates, interrupting airflow into the resonating chamber and producing a bird-like sound. Nail the reed fit and geometry and you'll have something that genuinely works on your first build.
How to Make a Bird Call Out of Wood Step by Step

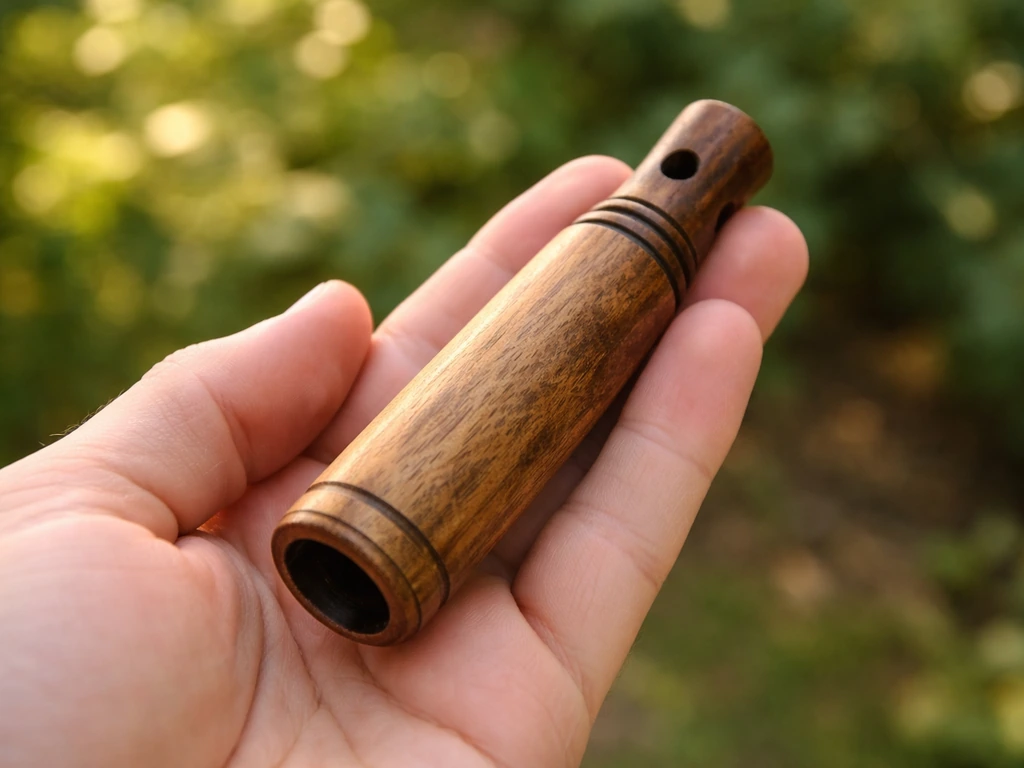
What a wooden bird call actually is (and which style to build first)
A wooden bird call is a hand-held acoustic tool that mimics or suggests a bird's sound so you can attract birds to your yard or get a closer look at a species already nearby. It is not an electronic device or a speaker: it is purely mechanical, producing sound through controlled airflow and vibration the same way a whistle or a reed pipe does. That simplicity is exactly what makes it buildable at home.
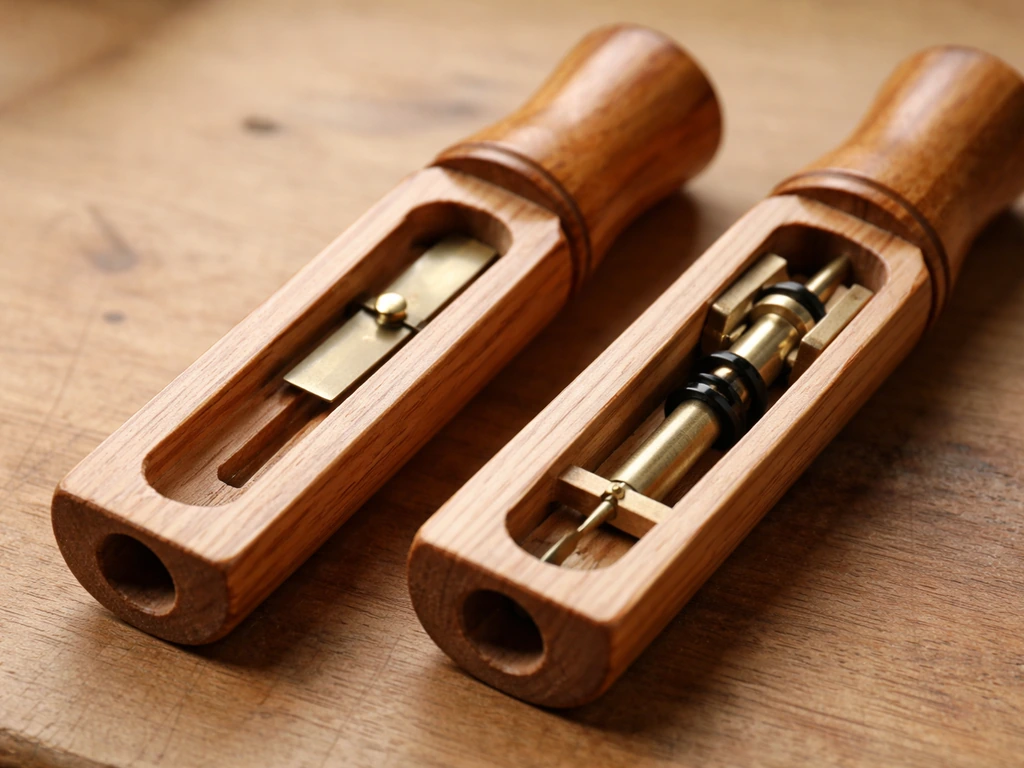
There are two broad styles worth knowing about. The first is a slot whistle, where a shaped air channel directs a thin blade of air against a sharp edge, causing oscillation (think of blowing across the top of a bottle). The second, and the one I recommend starting with, is a single-reed call. Here a thin flexible reed sits against a flat tone board inside the barrel. Air blown through the mouthpiece sets the reed vibrating at a specific pitch tied directly to the reed's length and stiffness. You can tune it later by trimming the reed or sanding the tone board, which makes it forgiving for beginners.
For attracting backyard birds, a reed call tuned to a high, light chirp works well for songbirds, while a lower-pitched reed call mimics larger birds like crows or ducks. If you are interested in going further with whistle-style calls, a wooden bird whistle is a closely related project that explores that slot-tone approach in more depth. For now, the single-reed barrel call is the fastest path to a usable result. If you are instead looking for how to make a bird launcher, the same basic principles of airflow control and tuning can help you design a more effective setup single-reed barrel call.
Materials and tools you'll need
The list is short. Most of it is probably already in your workshop or craft drawer.
- One hardwood blank roughly 4 to 5 inches long and 1 to 1.5 inches in diameter (dowel, small branch blank, or turning square — more on species below)
- A thin, flexible reed material: brass shim stock (0.005–0.010 inch thick) is ideal; a flattened wooden coffee stirrer slit down the middle works fine for a first prototype
- A drill press or handheld drill with bits in the 3/8 inch to 1/2 inch range for the main bore
- A smaller bit, around 3/16 inch, for the mouthpiece air channel
- A sharp craft knife or chisel for shaping the tone board flat
- Sandpaper in 120 and 220 grit
- Food-safe finish: pure beeswax, mineral oil, or a wiping coat of dewaxed shellac
- Calipers or a ruler for measuring reed length (small changes matter a lot)
- Optional: a small hand lathe or carving knife if you want to round and taper the barrel
Safe finishing options explained
Because this call will touch your lips and could end up near birds, finishing material matters. Avoid varnishes, polyurethane, and any solvent-heavy lacquer on the interior or mouthpiece. Pure beeswax is about as natural as it gets and seals the wood lightly without any toxic residue once dry. Mineral oil is another good choice and is extremely easy to apply. Dewaxed shellac (the kind sold as flakes dissolved in alcohol, not the pre-mixed hardware-store version with wax in it) is food-safe once fully cured and adds a bit more durability. A thin wiping coat on the exterior barrel is fine; just keep finish out of the reed chamber and bore where it can clog the mechanism or change the tuned dimensions.
Choosing wood and design specs for a good tone
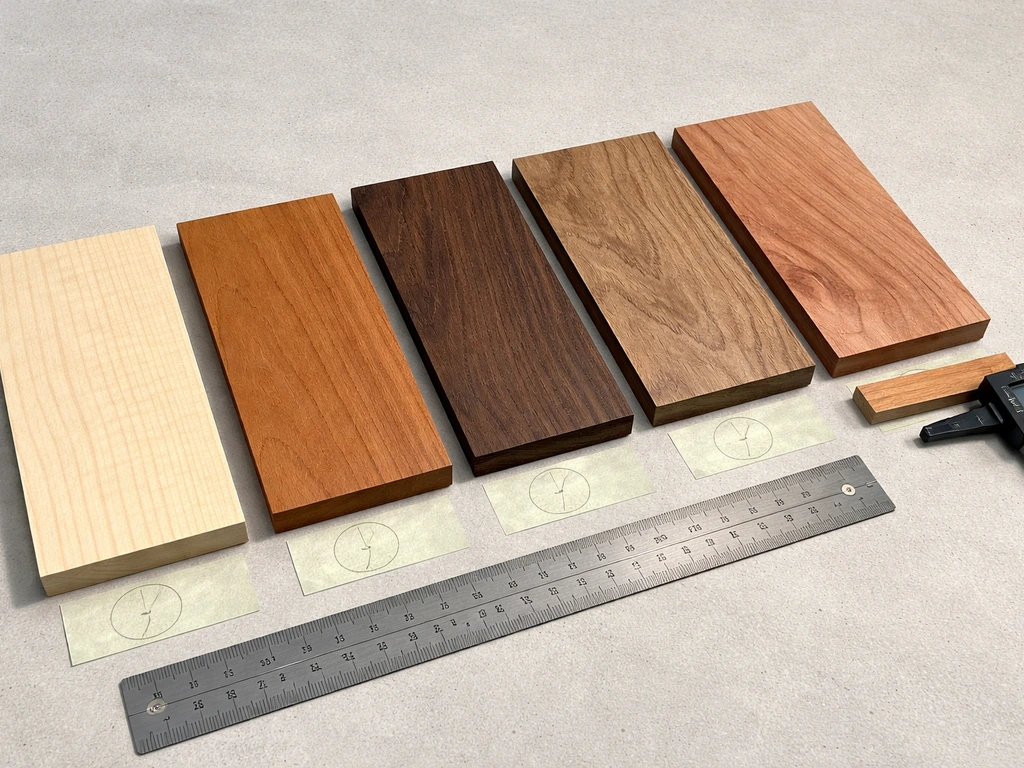
Wood choice affects both sound and safety. Dense, close-grained hardwoods produce a cleaner, more resonant tone than soft or porous woods because they reflect sound inside the bore more efficiently and hold tight tolerances at drilled edges. Avoid cedar for any part of the call that will be near birds or touch your mouth. Cedar contains aromatic oils that are toxic to some birds and can irritate mucous membranes. Yew is outright toxic. Treated or pressure-treated lumber of any species is a hard no.
Good choices for a first build include hard maple, cherry, walnut, and apple or pear wood if you have fruit-tree branches available. These are all considered safe for bird contact, hold drill holes cleanly, and have enough density to give the barrel good resonance. Walnut has a warm, slightly darker tone and is a pleasure to work with. Cherry finishes beautifully. Hard maple is the most widely available and the cheapest, which makes it a great starting point.
| Wood Species | Tone Character | Workability | Bird-Safe? | Cost |
|---|---|---|---|---|
| Hard Maple | Bright, crisp | Easy, widely available | Yes | Low |
| Cherry | Warm, mid-range | Easy | Yes | Low-medium |
| Walnut | Warm, dark | Easy | Yes | Medium |
| Apple/Pear (fruitwood) | Clear, slightly sweet resonance | Moderate (harder grain) | Yes | Free if you prune |
| Cedar | Soft, muted | Very easy | No — toxic oils | Low |
| Yew | Dense | Moderate | No — toxic | Avoid |
For design specs: a barrel length of 3.5 to 4.5 inches works well for a songbird-range call. The main bore (the resonating chamber drilled through most of the barrel) should be about 3/8 to 1/2 inch in diameter. The mouthpiece air channel that feeds air to the reed is narrower, around 3/16 inch. Reed length is the primary pitch control: shorter reeds vibrate faster and produce higher pitch, so start with a reed about 1.25 inches long and trim from there. The tone board, the flat shelf the reed rests on, should sit just below flush with the bore to keep the reed lightly loaded but free to vibrate.
Step-by-step build instructions
This is the build I use for a basic single-reed songbird call. It takes about 90 minutes on the first attempt, less once you have made one before.
- Cut your blank to length. Aim for 4 inches. Square up both ends with a saw or sanding block so they are flat and perpendicular.
- Mark center on both ends with a pencil. You will drill from the mouthpiece end, so mark that end clearly.
- Drill the main bore. Using a 3/8 inch (or 1/2 inch) bit, drill from the bell end (the far end from the mouthpiece) to within about 3/4 inch of the mouthpiece end. Go slow and clear chips often. The depth here determines the length of your resonating chamber, which affects overall tone.
- Shape the tone board. At the mouthpiece end, use a sharp chisel or craft knife to cut a flat shelf across roughly half the bore opening. This is the surface the reed will rest against. It needs to be flat and smooth — take your time here. Sand it with 220 grit until it is glassy.
- Drill the mouthpiece air channel. Switch to your 3/16 inch bit and drill from the mouthpiece face into the barrel at a slight downward angle (about 10 to 15 degrees) so it meets the bore just above the tone board. This angled channel is what focuses the air stream onto the reed.
- Cut your reed. If using brass shim stock, cut a strip about 3/16 inch wide and 1.25 inches long. If using a coffee stirrer as a prototype reed, flatten it, make a shallow slit lengthwise down the center, and trim to the same length. The reed should be flexible enough to flutter easily when you flick it with a fingernail.
- Set the reed on the tone board. Lay it flat against the tone board shelf so the tip of the reed sits just inside the bore entrance, lightly touching or barely clearing the top of the air channel opening. A tiny drop of food-safe wood glue at the back of the reed (the end furthest from the bore) holds it in place. Do not glue the tip — it must vibrate freely.
- Let the glue cure fully, then test-blow gently before sanding or finishing.
- Sand the exterior to 220 grit, round any sharp edges on the mouthpiece for comfort, and apply your food-safe finish to the outside only. Wipe on beeswax or mineral oil, let it soak in for 10 minutes, and buff off the excess.
First blow attempt: cup your hands loosely around the bell end to add back pressure, take a normal breath (not a giant one), and say 'wit' or 'hoot' into the mouthpiece rather than just pushing steady air. That voiced puff of air tends to trigger the reed much more reliably than a constant drone. If it works, you'll hear a clear note immediately. If not, do not panic, check the tuning section below.
Tuning and troubleshooting common sound problems
Most first-build problems come down to three things: reed position, reed length, and tone board flatness. Here is how to work through the most common issues.
No sound at all
This almost always means the reed is not vibrating. Check that the reed tip is free, not glued down or pressed too tightly against the tone board. Gently lift the tip a fraction of a millimeter with a thin blade. Try blowing again. If it still produces nothing, check that your mouthpiece air channel actually meets the bore at the tone board level and is not blocked by a chip or excess glue.
Sound is too low or muffled
A muffled, low tone usually means the reed is too long or the tone board is not flat enough. Start by trimming the reed: remove 1/16 inch at a time from the free tip. Shorter reeds vibrate faster, producing a higher, cleaner pitch. Make small cuts, test after each one. If pitch improves but is still muddy, lightly sand the tone board flat with 220 grit. Even a barely perceptible bump under the reed creates turbulence that muddies the tone.
Sound is too high or thin
You have trimmed too much reed, or the reed is very stiff. If the reed material is stiff brass and the pitch is too high, try a slightly thicker piece of shim stock (0.010 inch instead of 0.005 inch) which will vibrate more slowly. Alternatively, if you cut too much reed length, you will need to start fresh with a new reed blank, which takes about two minutes, so don't be shy about it.
Sound is hollow or echo-like
A hollow, tunnel-like resonance usually means the bore is too long relative to the reed length. The chamber dimensions and reed length interact directly. Try shortening the effective bore by plugging the bell end slightly with a small wooden disk or a tight-fitting cork and testing again. If the tone clears up, glue a permanent plug in at that depth.
Call is hard to blow
If you need to blow very hard to produce a sound, the reed is too stiff or pressed down too tightly against the tone board. Trim a small amount from the reed length, which reduces the force needed to trigger vibration. You can also very lightly sand the underside of the reed with 400 grit to thin it slightly, making it more flexible. The goal is a call that responds to a gentle, conversational puff of air.
How to use your bird call responsibly in a backyard
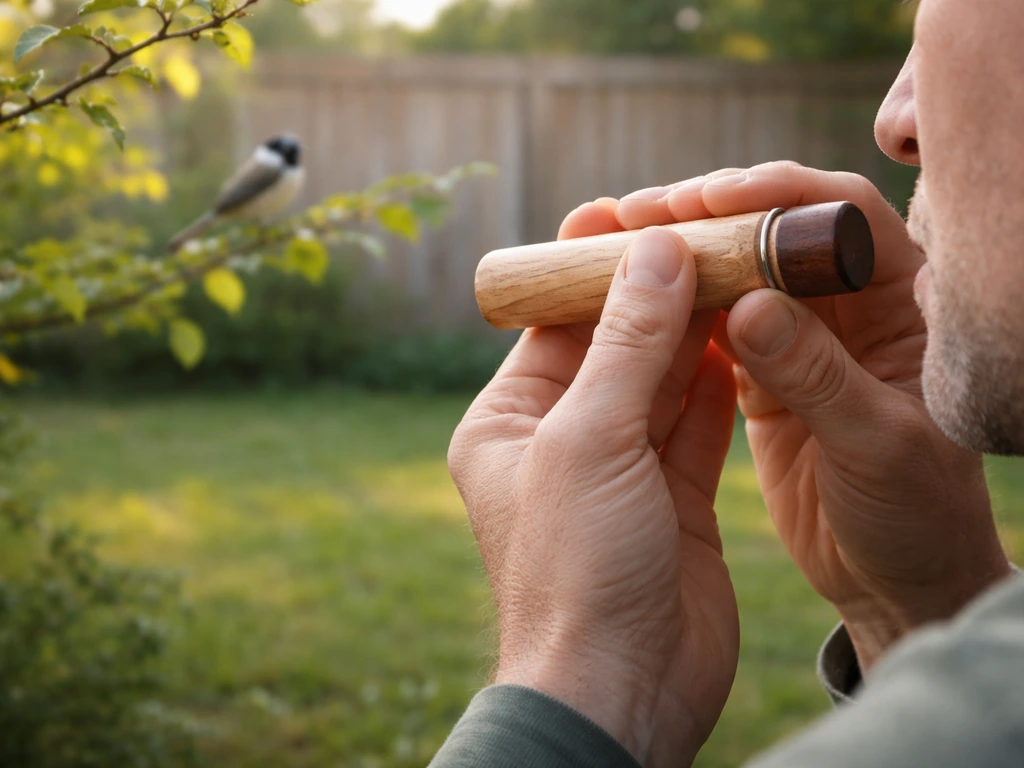
A hand-made wooden call is a mechanical tool, not a recorded playback device, but the ethical principles that apply to electronic bird sounds apply here too. Used thoughtfully, a call can bring birds closer for observation and genuinely enrich your backyard birding. If you want a bird scarer instead of an attractor, you can repurpose the same yard design ideas into a device like a plastic-bottle scare setup to reduce visits plastic bottle bird scarer. Used carelessly, it can cause real stress to the birds you're trying to enjoy.
- Avoid using any bird call during nesting season (roughly April through July for most North American backyard species). Territorial and nesting birds are highly vulnerable to disruption during this period, and repeated calling can distract them from feeding, incubating eggs, or caring for chicks.
- Use short bursts rather than continuous calling. A pattern of 20 to 30 seconds of calling followed by a pause is much less disruptive than sustained use and also more realistic to how birds actually communicate.
- Stop calling if a bird responds and moves toward you. At that point you have achieved observation contact. Continuing to call when a bird is already stressed or agitated causes unnecessary harm.
- Keep volume natural. Your call should not be louder than the natural calls of the species you are mimicking. Blowing too hard is both bad technique and bad ethics.
- Do not use calls in heavily trafficked birding areas where multiple people may already be stressing the same bird population.
- Use the call for observation and enrichment, not to lure birds for capture or to displace them from habitat.
Once you have your single-reed call working well, there is a lot of room to experiment. A longer bore with the same reed produces a darker, lower tone suited to larger birds. A very short, narrow barrel produces a light, high chip note that many small songbirds respond to. If you enjoyed this build, making a wooden bird whistle is a natural next step that explores the slot-tone approach and opens up a different range of sounds. Bird bells and other yard enrichment pieces are also worth exploring once you have the basic woodworking rhythm down. The core skill you have learned here, shaping wood geometry to control airflow and vibration, carries directly into all of them.
FAQ
What’s the difference between tuning a wooden single-reed call and just sanding the wood randomly?
Tuning changes how the reed loads and where the airflow reaches the vibrating tip. Trim the reed tip in small steps first, then only sand the tone board enough to remove a warp or tiny ridge (you are aiming for flatness under the reed). If you sand aggressively, you change the gap and can make the call require harder blowing or stop vibrating.
Can I use a different reed material than a coffee-stirrer reed or brass shim?
Yes, but reed stiffness and thickness change the pitch and how much force the call needs to trigger. If you swap materials, start by matching similar thickness and flexibility, then expect to re-tune with reed trimming and shim thickness. Brass works as a more stable baseline, flexible plastics vary widely, and you may need more trial pieces.
How do I know the reed tip is positioned correctly on the tone board?
A correct fit leaves the reed tip free to vibrate while the base is supported. The common tell is whether you can see a tiny clearance or feel light movement with a thin blade, without rocking the reed. If the reed tip touches solid wood anywhere along its length, it often produces silence or a weak, sputtering note.
My call makes sound, but it squeaks or chatters instead of a clean note, what should I check?
Chatter usually means the reed is either too loosely loaded, the air channel is misaligned, or the tone board has turbulence. Check that the mouthpiece channel meets the bore at the same level as the tone board, clear any chips or glue bumps, and verify flatness where the reed rests. If needed, trim a very small amount off the reed tip to stabilize the oscillation.
What’s the best way to avoid clogging the reed chamber while finishing the wood?
Finish only the exterior barrel and keep every sealant out of the reed chamber, tone board shelf area, and the air path. Apply wax or mineral oil with light pressure, then wipe until the surface feels dry. Let it cure fully before testing, and inspect the bore with good light to ensure no pooled finish remains.
Should I glue the reed in place, or leave it removable?
For most first builds, a permanent bond is safest once the tuning is right. But if you are still experimenting, you can temporarily tack the reed so you can swap reed lengths quickly, then commit after the note is close. Permanent gluing too early is a common mistake because even small glue thickness changes loading and pitch.
How can I test quickly to tell whether the bore or the reed is the main problem?
Do two fast experiments. First, gently ensure the reed tip can move freely, then test. Second, without changing the reed, try briefly reducing the effective bore length by plugging the bell end, even temporarily. If plugging fixes muddiness or tunnel resonance, the bore and reed-length relationship is the culprit.
What blow technique should I use if I can’t get the call to trigger?
Use a conversational puff, not a constant pressure stream. Cup your hands around the bell to add back pressure and blow with a voiced start like “wit” or “hoot” into the mouthpiece. If you must blow very hard, the reed is usually too stiff, pressed too tightly, or the tone board is not providing a light, flat load.
How do I choose a high versus low tone for different birds without overbuilding multiple calls?
Start with the same barrel size and use reed length to set pitch. Shorten the reed for a higher, chirpier tone, and keep the reed trim incremental (for example, remove small amounts and test each time). If you later want a lower pitch, you will usually need a longer, appropriately flexible reed rather than just changing how you blow.
Is it safe to handle and store the call around birds during different weather conditions?
Wood and reed assemblies can shift slightly with humidity. After exposure to wet weather, dry the call thoroughly and retest, because swelling can change fit and how tightly the reed sits. Avoid storing it with residue or finish inside the bore, as that can soften and creep into the air path.
What should I do if I accidentally cut the reed too short?
Replace the reed blank rather than trying to “fix” it with more glue or sanding. The reed’s length strongly controls frequency and how easily it vibrates, and over-tuning often leads to a call that either won’t trigger or only works under extreme pressure. A new reed blank is faster than chasing the problem for hours.
Can I make the call quieter or louder for closer observation?
You can influence perceived loudness by how freely the reed vibrates and by barrel geometry. Softer, controlled notes usually come from a reed that triggers with gentle puffs and a clean, flat tone board. Loud, harsh output often means turbulence, misalignment, or an overly stiff setup that forces stronger airflow, so focus on reed freedom and flatness before changing bore dimensions.
Step-by-step guide to make a wooden bird whistle: wood choice, cutting windway, tuning, finishing safely, troubleshootin

Step-by-step DIY plans to build a chimney swift bird house, with correct dimensions, placement, and weatherproofing for

Step-by-step DIY for building an oriole bird house with right dimensions, weatherproofing, predator-safe placement, and