You can build a solid wooden bird ladder in an afternoon with a few feet of lumber, some dowels, basic hand tools, and a bird-safe finish. Mount it near a feeder, bird bath, or roosting box and most backyard birds will find and use it within days. The key decisions are wood type, rung spacing (about 1.5 to 2 inches apart works for most small to medium birds), and a finish that handles weather without releasing toxins. Everything else is just cutting and assembly.
How to Make a Bird Ladder: Wooden DIY Step by Step

Marcus Thornton
19 May 2026
What a bird ladder is actually for (and where to put it)
A bird ladder is a simple climbing structure that gives birds a graded path up to something they want to reach: a hanging feeder, the edge of a bird bath, a roosting box entrance, or even a nesting shelf mounted higher on a wall or post. It is especially useful for ground-feeding species like juncos, towhees, and doves that feel exposed hopping straight up onto an elevated platform, and for cavity-nesting birds that benefit from a perch approach path into a nest box.
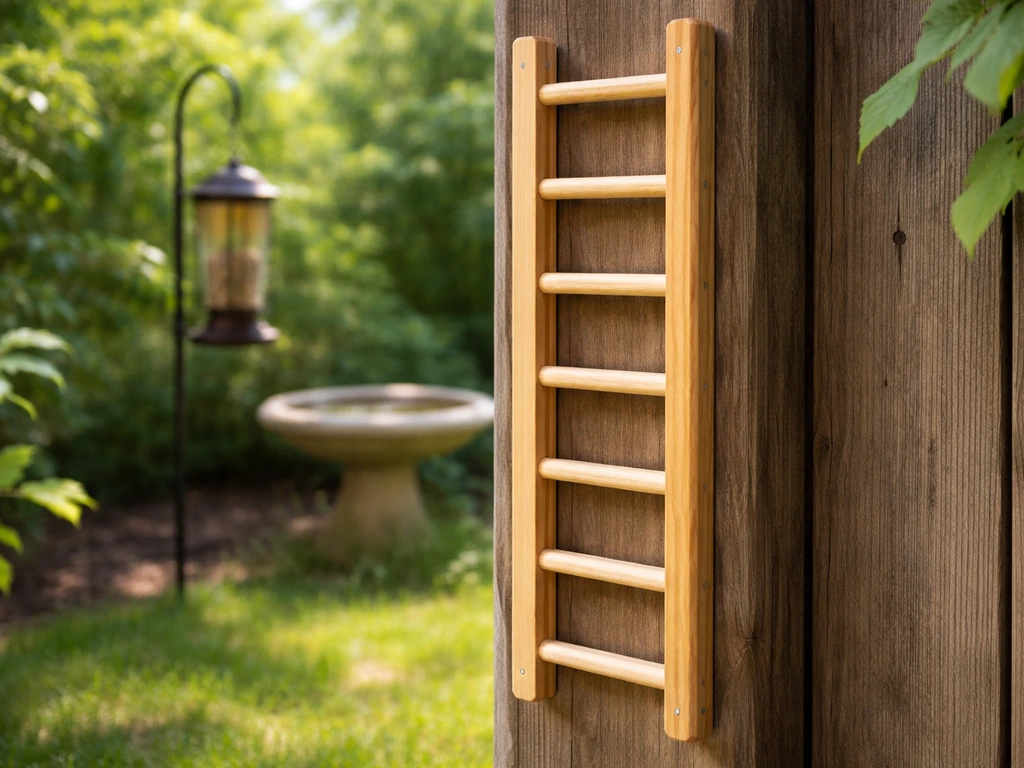
Before you cut a single piece of wood, figure out exactly where the ladder is going. The best placement is a spot with nearby shrub or tree cover within about 10 feet, so birds have a quick escape route from predators. At the same time, keep the ladder and whatever it leads to a safe distance from large windows. Homes with bird feeders already face roughly double the window-collision risk compared to homes without feeders, so think about sightlines when you choose your installation spot. If a window is unavoidable, placing the feature very close to the glass (within a foot or two) is actually safer than placing it at a mid-range distance, because birds approaching from close range cannot build up enough speed for a fatal strike. A distance of around 10 feet from glass is a commonly recommended compromise when you cannot go very close.
For the ladder itself, think about the angle. A near-vertical ladder (70 to 90 degrees) works fine for agile climbers like nuthatches and chickadees. A shallower angle (45 to 60 degrees) is friendlier for heavier birds and makes the structure more stable when leaned against a post or wall. Decide on your target species and installation surface before you finalize dimensions.
Materials and tools you will need
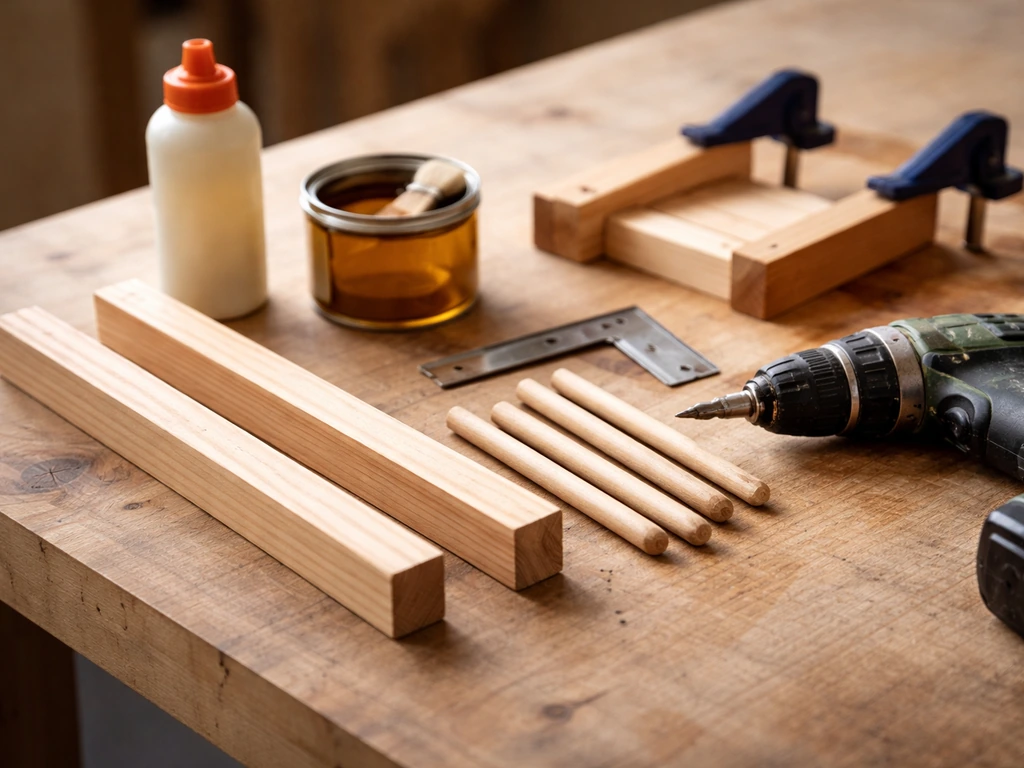
For a standard ladder about 18 to 24 inches tall, you do not need much. Here is what I reach for first:
- Side rails: two pieces of untreated pine, cedar, or poplar, each about 3/4 inch thick by 1 inch wide by 24 inches long (cedar is the best first choice because it naturally resists rot and weathering without any chemical treatment)
- Rungs: hardwood dowels, 1/4 to 3/8 inch in diameter, cut to 4 to 6 inches long depending on how wide you want the ladder (birch or beech dowels are easy to find, affordable, and grip-friendly)
- Wood glue rated for exterior use (Titebond III is a reliable pick)
- Stainless steel or galvanized screws, 1 inch or shorter, if you want mechanical reinforcement at each rung joint
- Sandpaper: 80-grit for shaping, 150-grit for finishing
- Bird-safe sealant or finish (more on this below)
- Mounting hardware: small eye screws, S-hooks, or jute twine for a hanging mount; a small flat bracket or wire for a post-lean mount
For tools, a hand saw or miter saw, a cordless drill with a drill bit matching your dowel diameter, a square, a pencil, and a clamp or two are all you need. No power tools beyond a drill are strictly required. If you do not have a drill, a sharp awl and a small chisel can open holes in soft pine, though it takes more patience.
A word on repurposed materials: old wooden yardsticks, salvaged fence slats, and even thick bamboo skewers for small rungs all work well. Just avoid any wood that has been treated with CCA (chromated copper arsenate) pressure treatment, creosote, or painted with lead-based paint. If you are not sure about an old board, skip it and buy a fresh piece of cedar for a dollar or two.
Dimensions and rung spacing that actually work for birds
Getting the spacing right is honestly the most important design decision. Too far apart and smaller birds skip rungs or refuse to use the ladder entirely. Too close and larger birds find it awkward. Here is a simple reference:
| Target bird size | Rung diameter | Rung spacing (center to center) | Ladder width (between rails) |
|---|---|---|---|
| Small (finches, wrens, chickadees) | 1/4 inch | 1.5 inches | 3 to 4 inches |
| Medium (sparrows, nuthatches, juncos) | 5/16 inch | 2 inches | 4 to 5 inches |
| Larger (doves, jays, flickers) | 3/8 inch | 2.5 to 3 inches | 5 to 6 inches |
For a general-purpose ladder that works for most backyard species, I default to 5/16-inch dowels spaced 2 inches apart (center to center) on rails set 4 inches apart. That covers the widest range of common visitors without getting too complicated. The total height is up to you and your installation, but 18 to 24 inches is a practical starting range for most feeder or bath setups.
Rung texture matters too. Smooth dowels can be slippery, especially when wet. Lightly scoring each dowel with sandpaper or wrapping the top half of each rung with natural jute twine gives birds a much better grip. This is the kind of thing I did not think about on my first build, and I noticed birds hesitating at wet rungs before I fixed it.
Step-by-step build: cutting, assembly, and anchoring
Step 1: Cut your rails and dowels
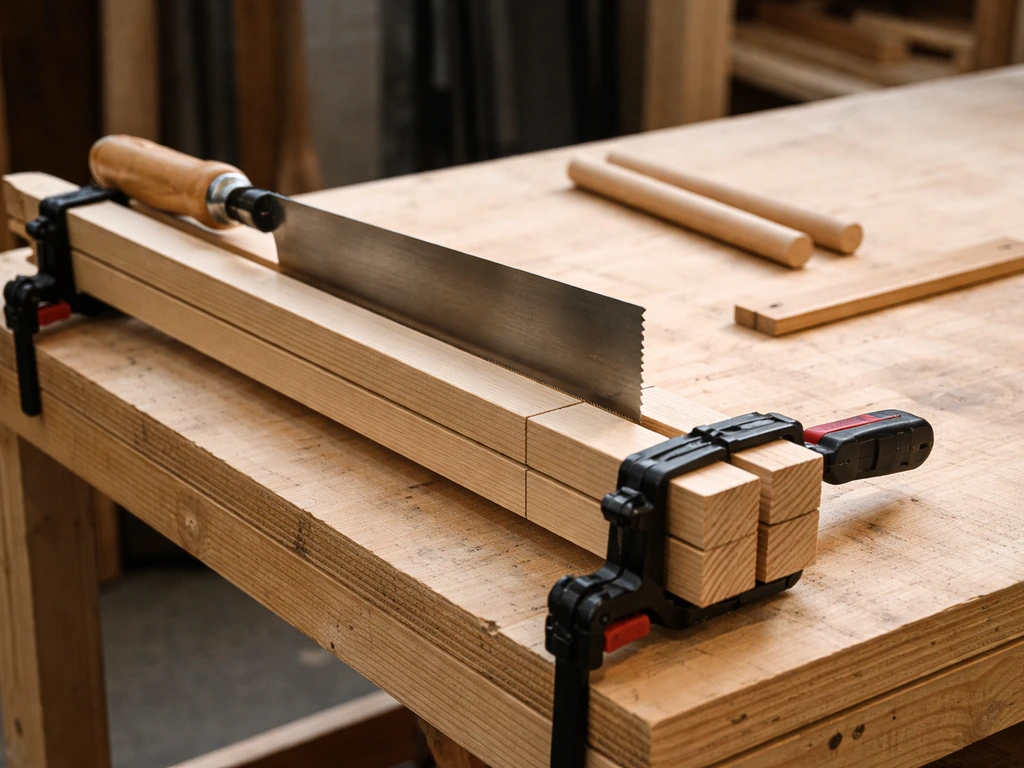
Cut both side rails to the same length at the same time if possible, clamping them together so your saw runs through both at once. This ensures they are identical, which makes alignment much easier later. Then cut your dowels. For a 24-inch ladder spaced at 2 inches, you will need about 11 rungs. Cut all of them the same length in one pass.
Step 2: Mark and drill the rung holes
Clamp both rails together again, side by side, and mark your rung positions on both at once with a square and pencil. This guarantees the holes on each rail line up perfectly. Drill each hole to a depth of about 3/8 inch, just deep enough for the dowel end to seat firmly without poking through the other side. Use a piece of tape on your drill bit as a depth stop so you do not accidentally go too deep.
Step 3: Dry-fit everything before gluing
Before any glue touches anything, press all the rungs into one rail, then bring the second rail down onto the opposite ends. Check that everything lines up and the ladder sits flat. This is your one chance to catch problems without a mess. If a hole is slightly off, now is when you widen it gently with a round file.
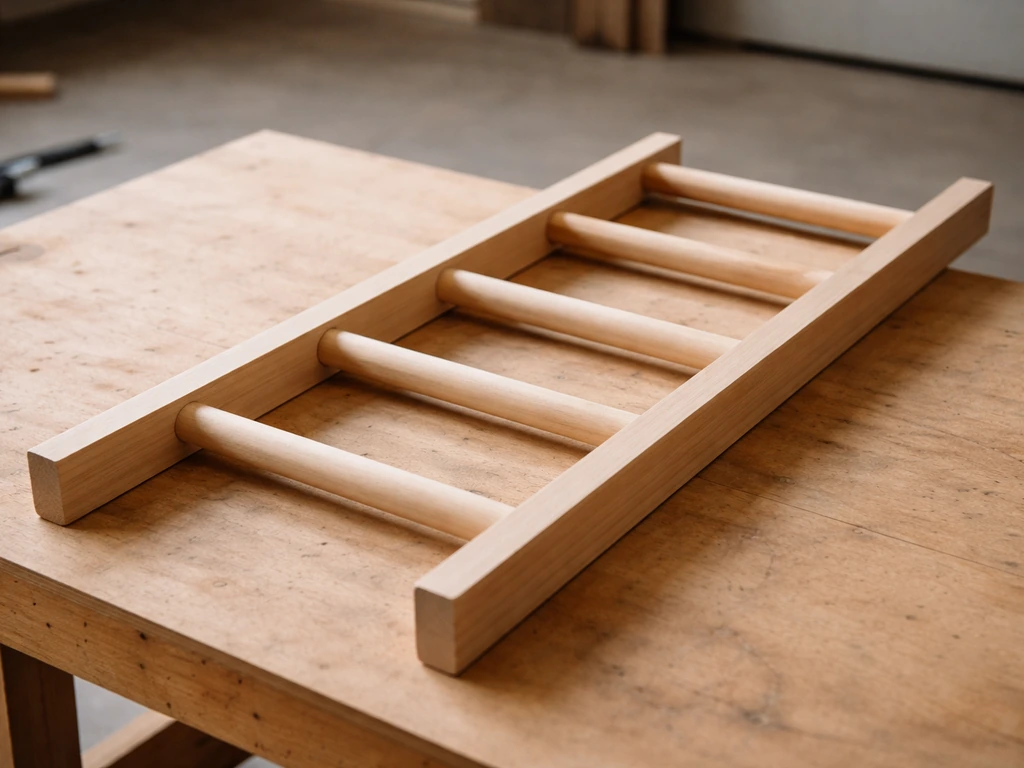
Step 4: Glue and clamp the assembly
Apply exterior wood glue to the inside of each hole and to both ends of each dowel. Press the rungs into one rail first, then bring the second rail down and press it firmly onto the other ends. Use bar clamps or even rubber bands wrapped multiple times to hold everything together while the glue sets. Wipe away squeeze-out immediately with a damp cloth. Let it cure for at least two hours before handling, and a full 24 hours before load-testing.
Step 5: Add mechanical reinforcement (optional but recommended)
Once the glue is dry, you can drill a small pilot hole through the side of each rail into the end of each dowel and drive a short screw through it. This adds real mechanical strength and is worth the extra 15 minutes if the ladder will be outdoors year-round. Use stainless or galvanized screws so they do not rust and stain the wood.
Step 6: Anchoring the ladder to its location
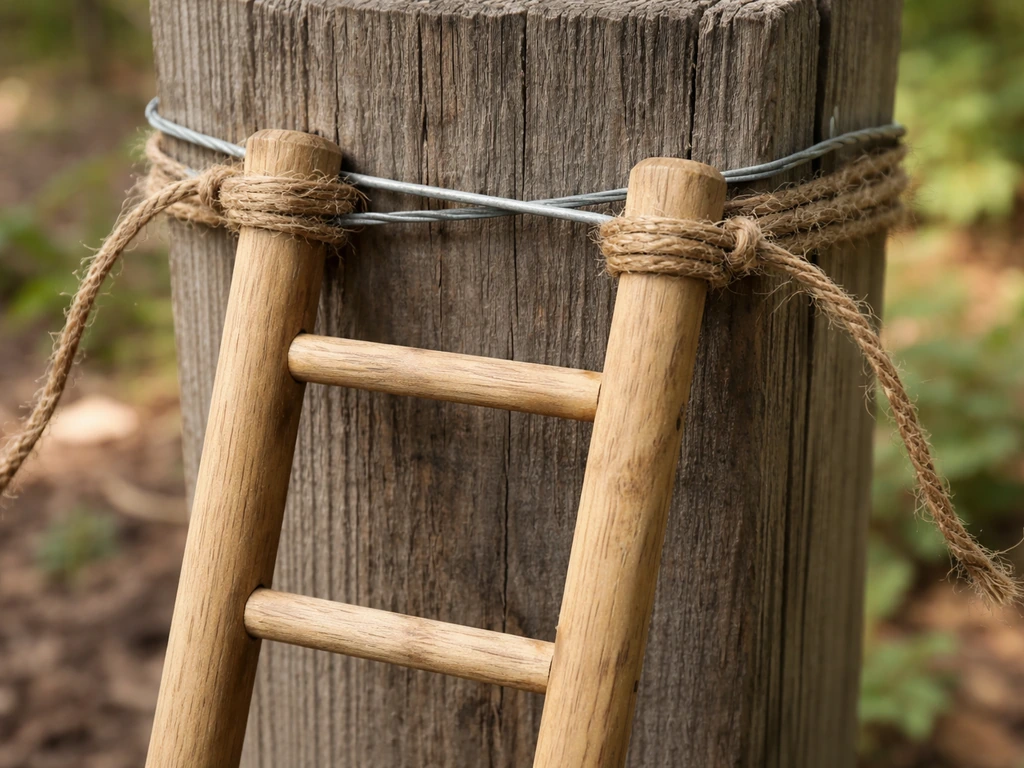
How you anchor it depends on how it will be used. For a leaning mount against a feeder post, drill a small hole near the top of each rail, thread heavy-gauge wire or jute through both holes, and tie it around the post so the ladder cannot slip or blow over. For a hanging mount (suspended from a hook below a feeder platform), screw a small eye hook into the top center of the ladder and hang it with an S-hook. For a freestanding mount in a garden bed, extend the rails 6 to 8 inches past the bottom rung and push those feet into the soil, or attach a simple crossbar base.
Finishing the wood safely for outdoor use
This step is where a lot of well-intentioned builders go wrong. Standard deck stains, varnishes, and polyurethanes often contain solvents, fungicides, or UV stabilizers that are harmful to birds, especially when fresh or when birds chew on the wood. The rule I follow: if it smells strong when curing or if it lists biocides on the label, it is not safe for bird contact.
The safest options are raw linseed oil (not boiled, which contains metallic driers), pure tung oil, or a water-based sealant that is specifically labeled non-toxic once cured. Raw linseed oil takes longer to dry (a few days in warm weather) but penetrates deeply and protects the wood from moisture without forming a film that birds can peel and ingest. Apply it with a rag, wipe off the excess, and let it cure fully before installation. Two thin coats work better than one thick one.
Cedar and redwood, if you used them, can actually go unfinished for a season or two because their natural oils provide built-in rot resistance. If you want to extend their life further, a single coat of raw linseed oil is plenty. Pine needs more protection, so do not skip the finish on a pine build.
Before any finish goes on, sand every rung and rail surface with 150-grit sandpaper. Run your finger along each dowel and feel for splinters. Birds grip with bare feet and scrape with their beaks, so any roughness you feel, they will feel too. Take the extra few minutes to get it smooth.
Installing it, testing it, and getting birds to actually use it
Once the finish has fully cured (at least 48 hours for oil, 24 hours for water-based sealant), mount the ladder in its spot before adding any bait or food nearby. Give it a firm tug test: grab the top and pull, then push sideways. If it wobbles, reinforce the mount before birds arrive. A ladder that shifts underfoot will train birds to avoid it.
To attract birds initially, scatter a small amount of seed or mealworms on a couple of the rungs and at the base of the ladder. Birds explore with their feet and beaks, and food on the rungs teaches them the structure is a path worth climbing. Chickadees and nuthatches usually investigate within a day or two. Shyer ground feeders like towhees may take a week or more.
If birds seem to avoid the ladder entirely after two weeks, check a few things. First, is there a nearby perch (branch, shrub) within hopping distance that birds are using instead? If so, try moving the ladder closer to that natural launch point. Second, is the ladder in full open sun with no nearby cover? Add a small potted shrub nearby to give birds a sense of safety on approach. Third, check the rung texture: slick dowels in wet weather are a real deterrent. Wrap a few rungs with natural jute twine and see if that changes behavior.
If rungs become loose over time (this happens after a winter or two outdoors), drill a fresh pilot hole at a slightly different angle and drive a new screw through the rail into the dowel end. A dab of fresh exterior glue in the gap, clamped overnight, will restore most joints without needing to rebuild. Reapply a thin coat of your chosen finish every spring to keep the wood from splitting or absorbing standing water.
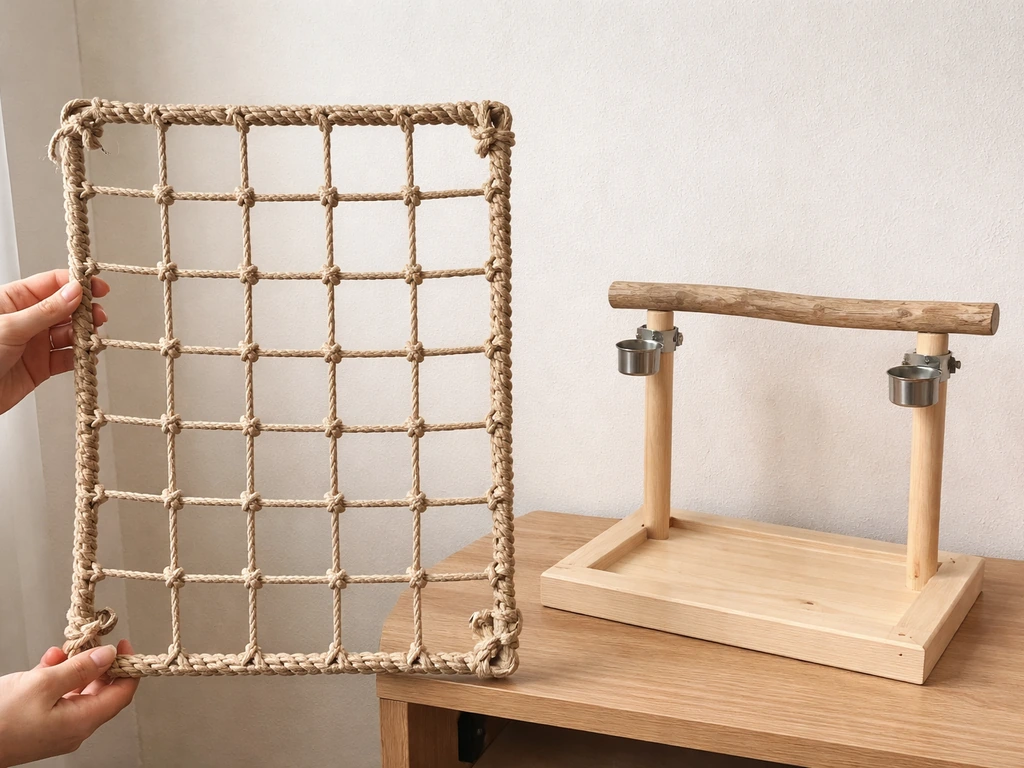
One more thing worth mentioning: a bird ladder pairs really well with companion enrichment structures. If you also want specialized perches, see how to make manzanita bird perches for a natural-looking option that birds love to land on. If you want to go beyond a ladder, use this guide to learn how to make bird perches out of branches that offer safer natural stepping points companion enrichment structures. If you are already thinking about natural perch options for the area around the feeder, branch-based perches made from foraged wood are a natural next project in the same vein, and climbing nets are another option for enclosed aviaries or covered feeders where you want more surface area for birds to navigate. To make one, focus on a stable base, weather-resistant materials, and a comfortable grip surface for the birds bird shower perch. The ladder handles the vertical access, and those other structures handle the horizontal exploration.
FAQ
Can I use pressure-treated, painted, or leftover scrap wood to build a bird ladder?
Use only clean, untreated natural wood or confirmed bird-safe hardware. Even if the ladder itself is finished correctly, painted, rusty, or chemically treated mounts and fasteners can contaminate surfaces birds chew or contact with their feet.
Should I take the bird ladder down seasonally, and how do I maintain it long-term?
Remove the ladder during seasons when you see heavy pest activity or when predators are likely using it as a route, then thoroughly wipe it and re-check rung texture. If you use oil finishes, also look for tackiness, and let it fully cure again before returning it.
How do I know the ladder height and endpoint are correct for my specific birds?
Anchor height matters more than total ladder height. If the top endpoint is too high for the feeder or bath ledge, birds land too far away and will not commit; aim for a reachable target that birds already use, and keep the first rung close enough to their usual landing spot.
Can I connect two bird ladders to reach a higher feeder or nest shelf?
Yes, but keep the climbing path continuous. If you add a second level, stagger the ladders so birds are not forced to jump between rungs, and ensure both segments share a stable mounting point so one does not twist the other.
What should I do if a rung loosens or the ladder starts to rack after assembly?
If the dowels wobble, it is usually a glue or hole alignment issue. Re-seat the rungs, widen slightly only the misaligned holes, then add new screws through pilot holes into each dowel end after glue cures, since mechanical fasteners help prevent future loosening.
How should I place seed or mealworms to teach birds the ladder without confusing them?
Avoid baiting right at the top target only. Start with small amounts on the lower rungs and at the base, then gradually shift upward once birds reliably use the structure, so you do not train birds to hover and miss the rungs.
Can I mount the ladder with adhesive pads or lightweight hooks?
Suction cups and lightweight hooks often fail in wind, and they can shift the ladder into an unstable angle. Instead, use the mount method that matches your surface (wire through rails for leaning, eye hook for hanging, or extended feet or a base crossbar for freestanding).
Why would birds stop using the ladder after a rain, and how can I fix it?
Many birds reject slick rungs in wet weather. Add grip where it matters most, wrap or roughen the top half of the rungs (where feet contact first), and re-check after rain because oil-slick surfaces can increase slip until the finish is fully cured.
What is the best angle if I want the ladder to work for heavier birds too?
If you plan to lean the ladder against a post, choose an angle that stays stable when you gently push sideways at the mount point, not just when it is sitting alone. For deeper angles, heavier birds can use it comfortably, but you must also ensure the feet and wire or tie are tight so it cannot rotate.
Can I make a bird ladder from pine, and does it need different care than cedar?
If you cannot buy cedar or redwood, pine can work, but you must not skip a protective bird-safe finish and you should keep cure times strict (fully cured before installation). Also inspect pine more often for splitting around dowel ends, especially after cold winters.
Next Articles
How to Make a Bird Climbing Net Step by Step DIY
Step-by-step DIY guide to build a safe bird climbing net with size, knotting, mounting, tension, and care tips.
How to Build a Chimney Swift Bird House DIY Guide
Step-by-step DIY plans to build a chimney swift bird house, with correct dimensions, placement, and weatherproofing for
How to Build an Oriole Bird House: Step-by-Step DIY
Step-by-step DIY for building an oriole bird house with right dimensions, weatherproofing, predator-safe placement, and