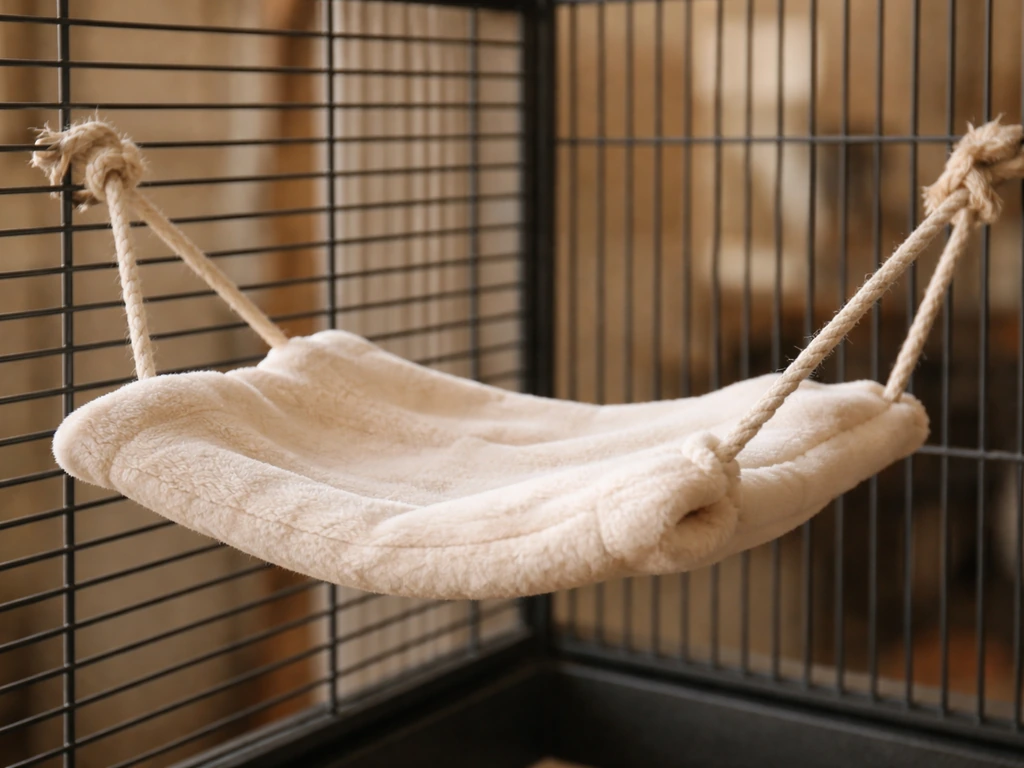
You can make a bird hammock today using a piece of fleece or cotton fabric, some bird-safe rope (cotton, sisal, or hemp), and a couple of secure anchor points. Cut your fabric to size, hem or fold the edges so there are no loose threads to catch a toe, tie figure-eight stopper knots at each corner, and hang it with just enough sag that your bird can nestle in without the sides folding over it. The whole project takes under an hour, costs almost nothing if you have scrap fabric, and gives your bird one of the most-used enrichment items you can add to a cage or aviary.
How to Make a Bird Hammock Step by Step DIY Guide

Marcus Thornton
20 May 2026
What a bird hammock actually is (and where it fits)
A bird hammock is a suspended fabric or woven resting platform that lets a bird lounge, nap, or just hang out off the floor of a cage, aviary, or covered outdoor perch area. It is not a net or a bag-style sleeping tent (those are "bird cozies") and it is not a rigid perch. Think of it as a soft, flexible shelf that hangs at an angle or in a gentle curve, supported at two or more corners by rope or rings.
For caged or aviary birds, a hammock sits inside the enclosure and is anchored to the cage bars or frame. Parrots, cockatiels, finches, and even canaries will use one as a resting spot, a play surface, or a social perch. For covered outdoor spaces like a large walk-in aviary or a shaded garden structure, a hammock can also give birds a softer resting surface away from rough branches. True open-backyard use (hanging between trees for wild birds) is less practical and rarely used by wild birds, so this guide focuses mainly on caged, aviary, and covered-outdoor setups where you have real control over placement, tension, and safety.
A hammock is different from a bird swing (which moves and is usually a single perch rod or dowel) and different from a bird bench (which is fixed). If you are specifically looking for how to make a bird bench, you will want to focus on building a fixed, stable platform rather than a suspended, adjustable hammock. If you want something that swings instead of sitting still, see our guide on how to make bird swing.
It also differs from a bird cozy, which is an enclosed pocket for sleeping. The hammock is open, flat-ish, and designed for daytime lounging and activity as much as rest. If you are already building other cage furniture, a hammock is a natural companion piece to any of those projects.
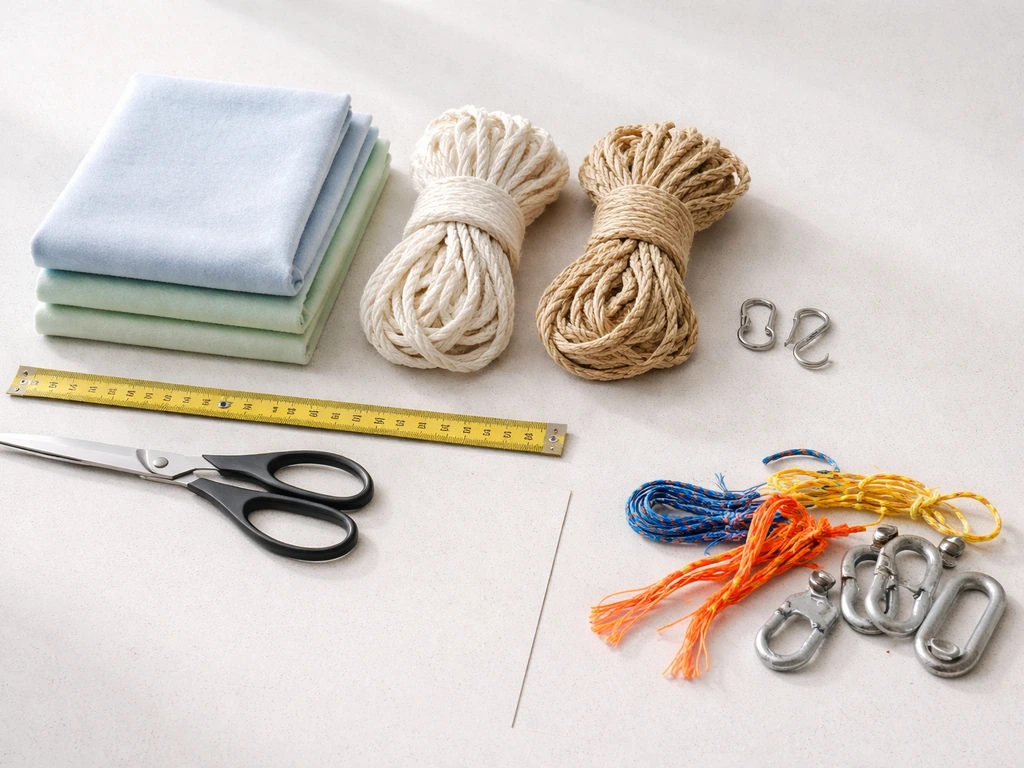
Materials and tools: what to grab (and what to skip)
The single most important rule with bird hammocks is: if it can fray into fine threads or fibers, it is a risk. Birds chew everything, and loose fibers or threads can be swallowed and cause serious crop or gut blockages. The RSPCA specifically flags rope toys for this reason, and the same logic applies to fabric. That does not mean you cannot use fabric or rope, it just means you choose tightly woven materials and finish your edges cleanly.
Fabric choices
Fleece is the beginner's best friend here. It does not fray when cut, so you can skip sewing if you want a no-sew version, and it is soft enough for birds to grip without slipping. A 15-inch by 15-inch square of fleece works well for small to medium birds and is exactly the size used in tested wildlife hammock designs. Polar fleece and anti-pill fleece are both fine.
Avoid any fleece with a very loose knit or a long pile because those fibers pull out easily. If you do want to sew, 100% cotton canvas or plain cotton twill is durable, washable, and safe. Avoid synthetic fabrics like nylon, polyester, and acrylic. Nylon and polyester create entanglement and ingestion risks, and they do not wash and dry as cleanly as natural fibers.
Rope and cord
Use 100% cotton rope, sisal rope, or hemp rope. All three are accepted as bird-safe by avian welfare organizations and experienced bird keepers. Avoid nylon or polypropylene rope entirely. A 3mm to 5mm diameter rope is the right range for most small to medium birds. Thicker rope (6mm to 8mm) works for larger parrots where the added bulk makes the knots easier to check and tighten. Whatever rope you use, check it regularly for fraying and replace it before it looks bad, not after.
Hardware
This is where a lot of DIY bird projects go wrong. Never use galvanized hardware. Galvanized steel contains zinc, which is genuinely toxic to birds if chewed or ingested. The same goes for any hardware that looks soldered or has a shiny metallic coating you cannot identify. Stick to stainless steel quick-links, stainless steel or nickel-plated carabiners, or plain untreated steel S-hooks that you inspect regularly for sharp edges. Stainless steel is the safest, most durable option and worth the small extra cost.
Tools you will need
- Scissors or fabric shears (sharp enough to cut cleanly)
- Ruler or measuring tape
- Sewing machine or needle and thread (optional, only if sewing edges)
- Marker or chalk for measuring fabric
- Lighter or candle (only for sealing rope ends on natural fiber rope to prevent unraveling)
- Stainless steel quick-links or S-hooks (2 to 4 depending on design)
Sizing and sag: how big and how loose?

Get this wrong and the hammock either folds over your bird like a taco or sits so flat and taut it offers no comfort at all. The right size depends on your bird, and the right sag depends on how many anchor points you use.
| Bird Size | Example Species | Recommended Fabric Size | Rope Length Per Side |
|---|---|---|---|
| Small | Finch, canary, budgie | 8" x 8" to 10" x 10" | 6" to 8" |
| Medium | Cockatiel, lovebird, conure | 12" x 12" to 15" x 15" | 8" to 10" |
| Large | African grey, Amazon, cockatoo | 18" x 18" to 22" x 22" | 10" to 14" |
For sag (the gentle dip in the center of the hammock), you want the center of the fabric to hang about 2 to 3 inches below the anchor points for small birds, and 3 to 4 inches for larger birds. Too much sag and the fabric walls close in on the bird. Too little and there is no resting curve to snuggle into. The easiest way to test this before final installation is to hang the hammock empty and press gently in the center with your finger. It should give a soft bowl shape without the sides pinching together.
Placement height inside a cage matters too. For a medium or large cage, aim to hang the hammock in the upper third of the cage, well below the ceiling to avoid head strikes, and never directly above food or water dishes. Birds will defecate from whatever height they perch at, and a hammock above the water bowl is a contamination problem waiting to happen. Leave at least 6 inches of clearance on all sides so your bird can land on, adjust itself on, and exit the hammock without bumping into bars or other accessories.
How to build it: cutting, finishing, and tying
Step 1: Cut your fabric
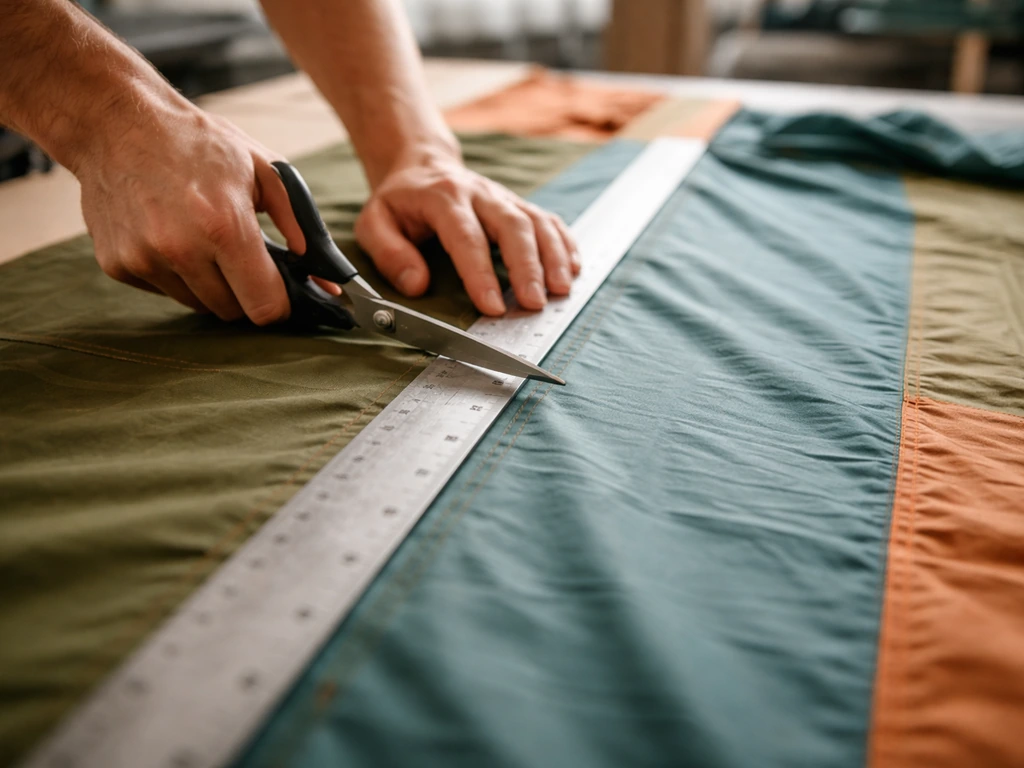
Measure and mark your fabric using the size guide above. Cut cleanly and straight. If you are using fleece, you are done with the edges. If you are using cotton canvas or twill, fold each edge over about half an inch and either sew a simple straight stitch hem or use fabric glue rated safe for bird contact. The goal is zero loose threads and no raw edge that can be pulled apart. I have skipped this step on early prototypes and watched a bird methodically unravel an entire edge in one afternoon. It is worth the extra five minutes.
Step 2: Reinforce the corners
The corners take the most stress. If you are sewing, stitch a small square or X-pattern at each corner through two layers of fabric to create a reinforced anchor point. If you are not sewing, fold the corner in on itself twice to create a thick pad, then make a small hole through all layers about half an inch from the tip using scissors or a hole punch. This is where your rope will attach. For fleece, the folded corner method works well because fleece grips itself.
Step 3: Attach the rope
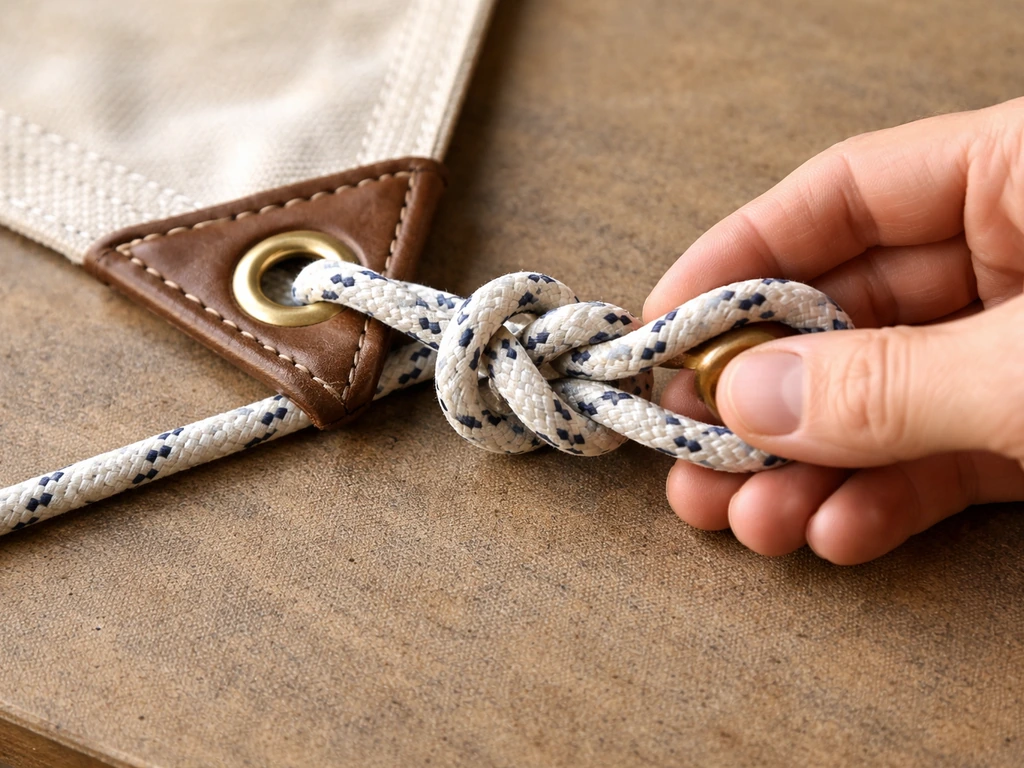
Cut four equal lengths of rope (one per corner) using the measurements from the table above. Thread one end of each rope through the corner hole and blank" rel="noopener noreferrer">tie a figure-eight stopper knot on the underside of the fabric. A figure-eight knot works by creating a loop that locks under load, so the rope cannot pull back through the hole even when your bird's full weight is on the hammock. Leave at least 8 to 10 inches of tail below that knot so you have something to work with and so the knot does not sit flush against the fabric and stress the material.
On the free end of each rope, tie another figure-eight loop or a simple secure loop that can clip onto your hardware. Clip a stainless steel quick-link through each loop. Now you have four corner ropes with hardware ready to attach to your cage or frame.
Step 4: A two-point vs four-point setup
A four-point setup (one rope at each corner) gives the most stable, flat hang and is best for larger birds or birds that like to pace across the hammock surface. A two-point setup (gather the two front corners together onto one attachment point and the two back corners onto another) creates a more pronounced hammock curve and is great for small birds who want to nestle in. Either works. The two-point version uses half the hardware and is faster to build, which is why it is a good starting point for beginners.
Installing it: cages and aviaries vs outdoor setups

Inside a cage or indoor aviary
Clip your quick-links directly onto the cage bars at matching heights on opposite walls or on the same wall if using a corner mount. Check that the attachment bars are sturdy enough that the quick-links cannot slide along them when your bird jumps on and off. Most wire cages have horizontal bars that hold hardware in place naturally. Clip the links, check the sag, and adjust the rope length by retying if needed before your bird has access. Do a firm tug test on each corner before letting your bird near it.
Keep the hammock away from any other perches or toys positioned directly above it. You do not want droppings landing on the resting surface. Position it so the bird has a clear flight path to land on one end of the hammock rather than having to squeeze past another accessory. If your cage is on the smaller side, a hammock replaces a perch rather than adding to the clutter.
In a walk-in or outdoor aviary
In a large aviary, you have more placement flexibility but also more exposure to weather, droppings from overhead birds, and predator stress. Hang the hammock in a sheltered section of the aviary, ideally under a covered roof section or in a corner that gets shade during the hottest part of the day. Use stainless steel eye bolts screwed into wooden frame members rather than clipping to wire mesh, as mesh attachment points flex more and can work loose over time.
For any outdoor setup, use only materials that can handle moisture. Fleece dries quickly and holds up reasonably well, but untreated cotton canvas is the more durable outdoor choice. Avoid anything that will rot, mold, or hold moisture against a bird's feathers. Outdoors, replace the hammock more frequently, roughly every 4 to 8 weeks depending on weather conditions, rather than the longer intervals you can get away with indoors.
Placement relative to predators matters too. In a backyard aviary, the hammock should never be near a gap in the wire or at a height where a reaching paw or beak from outside could access a resting bird. Keep it central and elevated, not pressed against the outer wall.
Safety checks and problems to troubleshoot
Do a quick visual check every day when you are feeding or checking on your birds. It takes about 10 seconds and catches problems before they become emergencies.
Daily checks
- Look at the rope ends for fraying, especially near the knots and at the corner attachment holes
- Check that the sag has not changed (a noticeably flatter or deeper hammock means something has shifted)
- Scan for loose threads or pulls in the fabric surface
- Confirm the hardware has not opened, bent, or slid out of position
Common problems and how to fix them
The hammock twists or rolls to one side: This usually means one rope is shorter than the others. Untie and re-cut to match, or add a small piece of rope to the short side. Alternatively, the attachment points on the cage are not level. Check that the hardware is at the same height on both sides.
The bird is not using the hammock: Give it a week before worrying. Try rubbing a favorite treat or a bit of foraging material onto the surface. Some birds need to see the hammock as a neutral object before they trust it. You can also temporarily make it the only elevated resting surface in the cage to encourage exploration.
Rope ends are unraveling: Tie a simple overhand stopper knot right at the rope tip or seal natural-fiber rope ends with a brief pass over a flame (not touching the flame, just close enough to melt or compress the fibers slightly). Do not do this with synthetic rope because the melted plastic is a hazard.
Toes or nails are catching in the fabric: This is a sign the weave is too loose or there are small loops forming. Replace the fabric with a tighter weave or switch to fleece, which has minimal surface loops. Check nail length too as overgrown nails catch on everything and are a health issue independent of the hammock.
The hammock sags too far after a few days: The rope has stretched, especially with cotton. Re-tie the corner ropes with slightly shorter lengths. Cotton rope does stretch with use and humidity, so account for this when setting initial tension.
Cleaning, maintenance, and knowing when to replace
A hammock that cannot be cleaned is a health hazard. This is why material choice matters so much at the start. Fleece and cotton canvas are both machine washable, which makes the cleaning routine genuinely easy.
Cleaning routine
Remove the hammock from its hardware once a week for a cage bird, or every 3 to 5 days for a high-use aviary setup. Machine wash on a warm cycle with an unscented, bird-safe detergent or plain hot water alone. Do not use bleach or chlorine-based cleaners because even residual fumes after drying can be harmful. If you want to disinfect, a 3% hydrogen peroxide solution is a good option: soak or spray, leave it for a few minutes, then rinse thoroughly with warm water and let it air dry completely before returning it to the cage. Make sure there is no remaining scent before the bird is back on it.
For the hardware, wipe the quick-links or S-hooks with a damp cloth and dry them completely to prevent any rust or surface corrosion. Check the threads on quick-links to confirm they still close and lock properly.
When to replace it
Replace the hammock immediately if you see any of these: fabric that is visibly frayed or has loose threads you cannot trim away, rope that has worn thin or shows significant fraying near the knots, staining that does not wash out after two cleaning cycles, or any mold or persistent odor. Do not try to patch a fraying hammock. The materials are cheap enough that a replacement is always the safer call. A good habit is to keep a second hammock made and ready so there is no gap in the bird's routine when you pull the old one for washing or retirement.
For outdoor or aviary hammocks exposed to weather, budget for replacement every 4 to 8 weeks. For a well-maintained indoor cage hammock made from good fleece or canvas, you can realistically get 3 to 6 months of use before the fabric starts to show wear. The rope usually lasts longer than the fabric, so you can often re-use your hardware and rope while replacing just the fabric panel.
Ways to customize once you have the basics down
Once you have built one hammock and seen how your bird uses it, there is plenty of room to experiment. You can sew a short wooden perch or a natural branch dowel along one edge of the hammock to give the bird a landing bar before stepping onto the softer surface. You can layer two pieces of fleece in contrasting colors and cut fringe along the edges (keeping the fringe short, under an inch, to reduce tangle risk). You can also make a double-panel hammock with a pocket sewn into the underside, creating a hybrid between a hammock and a bird cozy, though at that point it is worth looking at a dedicated sleeping tent design separately.
For a more advanced build, try a woven cotton cord hammock using a basic square knot macrame pattern. This takes longer but produces a beautiful open-weave surface that many birds prefer because their feet can grip the individual cords. The same material and hardware rules apply: 100% cotton cord, stainless steel hardware, no galvanized metal, and regular inspection of every knot.
Whatever version you build, the goal is the same: a safe, comfortable, cleanable resting spot that adds real value to your bird's daily environment. Start with the simple fleece square, hang it today, and adjust from there based on what your bird actually does with it.
FAQ
Can I use an existing hammock fabric or scrap from an old project?
Only if the material is tightly woven and you can confirm it does not fray into loose fibers. If the fabric sheds fluff when you pull on a cut edge, switch to fleece or new 100% cotton canvas, and always finish edges so there are no raw threads exposed to chewing.
How do I choose the right hammock size for a specific bird?
Start with a square panel that lets your bird sit without the sides folding onto them. As a quick check, aim for a hammock that allows at least a finger-width of clearance between the fabric walls when your bird is resting in the center, then adjust rope length rather than changing the fabric size.
Is fleece safe even though it can pill and wear?
Fleece is safe for hammocks when you avoid loose-knit or long-pile types, and you inspect it frequently. If you see fuzzy shedding that could become threads, or the panel develops thin spots at stress corners, replace it instead of trying to trim loose pills.
How do I prevent the hammock from twisting or rolling?
Make sure your corner knots and attachment points are consistent and that the quick-links sit at the same height on both sides. If it still twists, re-tie one corner at a slightly longer rope length so the fabric rests evenly, do not just tug the hammock into place.
What knot is best for securing rope to the fabric, and does it need to be tied on top or underneath?
Use a figure-eight stopper knot and place it so the loop locks under load. Keep the knot on the underside of the fabric and leave a tail so the knot does not press flush against the edge, reducing stress and slip risk.
Should I hang the hammock directly above a chew toy or ladder?
No. Place it away from anything above it so droppings do not land in the resting area, and so your bird has a clear landing path to one end of the hammock. Also avoid tight spacing where the bird must squeeze past other items to enter or exit.
Can I attach the hammock to wire mesh instead of the cage frame?
In general, prefer the cage bars or a solid wooden frame member. Wire mesh attachment points can flex and loosen over time, which increases sag and can change alignment. If your only option is mesh, use hardware that spreads load and re-check it often.
How often should I check the hammock for safety between cleanings?
Do a brief daily visual check and a tug test whenever you see any change in sag or alignment. For a high-use aviary, check corners and knots at least every few days, because repeated jumping accelerates fraying and rope stretch.
What should I do if my bird keeps chewing the hammock?
Remove it and switch to a tighter-woven fabric or fleece that is less likely to fray, then confirm there are no loose threads at the edges or corners. Also consider adding safe chew alternatives nearby so the hammock does not become the primary chewing target.
Is it safe to add a small perch to the hammock edge?
Yes, but only if the perch is securely stitched or tied so it cannot shift and create pinch points. Keep the perch low enough that the bird can step onto it smoothly from an adjacent area, and ensure it does not block exit from the hammock.
How do I clean it without leaving odor or residue?
Machine wash with unscented, bird-safe detergent or use hot water alone, then ensure it fully dries and smells neutral before returning it. Avoid bleach or chlorine cleaners, even if you rinse well, because residual fumes can irritate birds.
Can I disinfect the hammock more aggressively for mold concerns?
Do not patch moldy material. Replace the fabric if mold or persistent odor returns after cleaning, and for disinfection use a mild 3% hydrogen peroxide routine with thorough rinsing and complete air-drying before reintroducing the bird.
How do I know when it is time to replace rather than re-tie or patch?
Replace immediately if you see deep fraying, thin rope near knots, loose threads you cannot trim away safely, staining that does not come out after multiple washes, or any mold. If only sag has changed, re-tie rope lengths, but do not rebuild on damaged corners.
What rope diameter should I use if my bird is between sizes?
If your bird is medium, use the 3mm to 5mm range so knots stay manageable but not overly bulky. For larger parrots that put more force on corners, 6mm to 8mm can make knot inspection easier. When unsure, choose the slightly thinner option for smaller birds and increase only if knots become hard to check.
Next Articles
How to Make a Bird Cozy: DIY Shelter and Comfort Guide
Step by step DIY shelter, roosting and enrichment tips to keep backyard, nest, or pet birds safe, warm, and calm.
How to Make a Bird Swing: DIY Steps, Sizing, and Safety
Step-by-step how to make a bird swing with sizing, safe materials, secure mounting, and hazard-proofing tips.

How to Build a Chimney Swift Bird House DIY Guide
Step-by-step DIY plans to build a chimney swift bird house, with correct dimensions, placement, and weatherproofing for