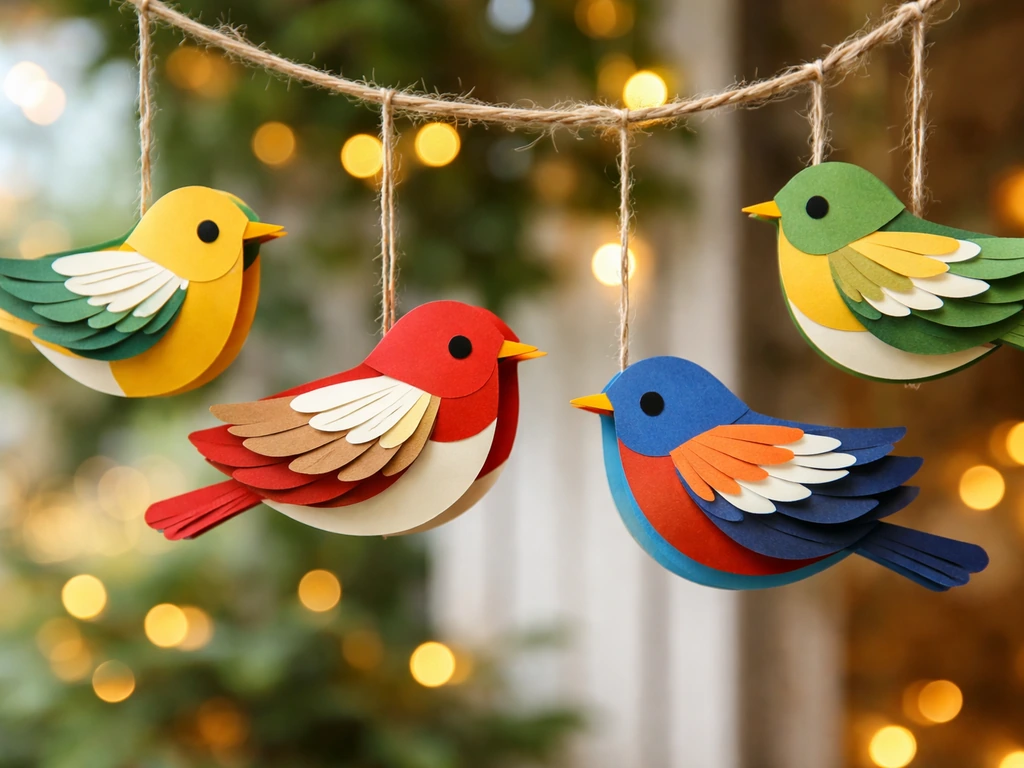
You can make beautiful bird decorations at home with basic supplies, a printed template, and an hour or two of your time. Whether you want delicate paper bird ornaments for a garland, clay birds to hang on a Christmas tree, or felt birds sturdy enough to survive years of handling, the process is straightforward once you pick your style and gather your materials. This guide walks you through both a paper-craft approach and a non-paper ornament approach, plus how to finish and display them so they actually last.
How to Make Bird Decorations: Paper Birds and Ornaments

Marcus Thornton
20 Apr 2026
Choosing the right bird ornament style: paper vs. other materials
The first decision is what you want your finished ornament to survive. Paper and cardstock birds are fantastic for indoor garlands, holiday displays, and wall arrangements, and they are genuinely fast to make in multiples. The layered 3D cardstock approach popularized by makers like Jennifer Maker gives paper birds real structure, since gluing multiple cut layers together creates thickness and lets you fold small details like a beak without things falling apart. That said, paper is not weatherproof even with a sealer coat, so keep paper birds indoors.
If you want ornaments you can hang outside, put on a real tree, or pass around for kids to handle without worry, felt and air-dry clay are better picks. Felt birds, assembled with blanket stitching and a ribbon loop, hold up to repeated handling season after season. Air-dry clay birds come out solid and heavy enough to feel like real ornaments, and you can seal them for genuine weather resistance. The table below lays out how these three material options compare so you can match your project to your actual goal.
| Material | Best for | Durability | Outdoor use | Beginner ease |
|---|---|---|---|---|
| Cardstock / paper | Indoor garlands, wall art, holiday displays | Moderate (handles indoor use well) | Not recommended | Very easy |
| Felt | Christmas tree ornaments, gift tags, reusable holiday décor | High for indoor use | Not ideal unless sealed | Easy |
| Air-dry clay | Hanging ornaments, outdoor-safe décor when sealed | High when properly sealed | Yes, with sealant and full cure | Easy to moderate |
Materials and tools you'll need
You don't need a craft room full of specialty tools. Here is what covers all three approaches. Pick the list that matches your chosen style, or grab everything if you want to try more than one.
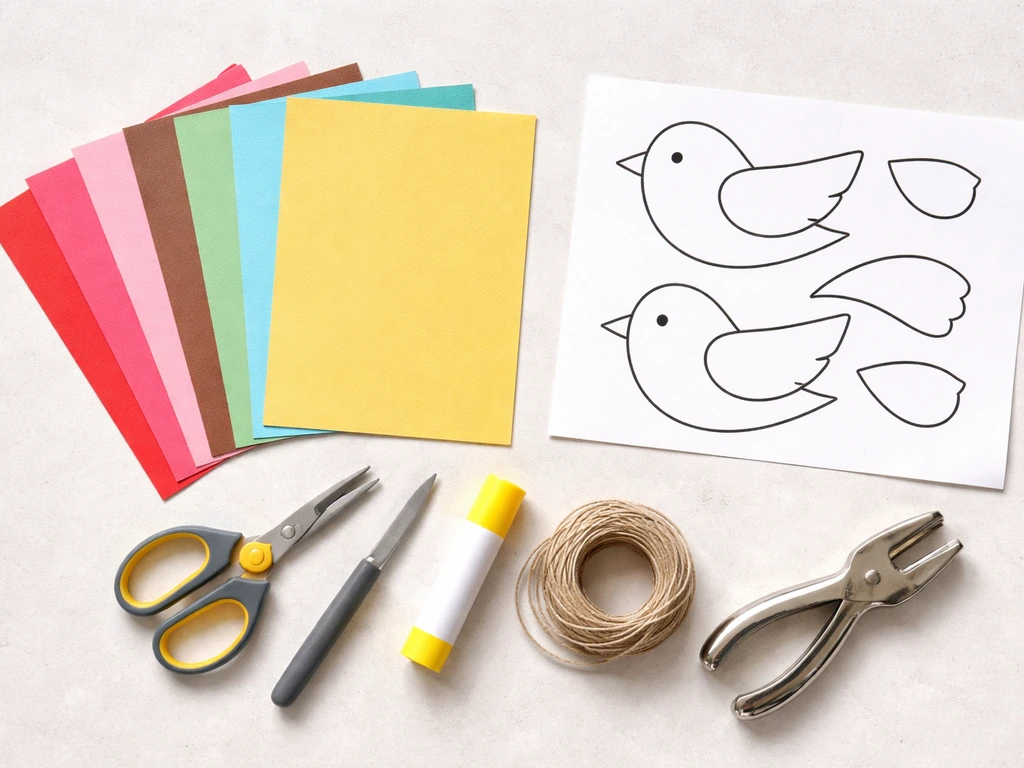
For paper and cardstock bird ornaments
- Cardstock in your choice of colors (65–80 lb weight works well; regular printer paper is too flimsy for layered 3D builds)
- A printed paper bird template or SVG file (PDF templates from sites like Wee Folk Art give you consistent, repeatable outlines)
- Sharp scissors or a craft knife and self-healing cutting mat
- A cutting machine like a Cricut or Silhouette (optional but helpful for SVG-based builds)
- PVA glue or a glue stick (PVA gives a stronger bond for layered assemblies)
- A bone folder or butter knife for making crisp folds
- A hole punch for the hanging hole
- Thin ribbon, twine, or fishing line for hanging
For clay bird ornaments

- Air-dry clay (brands like Activa Plus or similar craft-store air-dry clay work well for pendants and ornaments)
- A rolling pin or smooth bottle to flatten clay evenly
- Bird-shaped cookie cutters or a printed template to cut around with a craft knife
- A thin wire or paperclip to insert a hanging loop before the clay dries
- Fine sandpaper (220 grit) for smoothing after drying
- Acrylic craft paints
- Paintbrushes in a range of sizes
- Mod Podge Outdoor or a clear acrylic sealer spray for weather resistance
- Ribbon, jute twine, or thin cord for hanging
For felt bird ornaments
- Craft felt sheets in bird-appropriate colors (wool blend felt is sturdier than pure acrylic felt)
- A felt bird template printed at full size
- Sharp fabric scissors
- Embroidery floss and a needle for blanket-stitch edges
- Polyfill stuffing or a small amount of fiberfill
- Narrow ribbon (about 6 inches) for the hanging loop
- Fabric glue or hot glue for small details like eyes or wing accents
- Small beads, buttons, or googly eyes for detailing
Step-by-step: making paper bird ornaments
This method follows a layered 3D cardstock approach. It produces birds with real dimension, not just flat cutouts, which means they look good hanging in a window or on a garland and they hold their shape. I'd recommend doing a test bird with plain white cardstock before cutting into your nicer patterned paper.
- Download or print your template. Use a PDF template for consistent outlines across multiple birds. Print on regular paper first to confirm the size looks right before printing directly onto cardstock.
- Cut out all the layers. A typical 3D paper bird has at least two or three body layers plus a separate beak piece. Use sharp scissors and cut slowly around curves. If you have a cutting machine, load your SVG file and let it do the work for cleaner edges.
- Score fold lines before folding. Lay your ruler along any fold line marked on the template and run a bone folder or the back of a butter knife along it firmly. This prevents tearing and gives you a crisp, clean fold.
- Glue the body layers together. Apply PVA glue evenly across the back of each layer and press them together, aligning the edges carefully. Hold each glued pair flat under a book for a few minutes so they bond without warping.
- Fold and attach the beak. The beak piece usually has a center fold line. Score it, fold it, then apply a small amount of glue to the tab and press it into the slot or notch on the head. Hold it in place for 30 seconds.
- Add a hanging hole. Once the glue is fully dry (give it at least 30 minutes), use a hole punch near the top of the bird's back. Thread thin ribbon, twine, or clear fishing line through and tie a knot to form a loop.
- Decorate if desired. Use fine-tip markers, watercolor pencils, or washi tape strips to add feather details, eye markings, or color gradients. Markers work better than wet paint on cardstock since heavy moisture will warp the layers.
One honest note: the first time I tried folding a tiny cardstock beak, I tore through the paper because I skipped scoring it. That one step makes a bigger difference than it sounds. Take 10 extra seconds and do it.
Step-by-step: making bird Christmas ornaments and hanging decorations
For ornaments that go on a tree, get handled by kids, or come out year after year, air-dry clay and felt are both excellent. Here are complete walkthroughs for each.
Air-dry clay bird ornaments
- Condition the clay by kneading it for 1 to 2 minutes until it's smooth and pliable. If it cracks when you fold it, it needs a few more seconds of warming in your hands.
- Roll the clay out to about 1/4 inch thickness on a non-stick surface. A silicone mat or a piece of parchment paper works well.
- Cut your bird shape. Press a bird-shaped cookie cutter firmly and evenly through the clay, or place a printed paper template on top and cut around it with a craft knife.
- Smooth the edges with a damp finger before the clay starts to stiffen. This removes rough bits now so you don't need heavy sanding later.
- Insert the hanging loop while the clay is still soft. Cut a 3-inch length of thin wire or open a paperclip and bend it into a U shape. Press the two ends into the top of the bird's back, leaving a loop sticking out above the surface. Press the clay gently around the wire ends to secure it. This creates a strong integral hanger that won't pull out later.
- Let the clay dry fully according to the package directions. Most air-dry clays take 24 to 48 hours at room temperature for a piece this size. Don't rush it with a heat gun; slow drying prevents cracking.
- Sand lightly with 220-grit sandpaper once completely dry to smooth any rough patches.
- Paint with acrylic craft paints. Add your base color first, let it dry for 30 minutes, then add feather details and markings with a fine brush.
- Seal the finished painted bird with Mod Podge Outdoor or a clear acrylic sealer spray once the paint is fully dry. Apply two coats, letting each dry completely between applications.
- Thread ribbon, jute twine, or thin cord through the wire loop and tie it off to form your hanging loop.
Felt ball bird ornaments
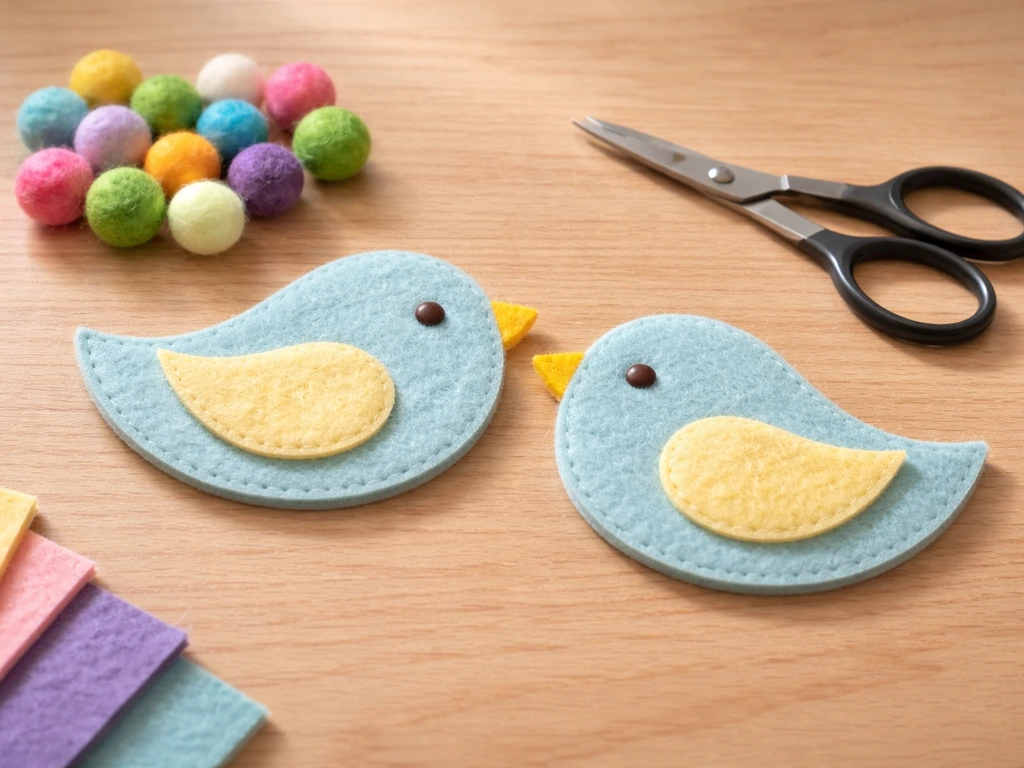
- Print and cut out your felt bird template at the size you want. A palm-sized bird (roughly 3 to 4 inches) is easy to handle and looks great on a tree.
- Trace the template onto two layers of felt stacked together and cut both pieces simultaneously so they match exactly.
- Fold a 6-inch piece of narrow ribbon in half and place it between the two felt layers at the top of the bird's back, with the loop pointing outward. This is your hanger.
- Stitch around the edge of the bird using a blanket stitch, starting at the tail and working your way around. The blanket stitch catches the ribbon loop in place as you pass over that section.
- Leave a 1-inch gap unsewn near the tail. Push small amounts of polyfill stuffing inside using a pencil eraser until the bird has a plump, rounded shape.
- Stitch the gap closed to finish the seam.
- Add details with fabric glue or a few hand stitches: a small bead for the eye, a contrasting felt piece for the wing, or embroidery floss for feather lines.
- Hang directly from the ribbon loop. The knotted ribbon tail at the inside of the neck area anchors the loop securely, as suggested in tutorials like Amy Loves to Sew's felt bird design.
Finishing, decorating, and safety considerations for outdoor use
If your bird ornaments are staying indoors, finishing is mostly about looks. But if you're placing them outside near a feeder, on a garden post, or in a backyard bird-watching area, you need to think about weather resistance and material safety around the birds themselves.
Sealing for outdoor durability
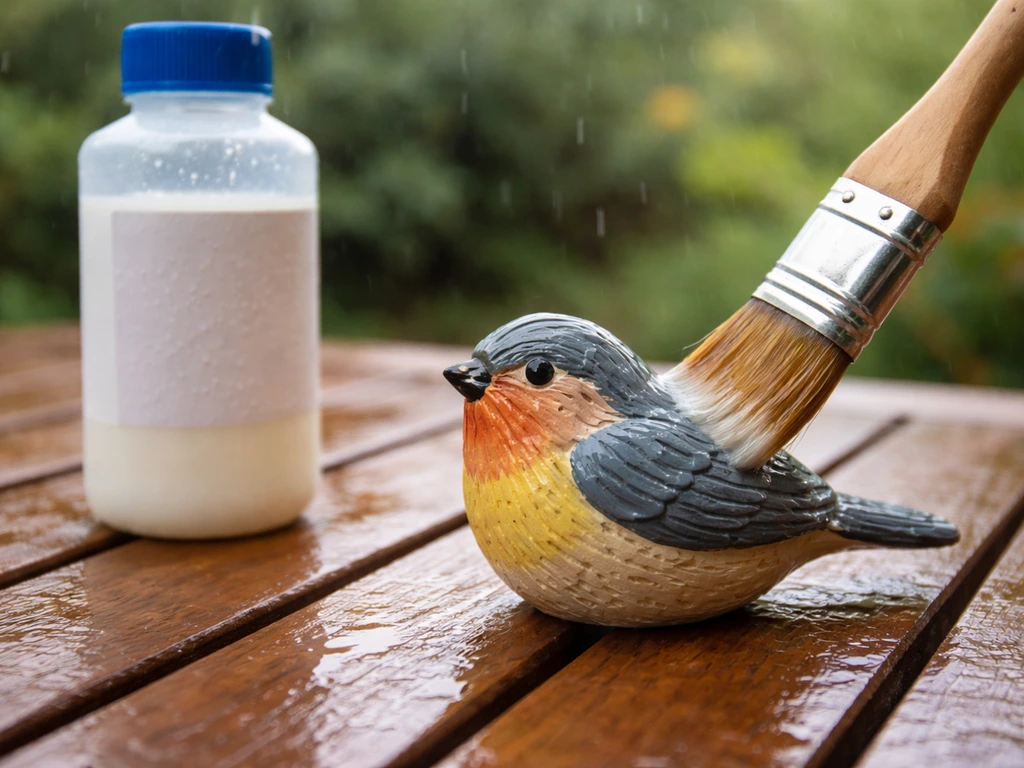
Mod Podge Outdoor is a solid choice for sealing painted clay or wood bird decorations because it's formulated to handle moisture. Here's the important part though: even though it feels dry to the touch within a few hours, Mod Podge Outdoor doesn't reach its full water resistance until it has fully cured, which the brand states takes up to 4 weeks.
Mod Podge Academy (Plaid) notes that drying and curing are different, and Mod Podge needs about 28 days to fully cure. Don't hang your outdoor ornaments in the rain before that point. For a spray-on alternative, Mod Podge Clear Acrylic Sealer forms a water-resistant barrier once fully cured and is non-toxic when dry and used as directed.
Two thin coats will always outperform one thick coat for even coverage and durability.
Non-toxic material choices for a backyard setting
When decorations go into a backyard bird-watching space, birds may land near or even on them. Look for art supplies that carry the ACMI AP (Approved Product) seal. The AP seal indicates the product has been certified non-toxic by the Art and Creative Materials Institute, which is a meaningful standard backed by toxicological evaluation. Most major craft paint brands carry this seal, but it's worth checking the label. Keep in mind that 'non-toxic' applies to normal handling and use, not to materials being chewed or ingested, so don't place any decorated items directly inside a birdhouse or nesting box where birds interact closely.
Avoiding shedding and loose parts outdoors
Glitter, loose sequins, and small beads are a genuine hazard outdoors because birds can pick them up thinking they're food or grit. If you're decorating ornaments for an outdoor garden or backyard space, skip the loose glitter and stick to painted details or sealed metallic paint instead. Secure all embellishments with a strong craft glue and then coat the whole ornament in sealant so nothing can detach. For hanging hardware outdoors, use rust-resistant wire or coated hooks rather than plain steel wire, which will rust and stain the ornament within one wet season.
Display, storage, and customization ideas
Displaying your bird ornaments
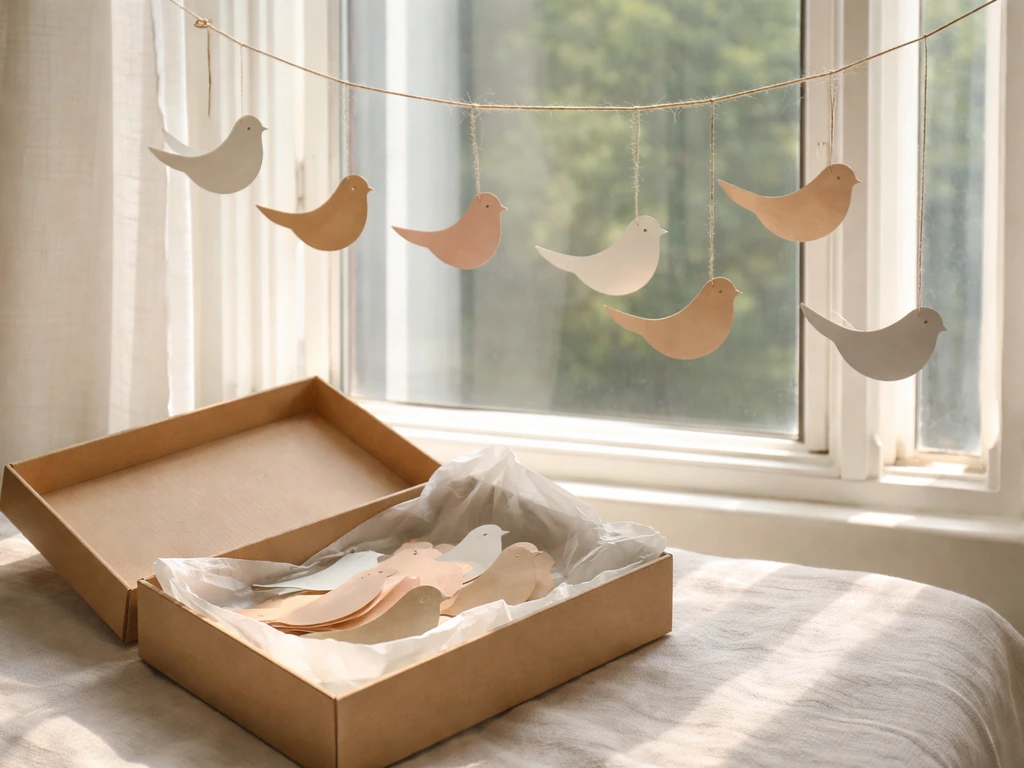
Paper bird ornaments look great strung along a garland with thin twine, hanging in a cluster at different heights in a window, or arranged on a wall with small command hooks. Clay and felt ornaments work well on a Christmas tree, hung from a decorative branch in a vase, or tied to a wreath. If you're putting clay ornaments outdoors, anchor them to something stable so they don't swing violently in wind and chip against each other. A simple solution is spacing them out on a length of jute twine attached between two fence posts or along a garden trellis.
Storing ornaments between seasons
Paper ornaments should be stored flat or hanging, never folded flat in a box where other items can press on them. A cardboard box with tissue paper between layers works well. If you want a more functional craft than ornaments, you can also learn how to make a bird cage craft that’s safe for backyard displays a cardboard box with tissue paper between layers. Clay ornaments are fragile if stored loose together, so wrap each one individually in tissue paper or bubble wrap before packing. Felt ornaments are the most storage-friendly: they can be stored in a zip bag or a small fabric pouch with no damage.
Customization ideas to make them your own
One of my favorite things about making bird decorations is that you can tailor them to the birds you actually see in your backyard. If you watch chickadees or nuthatches at your feeder, paint your clay ornaments to match. For paper ornaments, use patterned scrapbook paper in textures that mimic feathers.
If you're building a backyard bird-watching space and want the decorations to reinforce the theme, coordinating the ornament colors and species with the birds you're trying to attract makes the whole space feel intentional rather than random. This pairs naturally with projects like decorating a birdhouse or building a bird feeder, since the same color palette and non-toxic sealant choices apply across all of them.
You can use the same color palette and non-toxic sealing approach when you learn how to make a bird seed covered birdhouse. If you want to go one step further, decorating a birdhouse with matching colors and a non-toxic finish can tie your whole backyard look together.
Template-based designs are also easy to scale: print the same PDF template at 50% size for tiny ornament versions, or at 150% for larger wall-mounted decorations. Once you've made one good bird, you have a repeatable process you can use to make a whole flock. If you’re starting from scratch, this is the same mindset behind how to make DIY bird ornaments step by step Once you've made one good bird, you have a repeatable process you can use to make a whole flock.. Once you've made one good bird, you can build confidence fast and learn how to make a bird at home in a way that fits your materials and your space.
FAQ
Can I use paper bird decorations outside if I seal them?
If you want a bird decoration to last in direct sun, prioritize materials and finishes meant for outdoor exposure, felt or air-dry clay sealed after full curing. Even with sealer, paper will fade and become brittle over time, so use paper for indoor-only garlands and window clusters.
How do I know when my outdoor sealer is fully ready to handle or hang?
Instead of relying on one thick coat, apply multiple thin coats and let each layer dry fully. For outdoor sealers, plan around full cure time, then do a quick edge test (lightly touch a hidden area) before hanging near rain or sprinklers.
My air-dry clay birds crack or chip when hanging. What’s the fix?
For clay birds, avoid pressing them directly against rough surfaces, and plan to hang or tie them so weight is supported by a wire or loop rather than a single point on the body. If the ornament must be suspended from the head or beak area, reinforce that spot with an extra small piece of wire before sealing.
What’s the best way to attach string or loops to paper birds so they don’t tear?
Yes, but use a stable attachment method. For paper garlands, punch holes and tie with thin twine, then reinforce around the hole with a small scrap of cardstock. For hanging points, avoid just gluing paper edges, because repeated pulling can peel the seam.
Are glitter and sequins safe for backyard displays?
Before adding embellishments, pick them based on how the ornament will be used. Outdoors and around birds that peck, skip loose glitter and any small detachable pieces, then secure everything with strong craft glue and finish with a full seal coat to prevent shedding.
I keep tearing the beak or wing tips on layered cardstock. What technique should I change?
If your tiny folds keep tearing, score first, then fold along the score line using a bone folder or the edge of a straight tool. Also cut slightly conservative shapes, do a test bird, and remember that beaks and wing tips are the highest-stress areas.
How should I store bird decorations so they don’t warp or get damaged between seasons?
Choose storage based on material flexibility. Store paper flat or hanging with tissue between layers, clay individually wrapped to prevent edge-to-edge impacts, and felt in a zip bag or pouch so it stays clean without crushing embroidered or stitched areas.
What should I watch for when printing the same bird template at different sizes?
When you scale templates, check that small details remain functional. If you shrink to very small sizes, consider simplifying protruding parts like beaks, and leave slightly larger hanging holes so string can pass without enlarging cuts later.
How can I hang paper bird garlands so they look layered and stay flat?
For garlands and window displays, use lighter suspension so the birds hang naturally and don’t twist. Space them evenly, and consider staggering heights by tying different lengths of twine, then keep paper decorations away from areas where people or pets will bump them repeatedly.
If a product is labeled non-toxic, can I put ornaments inside birdhouses or nesting boxes?
It is usually a bad idea to place decorated items inside a nesting box or where birds can actively chew decorations. If you are creating a bird-friendly space, keep decorations at feeder height or on nearby stands, and treat “non-toxic” as safe for incidental contact, not for ingestion or chewing.
Next Articles
How to Decorate a Bird House Safely Step by Step
Step-by-step how to decorate a bird house safely with bird-safe paints, finishes, and durable outdoor details.

How to Build a Chimney Swift Bird House DIY Guide
Step-by-step DIY plans to build a chimney swift bird house, with correct dimensions, placement, and weatherproofing for

How to Build an Oriole Bird House: Step-by-Step DIY
Step-by-step DIY for building an oriole bird house with right dimensions, weatherproofing, predator-safe placement, and