You can build a safe, effective live bird trap from basic hardware cloth, scrap wood, and a handful of fasteners in an afternoon. The key is choosing the right trap style for your situation, building it so there are no sharp edges or gaps that could injure a bird, checking it at least every 12 hours, and releasing non-target birds immediately. Done right, a homemade live trap is genuinely humane. Done carelessly, even a well-built cage can hurt or stress a bird badly. This guide covers everything: legality first, then design, construction, placement, monitoring, release, and what to do instead of trapping if trapping isn't actually the right tool for your situation.
How to Make a Live Bird Trap: DIY Humane Guide

Marcus Thornton
14 May 2026

Legality, Ethics, and When Trapping Actually Makes Sense
Before you cut a single piece of wire, you need to know whether you're legally allowed to trap the bird you have in mind. In the United States, most wild birds are protected under the Migratory Bird Treaty Act (MBTA). Under that law and its implementing regulations in 50 CFR Part 21, "take" is broadly defined to include trapping and capture. That means you generally cannot trap, possess, or transport a migratory bird without a federal permit or a specific regulatory exception. This isn't a technicality you can skip over. Trapping a protected species without authorization can result in serious penalties.
There are some exceptions baked into federal rules. For example, 50 CFR 21.43 includes a depredation order covering blackbirds, cowbirds, crows, grackles, and magpies that allows certain take under specific conditions, including providing shade above 80°F, adequate food and water, and prompt release of non-target birds. Under 50 CFR 21.6, the definition of humane and healthful conditions requires using methods supported by the best available science that minimize fear, pain, stress, and suffering for migratory birds held in possession. But even within those exceptions, conditions are strict and you still need to comply with state law on top of federal rules. States like Washington and New York add their own layers, including restrictions on relocating trapped wildlife to parks, state land, or any property other than where it was captured.
The species that are generally legal to trap without a federal migratory bird permit are non-native invasive birds: European starlings, house sparrows (also called English sparrows), and feral/domestic pigeons. These three are not protected under the MBTA, which is exactly why most DIY live trapping guidance focuses on them. If you're dealing with a robin, a finch, a mockingbird, or any native songbird, you need to contact your state wildlife agency and likely USFWS before doing anything. When in doubt, call first.
Ethically, trapping is appropriate when you have a specific, real problem: a starling colony nesting in your eaves, a flock of house sparrows monopolizing feeders and killing native nestlings in your nest boxes, or pigeons fouling a structure. It's not appropriate as a general hobby or for casual "catch and see" purposes. Even cage traps cause measurable stress and can cause physical injury, so every trap set should have a clear, legitimate reason behind it and a clear plan for what you do with the bird once you have it.
Choose the Right Trap Type for Your Situation

There are a handful of trap styles used for live-catching birds, and they're not interchangeable. Each has tradeoffs in terms of how many birds it catches at once, how easy it is to build, and how safe it is for the bird inside.
| Trap Style | Best For | Capacity | DIY Difficulty | Main Risk |
|---|---|---|---|---|
| Drop trap (box trap) | Single birds; backyard feeders | 1 bird | Easy | Bird panics if not checked quickly |
| One-way funnel/bob wire cage | Starlings, sparrows; flock situations | Multiple birds | Moderate | Bycatch of non-target species |
| Repeating cage trap | Ongoing house sparrow/starling control | Multiple birds over time | Moderate | Overcrowding stress if unchecked |
| Walk-in cage (decoy trap) | Crows, grackles (with permits) | Multiple birds | Moderate-hard | Requires legal permit in most cases |
| Clap/drop net | Research banding; professional use | Flock | Hard | High injury risk without training |
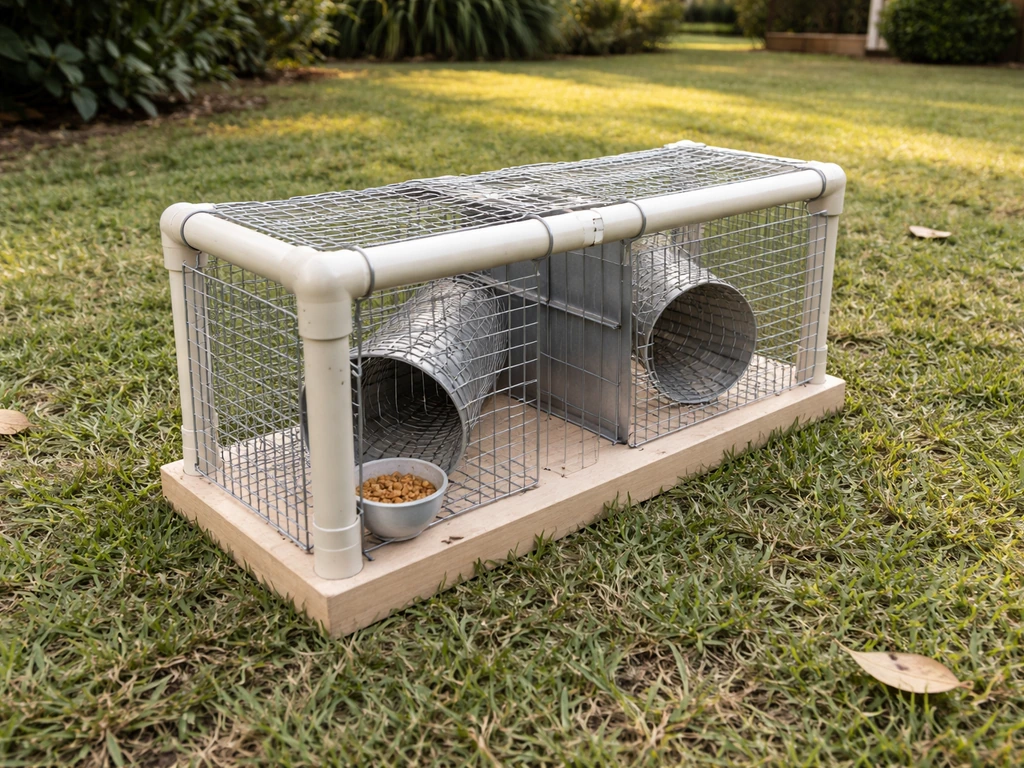
For most backyard DIYers targeting house sparrows or starlings, a repeating funnel-entry cage trap or a simple drop-box trap are the two practical choices. The funnel/bob-wire entry style uses inward-pointing wire prongs that let a bird walk in but not back out, which is the same basic principle described in standard licensed trapping conditions. The drop-box is simpler: a box propped up by a stick attached to a pull-cord, triggered manually when a bird walks under it. Both can be built with beginner skills. If you're interested in more automated triggering, that crosses into automatic trap territory, which is a related but separate topic worth its own research.
What You'll Need: Materials and Tools
The build below is for a repeating funnel-entry cage trap sized for house sparrows and starlings. It's the most versatile design for ongoing backyard use. You can scale it up for larger target species by increasing the dimensions, but keep the wire spacing tight enough that small birds can't squeeze through gaps and get stuck.
- 1/2-inch hardware cloth (welded wire mesh), roughly 3 feet x 6 feet for a medium cage
- Scrap 1x2 or 1x3 lumber for a simple frame (optional but makes the build cleaner)
- Wire cutters and needle-nose pliers
- J-clips or hog rings and the appropriate pliers, OR zip ties as a beginner alternative
- Tin snips if cutting heavier gauge wire
- A small wooden dowel or zip ties for shaping the funnel entry
- Staple gun and staples if attaching mesh to a wood frame
- Sandpaper or a metal file for smoothing any sharp cut edges
- A small door or hinged panel (can be made from a cut piece of the same hardware cloth)
- Optional: a trail camera or baby monitor camera for remote checking
A note on wire gauge: 19-gauge hardware cloth is the sweet spot. It's stiff enough to hold its shape but easy enough to cut and bend by hand. Chicken wire looks similar but has larger, hexagonal openings that can trap legs and toes, so avoid it entirely for live bird trapping. Any cut wire edge must be filed or bent back before the trap is used. Sharp wire ends are one of the most common causes of injury in homemade traps, and it's an easy problem to fix before it becomes one.
Build the Trap: Step-by-Step
Step 1: Build or assemble the main cage body
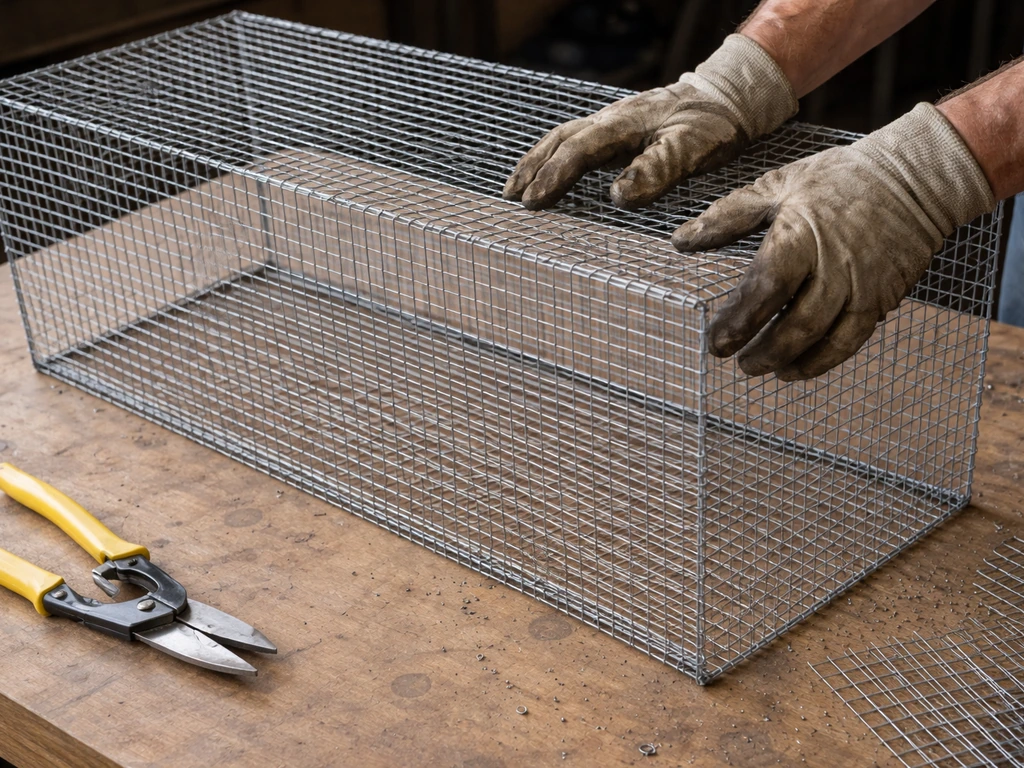
Cut your hardware cloth to form a rectangular cage roughly 24 inches long, 12 inches wide, and 12 inches tall for a sparrow/starling trap. If you're going frameless (all-wire construction), cut six panels: top, bottom, two long sides, and two short ends. Join edges using J-clips spaced every 3 to 4 inches, or use zip ties as a beginner-friendly alternative. Make sure all seams are tight with no gaps wider than half an inch. Every joint needs to be smooth on the inside: bend any protruding clip ends or wire tips outward and away from the interior with needle-nose pliers. Run your bare hand slowly along every interior surface before you consider the cage finished. If it snags your skin, it will injure a bird.
Step 2: Build the funnel entry
Cut a roughly 4-inch square opening in one of the short end panels. Then cut a separate piece of hardware cloth, about 8 inches x 6 inches, and shape it into a cone or funnel by rolling it so the wide end (about 4 inches across) aligns with the opening you just cut, and the narrow interior end is about 1.5 to 2 inches across for sparrows (or 2.5 to 3 inches for starlings). The funnel should point inward so birds walk through the wide outer end and find themselves inside the cage. The narrow inner opening makes it difficult but not impossible for them to reverse out, which is fine. You want reluctant deterrence, not a permanent trap. Attach the funnel firmly around the opening using J-clips or zip ties. The concept is similar to classic bob-wire designs used in licensed wild bird trapping: birds follow the bait in, and the geometry makes exit unintuitive.
Step 3: Add the access door
Cut a door panel into the top or one of the long sides, large enough for your hand to fit through comfortably for extraction. A 6-inch x 6-inch hinged door works well. Attach it with wire hinges (just bent wire loops) and add a simple wire hook-and-eye closure. This door is how you remove birds for release, and how you add or refresh bait. Make it easy to open one-handed, because your other hand may be holding a bird. When the trap is not actively in use, leave this door propped open or secured open so birds cannot accidentally enter and be confined when you're not monitoring. This is standard practice in multi-catch cage trap management.
Step 4: Add a perch and some cover
A short wooden dowel or a twig secured across the interior gives captured birds somewhere to stand other than the wire floor, which reduces foot stress during any waiting period. A small piece of cardboard or a shingle of wood zip-tied to one end of the top provides shade, which matters a lot: once temperatures climb above 80°F, shade inside the trap is not optional. A bird in a wire cage in direct sun can overheat within minutes.
Set the Trap: Placement, Bait, and Timing
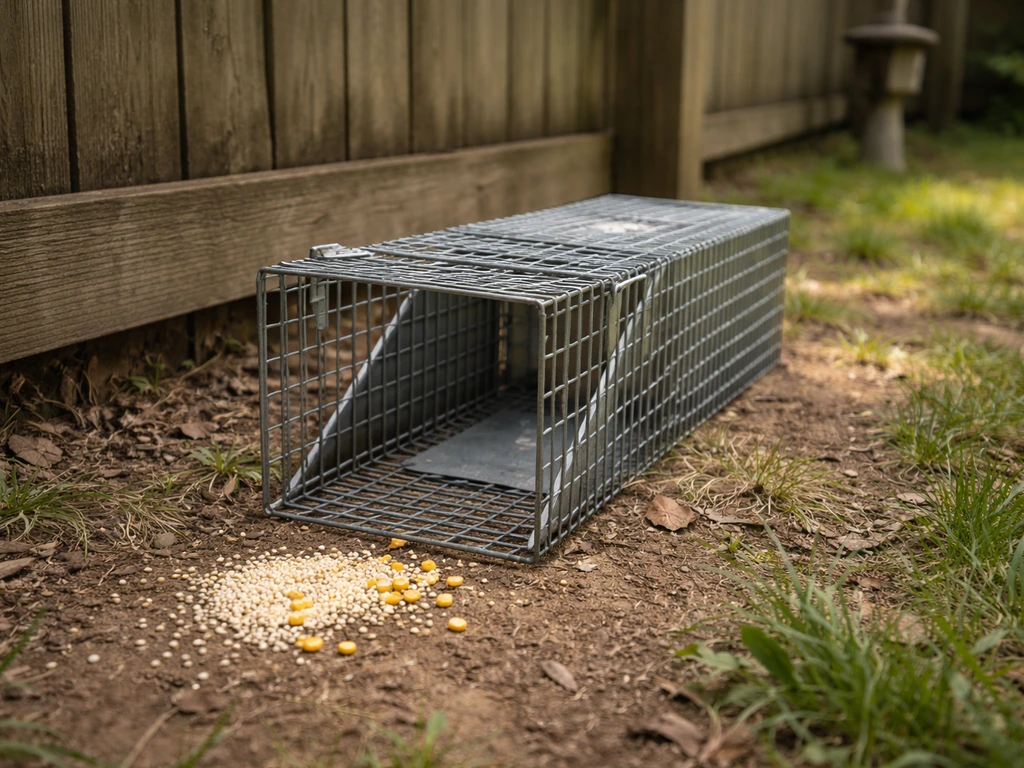
Where to place it
Put the trap where birds are already spending time: near an active feeder, along a fence line they use regularly, or near a structure where they roost. Ground level works well for sparrows and pigeons. Elevate slightly on a flat surface for starlings. Avoid spots in full sun with no nearby shade, and avoid areas with heavy foot traffic that will spook birds before they investigate. If you're worried about predators finding the trap before you do, positioning it close to cover like a shrub (but not directly under one) gives birds the confidence to approach while still leaving you a clear sightline.
What to use as bait
White millet is the go-to for house sparrows. Cracked corn works for pigeons and crows. Bread or starchy scraps attract starlings and pigeons. Scatter a small amount of bait outside and leading into the funnel entrance for the first day or two to let birds get comfortable with the trap before they commit to entering. Once they're feeding confidently around it, move the majority of the bait inside. Avoid baits that would attract songbirds or other species you don't want to catch, and avoid placing bait in a way that piles it up where a non-target species would be more likely to enter. Targeted bait choice is one of the most practical ways to reduce bycatch.
When to set it
Set the trap in the early morning, when birds are most active and hungry. This gives you the best chance of a capture during daylight hours when you can monitor properly. Do not set a trap and leave for the day. Do not set a trap overnight unless you're actively monitoring with a camera and can respond within a couple of hours. The longer a bird spends in a trap, the higher the risk of injury, predation by a passing cat or hawk, escape attempts that cause physical harm, and severe stress. Minimum inspection frequency is every 12 hours, and honestly, every few hours is better practice. If the weather turns hot, check even more frequently.
Monitor, Release, and Aftercare
Check the trap every single day it's set, at minimum. Twice per day, roughly 12 hours apart, is the standard. If you've set up a trail camera or a cheap battery-powered camera pointed at the trap, you can do a remote visual check between in-person visits, but the camera doesn't replace the in-person check. Your on-site visit is when you actually assess the bird's condition, refresh water, provide shade adjustments, and perform the release.
Handling a captured bird
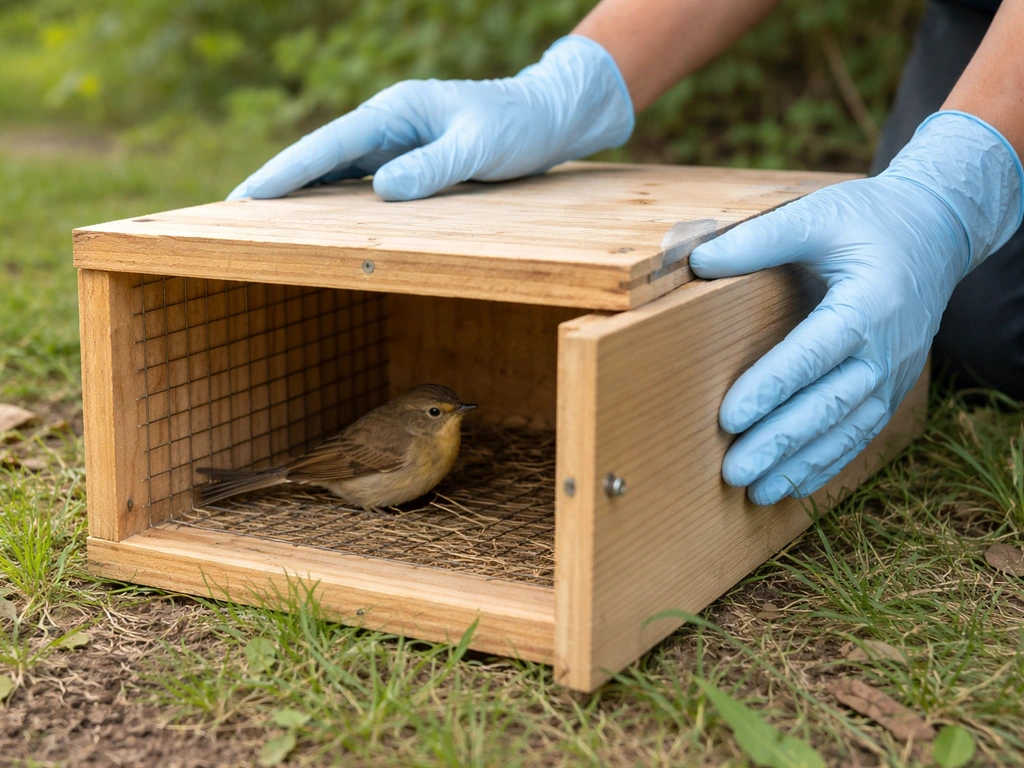
Open the access door slowly and calmly. If you have work gloves, wear them for larger birds like starlings or pigeons, which can peck and scratch. For sparrows, bare hands with a gentle grip around the body (wings lightly folded against the body, fingers around the torso) is sufficient. Never grab by the legs or wings alone. Minimize handling time. The more you handle a wild bird, the more cortisol-driven stress you're imposing. Your goal is a quick assessment and a quick release. Do not haze, yell at, or otherwise stress a bird that is already confined, as this is considered inhumane and counterproductive.
What to do with non-target birds
Release non-target birds immediately and unharmed at the trap site. Do not relocate them. Do not hold them while you decide what to do. If you find a native songbird in the trap, open the door and step back. Let it exit on its own if possible. If a bird appears injured or disoriented after being in the trap, contact a licensed wildlife rehabilitator. Under USFWS guidance, you may transport a sick or injured migratory bird directly to a permitted rehabilitator, but that's the limit of what an unpermitted person can legally do.
Releasing your target species
For non-native invasive species like house sparrows and starlings, the release decision is yours to make based on your management goals. Some people relocate them a distance away, though be aware that state regulations in some places restrict where you can release wildlife, so check your local rules before driving them to a park. If the bird appears healthy and alert, a release away from your nesting boxes or feeding station is usually the practical goal. Provide a small amount of water inside the trap if the bird has been held for more than an hour or if temperatures are warm.
When Things Don't Go as Planned: Common Problems
- Birds won't enter: The trap is too new and unfamiliar. Leave it unset (door open, bait inside) for 3 to 5 days so birds get used to it before you begin active trapping.
- No captures after several days: Move the trap to where birds are actually feeding, not just where you think they should be. Birds follow established patterns, so track their movement before choosing a spot.
- Non-target birds keep entering: Switch to a more species-specific bait and consider adjusting the funnel entry size to better match the target bird's body size.
- Bird escapes before you can check: Reinforce all seam joints and check the funnel entry for gaps. A bird that can push the mesh apart at a joint will find it.
- Bird is injured or extremely stressed upon check: Assess the trap design for sharp edges, overcrowding (if using a multi-catch design), or inadequate shade. Address the problem before setting again.
Alternatives to Trapping (and Why to Consider Them First)
Trapping is a tool, not a first response. For most backyard bird problems, there are faster, lower-effort, and completely permit-free solutions worth trying before you build anything. Exclusion is the most effective long-term strategy: blocking access points to eaves, vents, and attic spaces with hardware cloth or metal mesh eliminates the problem at the source. If house sparrows are outcompeting bluebirds or wrens at your nest boxes, adding a NABS-approved sparrow spooker (a simple strip of reflective tape above the entrance) dramatically reduces sparrow use without any trapping. Habitat adjustments, like switching from platform feeders that attract every species to tube feeders with small perches that favor the birds you actually want, can shift your yard's bird composition significantly.
Visual deterrents like reflective tape, predator decoys, and motion-activated sprinklers work reasonably well for short-term dispersal of problem birds from specific areas. These approaches don't require permits, don't carry injury risk, and don't require daily monitoring. If the goal is simply to redirect birds rather than remove them, deterrents and habitat design changes are genuinely worth trying first. Trapping makes the most sense when you've already tried exclusion and deterrence, when you have a clear target species that is unprotected, and when you have the time and commitment to monitor the trap properly every day.
The build itself is the easy part. A well-made cage from hardware cloth and scrap wood, with smooth interior edges, a proper shade cover, and a solid access door, is something most people can put together in a couple of hours. The harder part is the discipline of monitoring every single day, releasing non-targets immediately, and being honest about whether trapping is solving the actual problem. If you combine a good build with consistent checking and realistic expectations, a DIY live trap is a genuinely effective and humane tool for managing invasive species in your backyard. If you're specifically looking for how to make a bird trap with netting, this same live-trapping framework applies, but use the safest mesh and dimensions to prevent injury and escape how to make bird trap with net. If you're specifically trying to figure out how to make a myna bird trap, you'll still want to match the funnel-entry or drop-box design to the bird's size and the local legality and monitoring expectations described above DIY live trap. If you want a walkthrough on building a similar live bird trap, search for a YouTube how to make a bird trap video and compare it to this step-by-step guide.
FAQ
Can I make a live bird trap the same way for any species, even native birds?
No. The design principles (smooth edges, gaps that prevent squeezing, frequent inspection) still apply, but native and protected birds have legal limits that can make DIY trapping unlawful without permits. If the species is native, pause and contact your state wildlife agency before building or setting anything.
What are the biggest “gotchas” that turn a humane trap into an unsafe one?
The most common mistakes are sharp or snaggy wire ends, loose seams that create pinch points, inadequate shade in warm weather, and leaving the trap unmonitored. Another frequent issue is using the wrong mesh type (like chicken wire), which can trap toes or legs and cause panic injuries during attempts to escape.
How do I reduce the chance of catching the wrong species?
Use targeted bait for the specific invasive you want, and place bait so it leads into the funnel entrance rather than piling at ground level. Also consider trap location, near the target birds’ regular paths but away from mixed-species feeding spots, and avoid bait that attracts songbirds.
Is it ever acceptable to move the trap to a different spot after it captures a bird?
No. For non-target birds, the rule in the guide is immediate release at the capture site, not relocation. For invasive targets, moving can also create stress and may violate local rules, so instead adjust placement before setting again, not after capture.
How should I handle water and heat inside the trap during warm weather?
Provide shade and plan for more frequent checks when temperatures are high, because internal trap temperatures can rise quickly. If a bird has been held longer than about an hour, add a small amount of accessible water inside the enclosure (secured so it cannot spill onto the bird).
What if I find a bird that looks injured or disoriented after checking the trap?
Minimize handling time, open the access carefully, and avoid prolonging confinement. If the bird appears injured or severely stressed, contact a licensed wildlife rehabilitator, and do not transport it elsewhere without confirming you are authorized to do so.
Do trail cameras or remote checks replace in-person inspection?
No. Cameras can help you see whether birds are visiting, but you still need an on-site check to assess condition, provide water or shade adjustments, and release quickly. Use camera alerts only as a supplement, not as your primary monitoring method.
How do I safely prevent accidental captures when the trap is not actively monitored?
Keep the door secured open or propped open whenever you are not actively checking it, so birds cannot enter when you are away. Also avoid leaving bait out in a way that draws birds into a permanently accessible opening between checks.
What should I do differently if I’m using zip ties instead of J-clips?
Zip ties are beginner-friendly, but you must still ensure there are no protruding ends inside the cage and no gaps wider than about half an inch. Trim zip tie tails close and run your hand slowly along the interior, looking for any snag points before using the trap.
How far should I release invasive birds if I choose to relocate them?
There is no single safe distance that fits every jurisdiction, and local rules may restrict release locations. Use your local regulations as the deciding factor, and as a practical goal, release away from the nesting or feeding area so the bird is less likely to immediately re-enter the same conflict site.
Next Articles
How to Make a Myna Bird Trap: DIY Indian Myna Guide
Step-by-step DIY guide to make a humane Indian myna live-capture trap, place it with bait, and handle release safely.

YouTube How to Make a Bird Trap: Safe DIY Steps
Humane, safe backyard bird trap DIY steps: when to trap, what to build, placement, monitoring, and release legally.

How to Build a Chimney Swift Bird House DIY Guide
Step-by-step DIY plans to build a chimney swift bird house, with correct dimensions, placement, and weatherproofing for