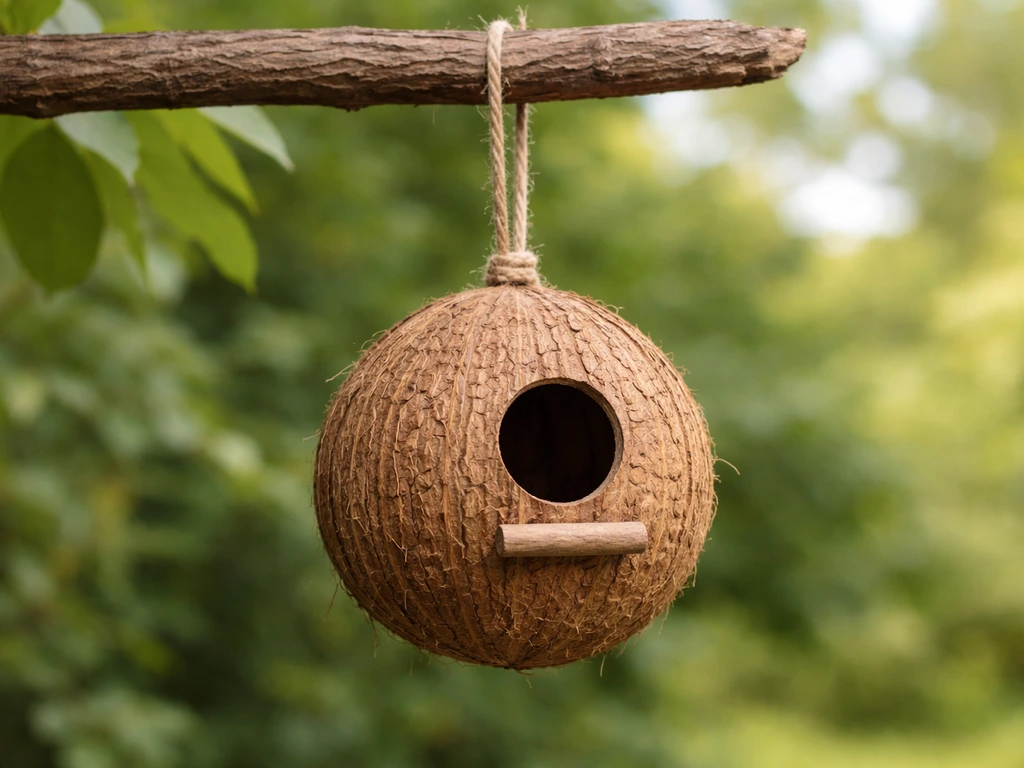
You can absolutely make a functional, bird-safe nesting shelter from a coconut shell, and the whole project can be done in an afternoon with basic tools you probably already have. The key is picking the right size shell, drilling a correctly sized entrance hole (1 1/8 inches works for chickadees and wrens), adding drainage and ventilation holes, cleaning everything thoroughly, and mounting it at the right height with predator protection. Get those details right and you have a genuinely useful little nest box that small cavity-nesting birds will investigate, especially in spring.
How to Make a Bird House With a Coconut Shell

Marcus Thornton
30 Apr 2026
Why a coconut shell bird house actually works (and when it doesn't)
Coconut shells are hollow, naturally insulating, and already shaped like a small enclosed cavity. That's pretty much exactly what a chickadee or wren is looking for in a nesting spot. The hard endocarp shell resists rot better than thin wood and gives the nest interior a rough texture that fledglings can grip when they're getting ready to leave. It's a genuinely practical material, not just a cute craft project.
That said, there are real limitations. A whole coconut is roughly 5 to 6 inches in diameter, which puts it in the right size range for small cavity nesters like Carolina wrens, house wrens, chickadees, and nuthatches. It's not going to work for bluebirds (which need a deeper 5x5 inch floor and more headroom) or anything larger. You're building for the small guys, and that's fine because those species are genuinely delightful backyard residents and will actually use a coconut shell if you set it up correctly.
The other limitation is weather exposure. A coconut shell mounted in full sun and driving rain will eventually crack and bleach out. Plan to hang it in a spot with some overhead cover, and expect to bring it in or replace it every couple of seasons. Think of it as a low-cost, high-charm nest box with a natural lifespan, not a permanent installation.
Choosing the right coconut shell and getting it clean
Picking and opening the shell
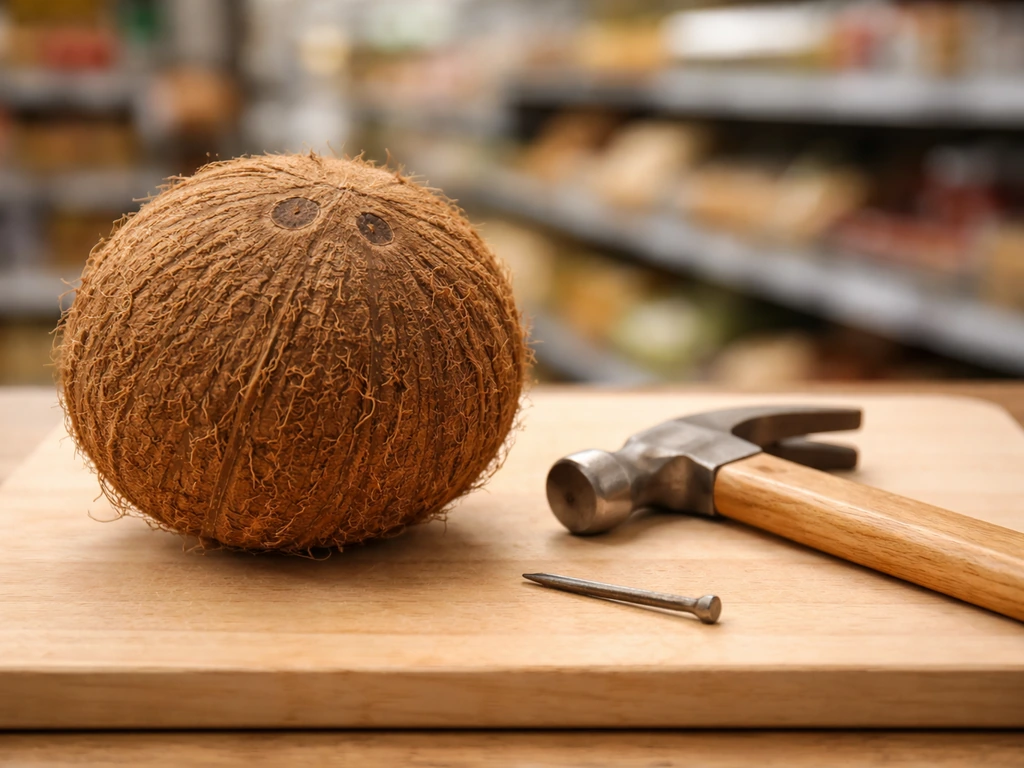
Start with a mature brown coconut from a grocery store, not a young green one. The brown outer husk has usually been removed already, which is what you want. You're working with just the hard inner shell. Look for one that feels solid and has no soft spots, cracks, or mold patches. Give it a shake and listen for liquid sloshing inside. A little milk is fine, but mostly you want a shell that sounds mostly full of meat, which means it's thick and sturdy.
To open it, use a hammer and a nail to pierce the three "eyes" at one end. Drain out the coconut water completely, then tap firmly around the equator with the blunt back of a heavy knife or a hammer until it cracks in half. You want two roughly equal halves, each forming a deep cup. One half will become your bird house; the other can be used as a second nest box or a bird feeder. If the crack is ragged, that's fine. You'll clean it up.
Remove as much of the white coconut meat as you can using a butter knife or a spoon. Getting this out completely matters. Any leftover meat will go rancid, attract insects and rodents, and make the house smell in a way birds won't appreciate. It may take some work, but scrape thoroughly.
Cleaning and sanitizing
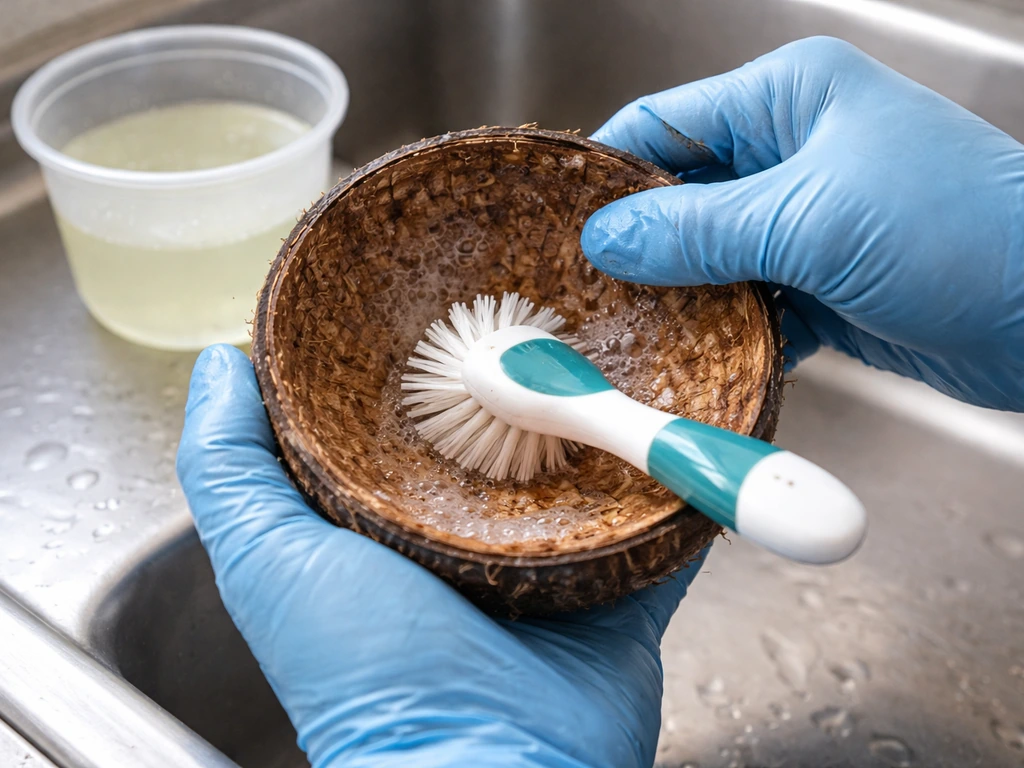
Once the meat is out, rinse the shell interior with hot water. Then mix a solution of 1 part household bleach to 9 parts water and use it to scrub the inside and outside surfaces thoroughly. Let the solution sit on the shell for at least 10 to 15 minutes to kill any mold spores or bacteria. This is the same ratio recommended for sanitizing bird feeders and nest boxes, and it genuinely matters for bird health. Rinse completely with clean water afterward, multiple times, until there is no bleach smell left. Then set the shell in a sunny spot and let it air dry completely, which usually takes a full day. Never rush this step. A damp shell will start molding again within days.
Tools and materials you'll actually need
The coconut shell is one of the harder natural materials you'll drill into, similar in density to a hardwood. Use the wrong bit and you'll crack it or get nowhere. Here's what to gather before you start: If you prefer a more durable option, you can also learn how to make bird houses out of pvc pipe using many of the same safety and drainage principles.
- A drill with variable speed (low speed is safer for hard shells)
- A 1 1/8-inch spade bit or Forstner bit for the entrance hole (Forstner bits make cleaner cuts in curved surfaces)
- A 3/8-inch or 1/2-inch drill bit for drainage holes
- A 1/8-inch drill bit for ventilation holes
- 80-grit sandpaper and 120-grit sandpaper
- A small rasp or file for smoothing the entrance hole edge
- Jute twine, galvanized wire, or a small eye-bolt with a screw for hanging
- Waterproof wood glue or epoxy (for attaching two halves if building an enclosed box from both halves)
- A pencil or chalk for marking
- Optional: raw linseed oil for exterior conditioning (no varnishes, paints, or chemical sealants inside)
What to avoid: any interior paint or varnish, treated wood screws that will be inside the cavity, and perches. NestWatch specifically recommends no outside perches on nest boxes because perches are unnecessary for the birds you want (cavity nesters can grip the hole edge just fine) and actually help predators like starlings and sparrows gain access. Leave the perch off entirely.
Step-by-step: carving the entrance hole and adding drainage and ventilation
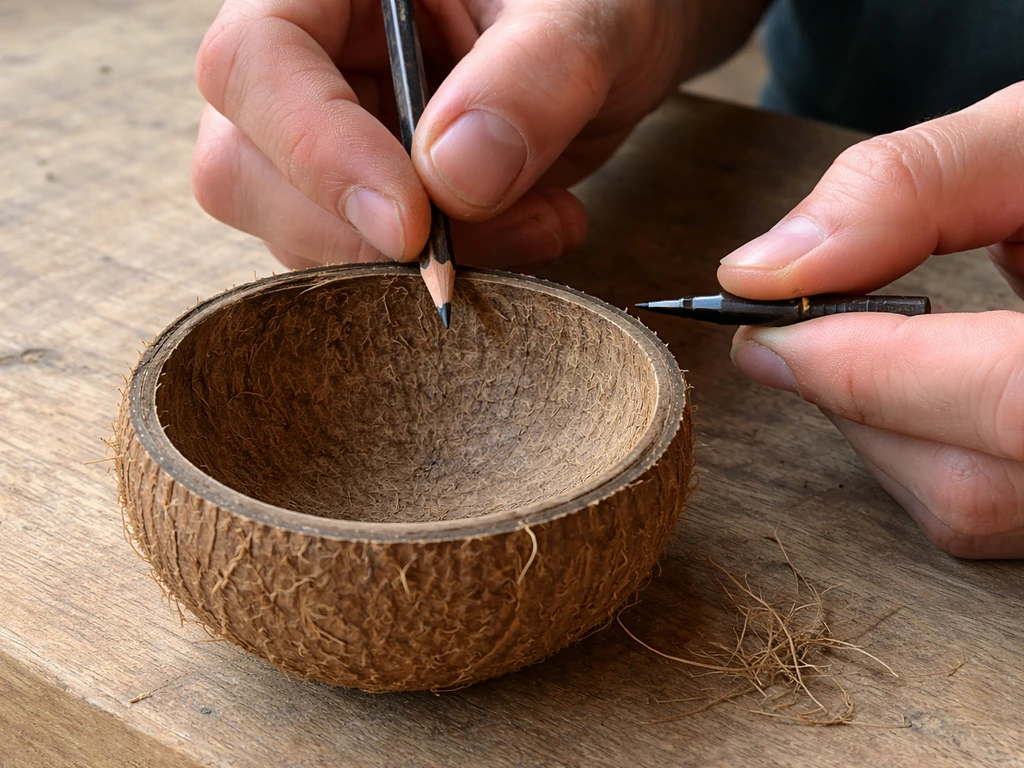
Step 1: Mark your entrance hole position
Hold the half-shell with the open side facing you and imagine it as a tiny room. The entrance hole goes near the top of the curved wall, leaving at least 2 inches of depth below the hole so the nest sits well below the opening. This depth gap makes it much harder for predators to reach in and grab eggs or chicks. Mark the center point with a pencil.
Step 2: Drill the entrance hole
Secure the shell so it can't spin or shift. A folded towel on a workbench works well as a cradle. Set your drill to low speed and use your 1 1/8-inch Forstner or spade bit to drill the entrance hole. Go slow, let the bit do the work, and keep the drill perpendicular to the shell surface. The shell is curved, so take extra care not to let the bit wander. A 1 1/8-inch entrance hole is the right size for chickadees, nuthatches, and wrens. Avoid going bigger unless you specifically want to attract slightly larger birds, and know that a larger hole also invites house sparrows, which are aggressive cavity competitors.
Step 3: Smooth the entrance hole edge
This step is critical for bird safety. The drilled edge will be rough and potentially sharp from the hard shell material. Use your rasp or file first to knock down any jagged edges, then follow with 80-grit sandpaper and finish with 120-grit until the entire rim of the hole is smooth to the touch. Run your finger around it slowly. If you feel anything that could snag or cut, keep sanding. A bird entering and exiting dozens of times a day will thank you for this.
Step 4: Drill drainage holes in the bottom
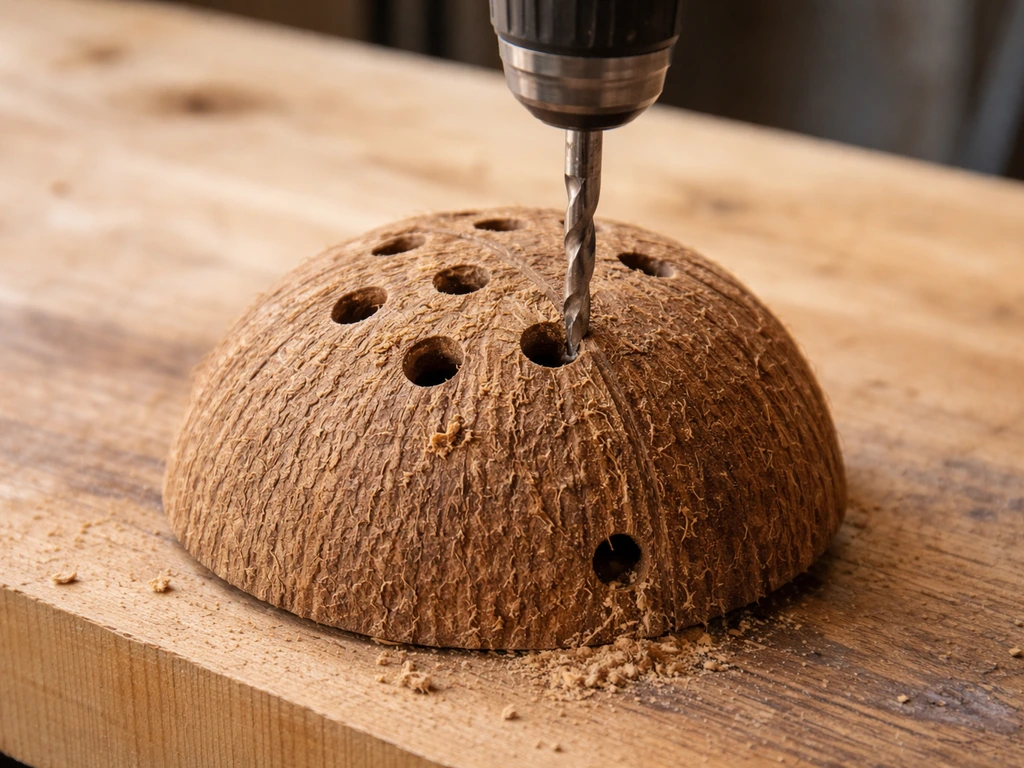
Flip the shell so the rounded bottom is facing up (this will become the floor when it's hanging). Drill at least four drainage holes of 3/8 to 1/2 inch diameter through the bottom. These let any rain or condensation that gets inside drain out instead of pooling and rotting the nest material. Wet nests are a leading cause of nest failure and chick death, so don't skip this step.
Step 5: Add ventilation holes near the top
Using your 1/8-inch bit, drill four to six small ventilation holes near the top rim of the shell, about 1 inch below the highest edge. These allow hot air to escape in summer and prevent the interior from becoming an oven. Place them in the upper back and sides of the shell, away from the entrance hole, so they don't create a wind tunnel that chills the nest.
Step 6: Create a hanging attachment point
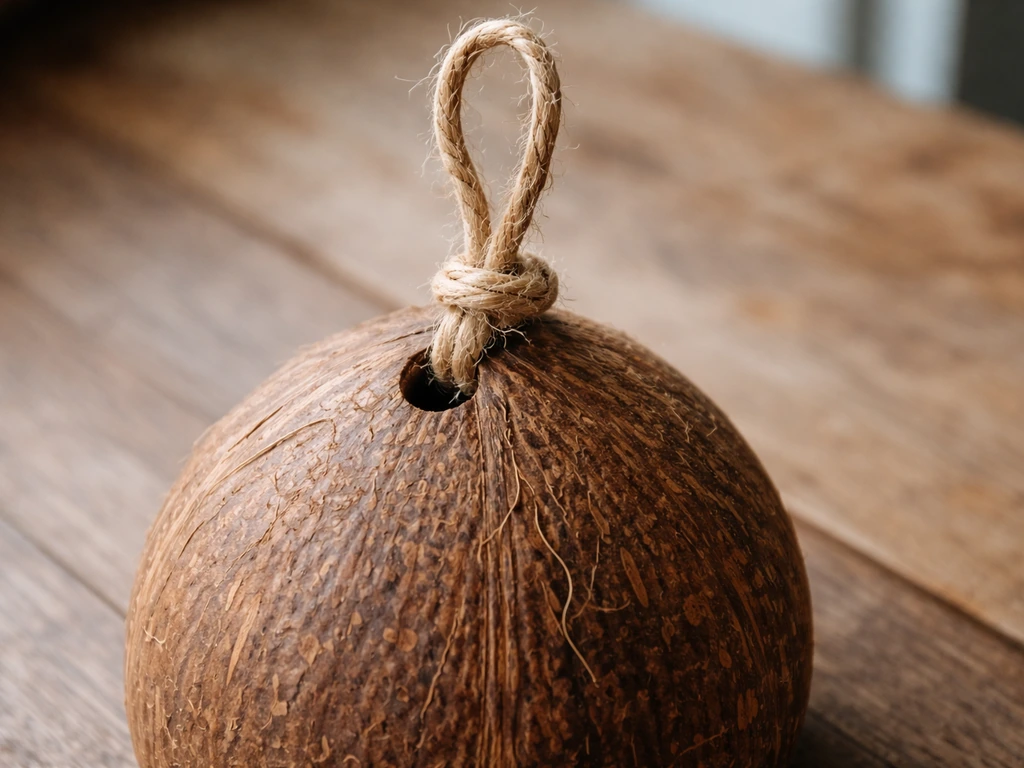
Drill a small hole through the very top of the rounded back of the shell. Thread heavy-gauge galvanized wire or thick jute twine through the hole and loop it securely. If you're using twine, double or triple it for strength. Alternatively, screw a small eye-bolt directly into the thickest part of the shell at the top. Test the attachment by hanging the shell and giving it a firm tug before you mount it outside.
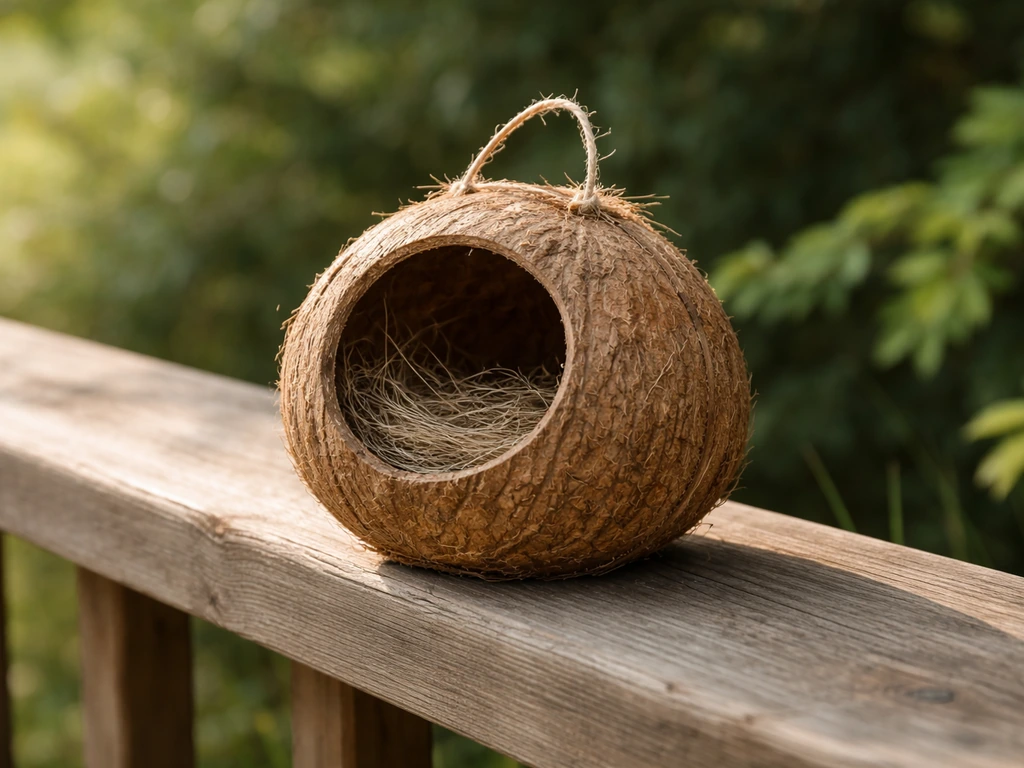
Mounting options and placement to actually attract birds
Height matters. For wrens and chickadees, hanging the coconut shell box at 5 to 10 feet off the ground is ideal. Mount it on a metal conduit pole or hang it from a tree branch, but think carefully about predator access before you choose your spot. A coconut shell hung directly from a tree branch is accessible to snakes and raccoons that can climb the tree. A pole mount with a cone-shaped metal baffle below the box is much safer. Tennessee TWRA guidance recommends the top of any baffle be at least four feet off the ground so climbing predators can't get past it.
Face the entrance hole away from prevailing winds and direct afternoon sun. East or north-facing is generally good in most of North America. A little morning sun is fine and may even help keep the interior warm, but hours of hot afternoon sun will overheat the shell quickly, especially because coconut shell doesn't breathe the same way wood does.
Hang it with some dangle room. Unlike a rigidly mounted wood box, a hanging coconut shell that sways slightly in the breeze can actually deter some predators and still feels natural to birds. Just make sure it can't swing into a hard surface repeatedly in wind, which will crack the shell over time.
Distance from other nest boxes matters too. Wrens are territorial and will try to fill every nest cavity in their range to keep competitors out. Give any second coconut shell box at least 100 feet of separation from the first to avoid conflict between nesting pairs.
Finishing, weatherproofing, and keeping it safe season after season
Coating the exterior (and what not to use)
The coconut shell doesn't strictly need any coating to be functional, and leaving it bare is always the safest choice for the birds inside. If you want to extend its life outdoors, a single coat of raw linseed oil on the exterior only is a reasonable option. Let it soak in and dry completely for at least 48 hours before hanging, making sure no oil is near the entrance hole or on any interior surface. Never use polyurethane, latex paint, or stains inside the cavity. Never use treated timber or hardware inside the nest space either. If you're unsure whether something is safe, leave it off.
Annual cleaning and inspection
Clean the box out at the end of each nesting season, usually late summer or early fall. Remove old nest material, which can harbor parasites that will reinfect the next season's birds. Use the same 1 part bleach to 9 parts water solution to scrub the interior, rinse thoroughly, and let it dry completely in the sun before storing it or rehinging it for fall and winter roosting. NestWatch also advises cleaning out nest boxes at the end of the breeding season, and if fecal matter is present, using a 1 part bleach to 10 parts water solution Use the same 1 part bleach to 9 parts water solution to scrub the interior. While you have it down, check the entrance hole edge for any cracking or sharpness that may have developed, and re-sand if needed. Check your hanging attachment for signs of fraying or corrosion and replace it if there's any doubt.
Signs it's time to retire the shell
- Visible cracks running from the entrance hole toward the rim of the shell
- Soft spots or areas that flex when pressed (sign of internal rot)
- Persistent mold that returns within days of cleaning
- The hanging attachment point has become loose or the shell material around it is crumbling
- The entrance hole has cracked or chipped to a noticeably larger opening than intended
When a shell is done, compost it or toss it in the yard waste. It's fully biodegradable, which is one of the genuinely great things about this material compared to plastic or treated wood alternatives.
How this compares to other repurposed material bird houses
Coconut shells sit in an interesting middle ground among repurposed-material bird house projects. They're more durable than milk cartons and popsicle stick builds in wet conditions, but less long-lasting than pallet wood or PVC pipe. The main advantages are that the material is free or very cheap, the rounded interior is naturally comfortable for small birds, and the project requires minimal cutting or shaping. If you enjoy repurposed builds and want to try something a bit different from a flat-sided wood box, this is a genuinely rewarding one-afternoon project. If you want to repurpose something else, you can also learn how to make bird houses from milk cartons for a similar simple DIY build. If you are looking for a bigger, more modular DIY option, you can also learn how to make bird houses from pallets using simple tools and safe hardware.
| Material | Durability outdoors | Best bird species | Tools needed | Approximate cost |
|---|---|---|---|---|
| Coconut shell | 1 to 2 seasons | Wrens, chickadees, nuthatches | Drill, Forstner bit, sandpaper | Under $5 |
| Pallet wood | 5 to 10+ seasons | Bluebirds, chickadees, wrens | Saw, drill, screws | Near free to $10 |
| PVC pipe | 10+ seasons | Bluebirds, swallows | Saw, drill, heat gun | $10 to $20 |
| Milk carton | 1 season | Wrens, small birds | Scissors, hole punch | Free |
Bottom line: if you have a coconut shell sitting on your kitchen counter and you want birds in your yard this spring, you have everything you need to start today. If you want to try a different style of DIY bird house, you can also make one with ice cream sticks using simple cut-and-assemble steps. Drill carefully, sand every edge smooth, add your drainage and ventilation holes, clean it thoroughly, and hang it at the right height with a baffle below it. That's the whole formula for a coconut shell bird house that birds will actually use. If you want a different repurposed option, you can also use this same bird-safe approach when making a bird house out of wine corks how to make a bird house out of wine corks.
FAQ
What if my coconut shell entrance hole ends up slightly too big or jagged after drilling?
If it is only a little large, you can still salvage it by sanding the rim until it is perfectly smooth and checking that at least 2 inches of interior depth remains below the opening. If it is significantly oversized, birds will be harder to control for predators and you may attract larger, more aggressive competitors like house sparrows, so it is usually best to start with a new shell.
Do I need to coat the inside of the coconut shell to protect it from weather and bacteria?
No, the inside should stay uncoated, because oils, stains, and varnishes can off-gas or leave residues that are hard to fully rinse out. Exterior-only raw linseed oil is optional, but keep it away from the entrance, interior surfaces, and any edges the birds touch.
How can I tell whether my coconut shell has leftover meat that could spoil?
After scraping, wipe the interior with a white paper towel. If you see oily residue or the towel picks up dark smears, scrape and rinse again. Also smell the dry shell; a true finished shell should not have a sour or rancid odor before you hang it.
Can I use a plastic or resin coating on the outside to make it last longer?
It is not recommended. Even if the coating is on the exterior, it can slowly degrade and transfer residues or odors, and it may also trap moisture at the shell surface, which increases cracking and mold. If you want longer life, stick with exterior raw linseed oil only (and only once fully dry).
My shell feels very thin in spots. Is it still safe to use?
Avoid shells with soft areas, visible mold pockets, or cracks that appear structural. Thin shells are more likely to split when drilling and when exposed to freeze-thaw cycles or repeated wind movement, which can expose sharp edges and reduce insulation for nesting birds.
Is it okay to use a pre-made hanger or screws to mount the coconut shell, instead of wire or twine?
Use a hanger that does not require hardware inside the cavity. If you use an eye-bolt, mount it at the top in the thickest area and do not let any screw tips protrude into the nesting space. Twine or wire through a top hole is simplest because it keeps all hardware outside the interior.
Should I place the entrance hole facing a specific direction for birds in my yard?
Yes, direction matters for overheating and prevailing winds. The entrance should generally face away from harsh afternoon sun and strong wind, east or north tends to work well in many regions, and you should confirm it stays shaded during the hottest part of the day.
How much ventilation is enough, and what happens if I drill too many small holes?
Too few holes can lead to heat buildup and moisture retention. Too many holes can create drafts that chill the nest, especially in cool weather. The typical approach is 4 to 6 ventilation holes placed near the upper rim and positioned to avoid creating a direct wind tunnel from the entrance.
Do birds reuse the same coconut shell year after year if I do not clean it?
Not reliably. Old nest material can harbor parasites and pathogens, which can reduce clutch survival. The safer practice is to clean at the end of the nesting season, scrub with a bleach-water solution, rinse thoroughly, and fully dry in sun before the next nesting cycle.
What should I do if I see birds not using the box after installing it?
First, confirm the hole size is appropriate for your target species, and check that the box is at the recommended height (around 5 to 10 feet for wrens and chickadees). Also ensure the entrance is not facing constant sun or wind, and add spacing from other nest boxes, because wrens can be highly territorial and may ignore nearby options.
Can I add a small landing board anyway, since birds seem to like perching?
Skip any exterior perch. The birds that use cavity boxes can land on the rim and do not need a stick or board, and perches can make it easier for predators and aggressive competitors to access the entrance.
How do I prevent the shell from swinging into a wall or tree trunk and cracking?
Test the setup before mounting, hang it so it has clearance, and avoid tie points that allow rubbing against hard surfaces. If your rope or wire lets it knock the pole or branch in wind, reposition the hanger or increase the clearance so the shell only sways gently.
Next Articles
How to Make a Bird House With Ice Cream Sticks
Step-by-step guide to build a bird house or feeder from ice cream sticks, with safe weatherproofing and mounting tips.
How to Make a Bird House or Bird Feeder From Popsicle Sticks
Step-by-step guide to build a popsicle stick bird house and feeder, with materials, tools, assembly, and weatherproof fi

How to Build a Chimney Swift Bird House DIY Guide
Step-by-step DIY plans to build a chimney swift bird house, with correct dimensions, placement, and weatherproofing for