A bird nesting material holder is exactly what it sounds like: a simple structure you fill with safe, soft fibers that nesting birds can visit, grab a beakful of material from, and fly straight back to their nest. Think of it less like a birdhouse and more like a nesting supply station. It sits in your yard, stays stocked with things like dry grass, natural cotton, or moss, and lets birds do the rest. You don't need to be a carpenter or spend much money to build one, and honestly, some of the best designs I've made came from stuff I had lying around the garage.
How to Make a Bird Nesting Material Holder DIY Guide

Marcus Thornton
15 Apr 2026
What a nesting material holder actually does
In a natural, undisturbed habitat, birds find nesting fibers everywhere: loose bark, cattail fluff, spider silk on fence posts, patches of dry grass. But in a tidy suburban backyard, those sources can be pretty sparse. A nesting material holder fills that gap by giving birds a reliable, safe spot to collect what they need during the critical few weeks of nest-building season. It's especially useful in spring, when demand is high and birds are working fast.
The holder doesn't replace a nest box. Birds build the nest somewhere else, a tree, a shrub, a cavity, or an actual nest box you've put up. The holder just keeps the raw materials tidy, protected from wind and rain, and easy for birds to access. It also keeps you from scattering fibers across your lawn and wondering where they went.
Picking the right design for your yard and target birds
Before you cut a single piece of wood or bend a single wire, think about which birds you're trying to help. Different species look for different materials, and that affects both what you fill the holder with and how you design it. American robins, for example, build a cup nest from coarse grass, twigs, and mud, lined with fine grasses and plant fibers. American goldfinches go for softer plant down like milkweed fluff and thistle fibers, reinforced with bits of spider silk. House sparrows want feathers, fine string, and soft lining materials, though they can be aggressive competitors that push out other species you might prefer to attract.
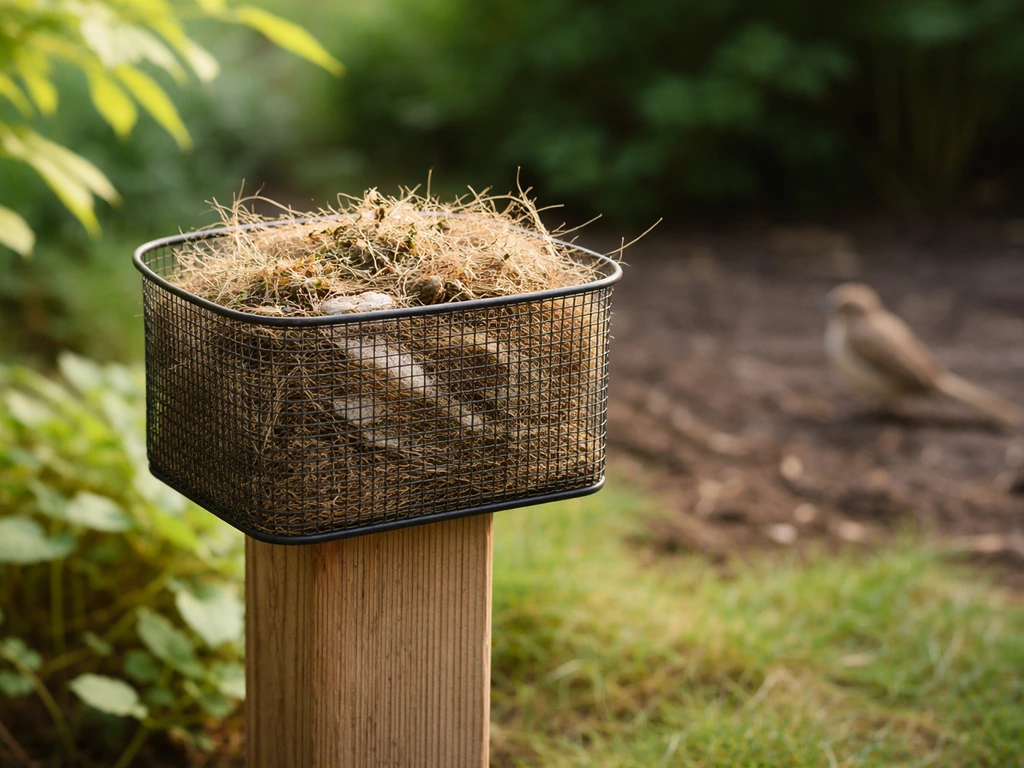
Your yard's layout matters too. A small, fence-mounted mesh cage works great in a compact yard. A hanging wire basket suits a tree or pergola. A tray-style holder with dividers lets you offer several material types side by side, which is ideal if you're trying to attract multiple species. If wind is a problem, go with a covered or partially enclosed design. If predators are a concern, keep it off the ground and away from fence rails that cats can walk along.
The four most common DIY styles are: a mesh or wire cage (the easiest build), a hanging wire basket or suet-cage style holder, a wooden tray with low dividers, and a small anchored box with a mesh front panel. Each has strengths, and I'll walk through building instructions for the most practical ones below.
Safe materials to offer (and what to keep out of the holder)
This is the part where a lot of well-meaning people accidentally put out things that can harm birds. The rule of thumb is: if it's natural, unbleached, and untreated, it's probably fine. If it's synthetic, dyed, or came out of a dryer, leave it out.
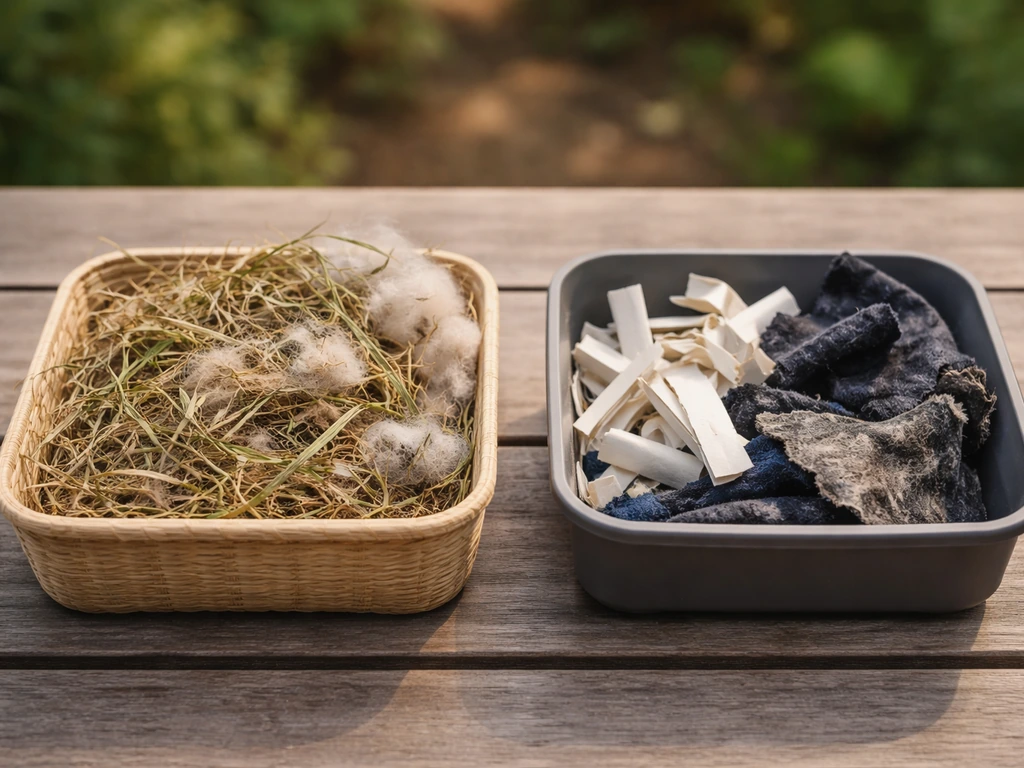
Safe nesting materials to offer include dry grass clippings (no pesticides), small twigs and plant stems, natural cotton fibers or undyed wool, dried moss, pine needles, strips of natural bark, and plant down from milkweed, cattail, or thistle. These are the kinds of things birds evolved to use and will recognize immediately.
Now for the definite no-list. blank" rel="noopener noreferrer">Dryer lint looks soft and harmless but it hardens when wet and can trap chicks. Human hair and pet hair can tangle around legs and feet. Yarn, string, and synthetic rope can cause entanglement injuries. Plastic strips, cellophane, aluminum foil, and tinsel are dangerous if ingested and can cause internal blockages or choking. Felt and cloth scraps are another one to skip. Treated or tarred materials, chemically dyed fabrics, anything that smells like solvent: all out. I've seen people put out a big pile of blank" rel="noopener noreferrer">dryer lint thinking they're doing birds a favor, and it's genuinely one of the more common mistakes. Stick to natural, dry, unprocessed fibers and you'll be fine.
What you'll need to build one
Materials
- Hardware cloth or galvanized wire mesh (1/2 inch or 1 inch grid, enough for a 10x10 inch panel or a 10-inch diameter cylinder)
- Untreated pine, cedar, or spruce board, 3/4 inch thick (one 6-foot length covers most designs)
- Zip ties or galvanized wire for closing mesh seams
- Galvanized screws or nails (1.5 inch for softwood)
- A screw eye hook and a length of galvanized chain or wire for hanging (optional, for hanging designs)
- Exterior wood glue (optional, for reinforcing wood joints)
- Waterproof sealant or exterior paint rated safe for birds (no lead, no VOCs) for wood surfaces
- A piece of thin plywood or scrap cedar for a roof panel, roughly 12x8 inches
Tools
- Wire cutters or tin snips
- Pliers (needle-nose are helpful for bending wire ends)
- Hand saw or circular saw for cutting wood
- Drill with a 1/8 inch bit for pilot holes
- Measuring tape and pencil
- Staple gun with 1/2 inch staples (for attaching mesh to wood frames)
- Safety gloves (cut wire edges are sharp)
You don't need all of these for every design. The mesh cage build only needs wire cutters, pliers, and zip ties. If you don't own a saw, most hardware stores will cut board lengths for you at the counter. Keep it simple, especially on your first build.
How to build it: step-by-step for two practical designs
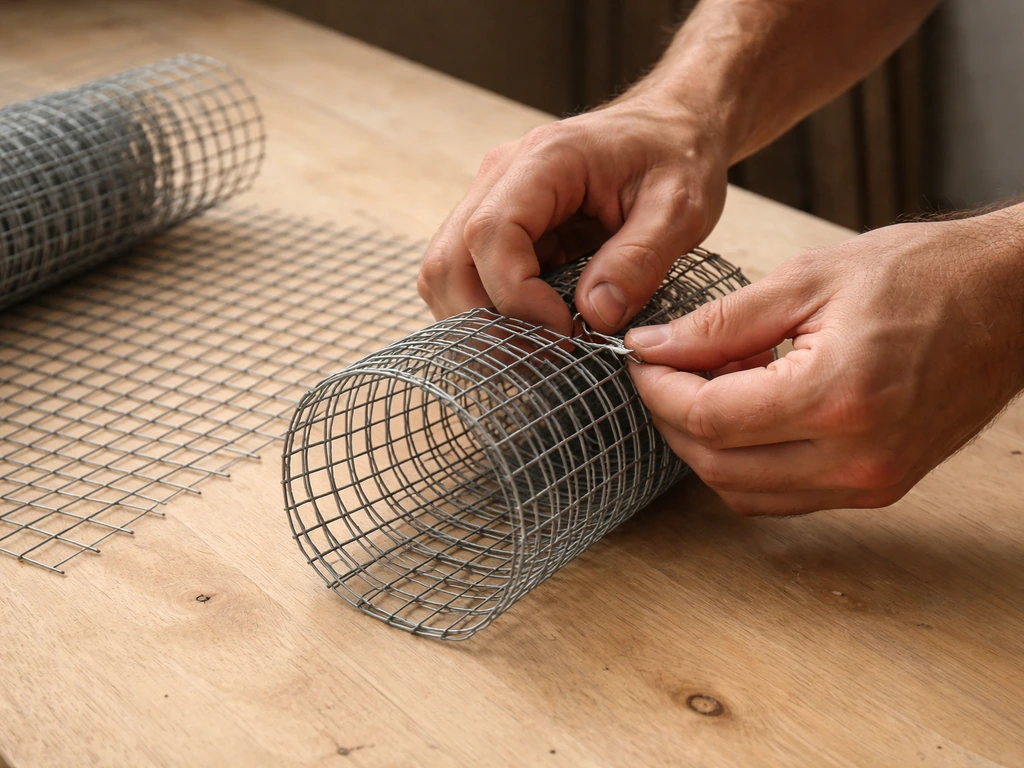
Design 1: The wire mesh cylinder (beginner-friendly, 20 minutes)
- Cut a piece of 1-inch hardware cloth to roughly 12 inches wide by 14 inches long. This will form a cylinder about 4.5 inches in diameter.
- Roll the mesh into a cylinder and close the seam with zip ties or short lengths of wire twisted tight. Trim any sharp wire ends that poke outward.
- Pinch one end closed and secure it with zip ties to form the base, or cut a small circle of mesh and wire it on as a flat bottom.
- Stuff the cylinder loosely with your chosen nesting materials. Don't pack it tight, birds need to be able to grab and pull single strands out.
- Attach a screw eye hook to a short loop of wire at the top, and hang from a branch or bracket at head height (roughly 5 to 6 feet off the ground). A carabiner clip makes it easy to take down and refill.
This is the design I always recommend to first-timers. If it doesn't attract birds or gets wrecked in a storm, you've lost maybe 30 minutes and a small piece of hardware cloth. Once you know it works in your yard, you can upgrade to the wooden frame version.
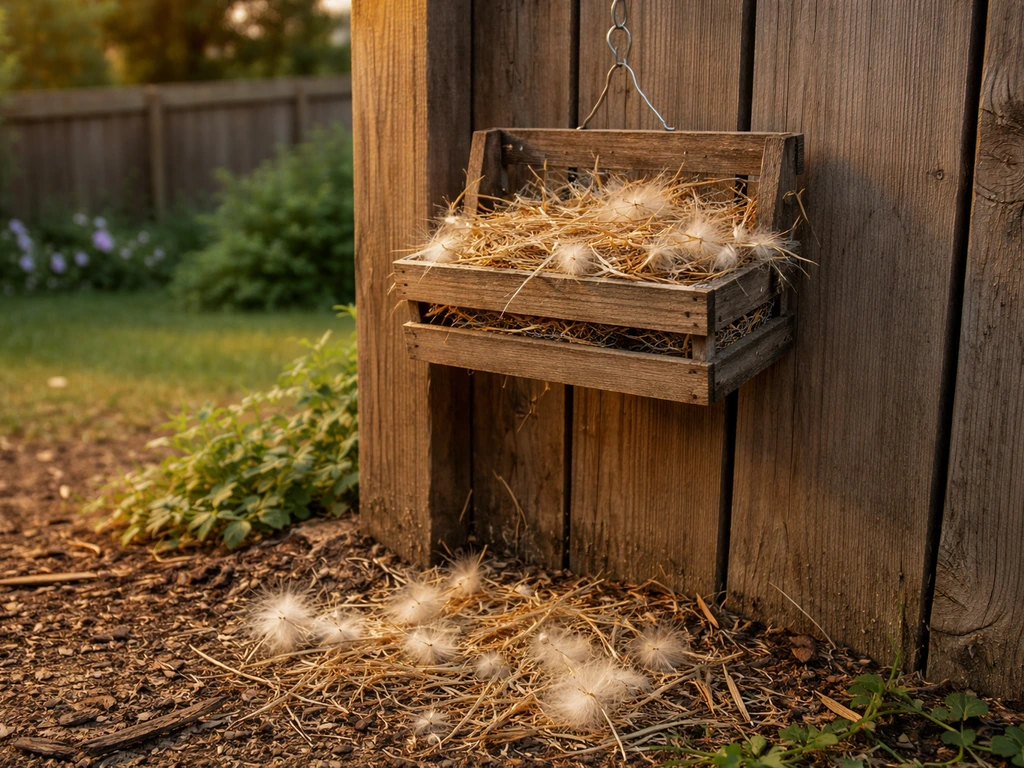
Design 2: Wooden-framed tray with mesh front (better weather protection)
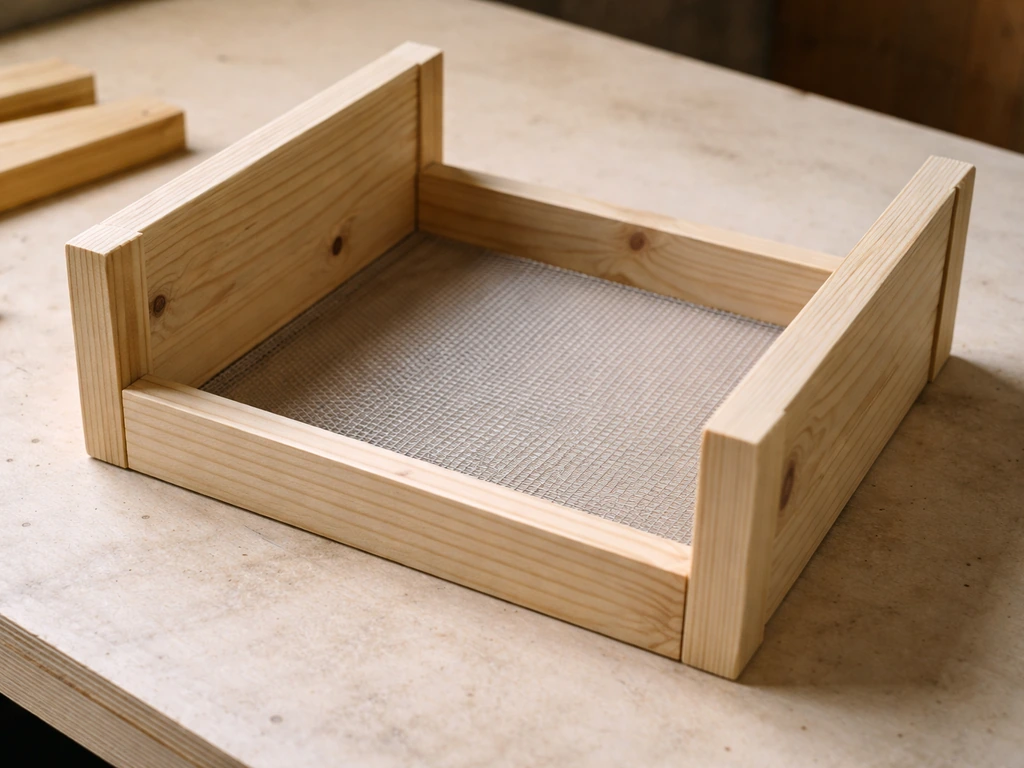
- Cut two side pieces from 3/4-inch untreated pine or cedar, each 6 inches wide by 8 inches tall.
- Cut a back panel 8 inches wide by 8 inches tall and a base panel 8 inches wide by 5 inches deep.
- Cut a roof panel 10 inches wide by 7 inches deep (the extra width gives a 1-inch overhang on each side to shed rain).
- Assemble the back, two sides, and base into a box shape using 1.5-inch screws and pilot holes. The front should remain open.
- Cut a piece of 1/2-inch hardware cloth to 8 inches wide by 8 inches tall and staple it across the open front using a staple gun. This mesh front lets birds see and access the materials while keeping wind from blowing them out.
- Attach the roof at a slight forward tilt (about 10 to 15 degrees) so rain runs off the front rather than dripping into the box. Two screws through the back panel into the roof works fine.
- Sand any rough edges on the wood, then seal exterior wood surfaces with a bird-safe waterproof finish. Skip the inside surfaces and the mesh.
- Drill two small drainage holes (1/4 inch diameter) in the base so any moisture that sneaks in can escape.
- Fill the box loosely through the mesh front, or add a small hinged door at the back for easy refilling.
This design holds more material, protects it from rain, and looks tidy mounted on a fence post or tree. If you want to go even further with creative DIY builds, you can repurpose a plastic bottle or other household waste into a nesting material feeder the same way you would make a bird nest with a plastic bottle, just adapting the structure to hold fibers instead of forming a complete nest cup.
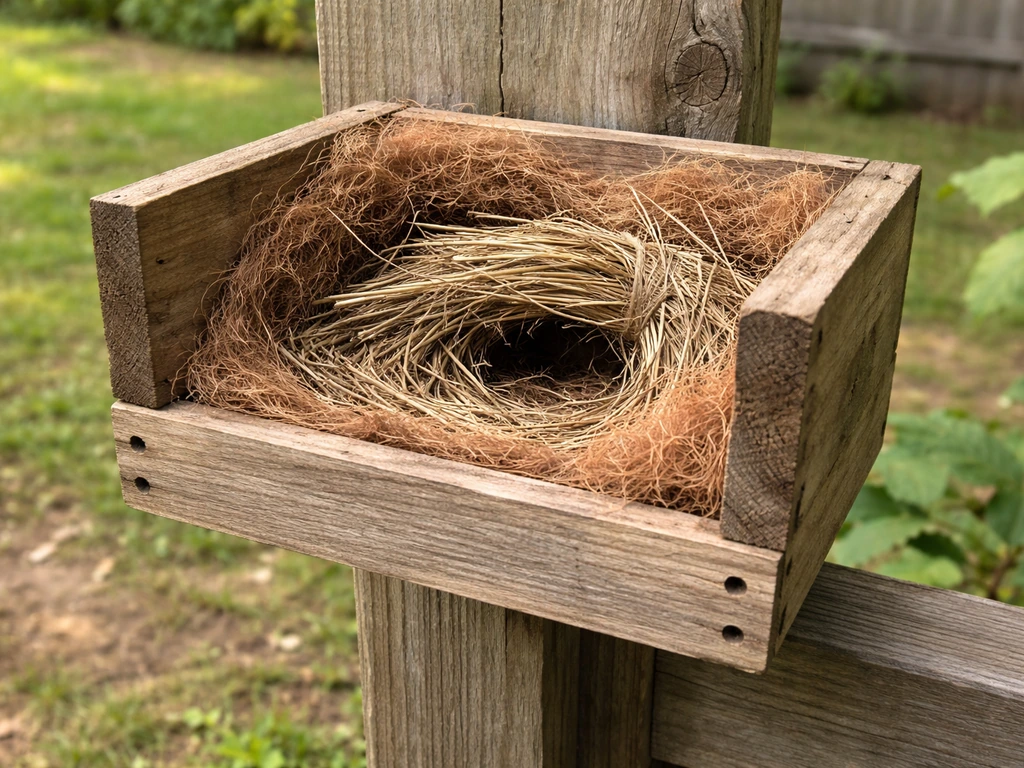
Where and how to mount it
Placement is where a lot of people go wrong, and it's usually because they put the holder where it looks nice rather than where birds will actually use it. Height matters. For most songbirds, somewhere between 4 and 6 feet off the ground is the sweet spot: high enough to feel safe from ground predators, low enough that you can easily refill it. Some guidance for nest boxes suggests around 3 meters (roughly 10 feet) for certain species, but nesting material holders work better at a more accessible height since birds are just stopping to grab material, not nesting inside.
Face the open or mesh side toward a relatively open area so birds can approach without crashing through dense shrubs. A clear flight path makes a huge difference in whether birds use the holder or ignore it. Think about what a bird sees when it approaches: is there a perching spot nearby? A branch or fence rail within 3 to 4 feet gives birds a place to pause and assess before grabbing material.
Keep the holder out of direct, unbroken afternoon sun in hot climates. A spot that gets morning sun and afternoon shade keeps the materials dry and comfortable. Avoid placing it right next to your nest boxes, as having the material station too close can create competition and distraction. About 10 to 15 feet away from active nest boxes is a reasonable separation.
For weather-proofing beyond the roofed design: add a simple baffle below the hanging point if squirrels or raccoons are an issue. You can use a plastic dome baffle from a hardware store, or make one from a plastic bowl zip-tied above the holder. If rain is consistently blowing sideways in your yard, add a small wooden side shield, just a 4-inch panel on the windward side.
Keeping it clean and troubleshooting common problems
Regular maintenance
Check the holder every week during nesting season (roughly March through July, depending on your location). Refill it when it's running low, and remove any material that's gotten wet and clumped, as damp fibers can harbor mites and mold. Old nesting material can be very dirty and compacted, and can become a breeding ground for parasites including mites, blowflies, and ants. That applies to the material you're offering too, not just material inside a nest box. At the end of nesting season, empty the holder completely, scrub it with a mild soap solution, rinse thoroughly, and let it dry before storing or refilling for the following year.
Birds are ignoring the holder
This is the most common complaint, and there are usually three causes. First, wrong materials: if you're offering something birds in your area don't recognize or want, they'll ignore it. Double-check that you're offering natural, dry, unprocessed fibers. Second, wrong location: if the approach is cluttered, the height is off, or there's no nearby perch, birds won't feel comfortable stopping. Third, wrong timing: if you've set it up in August, nesting season is mostly over. Put it out in late winter or very early spring, before birds start actively building. Making bird nests with waste material from your yard, like dried grass clippings or plant stems, can help you match the types of fibers birds in your area are already seeking out.
Material blowing away
If your material keeps blowing out, the mesh openings are too large or the holder is too exposed. Switch to 1/2-inch mesh instead of 1-inch, and consider adding the wooden frame version with a roof and sides. You can also press the materials in slightly more firmly (not packed tight, but not loose enough to flutter out in a breeze).
Ants, mites, or other pests
If you spot ants in the holder, brush and scrape them off, then discard the ant-infested material immediately and replace it with fresh, dry fibers. Don't try to salvage damp or pest-affected material. For mites, the most effective strategy is removing the source entirely, cleaning the holder thoroughly, and refilling with dry, clean material. Mounting the holder on a smooth metal pole rather than a wooden post makes it much harder for ants to climb up.
Dealing with unwanted visitors
House sparrows can be persistent, and they're strong competitors that will use nesting material aggressively while displacing other species. If house sparrows are dominating your holder and you'd rather attract species like goldfinches or robins, try offering materials those species prefer, like plant down or fine grass, which house sparrows find less appealing than feathers or coarse string. Adjusting what's in the holder can shift which species show up.
Comparing the main holder designs
| Design | Build time | Best for | Weather protection | Difficulty | Cost |
|---|---|---|---|---|---|
| Wire mesh cylinder | 20 minutes | Beginners, small yards | Low (no roof) | Very easy | Under $5 |
| Hanging wire basket | 15 minutes | Trees, pergolas, multiple materials | Low (open) | Very easy | Under $5 |
| Wooden tray with mesh front | 1 to 2 hours | Fence or post mounting, multiple species | Good (roofed) | Moderate | $10 to $20 |
| Anchored box with mesh panel | 2 to 3 hours | Windy yards, long-term setup | Excellent | Moderate | $15 to $30 |
If you're building your first holder, start with the wire mesh cylinder. If you've done a basic build before or you want something that lasts through several seasons with minimal fuss, jump straight to the wooden-framed tray.
Connecting this to your broader bird habitat setup
A nesting material holder works best as part of a wider backyard setup, not a standalone project. If you're also thinking about offering actual nesting structures, you might want to look at how to make a cockatiel bird nest box as a companion project, since pairing a material holder with the right nest box dramatically increases your chances of attracting and keeping nesting birds through the season. Similarly, if you want to experiment with entirely repurposed builds, the approach for making a bird nest with cardboard uses some of the same low-cost material logic that applies here: work with what you have, prioritize the bird's needs over aesthetics, and don't overthink the construction.
The bottom line is this: pick one design from above, gather whatever natural fibers you have available, build it this weekend, and get it mounted before nesting season peaks. Birds are practical. They don't care if your holder looks rough around the edges. They care if the material is safe, accessible, and dry. Get those three things right and you'll have birds visiting within days.
FAQ
Can I use feathers or down I find outside, or should I only use plant materials?
Use only clean, natural feathers that look dry and are not visibly dirty. If you are unsure about contamination, stick to undyed plant fibers like milkweed or thistle down, since those are easy to keep dry and birds recognize them readily.
How much nesting material should I put in the holder at first?
Start with a light layer instead of a full, packed load. Birds need to pull fibers out, so if the holder is too full or tightly packed, material can become damp at the bottom and become less accessible.
What mesh size should I choose to prevent fibers from blowing away but still stay usable?
If your material is disappearing in windy weather, switch from larger openings to smaller wire mesh (for example, around 1/2-inch). Also keep the holder sheltered on the side that gets the most prevailing wind to reduce “waste” and keep fibers dry.
My holder attracts the wrong species, how do I shift what shows up?
Change the fiber mix rather than the hardware. If house sparrows dominate, offer more materials they tend to ignore, like plant down and fine grasses, and avoid offering the coarser, stringy fibers they favor. You can also slightly increase the holder distance from active nest boxes to reduce competition.
Is it safe to offer dyed cotton, craft felt, or fabric scraps if they are “clean”?
No. Even if it seems harmless, dyed or treated fabrics can be risky because of residual chemicals, and felt can trap fibers in ways that are harder for birds to use. Stick to undyed, unprocessed fibers only.
How do I prevent mites, mold, and bugs from building up in the holder?
Keep the material dry and replace anything that has clumped or gotten damp. Brush off debris, remove ant-infested batches immediately, and do a full empty-and-scrub at the end of nesting season with mild soap, then rinse and dry completely.
Can I leave the holder up year-round?
Better to remove and clean it after nesting season. Leaving it outside can turn it into a year-round pest shelter, and debris buildup makes mites and mold more likely when birds return.
Do I need a roof on every design?
Not always, but it helps a lot if you have frequent rain or strong wind-driven showers. If you do not use a roof, prioritize sheltered placement (morning sun, afternoon shade) and check it more often so fibers do not stay wet.
Where should I place the holder if my yard is small or covered in dense shrubs?
Choose a spot with a clear approach path and a nearby perch, like a branch or fence element within a few feet. In a cluttered yard, birds may avoid the station even if the materials are perfect, so accessibility often matters more than height.
What height is best if I’m unsure which birds are nesting locally?
A practical starting range is about 4 to 6 feet off the ground for songbirds, since it balances safety from ground predators with easy access for refilling. If you know a species consistently uses higher or lower placement, adjust gradually rather than making a big jump.
How often should I refill, and should I remove old material or mix it with new?
When you refill, remove material that is wet, clumped, or heavily soiled. For mostly dry material, you can top up lightly, but avoid mixing in any questionable batches because damp or pest-affected fibers can spread problems quickly.
Will the holder work if I do not see birds immediately?
Sometimes birds take days to test a new resource. Keep materials fresh, ensure the approach is visible and safe, and avoid changing multiple variables at once. If after a week there is no activity, double-check materials first, then placement and flight path, before rebuilding.
Can I mount the holder to a wooden post, or should it be on metal?
Wood works, but metal makes it harder for ants to climb up to the fibers. If ants are a recurring issue in your yard, consider switching to a smooth metal mounting pole or adding the holder away from ant trails.
Next Articles
How to Make a Bird Nest With Waste Material Safely
DIY guide to build safe backyard bird nesting platforms from clean waste materials, with materials, steps, placement, an

How to Build a Chimney Swift Bird House DIY Guide
Step-by-step DIY plans to build a chimney swift bird house, with correct dimensions, placement, and weatherproofing for

How to Build an Oriole Bird House: Step-by-Step DIY
Step-by-step DIY for building an oriole bird house with right dimensions, weatherproofing, predator-safe placement, and