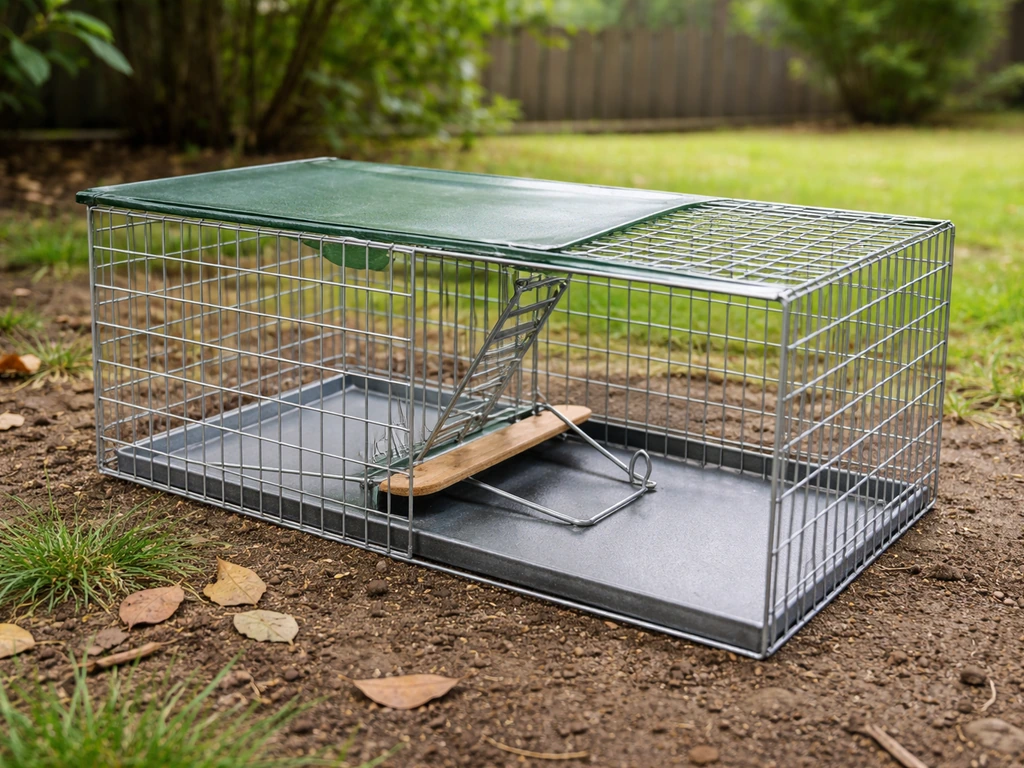
An automatic bird trap is a self-triggering live-capture cage that closes on its own when a bird steps on a treadle plate or disturbs a trigger wire, so you don't have to stand there holding a string. You set it, bait it, and the trap does the work. Done right, it's a humane way to catch a nuisance bird without harming it, so you can move it on or hand it to someone who can. That's the version we're building here: a simple treadle-style or drop-door cage trap you can put together in an afternoon with basic tools and repurposed timber or wire mesh.
How to Make an Automatic Bird Trap Safely and Humanely

Marcus Thornton
21 May 2026
What 'automatic bird trap' actually means (and which type we're making)
People search this phrase for very different reasons. Some want a triggered cage trap to catch a pigeon getting into their loft. Some want to relocate a myna bird raiding the garden. Others are thinking about nets or spring-loaded snares, which are a different category entirely and mostly illegal for unlicensed use on wild birds in most countries. Then there are exclusion devices that prevent entry to a space, which aren't really traps at all but solve the same problem.
This guide focuses on the humane live-capture cage: a wire-mesh box with a door that drops or swings shut automatically when the bird triggers a mechanism inside. The bird is caught alive and unharmed, you retrieve it, and you either release it well away from your property or contact a wildlife handler.
This is the approach covered by cage-trap licensing frameworks in places like the UK, where official guidance explicitly describes cage traps as devices that allow you to catch birds safely and release them back into the wild. If you're thinking about net-based setups, that's a closely related but separate topic.
If you want the net route instead, the planning and build steps differ a lot from a treadle cage trap net-based setups. The net trap approach has its own build process worth exploring on its own.
Before you build anything: legal, ethical, and safety checklist

This is not optional reading you can skip. In most countries, nearly all wild birds are protected by law, and trapping them without a permit is a criminal offence. In the US, the Migratory Bird Treaty Act covers hundreds of species. In the UK, the Wildlife and Countryside Act 1981 applies. Australia's Environment Protection and Biodiversity Conservation Act is similarly broad. The general rule everywhere: you need a licence or permit to trap most wild birds, even temporarily.
The birds most often exempt from full protection (and therefore legally trappable in more circumstances) are introduced pest species like feral pigeons, common starlings, house sparrows, and common mynas in certain regions. Even then, check your local rules before building anything. 'I didn't know' is not a legal defence.
- Check national and local wildlife protection laws before trapping any bird species in your area.
- Confirm your target species is legally trappable without a special licence in your jurisdiction.
- If you need a licence (e.g., to remove birds from a food premises or commercial site), apply before you set any trap.
- Never leave a set trap unattended for more than a few hours, especially in warm weather. Birds can die from heat stress or dehydration quickly.
- Never use a trap that could injure the bird: no sharp wire ends, no doors that slam with force, no mechanisms that could catch a leg or wing.
- Keep pets and children away from any set trap.
- Do not attempt to trap birds of prey, herons, owls, or any obviously protected species. If one ends up in your trap by accident, release it immediately and report it to your local wildlife authority.
- Have a release plan sorted before you set the trap, not after you catch something.
Know your bird: design the trap around the target species' behaviour
The most common reason a homemade trap fails is that it's built generically instead of for the specific bird you're dealing with. A trap sized and baited for a pigeon will confuse and scare a smaller myna. A trap placed at head height won't catch a ground-feeding sparrow. You need to observe the bird first.
Spend a day or two watching where the problem bird feeds, roosts, or enters a space. Note the time of day, the surface it prefers (ground, fence rail, flat roof), and what it's actually eating or chasing. That observation shapes three key trap decisions: cage size, trigger height, and bait type. Here's a quick guide by common nuisance bird type:
| Bird | Typical Problem | Preferred Surface | Trap Size (approx.) | Trigger Style |
|---|---|---|---|---|
| Feral pigeon | Roosting, fouling, food theft | Ground or flat surface | 60cm L x 30cm W x 30cm H | Treadle plate (floor trigger) |
| Common myna | Aggression toward other birds, nesting takeover | Ground or low perch | 45cm L x 25cm W x 25cm H | Treadle plate or perch trigger |
| House sparrow | Feeder domination, nesting in vents | Ground or feeder surface | 30cm L x 20cm W x 20cm H | Lightweight treadle or wire trip |
| Common starling | Flock feeding, fouling | Ground | 50cm L x 25cm W x 25cm H | Treadle plate |
| Feral/escaped parakeet | Crop damage, outcompeting native birds | Branch or ground | 55cm L x 30cm W x 30cm H | Perch-trigger or treadle |
If you're specifically targeting mynas, that species has its own quirks around bait preference and territorial behaviour that make it worth researching in more detail as a separate project. The same goes for any net-based capture approach, which works on different principles entirely.
What you need: materials and tools
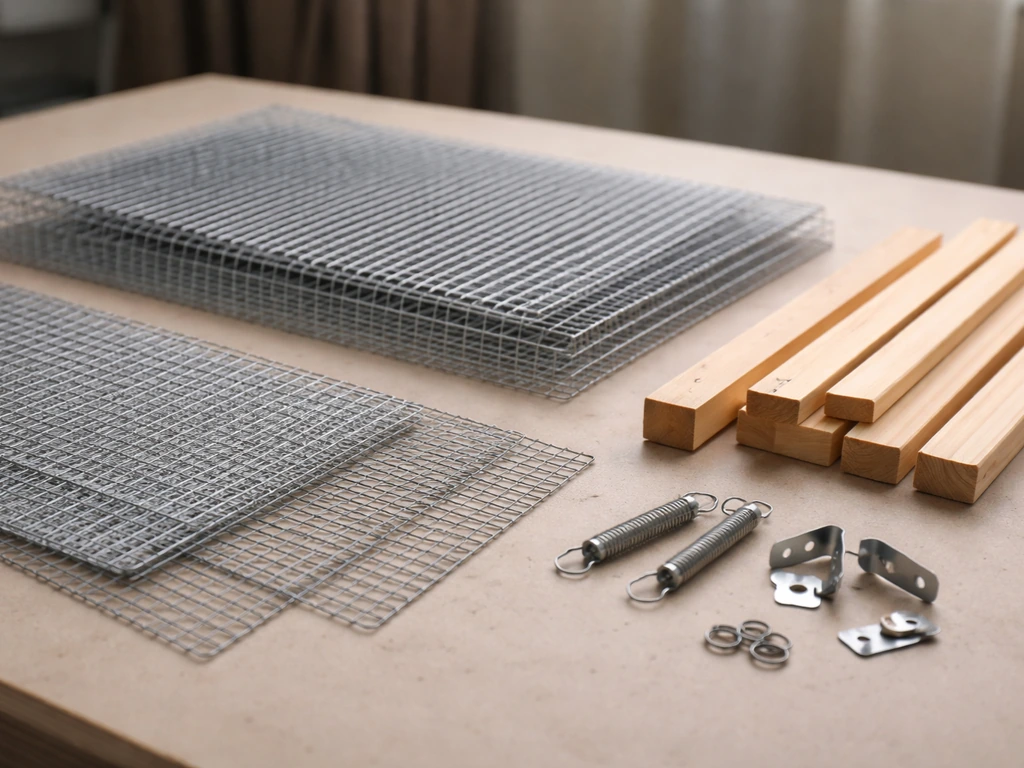
You can build a solid, functional automatic cage trap for around $15 to $30 using hardware store wire mesh and scrap timber. I've built several of these from old picture frames and leftover galvanised mesh, and they work just as well as commercially sold traps. Here's what you need:
Materials
- Galvanised wire mesh (hardware cloth), 1.25cm (0.5 inch) square openings: approximately 2 square metres for a medium-sized trap
- Timber for the frame: four lengths of 25mm x 25mm pine batten, cut to your target cage dimensions
- One piece of lightweight plywood or hardboard (3-4mm thick) for the treadle plate, cut slightly smaller than the cage floor
- One piece of the same plywood or a thin sheet of aluminium for the drop door
- Two small hinges (25mm brass or steel) for the door
- One compression spring or a short length of elastic cord (bungee-style) for the door return mechanism
- One length of galvanised or stainless steel wire (14-16 gauge) for the trigger linkage, about 60cm
- One small eye bolt or screw hook to act as the trigger latch point
- Staple gun and staples (or J-clip pliers and J-clips if you want cleaner mesh attachment)
- Sandpaper (80 grit) to smooth any rough timber or wire ends
- Non-toxic paint or outdoor varnish (optional, for weather protection)
- Small bait dish or cup: a bottle cap or jar lid works perfectly
Tools
- Wire cutters or tin snips
- Staple gun (or J-clip pliers)
- Hand saw or jigsaw for cutting timber
- Drill with small bits (2mm and 4mm)
- Pliers (needle-nose are useful for bending trigger wire)
- Measuring tape and pencil
- Safety gloves when handling cut mesh
How to build it: step-by-step from frame to trigger

I'll walk you through a treadle-trigger drop-door design, which is the most reliable style for ground-feeding birds. The concept: the bird walks in, steps on a treadle plate connected by wire to a latched door, the plate depresses under the bird's weight, the latch releases, and the door drops shut. If you want to see the process in action, search YouTube for how to make a bird trap and match your design to the same treadle-style approach youtube how to make a bird trap. No electricity, no batteries, no daily resetting unless you catch something.
Step 1: Build the frame
- Cut your timber battens to create a rectangular box frame matching your target dimensions (use the size table above as a guide). You need four long rails and enough cross pieces to create a rigid structure at each corner.
- Pre-drill all corner joints with a 2mm bit to prevent splitting, then screw or nail together. A simple butt-joint at each corner is fine for this. The frame doesn't need to be furniture-grade, just rigid.
- Sand all exposed timber edges and ends. This matters because a bird's feet and feathers will contact the cage, and splinters cause injury.
- Cut your wire mesh panels to fit each face of the frame: two long sides, two short ends, and the top. Leave the bottom open for the treadle plate, and leave one short end open for the door.
- Staple or clip the mesh tightly to each face of the frame, folding any cut wire ends back into the frame so there are no sharp points facing inward. Run your gloved hand across every internal surface before proceeding.
Step 2: Make and fit the treadle plate
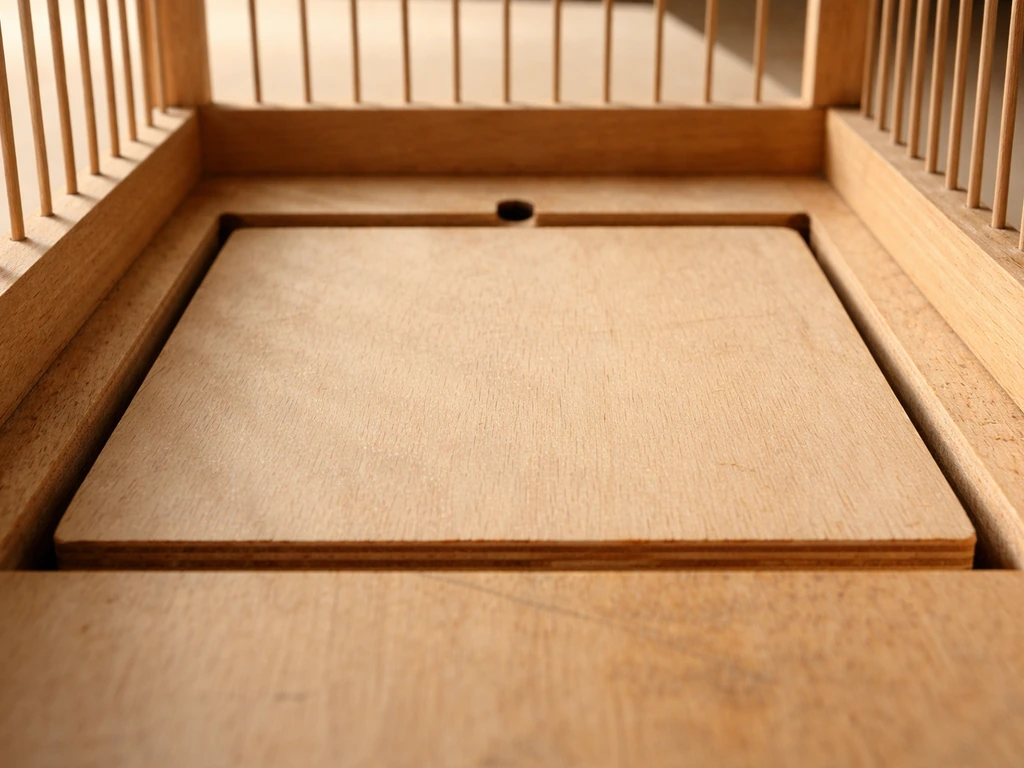
- Cut your plywood treadle plate to sit inside the cage floor with about 5mm clearance on each side so it can pivot freely.
- Drill a small hole (4mm) at the back centre of the treadle plate, about 2cm from the back edge.
- Pivot the treadle by attaching it to the cage frame with a thin wire or small hinge running across the back third of the cage. The plate should tilt forward (front dips down) when weight is applied at the front.
- Test the pivot: press the front of the plate with two fingers using light pressure (roughly equivalent to a medium bird's weight, around 60-150g depending on species). It should tip down smoothly without resistance. If it's too stiff, reposition the pivot point further forward.
Step 3: Build and hang the drop door
- Cut the drop door from plywood or thin aluminium to fit snugly in the open front end of the cage. It should cover the full opening with no gap larger than 5mm on any side.
- Attach the hinges at the top of the door so it swings outward and downward (like a drawbridge falling away from you). The door needs to fall freely under gravity when unlatched.
- Attach a small compression spring or looped elastic cord from the top of the door to a hook on the cage frame above. This is your return mechanism: it holds the door in the 'up and open' position until the trigger releases it, then allows it to drop. Test that the door drops cleanly when you release tension on the spring.
- Sand the door edges and check the fit. The door should drop straight and seal the opening without bouncing back open. If it bounces, add a small rubber bumper (a piece of cut pencil eraser works) to the bottom corners of the door frame.
Step 4: Connect the trigger linkage
- Screw your eye bolt into the top of the cage frame, directly above the treadle plate, roughly centred left-to-right and positioned about one-third of the cage length from the front.
- Cut a length of 14-gauge wire about 40cm long. Bend one end into a small hook and attach it through the hole in the back of the treadle plate. Run the wire up through the eye bolt.
- Bend the other end of the wire into a hook that loops over a small catch or notch on the top of the drop door when the door is in the raised (open) position. This wire is your trigger link: it holds the door open by tension.
- When the treadle front dips under a bird's weight, the back of the treadle rises, pulling the wire upward through the eye bolt, which lifts the hook off the door catch, releasing the door.
- Test the linkage by hand before ever placing the trap outside. Press the treadle front gently. The door should drop within half a second of trigger activation. Adjust the hook positions on the wire until this works smoothly and consistently every time.
Step 5: Final safety check
- Run a gloved hand over every interior surface. No sharp wire ends, no splinters, no exposed screw points.
- Check that the door drops and seats completely shut. A gap of more than 8-10mm at the bottom could allow a small bird to escape or get stuck.
- Verify the treadle pivot doesn't allow the plate to drop so far that a bird's leg could get caught beneath it. The maximum treadle travel (front dip) should be no more than 2cm.
- Reset the trap five times in a row and confirm it triggers consistently. If it fails even once, find the fault and fix it before baiting.
Baiting, placement, and getting the trigger dialled in
A well-built trap that's placed wrong or baited with the wrong food will catch nothing. This part is honestly where most first-timers go wrong, including me on my first attempt. I built a perfectly functional cage and then plonked it in the middle of an open lawn with no cover and nothing the birds in my garden actually ate. Not a single visit for three days.
Choosing the right bait
| Bird | Effective Bait | Avoid |
|---|---|---|
| Feral pigeon | Cracked corn, wheat, millet, bread crusts | Anything strongly scented or unfamiliar grain types |
| Common myna | Moist dog food or cat food, cooked rice, overripe fruit | Dry seed (mynas prefer protein and soft foods) |
| House sparrow | White millet, sunflower chips, fine breadcrumbs | Large grain (can't access it easily) |
| Common starling | Mealworms, suet, soft fruit pieces, dog food | Hard dry seeds alone |
| Parakeet | Sunflower seeds, apple slices, millet sprays | Nothing, parakeets are cautious of novel objects |
Place a small amount of bait (a teaspoon is enough) in the bait dish and position it at the back half of the treadle plate, past the pivot point. This means the bird has to step fully onto the front of the treadle to reach the food, which is where you need the weight to trigger the mechanism. If you put the bait too close to the door, the bird may eat it without triggering the plate at all.
Placement strategy
Set the trap where you've already observed the bird feeding or landing regularly, not where you think it should be. If pigeons roost on a flat garage roof, put the trap on that roof. If sparrows swarm your feeder, put it within a metre of the feeder but on the ground below. Familiar territory dramatically reduces the time to first capture.
- Use natural cover where possible: position the trap near a wall, hedge, or garden bed edge rather than in open space. Birds feel safer entering enclosed or sheltered spaces.
- Pre-bait the site for two or three days before setting the trap mechanism. Put food just outside and inside the cage (door propped open and trigger disabled) so birds get comfortable entering. Only arm the trigger after they're visiting regularly.
- In warm weather, place the trap in shade. A bird caught in direct sun can overheat and die in as little as 30 minutes.
- Check the trap at least every two to three hours when active. Set it in the morning and pull it by early afternoon to avoid late-day heat or overnight captures.
- If the target bird visits but won't enter the cage, try making the entrance feel more natural by placing sticks, leaves, or a small branch across the top to reduce the open-cage appearance.
Testing and adjusting the trigger sensitivity
Trigger sensitivity is the most common adjustment you'll make in the field. If the door is dropping when a leaf blows in, the treadle is too sensitive (move the pivot point forward slightly to require more force). If the bird is eating the bait and leaving without triggering it, the treadle needs less resistance (move the pivot point back toward the centre). A reliable rule of thumb: the treadle should require roughly the weight of a tennis ball dropped from 15cm to trigger, which approximates the weight shift of a bird stepping from one foot to the other.
What to do after you catch a bird
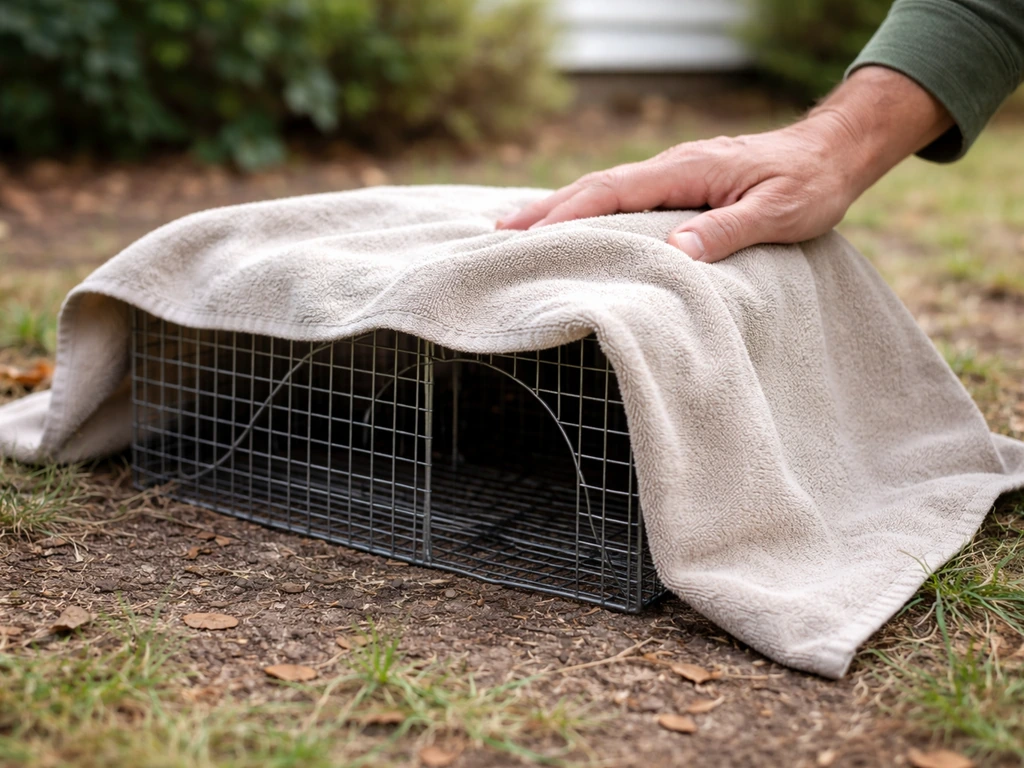
The moment you see a bird in the trap, act quickly and calmly. Don't leave it there while you go make a cup of tea. Here's exactly what to do:
- Approach slowly and cover the trap with a light cloth or towel. Darkness calms birds immediately and reduces panic flapping that causes injury.
- Move the covered trap to a quiet, shaded indoor space like a garage or shed while you assess the situation.
- Identify the bird species before doing anything else. If it's anything other than your intended target species, release it immediately at the capture site.
- For your intended pest species (e.g., feral pigeon, myna): decide whether you're relocating it yourself or handing it to someone else. If relocating, transport distance should be at least 5-10km to prevent homing behaviour (pigeons especially will return from shorter distances).
- To release: hold the cage at the release site, open the door facing away from you, and step back. Don't try to handle the bird directly unless you've identified an injury and need to get it to a wildlife rehabilitator.
- If the bird appears injured (limping, one eye closed, unable to fly), contact your local wildlife rehabilitation centre or RSPCA (UK), WIRES (Australia), or a local wildlife rehabber (US) for guidance before attempting to handle it further.
- Thoroughly clean and disinfect the trap before re-setting it. Bird feces and feathers carry diseases, and a contaminated trap can stress or harm subsequent captures.
If you're in the UK and trapping birds in a commercial food premises context, be aware that cage traps for that purpose typically require a specific licence from the relevant authority, and the RSPCA guidance in that context emphasises release into the wild as the outcome. Keep that documentation on you when transporting any wild bird.
If you'd rather not trap: DIY deterrents and exclusion that actually work
Honestly, for a lot of nuisance bird problems, trapping is more work than it's worth when what you really need is to stop the birds accessing a specific space. I've spent a weekend building a trap for a persistent pigeon problem and then realised that blocking a single gap under the eaves with a 50-cent piece of mesh solved the whole thing in twenty minutes. It's worth asking whether you actually need to catch anything, or whether you need to exclude.
Physical exclusion
The most effective long-term solution for most nuisance bird problems is blocking access to the space they're using. This means the same galvanised wire mesh you'd use to build a trap, used instead to seal gaps, vents, eaves, and ledges. The critical point the RSPCA's deterrent guidance makes is that any exclusion netting or mesh installed incorrectly can itself trap birds, so installation quality matters. Mesh needs to be secured on all edges with no loose sections birds can push behind and then can't escape from. Check any newly installed exclusion mesh every day for the first week to catch any accidental entrapments.
- Hardware cloth (1.25cm mesh) fixed over roof vents, soffits, and eave gaps stops sparrows and starlings nesting in roof spaces.
- Bird spikes on ledges, beams, and fence rails prevent roosting without harming birds.
- Reflective tape or old CDs hung near problem areas (feeders, fruit trees) create movement-based deterrents that cost almost nothing.
- A hawk silhouette kite or predator decoy can move problem birds on from an open area, though birds habituate to static decoys within a week or two, so you need to move them regularly.
- Redirecting birds with a dedicated feeding station stocked with the right food for your desired species (and away from problem areas) solves feeder-domination issues without any trapping at all.
Habitat redesign
If your real problem is aggressive or dominant species taking over feeders and nesting boxes meant for more desirable birds, the solution is often design rather than removal. Cage feeders with openings sized for small birds physically exclude larger species. Nesting boxes with correctly sized entrance holes (25mm for blue tits, 32mm for house sparrows, 45mm and above for starlings) let you control which species can nest where. This is exactly the kind of project this site is built around, and it's a far more satisfying long-term solution than ongoing trapping.
Whatever route you take, the goal is the same: a backyard where the birds you want are thriving and the ones causing problems are managed without unnecessary harm. A well-designed space does most of that work automatically, no trigger mechanism required.
FAQ
My trap sometimes drops when there is no bird present. How do I prevent false triggers?
If the bird keeps triggering and hopping out, it usually means the latch is releasing too easily or the door is not dropping far enough to prevent a retreat. Check that the door swings freely without rubbing, and that the latch fully engages before a visit. Also reduce bait quantity and put it slightly farther toward the back of the treadle so it forces a step pattern that stays on the plate.
The birds are eating the bait but leaving without triggering. What should I adjust first?
If you’re seeing repeated visits with no catch, first confirm the trap is on the bird’s actual approach route, not just nearby. Then adjust trigger sensitivity by moving the treadle pivot slightly so it needs a bit more force. Finally, keep bait consistent with what they are already eating (same food, same time of day), because mismatched bait can lead to quick sampling that never produces the full weight shift needed.
How can I make a homemade cage trap less “suspicious” to shy birds?
Don’t place the trap in full open exposure if the birds are wary. Add cover around the sides and rear, using the same mesh material, so the bird has a clear path to enter but can’t easily detect the trap from multiple angles. Also avoid bright reflections on the cage door, paint or tape over shiny spots if needed, and place the trap where the bird already feels sheltered.
How do I ensure the automatic door closes humanely and doesn’t injure the bird?
You can reduce risk by checking the treadle plate area and door gap for pinch points, smoothing any sharp wire ends, and using a soft buffer or door guide so the door closes without slamming. Use the smallest entrance opening that still works for the target bird, and make sure the captured bird can stand and turn without hitting hard internal corners.
What’s the most common baiting mistake that prevents successful captures?
Most first attempts fail because the trap is baited incorrectly or at the wrong depth relative to the treadle. Use only a small amount of bait (not a pile), position it past the pivot so the bird must step fully onto the plate to reach it, and keep the bait dish stable so it doesn’t roll or get pulled away without triggering.
How often should I check the trap after it catches a bird?
If you miss a capture time, don’t leave the trap to “try again later” once a bird is inside. Plan to check frequently, especially in hot or cold weather, because stress and dehydration happen quickly. If you cannot monitor, switch to non-trapping exclusion (mesh or sealing gaps) instead of attempting a capture you cannot supervise.
Do I still need a permit if the bird is a nuisance species like pigeons or sparrows?
Most legal risk is species and jurisdiction dependent. Before building or using anything, identify the exact species involved and verify whether any permit or exemption applies where you live. Even “common” nuisance birds are still covered in many regions, so confirm rules locally rather than relying on general statements about “pest” birds.
How do I choose the right cage size so the bird must step on the treadle?
A good way to confirm size is to compare the bird’s typical stance to the trap entry. Leave enough room for a full step onto the treadle while preventing the bird from pivoting sideways out of the entrance. If the cage is oversized, the bird can enter but avoid the trigger plate, so size should match the species and the way it steps.
What’s the best way to set trigger sensitivity without trial-and-error catching?
If the treadle is too sensitive, wind and debris can trigger it, and if it’s too stiff, the bird never creates enough force. In practice, adjust incrementally by changing the pivot position and verifying with a controlled “weight test” that simulates a foot step. Also keep the trigger area clean so leaves, dust, or grit cannot change resistance.
What should I do if I catch an unexpected species, or a different bird than I was targeting?
If you catch a bird you were not targeting, treat it as protected wildlife in most places, and switch to contacting the right authority or a licensed wildlife handler rather than releasing nearby. Release site matters too, because moving the bird into unfamiliar territory can increase mortality from stress or inability to find food and shelter.
When should I stop trying to trap and switch to exclusion instead?
Yes, often. If the problem is repeated access to one entry point, exclusion can be faster and avoids the monitoring burden of live trapping. Use the same mesh material to block gaps, vents, and ledges, and secure edges so birds cannot enter, push behind, or get stuck without an exit.
Next Articles

How to Make a Live Bird Trap: DIY Humane Guide
Step-by-step DIY humane live bird trap build, placement, bait, and release tips with safety and legal guidance.
How to Make a Myna Bird Trap: DIY Indian Myna Guide
Step-by-step DIY guide to make a humane Indian myna live-capture trap, place it with bait, and handle release safely.

YouTube How to Make a Bird Trap: Safe DIY Steps
Humane, safe backyard bird trap DIY steps: when to trap, what to build, placement, monitoring, and release legally.