You can build a safe, functional bird brooder in an afternoon using a plastic storage tote or a wooden box, a heat lamp or radiant heat panel, a simple thermometer, and some pine shavings. The key targets: keep the warm zone at 95–100°F for the first week, drop it by about 5°F each week after that, maintain humidity between 50–70%, and give chicks a clear temperature gradient so they can move toward or away from heat as they need. Get those four things right and your chicks will thrive.
How to Make a Bird Brooder: Step-by-Step DIY Guide

Marcus Thornton
1 May 2026
What a bird brooder is and when you actually need one
A brooder is simply a warm, contained environment that replaces the heat a mother bird would provide. If you want to hatch and raise chicks by yourself, learning how to make a bird brooder is the first step before you set up incubation and brood schedules. Newly hatched chicks, ducklings, goslings, quail, and other young birds can't regulate their own body temperature for the first several weeks of life. Without a reliable heat source and a protected space, they chill quickly and die. If you're hatching eggs yourself (something covered in more detail in a homemade incubator guide), you'll need a brooder ready before the eggs pip. If you're wondering how to make a homemade incubator for bird eggs, use this brooder timing to plan your incubation start so chicks hatch into a warm setup. If you're ordering day-old chicks through the mail or picking them up locally, you need the brooder set up and at temperature before they arrive, not after.
You also need a brooder when a parent bird abandons a nest, when chicks are orphaned, or when you're raising a small backyard flock indoors before outdoor conditions are safe. The brooder isn't a permanent home. It's a transition space that keeps fragile young birds alive through the first few weeks while their feathers develop and their thermoregulation kicks in. Once they're fully feathered, usually around 6 weeks depending on species, they're ready for a more permanent setup.
Choosing the right brooder design for your situation
There's no single right answer here, and honestly, the best brooder is the one you can build safely with what you have. That said, the three most practical DIY options each have real trade-offs.
| Design | Best For | Pros | Cons |
|---|---|---|---|
| Plastic storage tote | Small batches, 6–20 chicks, beginners | Cheap, easy to clean, widely available, draft-proof sides | Can warp or melt near heat lamps; limited airflow if not modified |
| Wooden box or plywood pen | Medium batches, 20–50 chicks, experienced builders | Durable, good insulation, easy to add ventilation, reusable | Takes more time and tools to build; harder to sanitize than plastic |
| DIY stand or wire brooder cabinet | Larger batches or long-term use | Maximum airflow, easy access, scalable | Less draft protection; floor can be hard on chick feet if not lined |
For most backyard setups with fewer than 25 chicks, I'd recommend a simple wooden plywood box or a large plastic storage tote to start. The tote is great for a first build because it's basically already a box. Cut ventilation holes in the lid, add a hardware cloth screen over them so chicks can't squeeze through, and you're most of the way there. If you want something more permanent, go with a plywood box. It insulates better, handles heat lamps more safely, and can be disinfected between batches. The wire cabinet design is excellent for airflow but needs extra draft guards at chick level, especially for the first week.
Everything you need before you build: the core components checklist
Before cutting a single board or drilling a hole, gather all the components. Missing one of these mid-build is frustrating, and some of them (like the thermometer and waterer) need to be in place before chicks arrive.
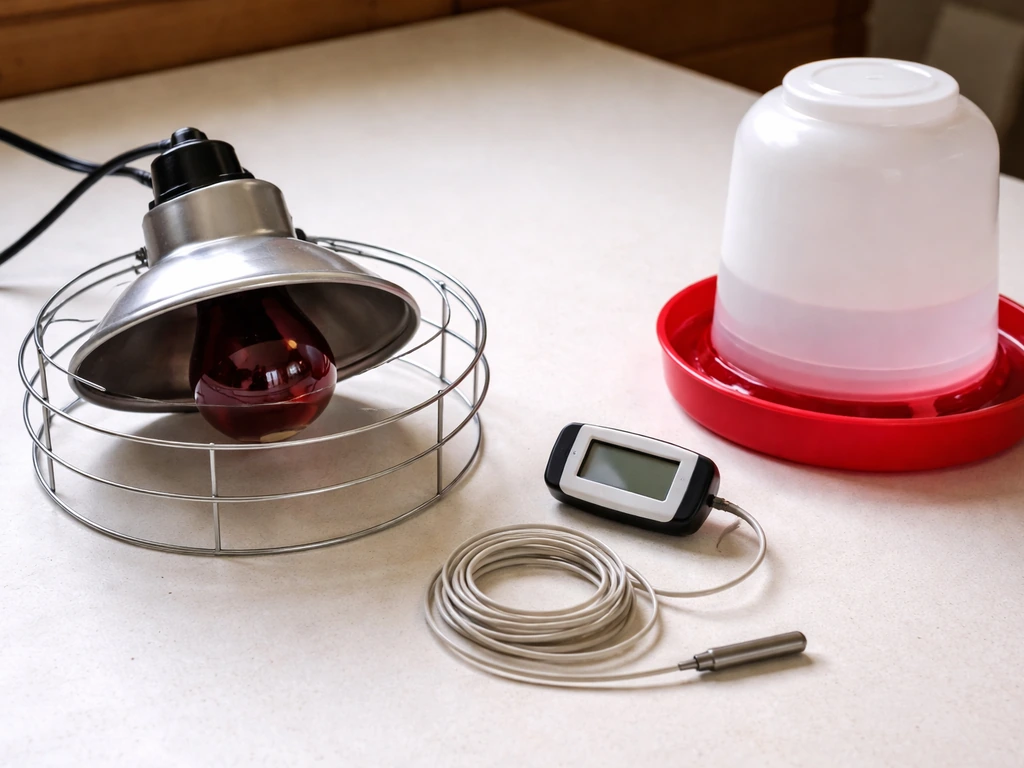
- Heat source: a 125–250W infrared heat lamp bulb in a proper porcelain fixture, or a low-voltage radiant heat panel like a Brinsea EcoGlow (the panel style runs on 12V and is generally safer than a mains-voltage lamp near dry bedding)
- Thermometer: a digital probe thermometer placed at chick level in the cool zone, not directly under the lamp
- Thermostat (optional but helpful): a plug-in thermostat controller keeps temperature steady without constant manual adjustment
- Brooder housing: your tote, wooden box, or framed pen (sized to the number of birds, covered in the next section)
- Bedding: 3–4 inches of pine wood shavings or chopped straw; avoid cedar shavings entirely because the aromatic oils are toxic to chicks
- Brooder guard: a cardboard or thin plywood ring placed inside the brooder for the first 5–7 days to keep chicks near the heat source, food, and water
- Chick waterer: a small base-style waterer with a shallow trough; for quail or very small birds, use a quail-specific fount with an especially narrow trough to prevent drowning
- Chick feeder: a small trough or tube feeder, or in the first day or two, a shallow dish or egg carton lid to help chicks find feed quickly
- Ventilation: screened openings near the top of the housing (not at chick level) that allow fresh air without creating ground-level drafts
- Hardware cloth (1/4-inch or 1/2-inch mesh): to cover ventilation openings and prevent escapes
- Lamp suspension hardware: a chain or adjustable hook (never hang the lamp by its cord alone), positioned so the lamp cannot fall onto bedding
- Properly rated extension cord: use a heavy-duty, grounded cord rated for the wattage of your heat lamp; underspecified cords are a real fire and shock risk
Step-by-step build plans: sizing, layout, and assembly
Step 1: Size the brooder for your flock
Overcrowding is one of the most common mistakes in homemade brooders. Cramped chicks stress each other, create too much heat and moisture in one spot, and compete aggressively for food and water. A good rule of thumb for the first two weeks is at least half a square foot per chick, moving to about 1 square foot per chick by weeks 3 and 4. So for 20 chicks, start with a minimum floor area of 10 square feet and plan to expand or move them outside sooner if they're growing fast. A 2x5 foot plywood box covers 10 square feet. A large 66-quart storage tote is about 2 square feet of floor space, which is realistic for only 4–6 chicks.
Step 2: Build or prepare the housing
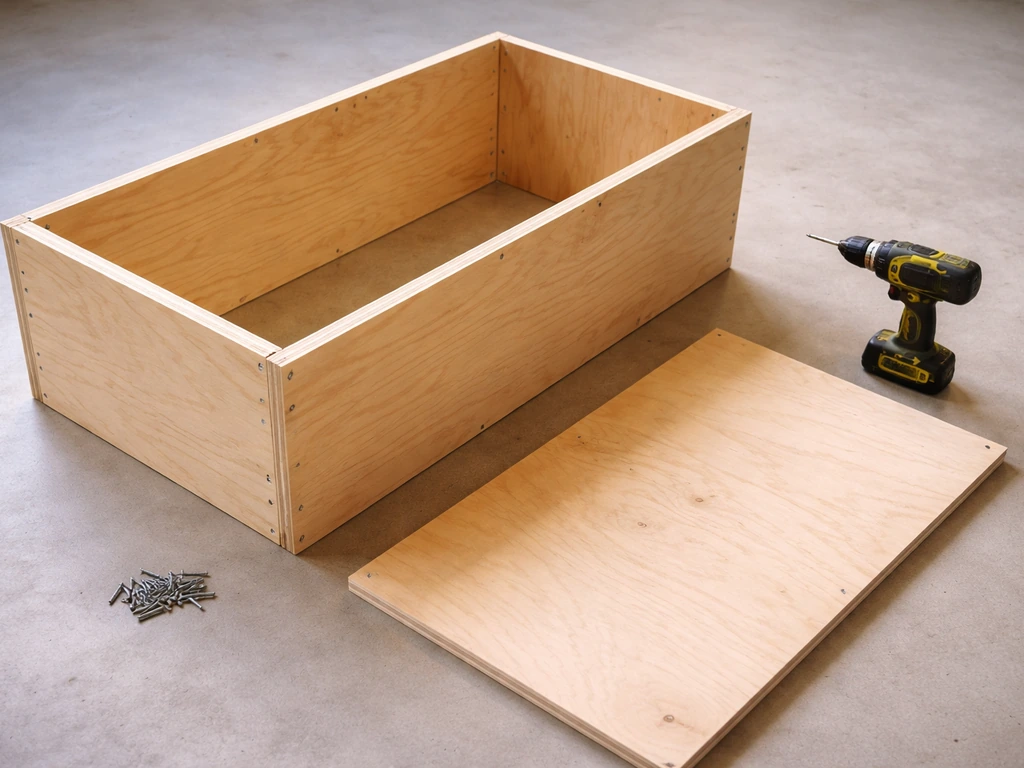
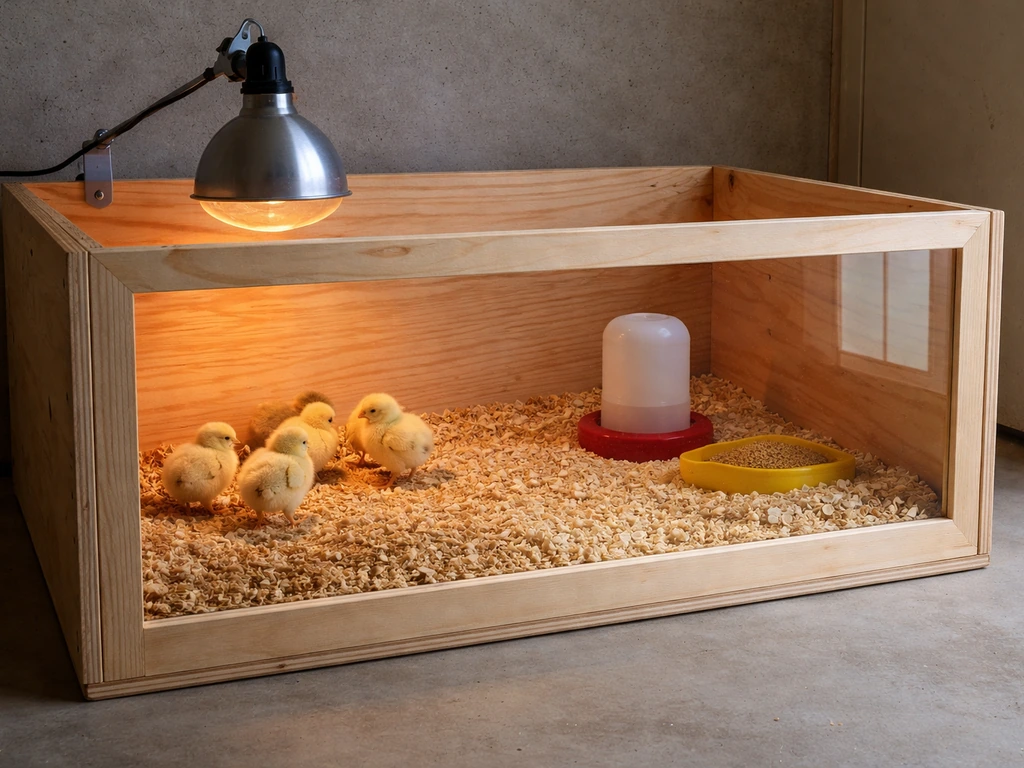
For a plywood brooder box, cut two side panels (2 feet tall x whatever length you need), two end panels, and a floor from 1/2-inch plywood. Screw the sides and ends together with 1.5-inch screws at each corner, then attach the floor from underneath. The box doesn't need a permanent lid. A hardware cloth top frame that rests over the opening works better because it allows easy access and ventilation while keeping chicks in. Cut a piece of 1/2-inch hardware cloth slightly larger than the box opening, staple it to a simple 1x2 lumber frame, and set it on top. For a tote build, drill or cut 2-inch ventilation holes across the top portion of the long sides, then cover each hole on the inside with a piece of hardware cloth stapled or glued in place. Don't skip the mesh. Chicks are surprisingly good at finding gaps.
Step 3: Set up the temperature gradient layout
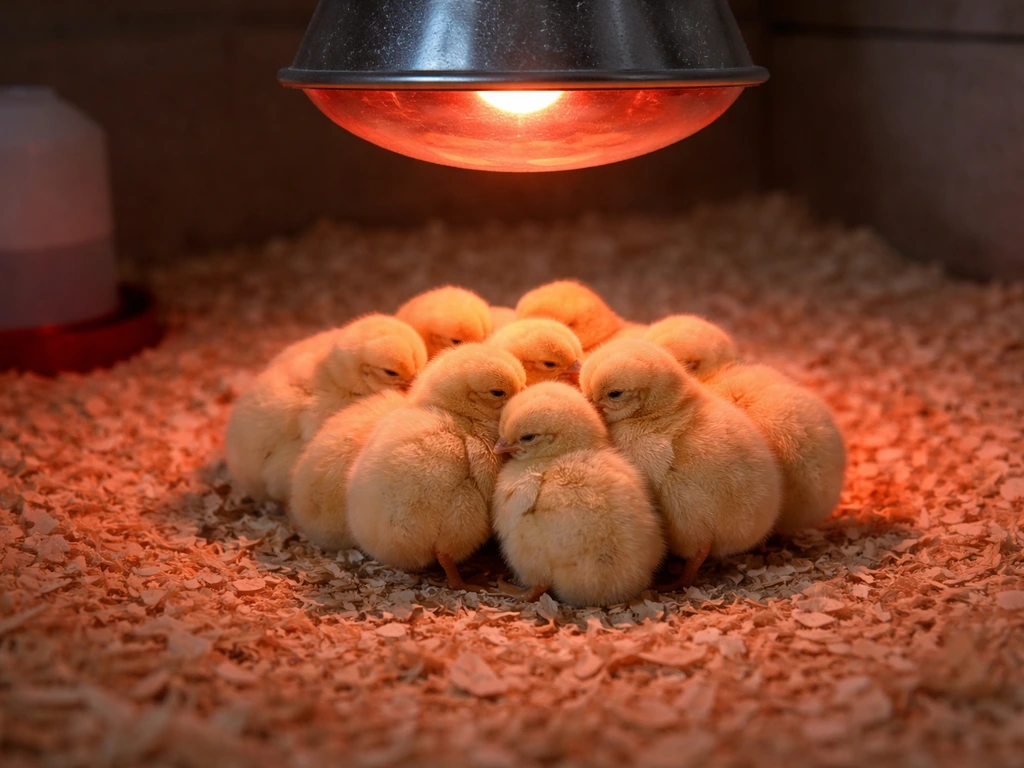
This is the part that matters most for chick welfare and it's completely free to do correctly. Place the heat source over one end of the brooder, not the center. This creates a warm zone under the lamp and a cooler zone at the far end. Chicks will move back and forth based on how they feel. If you heat the center, you remove their ability to self-regulate and any chick that gets too hot has nowhere to go. For a heat lamp setup, hang the lamp about 18 inches above the bedding to start and adjust height up or down to hit your temperature target. Use the chain or hook to make height adjustments. For a radiant heat panel, set it low (about 2 inches above chick height) over one corner and let chicks duck underneath it the same way they'd tuck under a mother hen.
Step 4: Add the brooder guard, bedding, food, and water

Lay down 3–4 inches of pine shavings across the full floor before anything else goes in. Then set up your brooder guard, a curved piece of cardboard or thin plywood about 12 inches tall, arranged in a circle or oval around the heat source area. This keeps chicks from wandering into cold corners during their first week when they haven't learned to navigate back to warmth. Place the waterer and feeder just outside the warm zone but inside the guard so chicks have easy access without standing directly under the heat. For the first couple of days, scatter some feed on a shallow dish or egg carton lid near the waterer so chicks spot it immediately. Once they're eating from the feeder reliably, you can remove the dish.
Step 5: Pre-heat and test before chicks arrive
Run the brooder for at least 2 hours before your chicks arrive and verify temperature at chick level in both the warm zone and the cool zone with your probe thermometer. University of Maine Cooperative Extension Bulletin #2219 recommends aiming for about 95°F at the chicks’ level, roughly 2 to 3 inches from the floor, through the first week temperature at chick level. You're aiming for 95–100°F directly under or near the heat source and something closer to 75–80°F at the far end. If the whole box reads 95°F, you have no temperature gradient and chicks will overheat. Adjust lamp height or panel position until you get a clear warm-to-cool range across the floor.
Temperature, humidity, and the brooding schedule week by week
Here's the schedule I follow, which lines up with guidance from multiple extension programs. These targets apply to most common poultry chicks: chickens, turkeys, and guinea fowl. Waterfowl like ducklings and goslings can tolerate slightly lower temperatures, starting around 90–95°F in week one.
| Week | Warm Zone Target | Notes |
|---|---|---|
| Week 1 | 95–100°F | Check temperature multiple times daily; remove brooder guard after day 7 |
| Week 2 | ~90°F | Chicks will start moving to the cool zone more; watch for panting (too hot) or huddling (too cold) |
| Week 3 | ~85–90°F | Feathers developing; chicks more active and exploratory |
| Week 4 | ~80°F | Begin transitioning to outdoor conditions if weather allows |
| Week 5 | ~75°F | Most chicks nearly feathered; reduce heat further or shut off on warm days |
| Week 6 | ~70°F or ambient | Fully feathered chicks can typically handle ambient outdoor temperatures above 60°F |
For humidity, aim to keep relative humidity between 50 and 70% throughout brooding. The first three days are especially important: try to hold it closer to 60–70% during that window because very dry air stresses newly hatched chicks. A simple hygrometer costs a few dollars and is worth having in the brooder alongside your thermometer. If humidity drops below 50%, especially in the first week, add a shallow dish of water near (not under) the heat source, or lightly mist the walls. If it climbs above 70%, your ventilation needs improvement or your bedding is getting wet.
The best real-time temperature gauge is chick behavior. Chicks evenly spread across the brooder floor, gently chirping, pecking at food, and moving freely means everything is dialed in. Chicks huddled tightly under the lamp means they're cold. Chicks pressed against the walls, panting, or avoiding the heat zone entirely means they're overheating. Trust what the chicks tell you as much as the thermometer.
Safety, hygiene, and fixing problems when they come up
Fire and electrical safety
Heat lamps are the most common cause of brooder fires, and almost all of them are preventable. Never suspend a heat lamp by its cord. Always use a chain, a wire hook, or a purpose-built lamp stand so the lamp is secure even if it gets bumped. Keep the lamp far enough from bedding that it cannot ignite shavings if it swings or if bedding fluffs up. Don't leave the brooder running unattended for long periods, especially in the first few days when you're still dialing in height and temperature. Use a properly rated extension cord. A lightweight indoor extension cord running a 250W heat lamp is a genuine fire and shock hazard. If you want to reduce fire risk significantly, consider a low-voltage radiant panel heater instead of a mains-voltage lamp. These run on 12V through a transformer and eliminate most of the ignition risk associated with traditional heat lamps.
Cleaning and hygiene routine
Before chicks ever enter the brooder, the housing should be clean and disinfected, ideally at least a week before placement to let any cleaning residue off-gas. Once chicks are in, spot-clean wet or soiled bedding daily. Don't wait until the whole floor is damp. Wet litter produces ammonia quickly, which damages chicks' respiratory tracts and eyes and sets up conditions for disease. When you smell ammonia or see wet patches, remove and replace that section of bedding immediately. Do a full bedding change every 5–7 days for small batches. Waterers are the most frequent source of wet spots, so check them twice a day and elevate them slightly on a small block of wood once chicks are steady on their feet so they stop scratching shavings into the trough.
Preventing drafts without cutting off fresh air
This is one of the trickiest balancing acts in brooder design. Young chicks are extremely sensitive to drafts at ground level, even a modest air current creates a wind-chill effect that drops their effective temperature significantly. But you can't seal the brooder completely or ammonia and moisture build up fast. The fix is positioning all ventilation at the top of the brooder walls or in the lid, never at floor level. Air enters at the top, circulates gently, and exits without hitting chicks directly. If you're building a plywood box, drill or cut ventilation openings about 1–2 inches from the top edge of each long side. Cover them with hardware cloth. That's all you need.
Troubleshooting the most common problems
- Chicks huddling under the lamp: the brooder is too cold, either the lamp is too high, the room is drafty, or there's a heat loss somewhere. Lower the lamp by 2 inches, check for gaps, and re-read the temperature.
- Chicks avoiding the heat zone and pressing against walls: overheating. Raise the lamp or reduce the wattage. Check your thermometer isn't reading falsely low from being in a cool spot.
- Uneven temperatures across the floor: usually means a draft from one side is cooling part of the brooder. Check ventilation positioning and look for gaps at the corners of the box.
- Wet bedding near the waterer: elevate the waterer slightly and switch to a waterer with a smaller base if chicks are splashing excessively. Replace the wet bedding immediately.
- Chicks stressed by noise or sudden bright light: brooders do best in a calm, low-traffic area. Sudden sounds and bright overhead lights startle chicks and cause piling, which can injure or suffocate the ones at the bottom. Keep the brooder in a quieter part of the house or garage.
- Quail or very small chicks near the waterer: tiny quail chicks can drown in standard chick waterers with a normal trough depth. Use a quail-specific fount with a narrow trough, or add marbles to the trough of a regular waterer to reduce the water depth.
- Chicks not eating: scatter feed on a shallow dish or paper towel for the first 24–48 hours. Chicks learn to eat by pecking at texture and color contrasts. Once they find the feed, transition them to the trough feeder.
Safe and unsafe bedding: a quick reference
| Bedding Material | Safe? | Notes |
|---|---|---|
| Pine wood shavings | Yes | Best all-around choice: absorbent, widely available, affordable |
| Chopped straw | Yes | Good absorbency; avoid long-strand straw that chicks can get tangled in |
| Paper towels (first 2–3 days) | Yes | Good non-slip surface for day-old chicks before they're steady; replace with shavings after |
| Cedar shavings | No | Aromatic oils are toxic to chicks; do not use under any circumstances |
| Newspaper (slick surface) | Not recommended | Slippery surface causes leg problems in young chicks; can use under shavings as a base layer only |
| Sand | Caution | Used by some experienced keepers but poor moisture absorbency; not ideal for young chicks |
What comes after the brooder
Once your chicks are fully feathered around week 6, they're ready to graduate out of the brooder. If you're raising them as part of a breeding setup, now is the time to start thinking about a proper bird breeding box or a permanent housing structure. If you need to move birds safely between locations, you’ll also want to know how to make a bird carrier that provides ventilation and secure footing breeding box. The brooder has done its job. Think of everything you've learned watching your chicks respond to heat, light, bedding, and feeding, because all of that hands-on knowledge directly applies to building whatever comes next. A well-built brooder is just the beginning of what you can make.
FAQ
Can I make a brooder using only a heat lamp, without a thermometer and hygrometer?
You really should not. A thermometer is how you confirm the 95–100°F warm zone and the cooler end that lets chicks self-regulate. A hygrometer helps you catch dry-air stress in the first three days. If you have to start immediately, at least use a probe thermometer at chick level in both zones, then add humidity monitoring as soon as possible.
What should I do if my brooder floor is warm but the air temperature in the box is cooler (or vice versa)?
Chicks respond to temperature at bedding and chick level, not what a thermometer reads in open air. Measure with the probe at bedding height in the warm zone and at the far end. Adjust lamp height or panel placement until chick-level readings match your target gradient.
How do I tell whether the bedding depth is right?
Start with 3–4 inches of pine shavings, then watch for two signs. If chicks are constantly walking through to a bare floor, add more bedding. If bedding is clumping, smelly, or getting wet quickly, reduce wetness sources (usually the waterer) and remove the affected section rather than just adding more shavings.
Is it okay if the humidity is higher than 70% for a day?
A brief spike is usually less dangerous than persistent wet bedding, but higher humidity often means ventilation is not keeping up. If you see condensation, damp litter, or a musty smell, improve ventilation at the top and fix the waterer immediately. If bedding stays dry and behavior is normal, you can continue monitoring and correct gradually.
How can I prevent chicks from getting wet if my waterer is always spilling?
Place the waterer just outside the warm zone but inside the guard so chicks can access it without crowding directly under heat. Check twice daily, and once they are steady on their feet, elevate the waterer slightly so shavings cannot be scooped into the trough. If chicks still wet the bedding, switch to a chick-safe waterer with a controlled drinking mechanism (cup-based designs typically spill less than open dishes).
Do I need a brooder guard if I already have ventilation holes covered with hardware cloth?
Yes, the guard and hardware cloth serve different purposes. Hardware cloth prevents escape through gaps, while the brooder guard prevents first-week wandering into cold areas. If you skip the guard, chicks may huddle near heat and miss opportunities to move to the cooler zone, which can make temperature management harder.
What if chicks pile up in one corner, even though the thermometer shows the right gradient?
Behavior can reflect airflow patterns, drafts, or a hot spot caused by lamp/panel positioning. Recheck chick-level temperatures in multiple points across the floor, confirm the heat source is over one end (not the center), and ensure ventilation is at the top rather than blowing across the bedding. Also check that the guard is not blocking movement into the cooler area.
How long should I run the brooder before chicks arrive, and should it stay on for days?
Run it at least 2 hours before placement, then re-check chick-level temperatures in both zones right before opening the brooder to chicks. After chicks arrive, keep it running continuously through the first week while they learn the warm-to-cool travel pattern. Temperature changes are usually made gradually, not in large jumps.
Can I use plywood and a heat lamp, but keep the top fully covered for insulation?
Avoid a fully sealed top. You need ventilation placed high (in lid or near the top edge of the walls) so airflow circulates gently without chilling chicks. If you fully cover the brooder, humidity and ammonia can rise faster, and chicks may overheat because fresh air exchange is reduced.
How should I adjust temperatures if I am brooding a smaller bird type like quail or guinea fowl?
Use the chick behavior checks, but start with the standard week-one target for poultry and then fine-tune. Quail and guinea fowl can be more sensitive to drafts, so prioritize avoiding floor-level airflow and keep the gradient clear. If chicks chirp evenly and spread comfortably, you are close; if they crowd under heat, warm the gradient by adjusting position or height slightly.
When do I remove or change the brooder guard?
Typically keep it during the first week when chicks are still learning to move toward warmth. Once they can navigate the whole floor and are evenly distributed, you can remove it and rely on the gradient and your normal bedding depth. If chicks immediately start spending long periods at the far, cooler end, put the guard back for another few days.
What is the safest way to handle and move day-old chicks into the brooder?
Move chicks quickly, minimize time outside the brooder, and place them directly into the guard-warm area near the feeder and waterer. For the first couple of days, scatter feed in a shallow dish so they spot food immediately. Avoid putting chicks directly under the heat source, let them choose within the warm zone so they learn temperature movement right away.
How often should I deep-clean or disinfect the entire brooder between batches?
Aim for cleaning and disinfecting at least a week before the next batch so residue can air out. Between that, do daily spot-cleaning for wet spots, and do a full bedding change every 5 to 7 days for small batches. Waterers are the most common wet-spot source, so prioritize cleaning them and checking alignment frequently.
What extension cord setup is safest for a heat lamp brooder?
Use a properly rated extension cord designed for the lamp's wattage, route the cord so it cannot be snagged, and keep it out of chick territory to prevent chewing. If possible, plug into a grounded outlet and keep the connection secure above bedding level. For higher safety, consider switching to a radiant panel heater that runs on low voltage through a transformer.
Next Articles
How to Make a Bird Breaster: DIY Backyard Build
DIY guide to build a backyard bird breaster: pick the right design, use safe materials, waterproof, mount, maintain, and
How to Make a Bird Carrier DIY for Safe Transport
DIY bird carrier guide: size, ventilation, secure door, safe materials, lining, and step-by-step build for pet transport
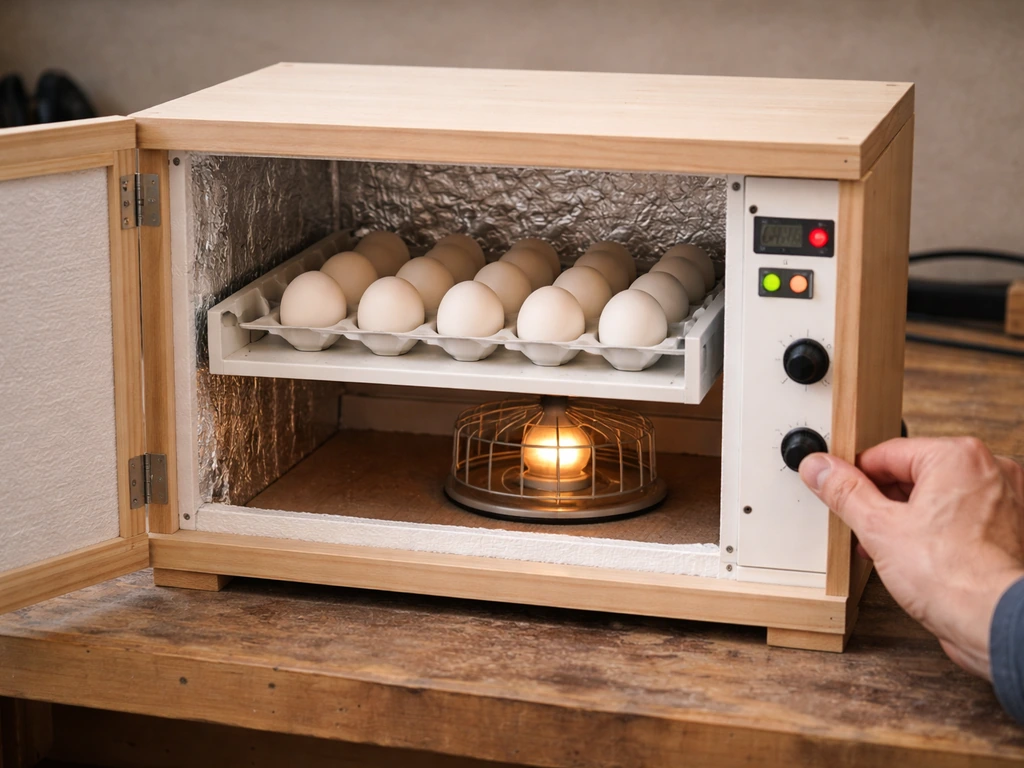
How to Make a Homemade Incubator for Bird Eggs
Step-by-step DIY guide to build a bird egg incubator with stable heat, humidity control, egg turning, calibration, and t