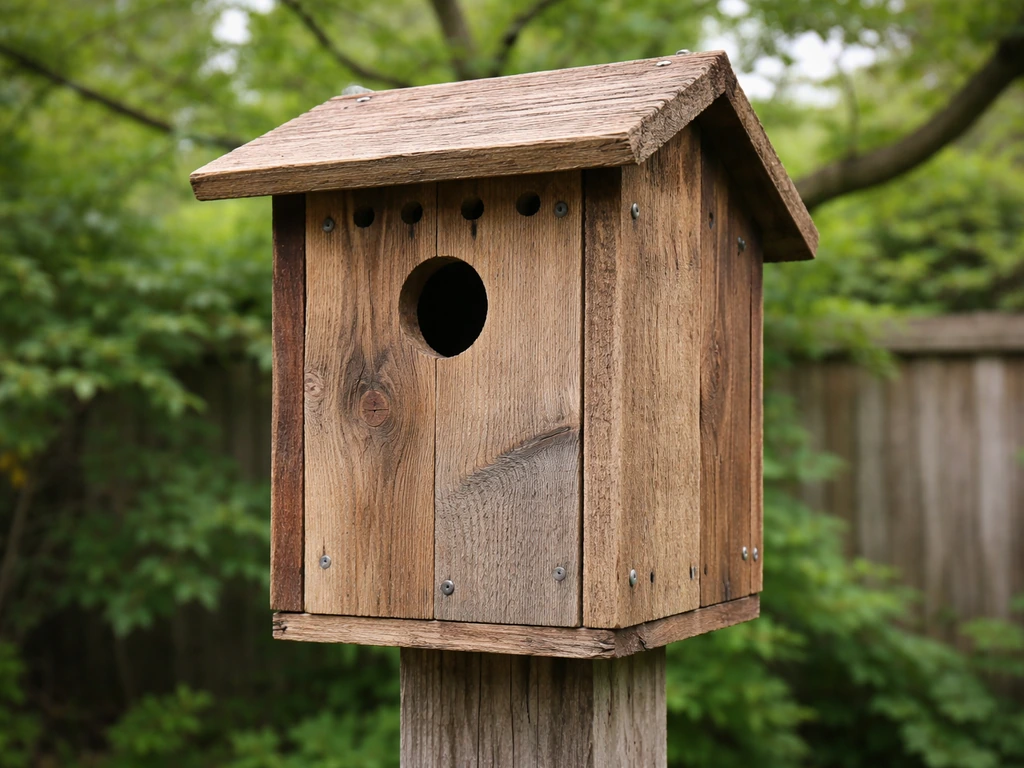
You can absolutely build a sturdy, bird-safe birdhouse from recycled materials using basic tools in an afternoon. The keys are picking the right repurposed wood (untreated, non-toxic), drilling an entrance hole sized for the species you want to attract, and adding drainage and ventilation so the nest stays dry and cool. Get those three things right and birds will move in. Get them wrong and you'll have a decorative box that sits empty. This guide walks you through the whole process, from the scrap pile to mounting it in your yard. If you also want to go further, you can use the same approach to make an eco-friendly birdhouse with other waste materials and natural finishes.
How to Make a Recycled Bird House Step by Step

Marcus Thornton
2 May 2026
Choosing suitable recycled materials

The most important rule with recycled materials is avoiding anything chemically treated. If you want the most eco friendly bird house result, focus on untreated, non-toxic recycled materials and skip chemically treated lumber so the nesting box stays safe for eggs and chicks. Pressure-treated lumber is impregnated with pesticides and fungicides, and creosote-treated wood is genuinely hazardous. Neither belongs inside a nest box where eggs and chicks will live. Stick to untreated wood scraps: old cedar fence boards, pine shelving, cypress offcuts, or salvaged hardwood are all excellent. Cedar is the gold standard because it resists rot naturally, but clean pine works fine and is usually easier to find for free.
Old wooden pallets can work, but inspect them carefully. Look for the heat-treatment stamp (HT) rather than the methyl bromide stamp (MB). MB-treated pallets are not safe for this project. If you can't find a stamp, skip that pallet and find another source. Salvaged wood crates, old drawer fronts, and thick plywood offcuts from furniture projects are all fair game as long as the wood is at least 3/4 inch thick. Thinner wood warps, cracks in the sun, and won't hold screws well.
Beyond wood, you can repurpose other materials for parts of the build. Old tin can lids work as predator guard plates around the entrance hole. Scrap metal or thick rubber can serve as roof flashing. Just keep the interior of the box all natural wood, no metal on the inside walls or floor where birds will nest.
- Untreated cedar, pine, or cypress boards (3/4 inch thick minimum)
- Heat-treated (HT-stamped) pallet wood
- Salvaged drawer fronts, crates, or wooden shelving
- Old tin lids or scrap metal for entrance hole guards
- Exterior-grade wood glue (non-toxic once cured) for reinforcing joints
One thing I learned building my first box from fence scraps: measure the thickness before you start cutting. Fence boards look like they're 3/4 inch but are often closer to 5/8 inch after weathering. That small difference changes your interior dimensions and can mean birds don't have enough depth below the entrance hole to nest comfortably. Measure twice, plan accordingly.
Tools and safety basics
You don't need a fully equipped workshop. A jigsaw or circular saw for cutting, a drill with hole saw bits, a hammer or screw gun, sandpaper, and a tape measure will get you through most builds. If you're using a hand saw, it'll take longer but works just as well.
Safety matters more with recycled materials than with fresh lumber because you genuinely don't know what was on that old wood. If you're sanding or cutting anything with old paint on it, wear a proper dust mask (at minimum an N95) and safety glasses. Lead paint was common before 1978, and sanding it creates fine dust that you absolutely do not want to breathe or track through your house. The CDC is clear that regular washing doesn't fully remove lead dust, so if you're unsure about the paint history of your salvaged wood, wear gloves, work outside, and clean up thoroughly before coming inside.
OSHA notes that even regular wood dust causes eye and nasal irritation and can throw splinters during sanding, so eye protection isn't just for lead paint situations. It's just good practice whenever you're cutting or grinding wood. Keep a pair of safety glasses on the workbench and make it a reflex.
- Safety glasses (non-negotiable for cutting and drilling)
- N95 or better dust mask, especially for sanding old painted wood
- Work gloves for handling rough or splinter-prone salvaged pieces
- Jigsaw or circular saw for ripping boards to size
- Drill with a 1/4-inch bit and a hole saw set for entrance holes
- Sandpaper (80 and 120 grit) for smoothing interior surfaces and entrance edges
- Tape measure, pencil, and a square for marking cuts
Designing a bird-house plan that fits the species
The single biggest mistake beginners make is building a generic box without thinking about who's supposed to live in it. Entrance hole size is the number one factor in which birds will use your box, and a wrong size either keeps your target species out or invites predators and competitor birds in. Before you cut a single board, decide which bird you're building for.
Here's a practical species dimensions table to plan your build around. The entrance hole diameter is the most critical measurement. The floor size determines whether the nest has enough room, and the hole height above the floor gives birds a safe drop that deters predators from reaching in.
| Species | Floor Size | Interior Depth | Entrance Hole Diameter | Hole Height Above Floor | Mounting Height Above Ground |
|---|---|---|---|---|---|
| House Wren | 4" x 4" | 6–8" | 1 1/8" | 4–6" | 5–10 ft |
| Chickadee | 4" x 4" | 8–10" | 1 1/8" | 6–8" | 4–15 ft |
| Eastern Bluebird | 5" x 5" | 8–12" | 1 1/2" | 6–10" | 4–6 ft |
| Western Bluebird | 5" x 5" | 8–12" | 1 1/2" | 6–10" | 4–6 ft |
| Mountain Bluebird | 5" x 5" | 8–12" | 1 9/16" | 6–10" | 4–6 ft |
| Tree Swallow | 5" x 5" | 6–8" | 1 1/2" | 4–6" | 5–15 ft |
| Downy Woodpecker | 4" x 4" | 9–12" | 1 1/4" | 6–9" | 5–15 ft |
If you're just starting out and want the most beginner-friendly build, go with a house wren or chickadee box. The smaller floor size and entrance hole are easier to work with from scrap boards, and both species are common across North America. Bluebirds are a rewarding target but need more open habitat away from dense cover, so choose them only if your yard or mounting area matches what they're looking for.
Rough up the inside wall below the entrance hole with a chisel or coarse sandpaper. This gives fledglings grip to climb out when it's time to leave the nest. It's a small step that genuinely increases nesting success.
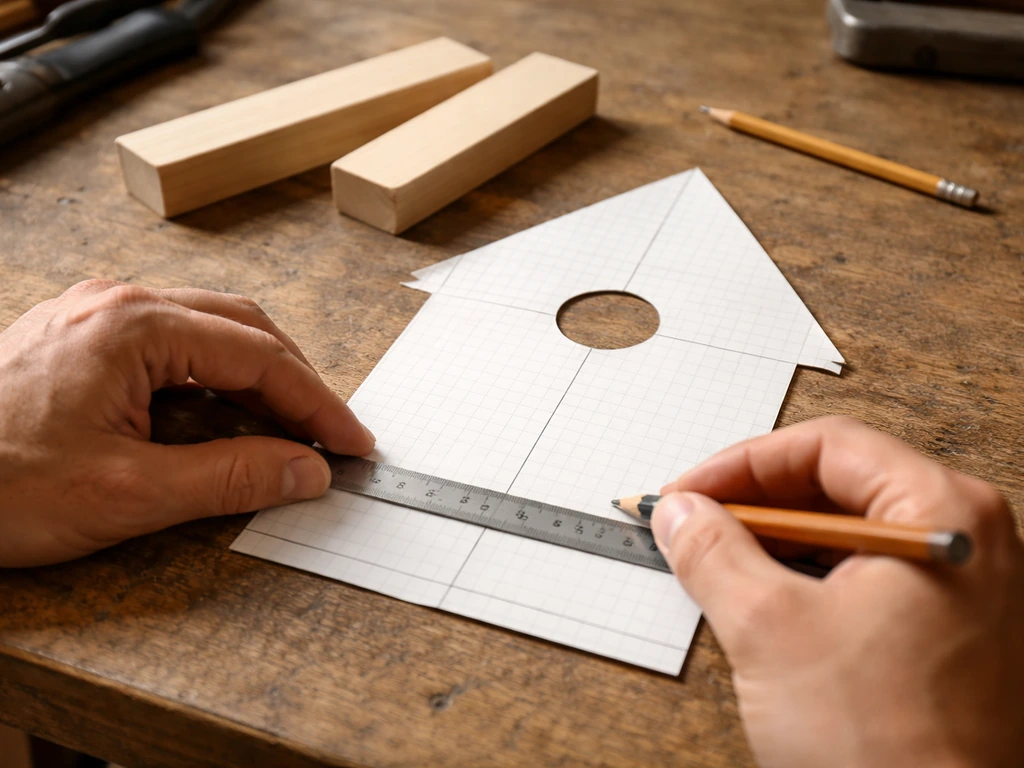
Step-by-step build process from recycled materials
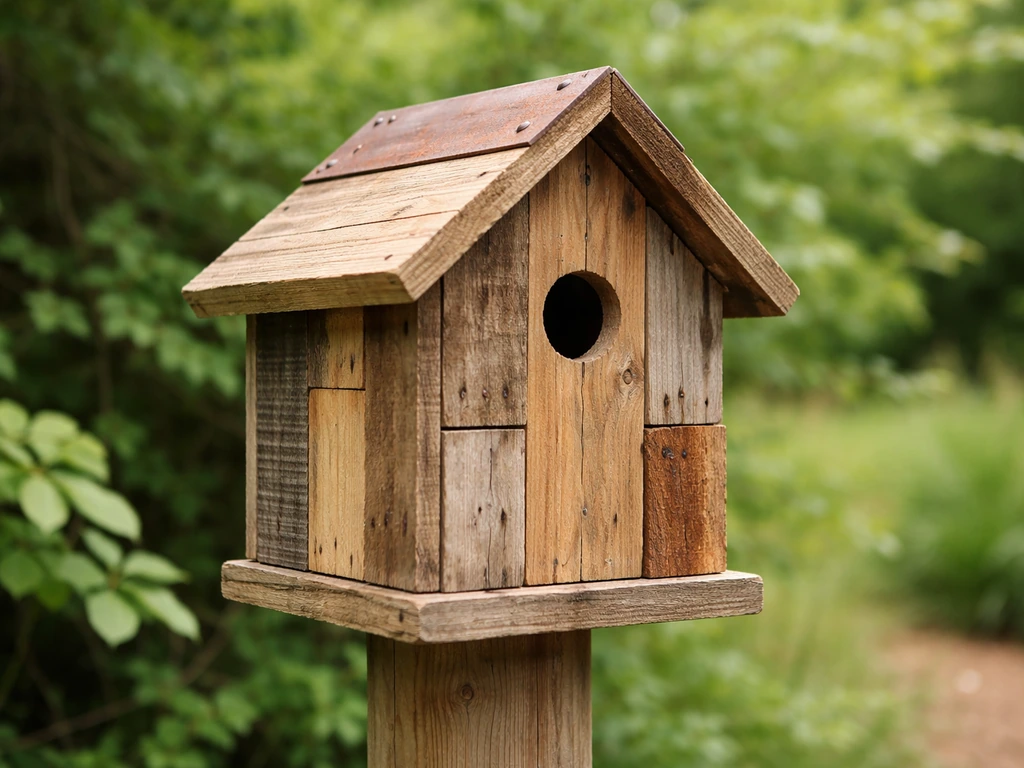
This sequence assumes you're building a basic single-chamber box, which works for all the species in the table above. The design is a front-opening box with a sloped roof, four side walls, a floor, and a cleanout door on one side panel. That cleanout door is essential for end-of-season maintenance, so don't skip it.
- Mill your salvaged boards to size. Rip them to the widths you need using a saw, and check that all pieces are at least 3/4 inch thick. Sand both faces smooth with 80-grit paper, then finish with 120-grit on the interior surfaces.
- Cut your five panels: front, back, two sides, and floor. The back panel should be taller than the front to create a natural roof slope of 15 to 20 degrees. A typical bluebird box back panel is about 18 inches tall while the front is around 14 inches.
- Drill the entrance hole in the front panel before assembly. Use a hole saw bit matched to your target species diameter (see the table above). The center of the hole should sit at the correct height above where the floor will be. Smooth the edges of the hole inside and out with 120-grit sandpaper so there are no splinters.
- Drill ventilation holes near the top of both side panels (two per side, about 5/8 inch diameter) and four drainage holes in the floor (3/8 to 1/2 inch diameter, one near each corner). This is easier to do before assembly.
- Score the inside of the front panel below the entrance hole with a chisel or coarse sandpaper to create grip for fledglings climbing out.
- Glue all joints with exterior-grade wood glue before nailing or screwing. This significantly extends the life of the box by sealing out moisture at the seams. Let the glue tack up for a few minutes before fastening.
- Assemble the box using galvanized screws (not standard screws, which rust and corrode). Attach the floor inside the walls rather than underneath so rain can't wick up into the joint. Leave a 3/4-inch gap between the floor edges and the walls, or bevel the floor corners, to aid drainage.
- Attach the roof last. It should overhang the front by at least 2 inches and the sides by 1 inch to shed rain away from the entrance. A longer overhang is better.
- Make one side panel a hinged or pivoting cleanout door. A simple pivot design uses two screws as pivot pins at the top of the panel, with a single screw latch at the bottom to keep it closed during nesting season.
- Do a final sand on all exterior edges and corners to remove splinters, then inspect the interior: it should be bare, smooth-ish wood with no paint, stain, or chemical residue.
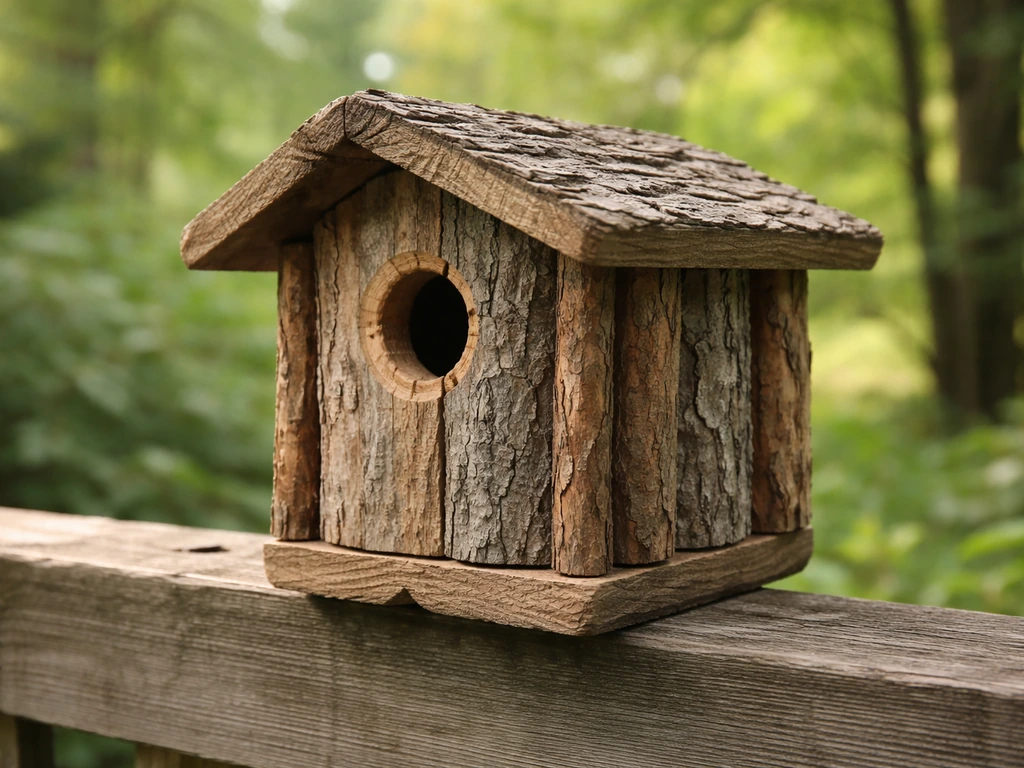
My first recycled build used an old cedar fence board that had weathered to a grey finish on one side. I put that weathered face on the outside and left it as-is. It looked natural, needed no finish, and lasted six seasons before I replaced it. Don't feel like salvaged wood needs to look polished.
Ventilation, drainage, and entrance sizing details
These three details are where a functional birdhouse separates from a decorative one. Get ventilation and drainage wrong and you'll have a soggy, overheated box that birds avoid or that kills eggs during heat waves.
Ventilation
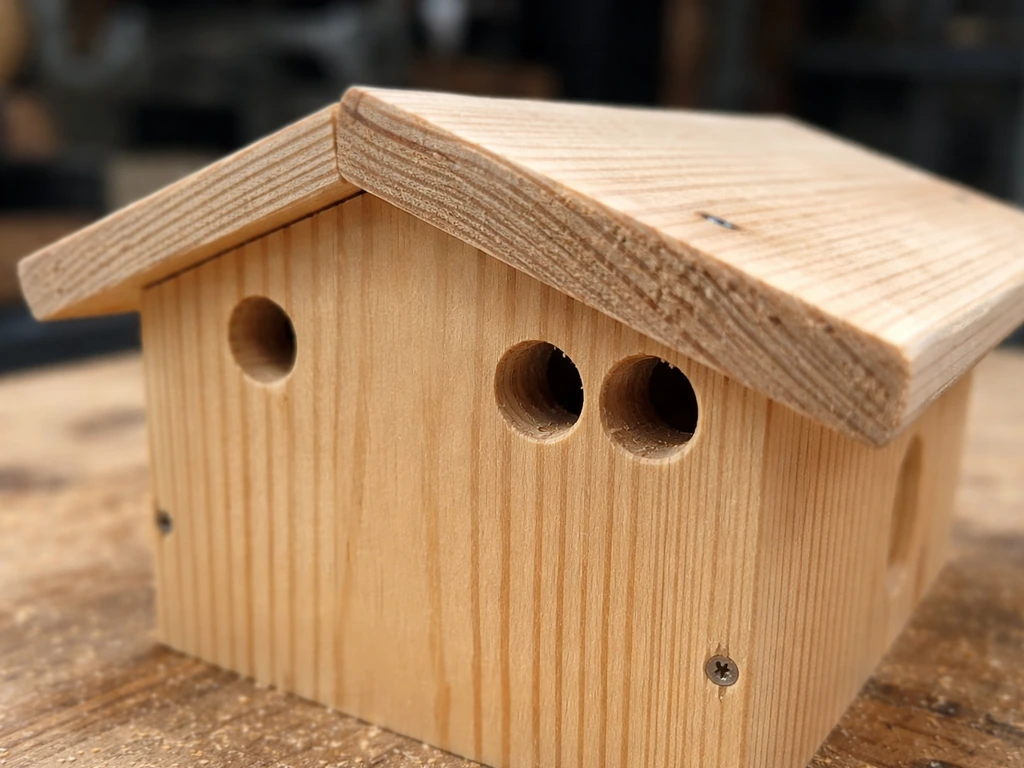
Ventilation holes should sit near the top of the side walls, just below the roofline, so hot air can escape upward. NestWatch recommends two 5/8-inch holes on each side (four total). The Avian Wildlife Center suggests drilling them at about 1/4 inch if you want a more conservative size. Either works. The placement matters more than the exact size: if the holes are low on the wall, they just let rain in and do nothing for heat. High placement lets convection do its job and keeps the interior 10 to 15 degrees cooler on hot days, which can literally be the difference between healthy chicks and heat stress.
Drainage
Drill at least four drainage holes in the floor, one near each corner, at 3/8 to 1/2 inch in diameter. If you're beveling the floor corners instead (cutting off the corners at 45 degrees so the floor sits slightly inside the walls), that works too. The goal is that if rain blows in through the entrance or moisture accumulates, it drips out rather than pooling under the nest. A wet nest is a breeding ground for bacteria and mites, and nesting birds will often abandon a soggy box entirely.
Entrance hole sizing
The entrance hole diameter isn't just about which species fits through: it's also a predator management tool. A 1 1/8-inch hole that fits a house wren physically blocks larger competitor birds like European starlings. A 1 1/2-inch bluebird hole is small enough to make it difficult for a cat or raccoon to reach in and large enough that the target species can enter easily. Going even 1/8 inch too large on a bluebird box can let European starlings compete for the cavity, so cut and measure carefully before drilling. Use a hole saw rather than a spade bit for a cleaner, more accurate hole.
Finishing, cleaning, and longevity tips
Never paint or stain the inside of a birdhouse. That's a hard rule. Even paints marketed as non-toxic when dry can off-gas in a small, enclosed, sun-heated box. CSU's nest box guidance is explicit about this, and NestWatch reinforces it. The interior stays bare wood, full stop.
On the exterior, you have options. Untreated cedar and cypress can go completely unfinished and will weather gracefully for years. If you're using pine or a softer recycled wood, a single coat of exterior linseed oil on the outside surfaces (not the interior, not around the entrance hole) will extend the life of the wood without adding toxic compounds. Avoid glossy paints that can heat up more in sunlight. If you do use exterior paint on the outside, stick to muted earth tones or white for hot climates, and never paint anywhere the birds contact when entering or nesting.
For longevity, the joints are the weak point on any recycled wood box. Gluing before fastening, using galvanized or stainless screws instead of nails, and making sure the roof overhangs generously are the three things that add years to the box's life. I've seen well-glued cedar boxes last a decade. I've also seen pine boxes held together with regular nails fall apart in two seasons after the nails rusted and the joints opened up.
Cleaning the box between nesting seasons is not optional if you want repeat use. After the young fledge, remove the old nest material completely. Audubon recommends doing this right after fledging so the box is ready for a second brood if the parents return. At the end of the season, do a thorough cleanout and inspect for damage. If there's visible mold or heavy soiling, scrub the interior with a 1-part bleach to 10-parts water solution, then rinse well and let it dry completely in the sun before closing it back up. Never clean when there's any sign of active nesting or eggs present.
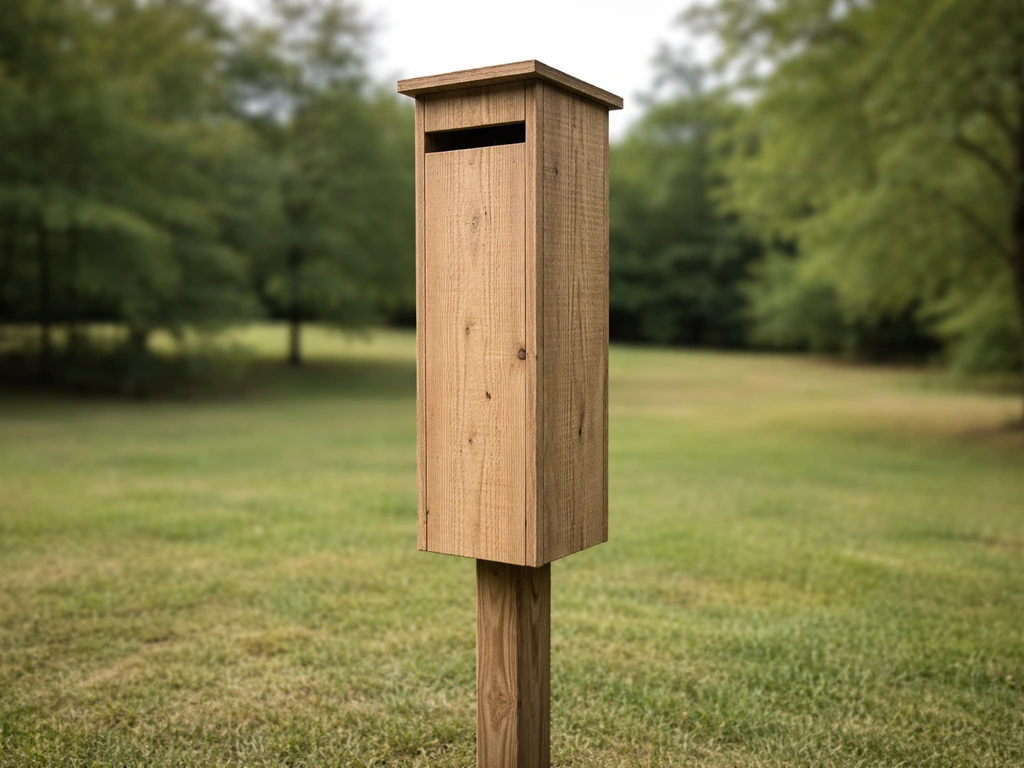
Placement, mounting, and seasonal maintenance
Where you put the box matters as much as how you built it. A perfectly built bluebird box mounted at the wrong height in a wooded backyard will sit empty for years. Match placement to species requirements using the mounting height column in the table above, and consider the habitat: bluebirds need open fields or meadow edges, wrens prefer shrubby cover near woodpiles, and tree swallows like open areas near water.
Face the entrance hole away from prevailing winds and ideally between north and southeast for temperature regulation. A south-facing entrance in a hot climate can overheat the box. A north to east orientation keeps things cooler and more stable. The roof overhang you built helps, but orientation adds another layer of protection.
Mount on a smooth metal pole rather than a tree if you can. Trees give squirrels, raccoons, and snakes a direct highway to the entrance. NestWatch data shows that boxes with predator guards had nesting success rates averaging 6.7 percent higher than unguarded boxes. A simple baffle, which is a cone or cylinder of sheet metal below the box on the pole, makes a big difference. You can make one from a recycled metal bucket or large tin can. For irregular or repurposed mounting bases, NestWatch recommends securing the box to a rigid upright support to eliminate wobble, which can startle nesting birds.
For seasonal maintenance, check the box weekly during peak nesting season (roughly April through August in most of North America). This lets you remove invasive house sparrow nests, check for predator damage, and monitor whether nesting is happening at all. Don't open the box during incubation or when very young chicks are present unless there's an urgent problem. Once the season wraps up, clean the box as described above, make any repairs to loose joints or cracked wood, and consider moving the box slightly if it went unoccupied the previous year. Sometimes a shift of even 20 feet to a better habitat edge makes all the difference.
If you want to go deeper on related builds, the same material-selection principles here apply when building a nest box from purely waste materials or when designing a fully eco-friendly birdhouse with natural finishes. The species dimensions and safety rules stay consistent across all of those projects, so what you learn here transfers directly.
FAQ
What if my recycled wood boards are thinner than the dimensions in the plan table?
Use a scrap wood thickness that matches the nest box plans for your target species, ideally at least 3/4 inch. If your recycled boards are closer to 5/8 inch, build a “deeper box” (increase the interior depth) rather than trying to compensate by enlarging the entrance hole, because entrance size controls both species fit and predator risk.
How can I be sure a piece of recycled wood is safe if there are no stamps or labels?
Before you drill, do a quick hazard check by scraping paint and looking for a stamp or markings. If there is any unknown coating, heavy varnish, or you cannot confirm it was not chemically treated, skip it, because sealed surfaces can still off-gas and reduce airflow. When in doubt, substitute with clean untreated fence boards or shelving.
Can I use recycled wood that has paint on it, as long as I leave the inside unpainted?
If the only wood you have is painted on the outside, that can still work, but keep the interior bare. Plane or sand the inside walls and roof so there is no paint residue, then use a vacuum and damp wipe to capture dust before assembly. Do not sand the entrance area only, treat the entire interior and around the drainage and ventilation holes.
What’s the safest way to seal the outside of a recycled bird house?
Yes, but choose a method that does not wick moisture into the interior. A single exterior coat of linseed oil is helpful, but do not apply it near the entrance opening, on the interior floor, or inside any ventilation channels. Also avoid treatments that form a thick film, which can trap moisture and make the interior too slick.
Should I add a waterproof finish or liner to the floor to protect the wood?
Do not put a floor finish or liner in. If you bevel corners, make sure the bevel does not create a ledge that prevents water from draining freely, and keep the bottom slightly sloped or designed so runoff exits through the drainage holes. The goal is no pooled water, even after a hard rain.
When is it okay to clean, and what if I find the nest is active?
Clean on a schedule that matches occupancy. If you discover active eggs or chicks, close the box and wait, because cleaning can cause abandonment. After fledging, remove all nest material, then do the deep scrub only if you see mold or heavy buildup, and let it fully dry in sun before the next season.
My birdhouse sat empty, what should I check first before rebuilding?
If the box goes unoccupied, first verify entrance diameter and mounting height for the target species, then check habitat fit. Also confirm you did not add ventilation holes too low, which can allow rain intrusion, and ensure drainage holes are present. Changing the mounting location by even 20 feet can outperform any minor adjustment to the build.
Do I really need a predator guard if the entrance hole size is correct?
Choose predator management before you add “cute” features. Anticipate squirrels and raccoons based on where the box is mounted, then use a smooth mounting pole plus a baffle if you have climbing pressure. Avoid materials that leave handholds near the entrance, because they help predators reach the hole.
What small build details most affect the birdhouse’s lifespan with recycled wood?
For durability, prefer stainless or galvanized screws over nails, and glue only at joints that you clamp or otherwise hold tight while curing. Then focus on structural weak points: roof-to-wall connection and the side panels. Make sure the roof overhang is generous so the drainage system stays effective.
What should I prioritize if I cannot drill both drainage and ventilation the way the guide suggests?
Set ventilation near the roofline and keep drainage at the floor corners. If you must choose between them, prioritize drainage and high ventilation placement, because standing moisture is the fastest way to drive off nesting birds and increase mites. Ventilation that is too low mostly becomes a rain path, reducing the benefit.
Next Articles
How to Make a Bird Box From Recycled Materials
Step-by-step DIY guide to build a bird box from reclaimed wood or logs, with safe dimensions, drainage, and mounting.
How to Make a Bird House With Waste Material
Step-by-step DIY birdhouse from safe waste materials, with size rules, assembly tips, and placement and maintenance chec
How to Build a Chimney Swift Bird House DIY Guide
Step-by-step DIY plans to build a chimney swift bird house, with correct dimensions, placement, and weatherproofing for