A DIY bird tent is one of the most flexible backyard bird projects you can build. At its core, it is a tent-like shelter or lightweight enclosure structure that gives birds a protected space to roost, stay dry during bad weather, find shade on hot days, or simply feel safe while they visit your yard. Unlike a fixed birdhouse, a bird tent can be temporary, seasonal, portable, or semi-permanent depending on what you need. And yes, you can build a solid one with basic tools, a weekend, and materials you probably already have lying around.
How to Make a Bird Tent: DIY Steps, Materials, Sizing

Marcus Thornton
21 Apr 2026
What a bird tent is actually for (and which design fits your goal)
Before you cut a single piece of wood or pull out your staple gun, you need to decide what job your bird tent is doing. There are four main use cases, and each one shapes your build differently.
- Roosting and weather shelter: A covered, enclosed or semi-enclosed structure where birds can hunker down during rain, cold snaps, or strong wind. Think of it as a birdhouse without the nesting pressure, accessible to multiple birds at once.
- Shade and heat protection: An open-sided canopy or tent frame with a waterproof or UV-blocking cover that creates a cool zone near feeders or water sources during summer.
- Observation blind or cover area: A tent structure you use yourself to watch birds without spooking them. You sit inside, birds feed or move around outside, everyone is happy.
- Safe temporary enclosure: A mesh-walled, roofed structure where birds (especially injured, fledgling, or rehab birds you are helping) can be kept safely while they acclimate or recover outdoors, with protection from predators and escape routes closed off.
The shelter and shade designs are the most common for general backyard setups and the most forgiving to build. The enclosure design demands the most attention to escape-proofing and predator prevention. The observation blind is really about you, not the birds. Pick your use case first, then read the rest of this guide with that goal in mind.
Planning your build: size, shape, and materials

Most beginner builders skip the planning stage and end up rebuilding things twice. Trust me, ten minutes with a tape measure and a notepad saves you a full afternoon of frustration.
Size and shape
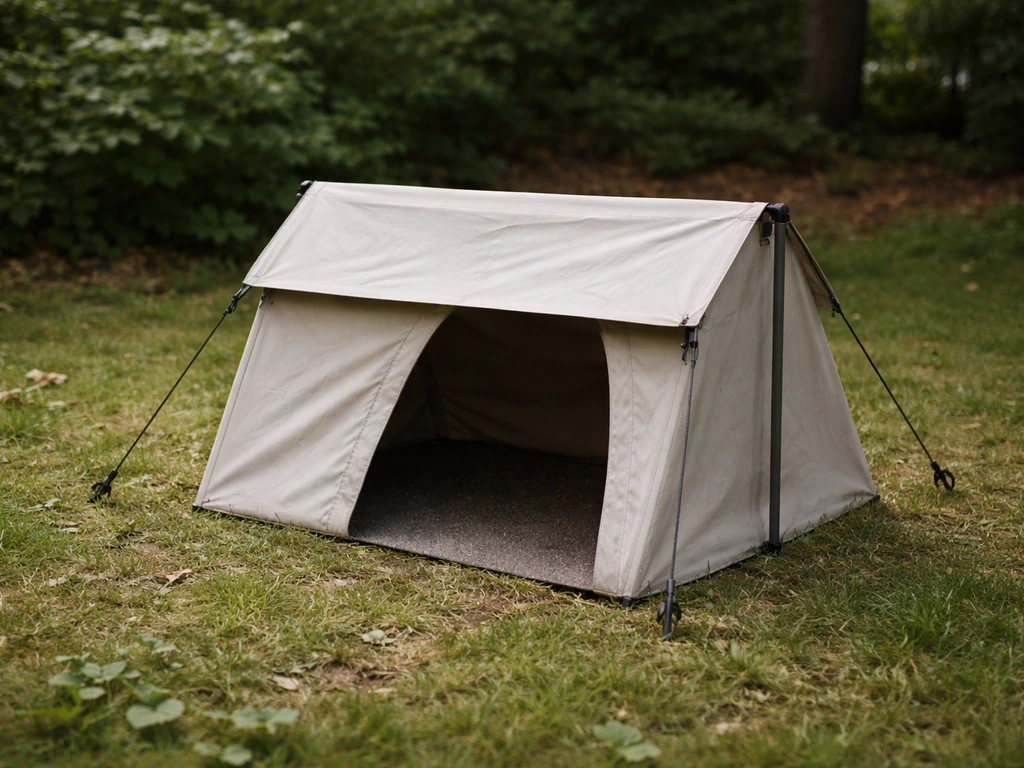
For a roosting or shelter tent aimed at small songbirds like chickadees, wrens, or sparrows, a floor footprint of about 12 by 12 inches up to 18 by 18 inches works well. For a multi-bird communal roost shelter or a shade canopy near a feeding station, go bigger: 24 by 24 inches or even 36 inches square is reasonable. For a temporary bird enclosure, the rule is always bigger than you think you need. A cramped enclosure stresses birds. If you are housing a fledgling robin for a day or two, think at least 3 by 3 feet of floor space and 3 feet of height. The classic tent or A-frame shape (peaked roof, sloping sides) is ideal because it sheds rain naturally and creates more airflow near the peak. Flat-roofed designs pool water and trap heat. Avoid them unless you are building a shade canopy where pooling is not an issue and you add a slight tilt.
Frame materials
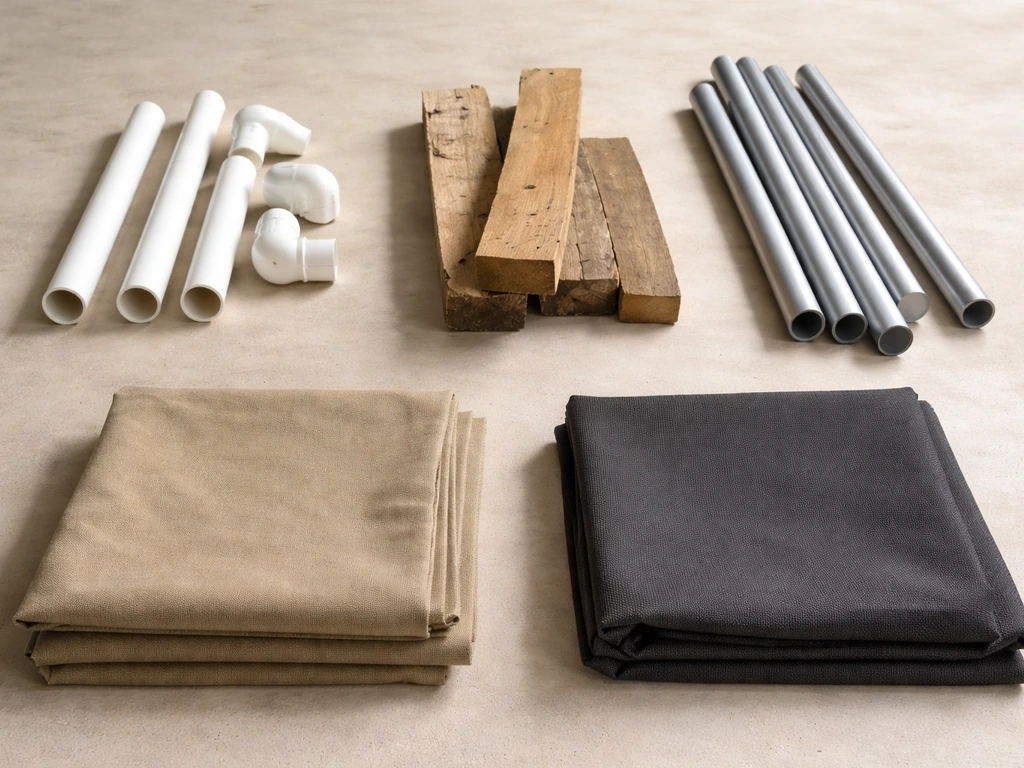
Your three main frame options are PVC pipe, wood, and repurposed lightweight metal conduit or tent poles. PVC is cheap, lightweight, easy to cut with a hacksaw, and assembles without screws using push-fit elbows and T-joints. A basic A-frame bird tent can be built from half-inch or three-quarter-inch PVC in under an hour. Wood (untreated pine or cedar) gives you a sturdier, more permanent structure and is easier to attach mesh or fabric panels to. Cedar is naturally rot-resistant, which matters for anything staying outdoors year-round. One firm rule: avoid pressure-treated lumber or any wood with chemical preservatives. The off-gassing is harmful to birds, and you should never coat the interior surfaces with paints or stains that could affect air quality inside the structure. Repurposed tent poles or collapsed camping frame sections are great for lightweight seasonal shelters. They fold down for storage and go up fast in spring.
Cover and mesh options
For the roof or canopy layer, a waterproofed canvas tarp, a piece of outdoor-grade polyester ripstop, or a rubber-backed fabric works well. Avoid anything with a chemical waterproofing treatment that has a strong smell when new. Let it air out for several days before putting it near birds. For enclosed wall panels (important for enclosure and roosting shelter designs), use hardware cloth (also called welded wire mesh) rather than standard chicken wire. NWRA and IWRC’s outdoor caging standards for wildlife rehabilitation specify galvanized hardware cloth with a 1/2 inch by 1/2 inch mesh for outdoor enclosures for songbirds and caution that chain-link can have openings large enough for predators or accidental contact hardware cloth (also called welded wire mesh) rather than standard chicken wire. Hardware cloth with a quarter-inch mesh opening is the gold standard. It is rigid, it keeps small birds in, and it keeps predators' claws and snouts out. Chicken wire has openings large enough for a cat's paw to reach through and is weaker overall. Avoid plastic mesh netting for any enclosure where the bird might get trapped in the weave.
How to build it: two approaches for different skill levels
Option 1: The repurposed beginner build (under $20, 1 to 2 hours)
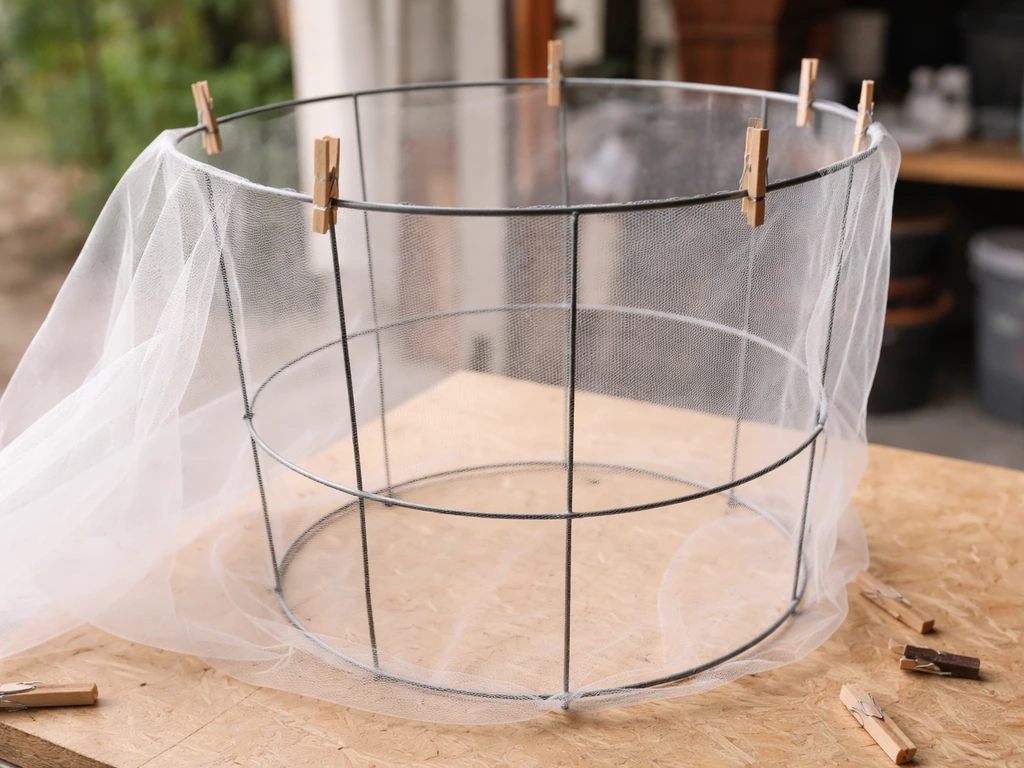
This version uses a salvaged wire tomato cage or a small pop-up laundry hamper frame as the skeleton. It is my favorite recommendation for first-timers because you are basically just covering and securing an existing structure, which removes all the frame-measuring stress.
- Source your frame: A large tomato cage (roughly 18 inches wide, 36 inches tall) or a pop-up wire hamper frame (round or square) works perfectly. If you use a tomato cage, flip it upside down so the wide end is at the top.
- Cut your cover fabric: Measure the height and widest circumference of your frame, then add about 4 inches on every edge for overlap and attachment. Cut a piece of waterproofed canvas, outdoor ripstop fabric, or even a repurposed rain poncho to size.
- Drape and attach the roof: Lay the fabric over the top of the frame so it drapes down the sides at least halfway. Use binder clips, S-hooks, or zip ties to secure the fabric to the frame wires at the top. Leave the bottom open for ventilation and bird access.
- Add a mesh skirt (optional but recommended for roosting): Cut a strip of quarter-inch hardware cloth to run around the lower half of the frame. Bend it to shape with pliers and attach it to the frame using zip ties or wire. Leave a gap of 2 to 3 inches at the bottom as a drainage and airflow break, not sealed to the ground.
- Create an entrance: If you want a defined entrance opening (good for roosting shelters targeting specific birds), cut a circle in the mesh skirt or leave one section open. For small songbirds like wrens or chickadees, an opening of about 1 to 1.5 inches in diameter is appropriate. For larger birds like bluebirds, 1.5 inches is the standard. Use a hole saw or a sharp blade and smooth any rough metal edges with a file or tape them with electrical tape.
- Stake or weight it: Push the lower wire tips of the tomato cage into the ground or place a flat stone or brick inside the base to hold it against wind.
Option 2: The sturdier PVC A-frame build (under $40, 3 to 4 hours)
This is the version you build when you want something that will survive a full season outdoors and look intentional rather than improvised. You will need a hacksaw, measuring tape, zip ties, a staple gun, and basic hand tools.
- Cut your PVC pipes: For a 24-by-24-inch footprint with a 30-inch peak, cut four 24-inch base pieces, four 20-inch side-slope pieces, and two 24-inch ridge pieces. Use half-inch or three-quarter-inch diameter PVC pipe.
- Assemble the base rectangle: Connect the four base pieces using four 90-degree elbow joints at the corners. This forms your ground frame.
- Build the A-frame uprights: On each of the two long sides of the base, attach a T-joint pointing upward at the midpoint of that side. Insert a short vertical riser piece (about 6 inches) into each T-joint, then cap each riser with a 45-degree elbow joint angled inward toward the center.
- Add the ridge: Run your two 24-inch ridge pieces from the 45-degree elbows down to the peak junction. Use a cross-fitting or two 45-degree elbows joined with a short coupler piece at the very top to form the peak.
- Wrap the sides with hardware cloth: Cut two panels of quarter-inch hardware cloth to fit each sloped side of the A-frame. Staple or zip-tie each panel to the PVC frame. File or tape any exposed cut wire edges.
- Attach the roof cover: Drape your waterproof fabric over the top, letting it overhang the sides by 2 to 3 inches. Staple it to the top ridge pipe and clip the sides down. This roof layer keeps rain off the mesh walls.
- Install a floor panel (for enclosures): If this is a predator-proof enclosure, add a hardware cloth floor panel zip-tied to the base frame. Elevate the entire structure on small feet (short sections of PVC cap) so the floor panel is slightly above the ground, allowing drainage.
- Add ground stakes: Push U-shaped metal garden stakes over the base frame pipes at each corner to pin the structure to the ground.
Safety and bird-proofing: the stuff that actually matters
This is the section most DIY guides skip over too fast, and it is where the difference between a good bird tent and a dangerous one lives. Let me walk through the four big safety areas.
Ventilation
Enclosed shelters can trap heat fast, especially in summer. For any covered roosting or enclosure design, you need airflow near the top of the structure. On a wood-framed version, drill several three-eighths-inch diameter holes on each upper side panel, just below the roof overhang. On a PVC or wire frame design, the mesh itself provides airflow, but make sure your fabric roof does not drape so far down the sides that it blocks airflow along the upper third of the walls. The goal is cross-ventilation: air should be able to enter on one side and exit on the other, especially near the peak where heat collects.
Drainage
Any rain that gets in needs a way out. For a floor panel on an enclosure, drill four quarter-inch drainage holes at each corner, or cut small triangles off the corners of a plywood floor panel before attaching it. If your floor is hardware cloth, water drains naturally but debris can clog the mesh, so check it after rain. Never let water pool inside the structure. Wet nesting material or wet flooring is a fast route to fungal problems and sick birds.
Predator prevention
If your bird tent is a ground-level or low-mounted shelter, predators are a real concern. Cats, raccoons, and snakes can all reach through or climb to enclosed structures. The best defense is layered. First, mount your structure on a smooth metal pole rather than attaching it to a fence post or wooden stake, because predators find smooth poles much harder to climb. Second, add a stovepipe-style or cone-style baffle on the pole, positioned about 4 feet off the ground, to stop climbing. Stovepipe baffles are essentially sections of metal pipe around the mounting pole, and they are easy to build from metal ducting material cut to about 24 inches long. Third, use quarter-inch hardware cloth rather than chicken wire on any enclosed walls. A cat's paw can reach through standard chicken wire openings. Finally, if you have a defined entrance hole on a roosting shelter, consider adding a wooden entrance block: a small block of wood with the correct-diameter hole drilled through it, mounted over the opening. This extends the tunnel depth of the entrance and makes it much harder for predators to reach inside with a paw.
Escape-proofing (for temporary enclosures)
If you are using the tent as a temporary enclosure for a bird, every seam, join, and edge needs to be checked. Birds are remarkably good at finding gaps you did not notice during construction. Zip-tie every mesh join at intervals no more than 3 inches apart. Check that your roof panel overlaps the side panels by at least 2 inches and is secured along its entire perimeter. The door or access panel (you need one for feeding and cleaning) should use a two-step latch: a hook-and-eye plus a carabiner clip, or similar. A bird can nudge a single latch open.
Where to put it in your yard
Placement makes or breaks how much birds actually use your bird tent. The best spot balances shade, shelter from wind and rain, proximity to cover, and enough open space nearby that birds feel safe approaching.
Sun, shade, and wind
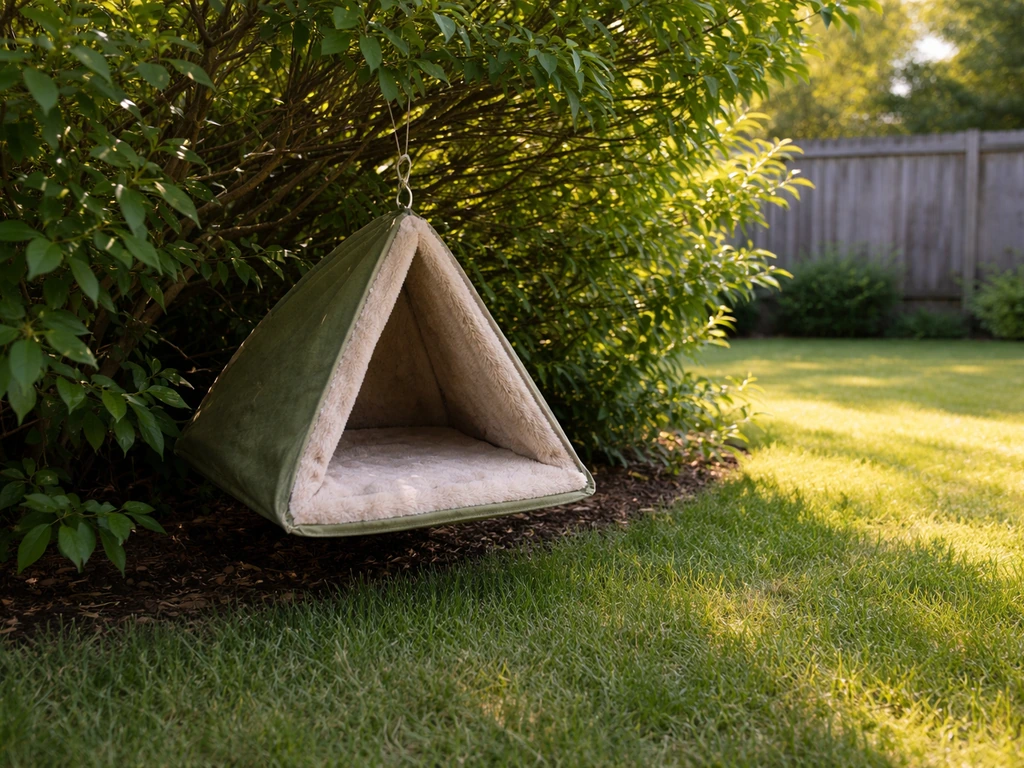
Orient your bird tent so the entrance or open face is away from the direction of prevailing wind and driving rain in your area. In most of North America, that means facing east or southeast, which also catches morning sun (birds love morning warmth) without afternoon overheating. If you are building a shade canopy near a feeder, position it so it provides shade from the western afternoon sun. Avoid placing any fully enclosed roosting or shelter structure in a spot that gets direct afternoon sun with no shade, as interior temperatures can climb to dangerous levels quickly.
Height and surroundings
For roosting shelters and small enclosure-style tents, a mounting height of 4 to 6 feet above ground keeps the structure accessible for monitoring and maintenance while still feeling safe and elevated to birds. Bluebirds, for example, are comfortable using structures at that height range. Wrens will use structures even lower, sometimes just 3 feet off the ground, if good shrub cover is nearby. Place your tent within 10 to 15 feet of shrubs, small trees, or dense plantings so birds have a perch to scout from before they approach. However, do not place it so close to dense cover that a cat can crouch in the shrubs and make a quick lunge at the entrance. A clear zone of about 6 to 8 feet around the structure is a good buffer. Avoid placing any bird structure near areas where pesticides or herbicides are regularly used.
Anchoring
A bird tent that blows over in the first storm will not be used again, and it can injure a bird that was inside. If you are mounting on a pole, use a metal pole set at least 18 inches into the ground (deeper in loose soil). For a freestanding ground structure, use at least four corner stakes and consider a central anchor point. For a heavier wooden frame version, a concrete footing for the support pole is worth the extra hour of work. Check the anchoring after every significant wind event in the first few weeks.
Finishing, weatherproofing, and keeping it clean
Weatherproofing without harming birds
If your frame is untreated cedar or pine, you do not necessarily need to treat it at all. Cedar weathers naturally and resists rot for years. If you want to extend the life of a pine frame, use a water-based exterior wood sealer on the outside surfaces only, let it cure for at least a week in open air before birds are near it, and never treat any interior surfaces. Avoid oil-based stains, creosote, and anything with a strong chemical smell. For your roof cover, a fabric that came with a durable water repellent (DWR) factory finish will hold up for one to two seasons. When it starts to wet out (water soaks in rather than beading), you can reapply a spray-on DWR treatment to the exterior only, then let it air out completely before reinstalling.
Seasonal prep
In climates with hard winters, either bring the tent frame inside or replace the fabric cover with a heavier insulating layer (burlap or thick canvas works well) to create a warm roosting shelter. Remove and clean the structure at the end of each season: scrub mesh and frame surfaces with a stiff brush and a dilute bleach solution (one part bleach to nine parts water), rinse thoroughly, and let it dry completely before storage or reuse. For spring, check all zip ties and joints for UV degradation before putting the structure back into service. Zip ties become brittle after about a year of sun exposure and should be replaced annually.
Routine maintenance
Check your bird tent every one to two weeks during active use. Look for: debris accumulation blocking drainage holes, signs of predator tampering (scratch marks, bent mesh), loose anchor points, and any mold or mildew growth inside. If birds are actively roosting or nesting in the structure, try not to disturb them more than necessary during monitoring checks. Observe from a distance first, and keep your inspection brief. The goal is safety, not surveillance.
Tailoring your bird tent for different backyard birds
The one-size-fits-all bird tent is a myth. The specific birds you want to attract or support should shape a few key design details. Here is a practical comparison of how to adjust your build for the most common small backyard birds.
| Bird | Entrance/Opening Size | Floor Footprint | Preferred Mounting Height | Key Notes |
|---|---|---|---|---|
| Eastern Bluebird | 1.5 inches diameter | 4x4 to 5.5x5.5 inches (nesting); larger for shelter | 4 to 6 feet | Face entrance toward open field or lawn; avoid dense shrubs right at entrance |
| Western Bluebird | 1.5 inches diameter | Same as Eastern Bluebird | 4 to 6 feet | Prefer entrance facing open area; some directional preference for east or southeast |
| House Wren | 1 to 1.25 inches diameter | Slightly smaller than bluebird box; approx 4x4 inches | 3 to 6 feet | Tolerates lower placement; likes shrubby areas nearby; corner drainage cut preferred |
| Chickadee | 1.125 inches diameter | 4x4 inches | 4 to 8 feet | Likes wooded edges; will use roosting shelters readily in cold weather |
| Sparrow / general small songbird | 1.25 to 1.5 inches diameter | 4x4 to 5x5 inches | 3 to 6 feet | Tolerant of a range; avoid oversized openings that let House Sparrows dominate |
The entrance hole or opening size is the single most powerful design variable you have. Get it right and you attract your target birds while passively excluding larger unwanted species. Get it wrong (too large) and House Sparrows or European Starlings will take over. A hole saw set with multiple bit sizes is a worthwhile $15 to $20 investment if you plan to build more than one structure. If you drill a hole slightly too large, you can glue or screw a wooden entrance block (a piece of 1-inch-thick pine or cedar with the correct-size hole drilled through it) over the opening to reset the effective diameter.
For the interior setup, think about what the birds actually need inside. A roosting shelter should have a rough interior surface (rough-sawn wood or a few horizontal perch grooves cut into the interior walls) so birds can grip comfortably. An enclosure for a fledgling or temporarily grounded bird should have a low natural perch stick secured inside, a shallow water dish held steady so it cannot tip, and some leaf litter or dry grass on the floor for comfort and temperature regulation.
If you enjoy building out a full enrichment setup for backyard birds, a bird tent pairs naturally with other DIY projects. You can use the same shelter, safe materials, and placement principles to learn how to make a homemade bird swing too. A nearby bird swing or a simple bird gym structure can extend the time birds spend in your yard and give them more reasons to return. A DIY PVC bird play gym structure is another great way to add safe enrichment once your tent is in place bird gym structure. The key is to build each piece with the same attention to safe materials, correct sizing, and smart placement.
Your next steps: from plan to finished tent
Here is the short version of your action plan. Pick your use case (shelter, shade canopy, enclosure, or observation blind). Choose your build option based on your budget, tools, and time. Measure your space and identify which birds you are targeting so you can set the right entrance opening size. Gather your materials, cut or source your frame, attach your mesh and cover, and double-check every seam and join. Set it up in the right spot: 4 to 6 feet off the ground, facing east or southeast, with open approach space and a predator baffle on the mounting pole. Then step back and give the birds a few days to discover it. If what you really want is a bird bed, the same shelter basics can be adapted to create a safe, comfortable spot for birds to rest and recover between visits. Most small songbirds will investigate a new structure within a week if the placement is good. If you see no activity after two weeks, try moving it 10 to 15 feet in a different direction or adjusting the entrance orientation. Iteration is normal. Even experienced builders move their structures around before finding the sweet spot.
The most important thing is to just start. A repurposed tomato cage and a piece of waterproof fabric can become a genuinely useful roosting shelter in a single afternoon. You can always upgrade the materials and scale up the design once you have seen what the birds in your yard actually respond to. That hands-on feedback from real birds is better than any plan.
FAQ
How can I make sure my bird tent doesn’t attract invasive species or unwanted birds?
If you built it for a specific bird, the first thing to verify is the opening size, because larger gaps are what attract the wrong species. If your opening is slightly oversized, you can “reset” it by attaching a wooden entrance block over the opening (drilled to the correct diameter). Also confirm you used hardware cloth for any enclosed sides, since standard chicken wire is easier for predators to reach through.
What’s the best way to prevent overheating inside a bird tent during summer?
For enclosed shelters, rely on cross-ventilation rather than “full coverage.” Keep the roof from draping low along the upper walls, and include airflow near the top by either leaving the mesh as the sides (PVC or wire frame) or drilling small holes on wood-framed upper panels just below the overhang. After setup, feel for heat buildup inside during the hottest part of the day.
How do I clean a bird tent without stressing the birds too much?
Yes, but handle the “where do they go while you clean” problem carefully. Plan a door or access panel that you can open briefly for feeding and cleaning, and do it when birds are least active (often morning or late afternoon). Avoid leaving the structure open for long, and if you notice wet nesting material or damp flooring, let everything dry before closing it again.
My bird tent might get moved by strong wind. What’s the safest way to anchor it?
Anchor and stabilization depend on whether it’s pole-mounted or freestanding. A pole-mounted tent should use a smooth metal pole with the base set deep enough for your soil, and the predator baffle should be positioned about 4 feet off the ground. For freestanding ground structures, use corner stakes plus a central anchor point, then inspect after the first few wind events to catch loosening before it gets dangerous.
Can I use a bird tent in winter, and what should I change for cold weather?
If you want to extend season use, the safest approach is to keep the interior as bird-safe and air-capable. Bring the frame inside in hard winters, or swap the cover for a heavier insulating layer (like thick canvas or burlap) while still maintaining upper airflow. After seasonal storage, check zip ties and joints for UV brittleness and replace them if they look cloudy, cracked, or stiff.
What materials should I avoid because of bird-safe safety concerns?
Don’t use pressure-treated wood anywhere near birds, and avoid interior coatings with paints, stains, or strong-smelling sealers. If you do treat pine, apply a water-based exterior sealer only to outside surfaces and allow it to cure fully in open air before bringing the tent near birds. For roof fabric, only reapply a DWR treatment to the exterior, then let it air out completely.
What are the most common DIY mistakes that create safety gaps in bird tents?
Check the build for small “gap logic” points: mesh joins, where the roof overlaps the side panels, and where any access door meets the frame. For temporary enclosures, zip-tie every mesh join at intervals no more than about 3 inches and confirm roof overlap is at least 2 inches. A second latch step matters too, because a single hook can be nudged open by a bird.
If no birds use my tent, how long should I wait before moving it?
A good rule is to give birds time to settle, then reposition if you truly get no interest. Expect investigation within about a week if placement is close to good cover. If there’s no activity after two weeks, move it 10 to 15 feet and adjust entrance orientation (for example, facing a different direction than east/southeast depending on your local sun and wind).
How should the interior setup change for roosting versus temporary enclosure use?
Use the tent differently depending on the bird’s situation. For grounded or fledgling-type use, include a low natural perch, steady shallow water that cannot tip, and a comfortable floor with leaf litter or dry grass. For roosting shelters, focus on rough interior gripping surfaces, like rough-sawn wood or shallow perch grooves, and prioritize airflow near the peak so birds stay comfortable overnight.
What should I do if I notice mildew or mold inside the bird tent?
If you’re seeing mold, stop and dry it out immediately, then correct the moisture source. Check drainage holes for blockage after rain, prevent pooling inside, and improve ventilation by keeping the roof from blocking upper airflow. After cleanup, scrub and rinse thoroughly, then fully dry before reuse so fungal spores do not keep re-establishing.
Next Articles
How to Make a Bird Bed: DIY Nest Bed and Resting Platform
DIY bird bed step-by-step: build a nesting nest bed or simple washable resting platform with safe, weatherproof material

How to Build a Chimney Swift Bird House DIY Guide
Step-by-step DIY plans to build a chimney swift bird house, with correct dimensions, placement, and weatherproofing for

How to Build an Oriole Bird House: Step-by-Step DIY
Step-by-step DIY for building an oriole bird house with right dimensions, weatherproofing, predator-safe placement, and