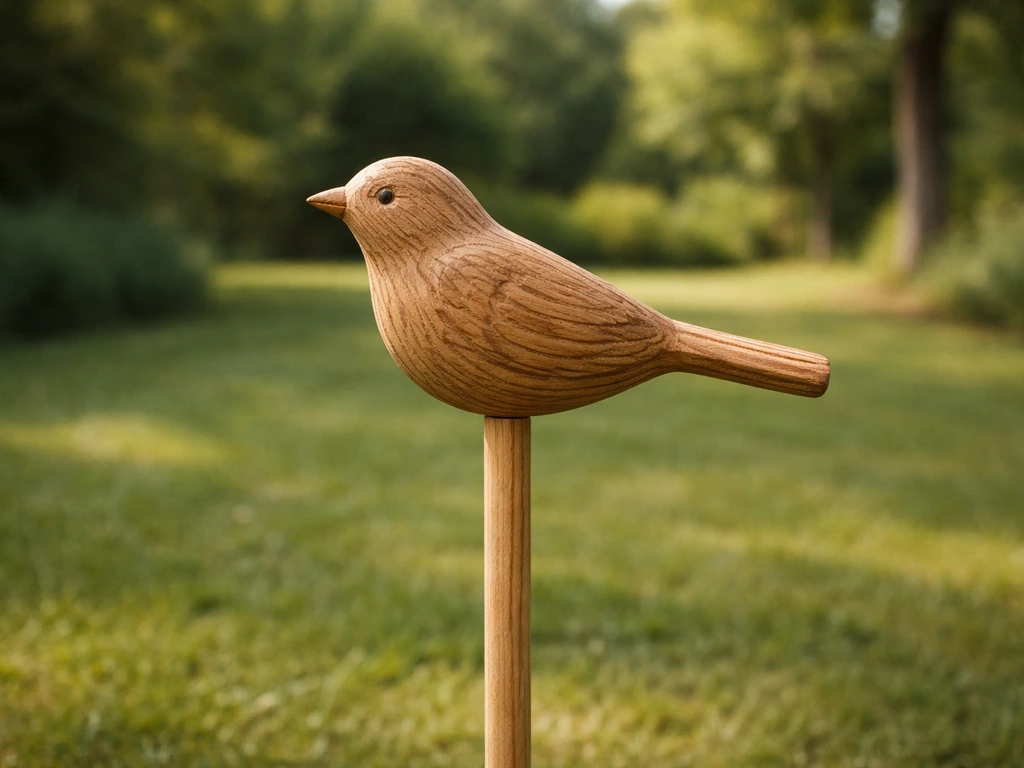
You can make a freestanding wooden bird using basic tools like a jigsaw, scroll saw, or even a carving knife, a piece of cedar or pine, and a few hours of workshop time. The key is to sketch your bird design onto the wood from at least two angles (side and top), rough-cut the outer silhouette first, then refine the shape with controlled paring cuts or a rasp before attaching separate wings, tail, and a stable base. Finish it with an exterior-rated spar urethane or polyurethane and your wooden bird will hold up outside for years without peeling or rotting.
How to Make a Bird Stand Out of Wood: Step-by-Step

Marcus Thornton
25 Apr 2026
Choosing a Bird Design and Wood Type

Before you touch a saw, decide what kind of bird you're making and what you want it to do. A simple silhouette cut from half-inch plywood makes a great flat yard stake. A chunky carved robin or bluebird in the round looks stunning on a garden post or porch railing. If you're building something to sit near a feeder or nesting area, a whimsical, slightly oversized figure works perfectly, and it's a lot more forgiving to build than a hyper-realistic carving.
For a first project, I'd steer you toward a simple assembled bird: a body block with separately attached wings and tail. It's faster than carving the whole thing from one piece, and the joints give you natural points to correct proportions if something looks off. If you do want to carve, a rounded songbird shape like a robin or wren is beginner-friendly because the body is basically an egg with a head and beak.
For wood choice, Western red cedar and redwood are your best outdoor options. Cedar handles moisture without rotting and is soft enough to carve or cut easily. Redwood's heartwood is naturally resistant to decay-causing fungi and wood-destroying insects, which makes it excellent for any piece that will sit in a garden year-round. If budget is tight, a good exterior-grade pine works fine as long as you seal it well. Avoid MDF or particleboard outside under any circumstances: they swell and fall apart with moisture no matter how much you seal them.
| Wood Type | Ease of Carving/Cutting | Outdoor Durability | Cost | Best For |
|---|---|---|---|---|
| Western Red Cedar | Easy (soft grain) | Excellent (rot resistant) | Moderate | Carved or assembled birds, any climate |
| Redwood | Easy to moderate | Excellent (insect + decay resistant) | Moderate–High | Garden décor, humid or rainy areas |
| Pine (exterior grade) | Easy | Good (needs sealing) | Low | Budget builds, painted finishes |
| Basswood | Very easy (carving) | Fair (needs full sealing) | Low–Moderate | Detailed carved birds kept under cover |
| Plywood (exterior) | Easy (cutting only) | Good (sealed edges critical) | Low | Flat silhouette yard stakes or plaques |
My personal recommendation for a beginner's first outdoor bird: Western red cedar from a lumber yard offcut bin. It's easy on tools, smells great while you work it, and you can often grab pieces for next to nothing.
Tools, Safety, and Prepping Your Wood
What you actually need
- Jigsaw or scroll saw (for cutting body and wing shapes from flat stock)
- Carving knife and/or a No. 7 or No. 9 sweep gouge (if you're rounding a carved bird)
- Rasp or spokeshave (for smoothing curves quickly)
- Sandpaper: 80–120 grit for shaping, 180–220 grit for final surface prep before finishing
- Drill with bits (for pilot holes, pocket holes, or adding a dowel perch)
- Clamps (at least two bar clamps or spring clamps)
- Pencil, ruler, and cardboard for templates
- HEPA shop vacuum with a dust collection port if your saw supports it
- N95 respirator or better (an N95 is a minimum; a P100 half-face respirator is better for extended sessions)
- Safety glasses
Wood dust is a real health hazard, not just an inconvenience. OSHA's permissible exposure limit for nuisance wood dust is 5 mg/m³ for the respirable fraction over an 8-hour shift, and sanding blows past that fast in a small garage. OSHA’s wood dust chemical data for wood species also notes that Western red cedar has lower PEL values for inhalable and respirable exposure compared with many other wood types Western red cedar species-specific lower PEL. A dust mask alone isn't enough. Use a HEPA shop vacuum connected to your sander or saw, work in a ventilated space, and wear a proper respirator. Cedar and redwood sawdust in particular can cause respiratory irritation with repeated exposure.
Prepping your wood stock
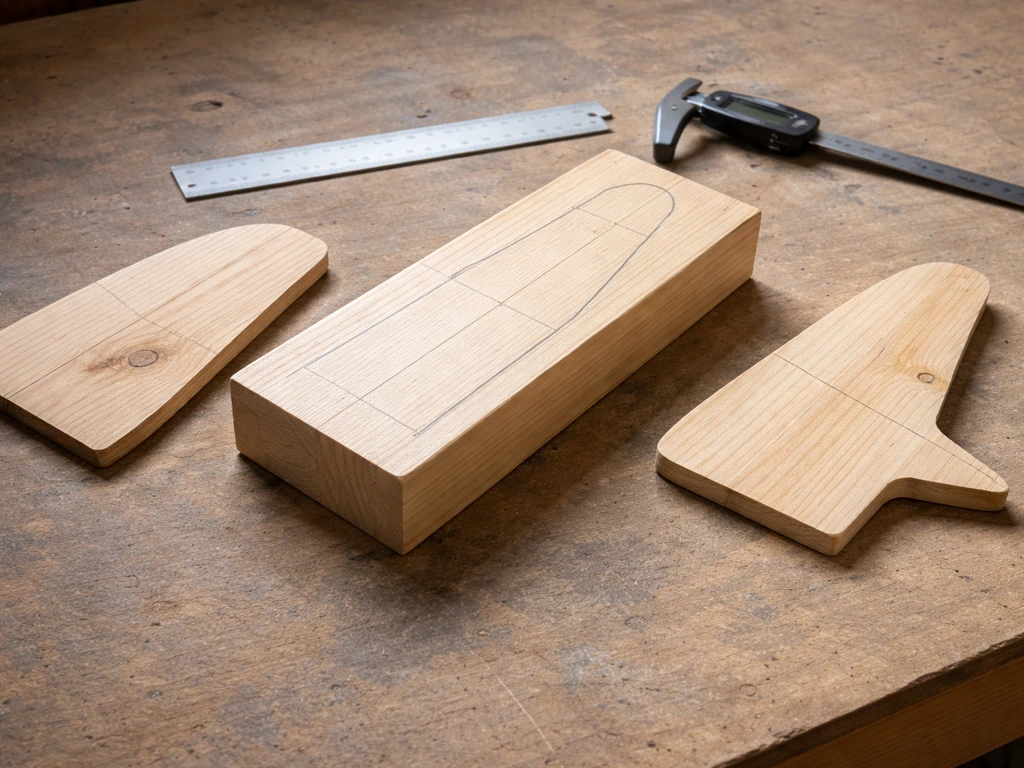
Start by checking your wood for knots, cracks, or soft spots. A knot running through a wing or beak will cause a breakage point later. If you find one, reposition your template to avoid it. For a carved bird, select a block that's close in size to your intended finished bird so you're not removing more material than necessary. Square up the faces of your block with a hand plane or by running it through a thickness sander if you have access to one. For scroll-saw or jigsaw work, mark both a side-view template and a top-view template on cardboard first. You'll trace both onto the wood and cut each view, which keeps the final shape proportional from every angle.
Step-by-Step: Carving or Assembling the Bird Form
Option A: Cut-and-assemble (best for beginners)
- Draw your bird design to scale on paper first. A songbird body is roughly oval: about 4–6 inches long and 2.5–3.5 inches tall for a decorative figure. Print or trace the side-view silhouette onto cardboard and cut it out as your template.
- Trace the template onto your wood and cut it out with a jigsaw or scroll saw. Cut just outside the line, then sand or rasp back to the line. For scroll-saw cuts, use a blade rated for the thickness of your stock and let the saw do the work at a slow, steady feed rate to minimize tear-out on the bottom face.
- Repeat the process to cut the body again if you want a three-dimensional form by stacking and gluing two or three identical layers with grain running in alternating directions for strength.
- Sand all cut faces starting at 80–120 grit to remove saw marks and round any sharp edges, then finish at 180–220 grit for a smooth surface ready for paint or sealant.
- Mark the attachment points for the head (if separate), wings, tail, and base dowel before assembly so everything lines up while the body is still easy to handle flat on the bench.
Option B: Carving from a single block
- Sketch the side-view silhouette directly onto the face of your wood block with a pencil. Then sketch the top-view outline on the top face of the block. This two-view approach is critical: skipping the layout step leads to proportions going way off once you start removing material.
- Use a saw or band saw to cut the side-view silhouette first, removing the large waste pieces. Keep the offcuts—you can tape them back on temporarily to stabilize the block for the next cuts if needed.
- Rough out the top-view outline by making additional relief cuts from the top. At this stage you have a blocky, angular bird shape. That's correct.
- Switch to a carving knife or gouge and begin rounding the body. Work from the center of each face toward the edges, taking controlled paring cuts rather than big chunks. This is where patience pays off: rough cuts first to remove bulk, then smaller controlled cuts to bring the shape to your pattern lines.
- Define the neck, breast curve, and tail taper. Constantly rotate the piece and check from multiple angles. A bird that looks right only from one side isn't finished yet.
- Sand the carved form using the same grit progression: 80–120 to smooth tool marks, 180–220 to refine the surface.
Adding Details: Wings, Tail, Perch, and Stand
Wings and tail
Cut wings and tail pieces from thinner stock, around 1/4 to 3/8 inch thick. A scroll saw is ideal here because it lets you cut smooth curves with minimal tear-out. If you're making symmetrical left and right wings, stack-cut them: tape two pieces of wood together and cut both at once. This gives you identical mirror shapes and cuts your time in half. Trace feather details onto the wings with a pencil, then use a V-tool or a sharp knife to carve shallow grooves suggesting feather lines. You don't need photorealistic detail; just two or three confident grooves per wing read perfectly as feathers from a few feet away.
Attach wings with a combination of exterior-rated wood glue and a small brad nail or screw driven from inside the body. A D4-rated exterior wood adhesive is ideal here since it's rated for demanding moisture exposure. Clamp for at least an hour. For the tail, create a shallow notch at the rear of the body with a chisel or router, and glue the tail piece into that slot. The slot gives you a glue surface on three sides instead of one, which makes a much stronger joint than just butting the pieces together.
Head and beak
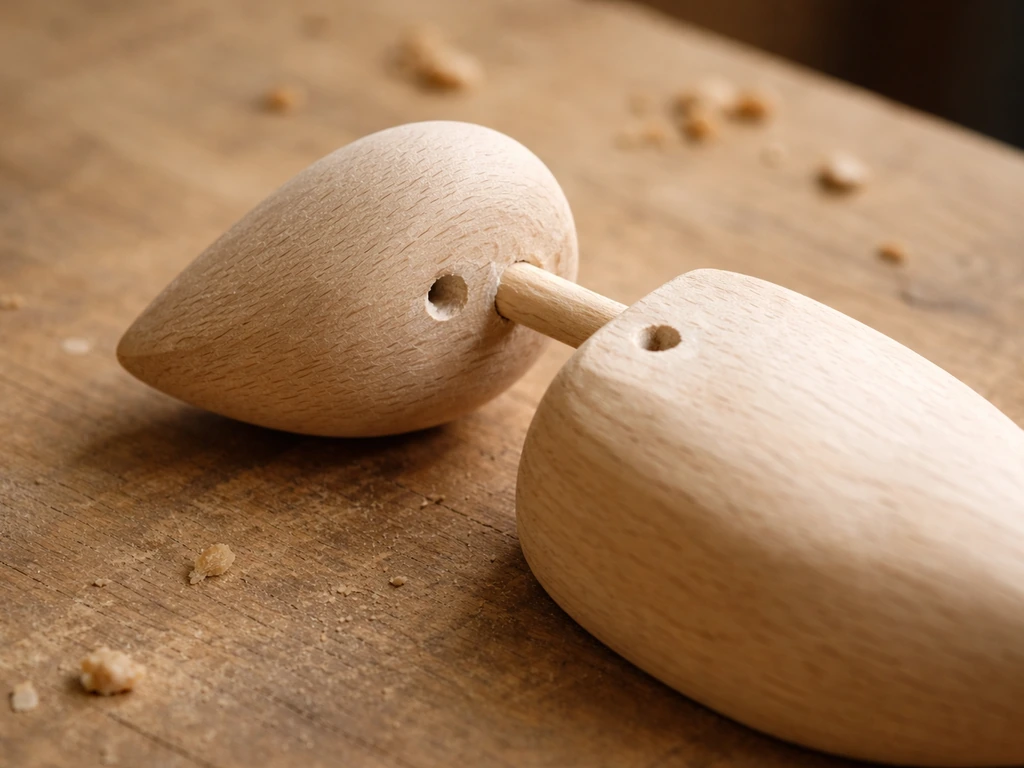
If the head is separate, carve or cut it as a rounded teardrop shape and drill a small pilot hole through the neck connection point on both pieces. Glue and pin with a wooden dowel through the joint for alignment. The beak can be a small wedge of hardwood (even a bit of hardwood dowel sharpened to a point) glued into a drilled slot in the head. Harden with a drop of thin cyanoacrylate (super glue) to reinforce the thin wood at the beak tip.
Stand and perch
The stand is what makes your bird actually stand out in the yard. The simplest approach is a 3/4-inch wooden dowel mortised into the bottom of the body and fitted into a drilled hole in a square base piece (around 4x4 inches, 1 inch thick). Make the base wide enough that the bird won't tip in wind. Drill your dowel hole slightly angled (5 to 10 degrees forward) so the bird appears to lean forward slightly in an alert, natural posture rather than standing perfectly vertical, which can look stiff. For a garden-stake version, sharpen the bottom of the dowel to a point or screw on a metal spike so it drives into the soil. Pocket-hole joinery works well if you want to attach a cross-brace or platform base: drill the angled pocket with a Kreg jig, drive the angled screw, and you get a tight joint without complicated mortise work.
Weatherproofing, Painting, and Bird-Safe Finishes
This step matters more than most beginners realize. An unfinished or poorly finished outdoor wood figure will look great for a season and be a soggy, peeling mess by year two. The good news is that getting this right isn't complicated.
Finish choices
Use finishes labeled for exterior use, specifically spar varnish, spar urethane, or exterior polyurethane. These are formulated to handle moisture cycling and UV exposure in ways that interior finishes simply aren't. Minwax states that its Helmsman Spar Urethane is formulated with UV blockers to reduce sun graying and fading while helping protect wood exposed to sunlight, water, or temperature changes. Minwax and Varathane both make reliable exterior polyurethane lines. For spar urethane in spray form, allow any underlying stain or paint to dry a full 48 to 72 hours before applying the clear coat. Between spar urethane coats, allow 2 to 12 hours depending on temperature and humidity, and only recoat when the previous layer is fully dry to the touch. Three coats minimum for anything that will sit in full outdoor exposure.
Avoid heavy-duty wood preservatives like chromated arsenicals, creosote, or pentachlorophenol. The EPA regulates these for good reasons: they carry real risks to humans and wildlife, and they have no place in a DIY backyard bird project. Stick to consumer-grade exterior finishes and you're in safe territory.
Paint and color
Exterior latex paint is fine for painted birds. Once fully cured (typically 30 days for full hardness), exterior latex is non-toxic and safe around wildlife. You can get remarkably lifelike results with a small round artist's brush and standard outdoor craft paints in acrylic formulas. Paint the base colors first, let them cure, then seal the whole piece with two to three coats of exterior spar urethane over the top to lock in the color and protect it from rain and UV fading. Lightly sand between coats with 220 grit for the best adhesion between layers.
Sealing the base and dowel
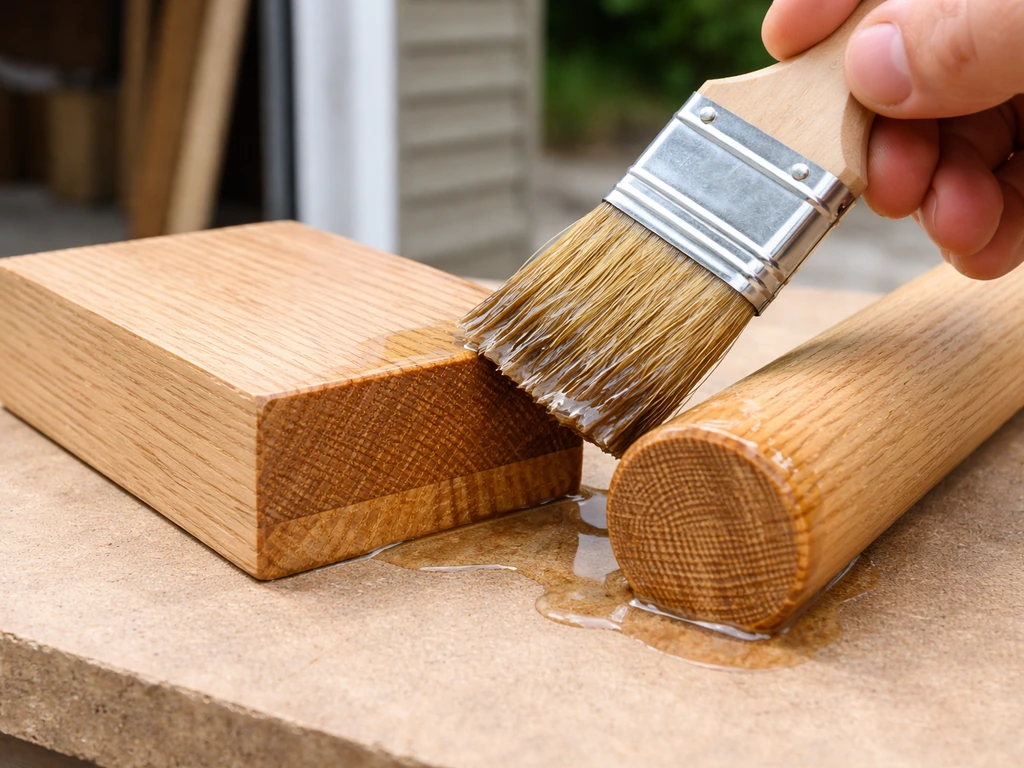
Pay extra attention to the bottom of the base and the end grain of any dowel that goes into soil or sits on a surface. End grain soaks up moisture like a sponge. Saturate these areas with a thin coat of exterior finish first, let it soak in and dry, then apply two more regular coats. This dramatically extends the life of any outdoor wood piece.
Sizing for Target Birds and Placement Tips
If your wooden bird is purely decorative, size it to whatever reads well in your yard from the distances you'll see it from. A figure between 6 and 12 inches tall works for most garden settings. Go larger (12 to 18 inches) for wide open yard placements where you want it to be a real focal point.
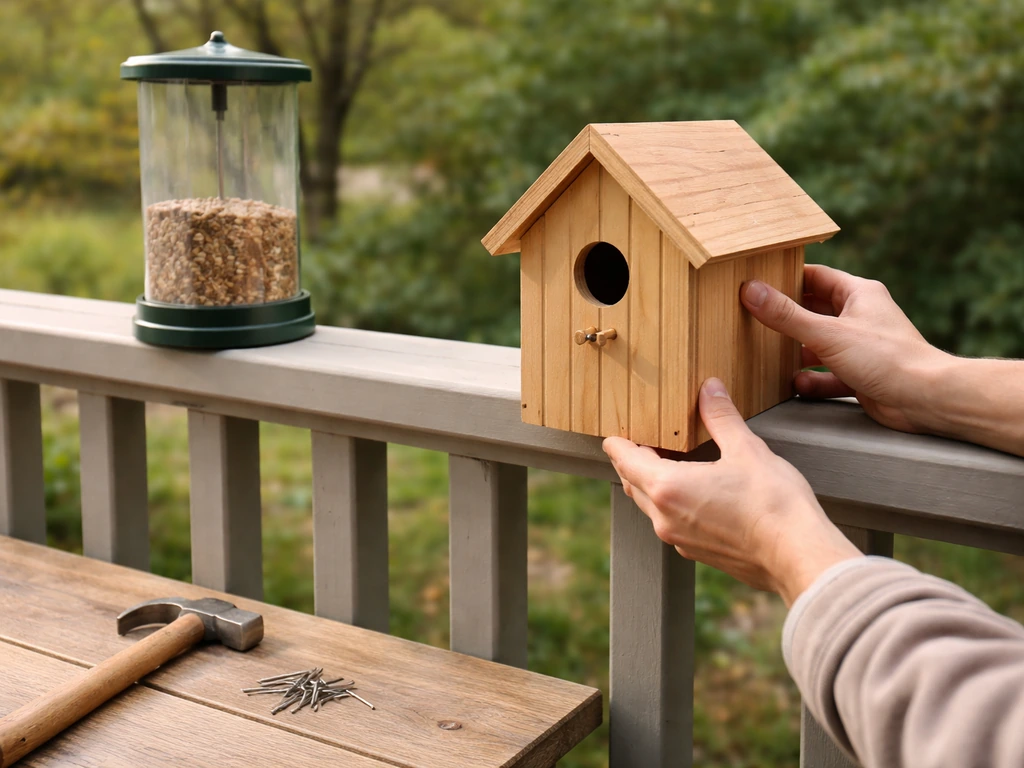
If you're placing the wooden bird near an actual feeder, nesting box, or water feature to create a welcoming environment, the visual scale matters. Real songbirds (sparrows, wrens, chickadees) are 4 to 6 inches long. A wooden figure that's roughly 1.5 to 2 times life size (about 8 to 10 inches long) reads as naturalistic without looking cartoonish next to a real feeder setup. Oversized yard art can actually alarm skittish birds at first, so if attracting live birds to a nearby feeder is the goal, place the figure a few feet away from the feeder rather than directly on it, and let local birds acclimate over a week or two. If a windmill-style scare setup sounds like what you want, you can also follow our guide on how to make a windmill bird scarer for a bigger deterrent effect.
For placement in the yard, position your wooden bird where it gets a mix of morning sun and afternoon shade if you can. Direct afternoon sun accelerates UV degradation of finishes. Mounting on a post at about 3 to 4 feet high puts the bird at a natural viewing height from a patio chair and makes it visible to actual birds flying through at low level. Avoid placing right under a tree where sap and bird droppings will accelerate surface wear on the finish.
Common Mistakes and How to Fix Them
Proportions that look off
This is the most common beginner carving problem, and it's almost always caused by skipping the two-view layout step. If you sketch only the side view and start carving, the top and front views will be wrong. The fix: always draw side and top-view templates on cardboard and transfer both to the wood before removing any material. If you're already mid-carve and the head looks too big or the body too stubby, don't try to fix it by removing more from the problem area. Step back, look at the overall form, and identify what needs to come off to restore balance. Usually the fix is reducing the body length or adding a longer tail extension rather than shrinking the head.
Splintering during cutting
Tear-out on the bottom edge of a scroll-saw or jigsaw cut is common, especially with thin stock or softer woods. Use a blade with a higher tooth count for cleaner cuts, and if your saw has a blade orientation option, check that the teeth are oriented to cut on the downstroke to minimize bottom-face tear-out. Applying a strip of painter's tape along the cut line before cutting also helps hold the wood fibers together. If you're already dealing with a splintered edge, fill small gaps with wood filler or a mix of fine sawdust and exterior wood glue, let dry, and sand smooth.
Weak or failing joints
Wings that pop off after one winter are usually caused by insufficient glue surface or glue that isn't rated for exterior use. Use a D4-rated or Type II exterior wood glue and make sure your mating surfaces are flat and clean before gluing. Remember that no glue is truly 100% waterproof under repeated moisture cycling, so always reinforce glued joints with a mechanical fastener: a brad nail, a small screw, or a wooden dowel pin through the joint. If a wing joint has already failed, clean off the old glue with a chisel and sandpaper, then re-glue with proper exterior adhesive and add a reinforcing pin.
Finish peeling or flaking
Peeling almost always means the surface wasn't clean or dry enough before finishing, or you recoated before the previous layer was fully dry. Strip the failing finish with a cabinet scraper or 80-grit sandpaper, wipe the surface clean with a tack cloth, and reapply in thin coats, giving each coat the full drying time it needs. In cool or humid weather, that can be toward the higher end of the 2 to 12-hour recoating window. Don't rush it.
An unstable bird that tips over
If your bird rocks or tips, the base isn't wide or heavy enough relative to the figure's center of gravity. An easy fix is to attach a wider, heavier base plate cut from thicker stock (1.5 inches thick cedar works well) using pocket-hole screws from underneath. You can also add small metal washers or a strip of sheet metal to the underside of the base to lower the center of gravity without making the base visually bulky. For a stake version driven into soil, make sure the stake goes at least 8 to 10 inches deep and compact the soil firmly around it.
Wrong paint or sealant choice
Using interior paint or varnish on an outdoor piece is the single most common finishing mistake I see. Interior finishes fail fast outside, full stop. If you've already done this, strip and reapply with properly rated exterior finishes. Going forward, if the label doesn't say exterior, spar, or marine, it's not the right product for this project. Craft-store acrylic paints work for color, but always topcoat with proper exterior spar urethane to protect them.
Once your bird is finished and sealed, you've got a project that will age gracefully outside for years. If you enjoy the process, the natural next step is adding more detail and complexity: carving a whole scene, building a matching birdhouse for a specific species, or even making a wooden bird baffle to protect your feeders. Add a wooden bird baffle to help keep squirrels and other opportunists away from the feeder area. If you want a fun non-wood project next, learn the drinking bird toy how to make instructions too. If you want a more challenging outdoor project, you can also look up how to make bird gun builds and safety considerations before starting. If you want the next woodworking challenge, this guide on making a wooden bird will help you level up to more detailed designs and better weatherproofing making a wooden bird baffle. The core skills you've built here, templating, cutting, joinery, and outdoor finishing, carry into every other woodworking project you'll tackle.
FAQ
What’s the best way to “make it stand out” from a distance, without making the bird look cartoony?
Use a bold silhouette first (clean head, clear wing shapes, distinct tail), then add only 2 or 3 high-contrast details (like a darker beak groove or simple feather lines). Keep the wings and tail slightly more pronounced than you think you need, because the outdoor viewing angle and finish fade will soften fine details over time.
Can I make the bird stand out by adding color, or will paint ruin the weatherproofing?
Paint is fine if it’s exterior-rated, but treat it as a two-layer system. Let the paint cure fully, then apply exterior spar urethane over everything. Skip “all-in-one” interior craft paints without a proper exterior topcoat, because UV and moisture will break down the color layer.
How do I choose between a single-piece carved bird and an assembled bird?
Assembled is more forgiving for proportions and survival in outdoor use, because wings and tail can be replaced if something breaks. A single-piece carve looks seamless, but thin carved projections are easier to snap and harder to repair without visible seams, especially after winters.
What’s a safe wood thickness range for outdoor wings and tail so they don’t snap?
For most beginner outdoor birds, keep wings and tail between about 1/4 and 3/8 inch thick, and avoid very skinny feather “strips.” If you want extra sturdiness, round the underside edges slightly, so stress concentrates less at sharp corners.
Do I need to pre-seal the wood before gluing wings and tail?
Usually no, because finish on the glue surfaces can prevent a strong bond. If you want to seal, do it on areas that will not be part of the joint. For end grain and the base area, seal first, then glue only where the mating faces are left clean, dry, and unfinished.
What’s the right approach if my bird looks crooked after assembly?
Stop tightening anything and check two alignment points: the centerline of the body and the mounting angle of the stand. If wings are off, adjust by shimming under the joint before glue cures, not by trying to re-carve after the glue sets.
How can I prevent the glued joints from failing when the bird gets lots of rain and temperature swings?
Make sure mating surfaces are flat, use an exterior adhesive, and always add mechanical reinforcement for small joints (brad nail, screw, or a wooden dowel pin). Also leave enough glue-line area (do not starve the joint), and clamp long enough that squeeze-out is minimal but the joint is fully wetted.
What should I do if I accidentally use interior varnish or interior paint on the bird?
Strip it back (scraper or sand), then reapply only exterior finishes. If you just topcoat over interior products, adhesion often fails later because interior film can soften and lift. After stripping, clean the surface thoroughly and let it dry fully before the first exterior coat.
How many finish coats are actually enough for full outdoor exposure?
Plan for at least three coats of exterior spar urethane or exterior polyurethane when the bird will see direct weather. If you live in very humid climates or the bird is in heavy sun, consider adding a fourth coat to the most exposed areas (wings tops, head, and the forward-leaning sides).
Should I sand between finish coats, and what grit works best?
Yes, lightly. Use around 220 grit between coats to improve adhesion, but avoid sanding through to bare wood. Wipe off dust after sanding and before recoating, because trapped sanding residue can cause cloudiness and weak bonding.
How do I protect the bottom and dowel holes from water wicking?
Do a dedicated end-grain treatment: pre-wet and saturate the end grain areas first with a thin coat of exterior finish, let it soak in, then apply additional full coats. For dowel holes, make sure the finish gets into the cavity before sealing the exterior, so water cannot wick down the internal wood.
Can I place the bird directly in soil like a yard stake, or will it rot faster?
You can, but only if the stake end goes deep and is sealed well. Drive the stake at least 8 to 10 inches, compact soil firmly, and pay extra attention to the end grain and the first 2 to 3 inches above the soil line, because that transition zone rots first.
What respirator setup is safest for sanding and cutting cedar or redwood?
Use a proper respirator rated for particulates, not just a disposable dust mask, and run a HEPA vacuum at the tool. Cedar and redwood dust can irritate with repeated exposure, and sanding creates fine dust that lingers, so good extraction and controlled airflow matter.
How do I prevent tear-out on scroll saw or jigsaw cuts when cutting wings?
Use a blade with higher tooth count, confirm correct blade direction for cutting on the downstroke, and tape along the cut line to stabilize fibers. If you still see splintering, sand only after cutting, and consider finishing the outer edge with a quick bevel so any micro-tear-out is hidden.
If my wing joint breaks after a winter, how do I repair it cleanly?
Chisel out the failed glue to remove contaminated surfaces, then lightly sand back to clean wood. Re-glue using exterior adhesive and add a reinforcement method. If the break left a gap, fill it with a tight-fitting shim or dowel plug instead of relying on filler alone, because filler alone lacks structural strength outdoors.
What’s an easy way to make the posture look more “alive” than a stiff vertical figure?
Angle the stand slightly forward (about 5 to 10 degrees) and keep the base wider than the body footprint. If the bird still feels rigid, subtly vary the head tilt when building or carving the head, small changes read as expression from across the yard.
Next Articles
How to Make Bird Gun Safely Redirected to Bird Housing
Clarifies bird gun is unsafe, then gives step-by-step DIY bird housing, feeders, and enrichment projects for a safer bac
How to Make a Windmill Bird Scarer More Effective
Upgrade a windmill bird scarer with reflective, predator cues, motion and optional noise plus placement tips and testing
Drinking Bird Toy How to Make: Step by Step DIY Guide
Step-by-step guide to build a working drinking bird toy with materials, assembly order, setup, and leak troubleshooting.