Yes, you can build a starling trap yourself, and it does not have to be complicated or expensive. A basic one-way entry funnel trap built from wire mesh and a few lumber scraps can catch multiple starlings in a single session. This guide walks you through the whole process: the legal stuff you need to check first, how to read starling behavior so you place the trap where it actually works, how to build it, how to set it, and what to do when starlings still will not cooperate. Let's get into it.
How to Build a Starling Bird Trap: DIY Step by Step

Marcus Thornton
12 Apr 2026
Before you trap: rules, safety, and humane intent
Here is the good news: European starlings are an invasive species introduced from Europe in the 1890s, and they are not protected by the federal Migratory Bird Treaty Act (MBTA). That means you can legally trap them on your property without a federal permit in most situations. The USDA APHIS confirms this explicitly, and states like Montana and Indiana go even further by stating that starlings can be taken any time of year without a state permit either. So at the federal level and in many states, you are in the clear.
That said, do not skip checking your local and state rules before you build anything. Some jurisdictions have specific restrictions on trap types. Washington D.C., for example, prohibits leg-hold traps, body-crushing traps, snares, and harpoon-style traps for wildlife control. The funnel trap design in this guide avoids all of those categories because it is a live-capture device, not a killing device. Still, take ten minutes to look up your state wildlife agency's page, and if you are in a situation where other migratory birds (which are MBTA-protected) might accidentally get caught, you may need a Migratory Bird Depredation Permit from USFWS. Better to know now than to deal with a fine later.
The word "trap" here means a humane live-capture device. The goal is to catch starlings alive so you can relocate or, where legal and appropriate, humanely euthanize them according to your state's guidance. What this guide is not about is anything that injures a bird during capture. A trap that works correctly holds a bird safely, with shade, water access nearby, and without causing panic injuries. If you are checking it regularly (more on that below), the animal stays in good condition throughout the process.
Choose the right control approach for starlings
Not every starling problem calls for a trap. Before you build one, figure out whether trapping is actually the right tool for your situation. There are three main approaches, and sometimes the best answer is a combination of all three.
| Approach | Best for | Limitations |
|---|---|---|
| Live-capture trap (funnel/decoy) | Active nesting season, feeders being dominated, relocating birds from a specific site | Requires daily monitoring, not practical for huge flocks |
| Exclusion (netting, hardware cloth, blocking entry points) | Preventing starlings from nesting in a structure or feeder area long-term | Does not remove birds already present; needs physical access to the site |
| Deterrents (reflective tape, predator decoys, sound devices) | Discouraging starlings from a general area without capture | Starlings habituate quickly; rarely a permanent fix on its own |
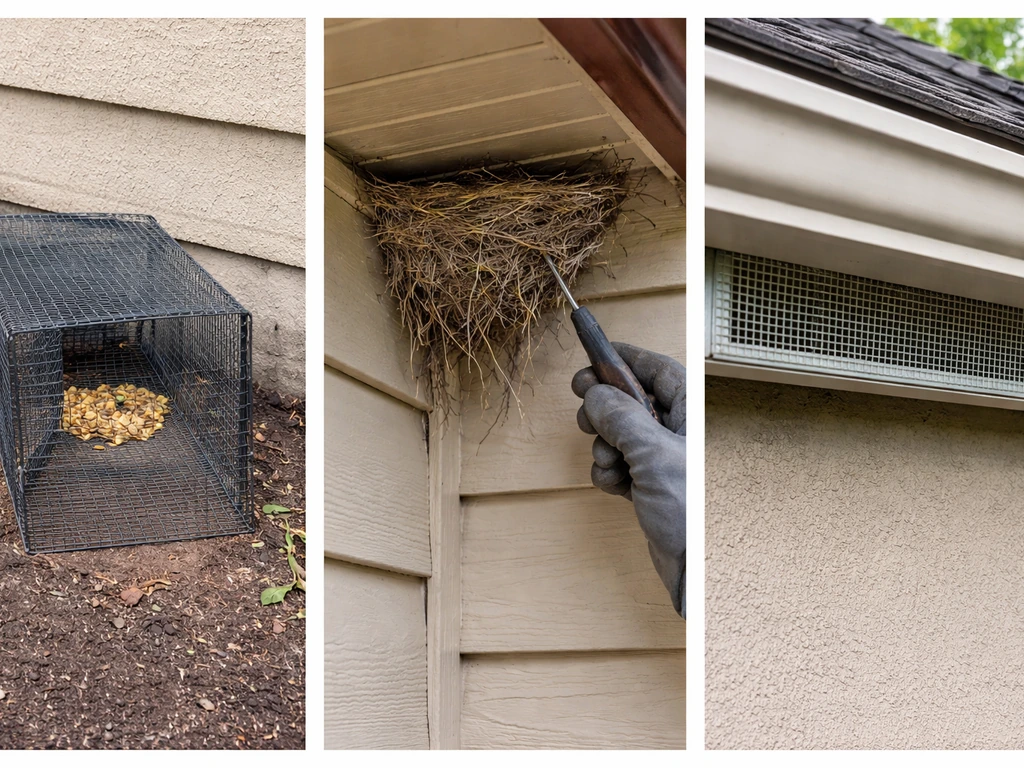
If you have starlings already nesting in a vent, eave, or outbuilding, trapping is the fastest way to reduce the population at that specific spot. After you trap, you seal the entry points so new birds cannot move in. If you just want to stop starlings from taking over a feeder, exclusion tactics combined with feeder design changes often work without trapping at all. That said, if you want a deep dive into the mechanics of different capture designs before committing to one, the best bird trap designs covers the tradeoffs between cage traps, drop nets, and funnel styles in more detail.
Understand starling behavior for better trap placement
Starlings are social, opportunistic, and bold. They flock, they follow each other, and they are heavily motivated by food and shelter. Understanding those three facts is what makes the difference between a trap that fills up in a morning and one that sits empty for weeks.
Timing matters a lot. Late winter through early spring (roughly February to April, which is where we are right now in April 2026) is one of the best windows for trapping because starlings are actively scouting nesting sites and food is still relatively scarce. Fall is also productive as flocks consolidate. Mid-summer, when natural food is abundant and birds are less desperate, is the hardest time to get consistent results. The USDA APHIS WDM Technical Series notes that trapping success varies by time of year, population size, and the specific area, which is worth keeping in mind if you are trying to set realistic expectations.
Decoy birds are one of the most effective tools for starling trapping. Because starlings follow each other, a single live or taxidermied decoy bird inside the trap triggers curiosity and reduces hesitation in others. Place your trap where you have already seen starlings feeding or perching, not just somewhere that looks logical to you. Watch the yard for 20 minutes on two or three mornings before you decide on a spot. Starlings tend to return to the same feeding routes daily.
Starlings also prefer open sightlines. They are nervous about dense cover right around a trap because they cannot see predators approaching. Set your trap in a semi-open area, not tucked under heavy shrubs. A few feet of clear ground around all sides makes them feel safer entering.
Materials and tools for a DIY starling trap
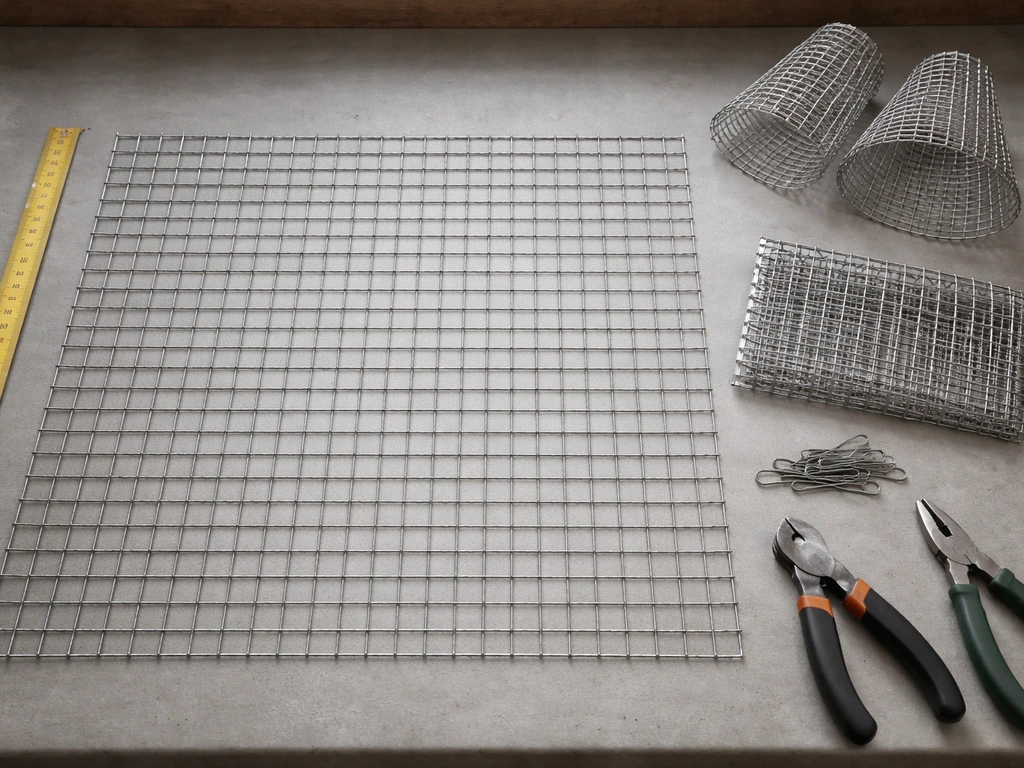
This build uses common hardware store materials. You do not need special tools or a woodworking background. I have built versions of this trap with wire mesh left over from a garden project and scrap 2x2 lumber, and it worked fine. Here is what you need:
- Welded wire mesh or hardware cloth: 1/2-inch or 1-inch grid, 19-gauge or heavier. You need enough to build a box roughly 24 inches wide x 24 inches deep x 18 inches tall, plus extra for the funnel cone.
- Wooden frame lumber: 2x2 or 1x2 pine for the frame. Pressure-treated lumber is durable but not necessary for a temporary trap.
- Wire cutters and pliers: for shaping and joining mesh sections.
- Zip ties or hog rings: for fastening mesh panels together. Hog rings give a cleaner, more secure join; zip ties work fine for a first build.
- Drill with bits: for attaching mesh to a wooden frame if you go that route.
- Staple gun and heavy staples: for securing mesh to wood.
- A small hinged door panel: for the access/retrieval door. Cut a 6x6-inch or 8x8-inch section, attach with a wire hinge.
- A flat solid panel or plywood sheet: for the roof, to keep rain out and provide shade.
- Optional: a small water dish and perch dowel for bird welfare inside the trap.
Total material cost for a first build typically runs between $20 and $45 depending on whether you have leftover mesh or lumber around. If you are sourcing everything new, hardware cloth is the biggest expense. The trap design below is sized for starlings specifically, with entry dimensions that allow starlings through but are tight enough to slow their exit attempts.
The USDA APHIS guide for modifying a European starling trap specifies funnel cross-section dimensions of 2 ¾” x 2 ¾” on one end and 4” x 4” on the other [entry dimensions](https://www. aphis. usda. gov/sites/default/files/modify-european-starling-trap.
pdf). If you want to compare this approach to other snare and capture methods before cutting anything, how to make bird snares explains the mechanics of entry-only designs in a useful side-by-side way.
Build steps: assembling a one-way entry funnel trap
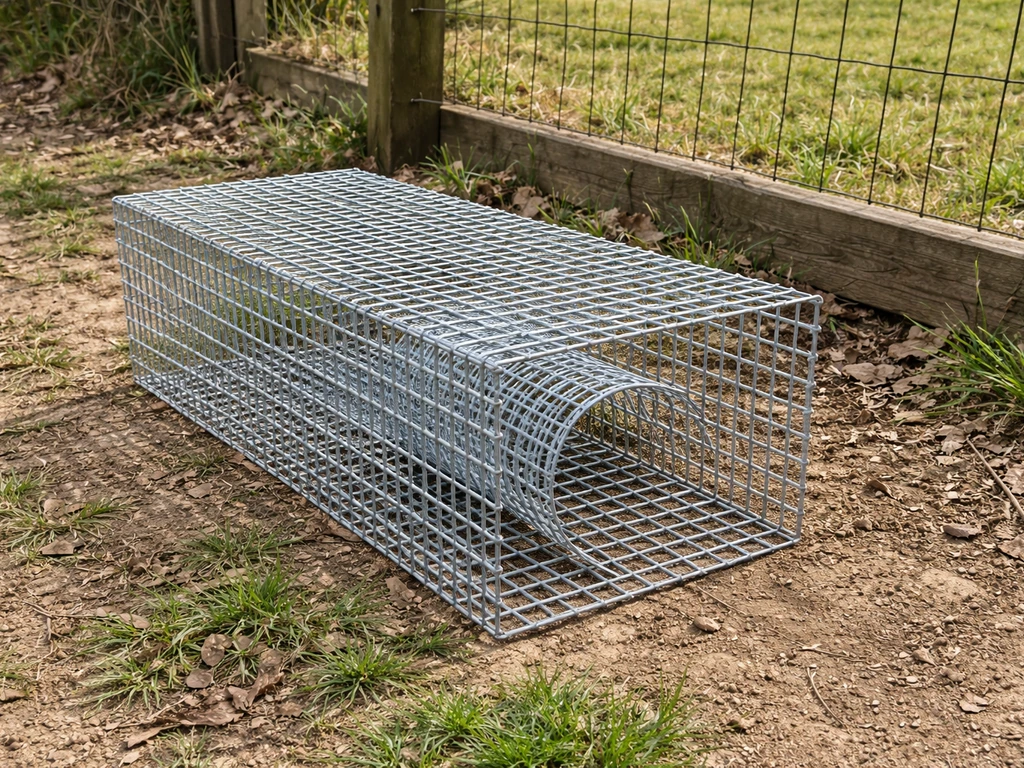
The core concept is simple: birds walk or fly into a funnel-shaped opening that narrows inward. Once inside, they cannot figure out how to back out through the narrow end. The inside of the trap is larger and open, so the bird does not feel immediately trapped and is less likely to panic at entry. Here is how to build it step by step.
- Cut your main box panels: two 24x18-inch side panels, two 24x18-inch front and back panels, and one 24x24-inch bottom panel from your wire mesh. Cut a 24x24-inch solid panel (plywood or corrugated plastic) for the roof.
- Assemble the box frame: if you are using a wooden frame, cut 2x2 lumber into lengths matching your panel dimensions and screw the frame together at corners. Staple or zip-tie the mesh panels to the frame. If you skip the wood frame, join panels directly using hog rings every 4 inches along each edge.
- Cut the funnel opening in one of the 24x18-inch panels (this becomes your entry wall): mark a circle roughly 3.5 inches in diameter in the center of the panel. This diameter lets a starling through comfortably but is small enough to be disorienting on the return trip.
- Shape the funnel cone: cut a roughly 12x12-inch square of mesh and roll it into a cone shape with the wide end (about 6 inches across) facing outward and the narrow end (about 2 to 2.5 inches) pointing inward into the box. The inward-pointing tip sits 4 to 6 inches inside the box interior. Secure the cone to the entry wall opening with hog rings or zip ties all the way around the perimeter.
- Add the retrieval door: on the opposite end wall or the roof panel, cut a 7x7-inch access flap and attach it with a wire loop hinge on one side. Add a simple hook-and-eye latch to keep it closed. This is how you reach in to remove birds.
- Attach the roof: zip-tie or staple the solid roof panel to the top of the frame on three sides, leaving one edge hinged or removable for cleaning.
- Check the interior: make sure there are no sharp wire ends poking inward. Bend any cut wire ends back with pliers. Bird welfare matters, and sharp edges cause injuries during capture.
- Place a small flat dish of water and a short perch dowel inside the trap if you plan to run it for several hours at a time.
First time I built one of these, I made the funnel tip too wide at about 3.5 inches on the inside end. Birds figured out how to reverse through it. Narrowing that interior tip to 2 to 2.5 inches fixed the problem immediately. The outside entry can be generous (3 to 4 inches) to encourage entry; the inside tip is where you do your work. If you are still getting your bearings on trap construction concepts and want a broader primer before going further, how to make a trap for birds is a great starting point that covers basic frame construction techniques that apply directly to this build.
Setup, bait, decoys, and monitoring routine
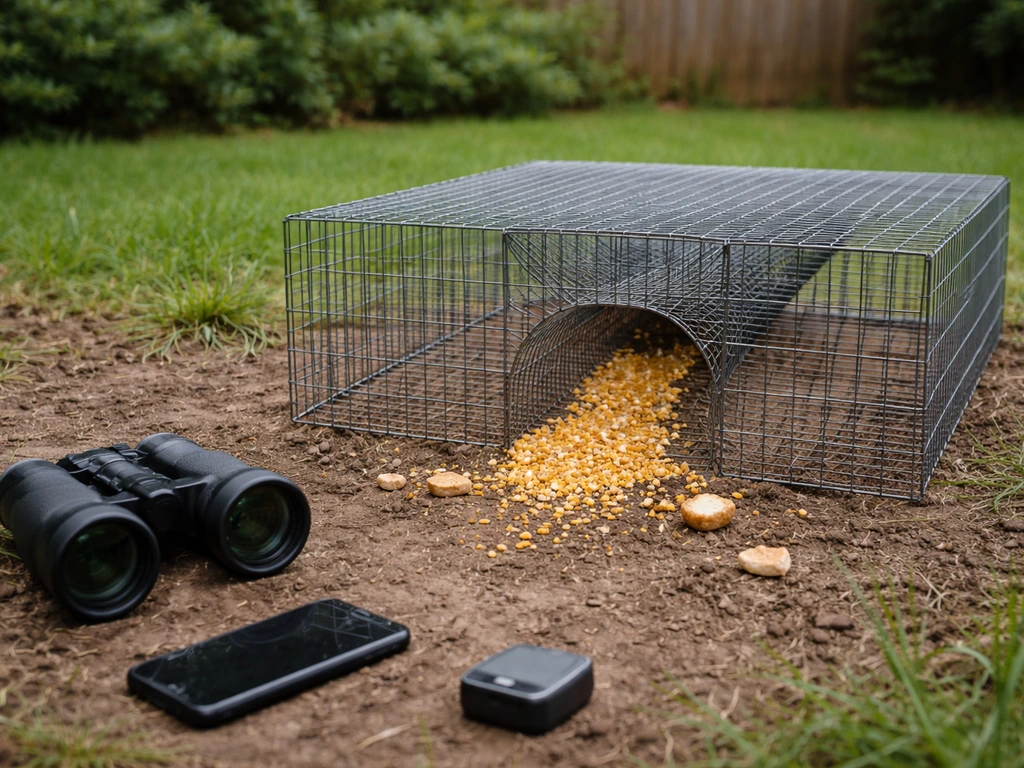
Building the trap is only half the job. How you set it up determines whether birds use it. Place the finished trap in the spot you identified during your behavioral observation period. Orient the funnel entry facing away from any solid wall or fence so birds approach from open ground. Set it at ground level or on a low flat surface like a patio block; starlings feed on the ground and are comfortable at that level.
Bait is straightforward. Starlings respond well to cracked corn, bread scraps, mealworms, and suet crumbles. Scatter a small amount of bait outside the funnel entrance for the first two or three days without even running the trap as a live capture device. This teaches birds that the trap area equals food, and reduces hesitation when you start using it actively. Once birds are visiting the bait regularly, place the main bait concentration inside the trap box through the retrieval door.
A decoy bird dramatically increases catch rates. If you have caught one starling already, place it inside the trap (with water) as a live decoy. Other starlings will follow. A taxidermied starling or even a realistic plastic decoy propped inside near the entry also works, especially early in a trapping session. The social nature of starlings is your biggest asset here.
Check the trap every two to three hours at minimum when it is active. Never leave a live-capture trap unattended overnight or through a full day without checking. Birds left in a trap too long without water, shade, or in extreme heat are at serious risk. In April heat or summer sun, even a couple of hours without shade can be dangerous. If you cannot monitor consistently that day, do not run the trap.
When you open the retrieval door to remove a bird, move slowly and use a light cloth or towel to hold the bird securely without squeezing. Gloves are helpful because starlings will bite and scratch when stressed. Have your relocation container (a ventilated box or small carrier) ready before you open the door. For more on the full range of capture methods and how active monitoring changes results, how to make a bird catcher covers practical handling tips that complement what you just built.
Troubleshooting and prevention after trapping
When starlings won't enter the trap
If birds are visiting the bait outside but not entering, the funnel entry is likely the issue. Check that the outside opening is actually 3 to 4 inches across and not accidentally smaller after attaching the cone. Also check that the interior of the trap looks open and light from the outside; if it looks dark and tunnel-like from a bird's perspective, they will hesitate. Leaving the retrieval door open slightly during pre-baiting (without the funnel active yet) lets birds walk through freely and builds comfort with the structure.
Another common issue is trap placement that is too close to cover or too exposed. Move the trap 3 to 6 feet and re-observe. Sometimes the fix is as simple as angling the entry toward the direction birds approach from most often.
When birds escape after entry
If birds are getting back out through the funnel, your interior cone tip is too wide. Remove the cone, reshape it tighter (aim for 2 inches at the interior tip), and re-attach. Also check that the cone is pointing inward at a slight downward angle, which makes reverse navigation even harder. If birds are escaping through the retrieval door, add a secondary latch and double-check the hinge side for gaps wider than half an inch.
Preventing starlings from coming right back
Trapping solves a current problem but does not stop the next wave of starlings unless you pair it with prevention. The most important step is sealing every nesting entry point on your structures: vents, eave gaps, and any opening larger than 1.5 inches. Hardware cloth or sheet metal over these spots is the most permanent fix. Starlings will return to the same nesting sites year after year if the entry stays open.
At feeders, switch to feeders that physically exclude starlings. Tube feeders with short perches, upside-down suet feeders, and weight-sensitive feeders all reduce starling access without harming other birds. Remove or limit cracked corn and bread, which starlings love, and replace with nyjer seed or safflower, which they generally ignore.
Longer term, reducing available food and nesting sites is the only thing that meaningfully lowers starling pressure in a yard. Trapping addresses the birds that are already there. Exclusion and habitat management address the reason they want to be there in the first place. Run both strategies together and you are in a much better position than either approach alone.
FAQ
What mesh size should I use so starlings can enter but other birds are less likely to get through?
Use a light, weather-resistant metal such as hardware cloth rated for small birds, and keep all cut ends covered or capped. Even if the funnel shape is correct, sharp mesh edges and loose wire can injure birds and also reduce visitation because birds avoid unsafe-looking entry points.
Can I pre-bait the trap without trapping so birds get used to it first?
Yes, but only as a short pre-baiting step. Leaving the retrieval door open while you are not running the trap (no funnel restriction active) helps birds treat the structure as normal feeding ground. Once they are consistently walking in, close and activate it, otherwise you will just train them to treat the inside as a safe escape route.
What should I do if it’s too hot for frequent checking but I already set the trap?
Plan to stop and resume later if temperatures are high or if you cannot check every two to three hours. If shade is limited, place the trap where it will stay mostly out of direct sun, and avoid running it during heat waves. The goal is to prevent overheating and dehydration before any door is opened.
What gear should I have on hand before I open the retrieval door to remove a bird?
Have a relocation container ready, plus basic handling supplies. A ventilated carrier is best for transport, and a soft towel can help you control the bird briefly without squeezing. Gloves are strongly recommended because stressed starlings bite and scratch, especially when you open the retrieval door.
If starlings won’t enter, how do I troubleshoot without wasting materials or rebuilding from scratch?
If no birds enter after a few days of pre-baiting, reduce variables before rebuilding. Re-check that the funnel points in the correct direction, confirm the outside opening is not smaller after attachment, and verify the trap is in a semi-open sightline area with clear ground around it.
How do I handle the risk of trapping other birds, not just starlings?
Yes, in some local situations you may need more than a simple live-capture approach. If other migratory birds could access the same area or the trap design could unintentionally capture protected species, you may need federal authorization and must adjust placement and access paths to reduce bycatch risk.
If I relocate trapped starlings, how far should I move them so they do not come right back?
Relocation outcomes vary, and many starlings will attempt to return to the same feeding routes. If relocation is allowed where you live, use a practical distance and keep timing in mind, typically avoiding immediate release near the original entry point so you do not create a quick re-capture cycle.
Birds are escaping through the funnel, what adjustments should I make first?
If the funnel interior is the problem, you usually need to tighten the cone tip, and make sure the cone is angled slightly inward and downward. Start by inspecting where birds are backing out or how they exit, then adjust only the cone and hinge gaps first before changing the baiting or placement.
What causes catch rates to drop after the trap initially worked?
If you are catching birds but numbers drop suddenly, it often signals changes in site security or food competition. Try re-seating the trap on stable ground, re-verify clear sightlines, and consider refreshing the bait schedule. Also look for new nesting activity elsewhere that is pulling flocks away.
Is it ever okay to leave the trap unattended for a longer stretch?
Do not run it when you cannot commit to monitoring. If your schedule prevents checks, shut it down for that day and focus on exclusion and feeder changes instead. A trap left too long without shade or water is unsafe for live-captured birds.
Next Articles

How to Make a Bird Trap: Step-by-Step DIY Guide
Step-by-step DIY bird trap guide: choose design, build, set, monitor, and humane release with safer alternatives.

How to Build a Chimney Swift Bird House DIY Guide
Step-by-step DIY plans to build a chimney swift bird house, with correct dimensions, placement, and weatherproofing for

How to Build an Oriole Bird House: Step-by-Step DIY
Step-by-step DIY for building an oriole bird house with right dimensions, weatherproofing, predator-safe placement, and