The right simple birdhouse plan for a beginner is a single-chamber box built from 3/4-inch untreated wood, with the entrance hole sized to match one target species. That one decision, getting the hole diameter right, does more to determine whether birds actually move in than almost anything else you build. So before you cut a single board, let's figure out what you're building and for whom.
Beginner Simple Bird House Plans: Easy Build Guide

Marcus Thornton
3 Apr 2026
Pick your bird first, then build to match
Every cavity-nesting bird has a preferred entrance hole size, and that size matters more than the paint color, the shape of the roof, or how fancy the trim looks. The hole is essentially a security door: make it too big and predators or aggressive species like House Sparrows and European Starlings can bully their way in. Make it too small and your target bird physically can't enter. Get it right and you've done most of the hard work.
Here's a species-by-species breakdown of the dimensions you actually need, pulled from Audubon and USGS birdhouse guidance. These are the most common backyard cavity nesters in North America, and the ones beginner plans are built around:
| Species | Entrance Hole Diameter | Floor Size | Mounting Height |
|---|---|---|---|
| Black-capped Chickadee / Titmouse | 1 1/8 inches | 4 x 4 inches | 4–8 feet |
| House Wren / Carolina Wren | 1 1/8–1 1/4 inches | 4 x 4 inches | 5–10 feet |
| Eastern / Western Bluebird | 1 1/2 inches | 5 x 5 inches | 4–6 feet |
| Mountain Bluebird | 1 9/16 inches | 5 x 5 inches | 5–7 feet |
| Tree Swallow | 1 1/2 inches | 5 x 5 inches | 5–8 feet |
| House Sparrow / Great Tit (UK) | 1 1/2 inches (38 mm) | 4 x 4 inches | 6–15 feet |
| Blue Tit (UK) | 1 inch (25 mm) | 4 x 4 inches | 6–10 feet |
If you're in the UK, the Wildlife Trusts recommend 25 mm for blue tits, 28 mm for great tits, and 38 mm for sparrows. In North America, a 1 1/8-inch hole is your go-to for chickadees and wrens, while 1 1/2 inches is the USGS-recommended target for bluebirds because it admits them while helping shut out House Sparrows and Starlings. Pick one species, confirm the hole size, and commit. Trying to build a 'universal' box usually means nobody moves in.
If you're just getting started and want the highest chance of success, build the chickadee/wren box first. The 4x4-inch floor plan is forgiving, the wood cuts are simple rectangles, and wrens especially will nest in almost anything with the right hole. Bluebirds are more habitat-specific but deeply rewarding if you have open lawn or meadow nearby.
Three beginner plans worth building
You don't need a dozen plans. Most beginner birdhouses fall into three designs, and picking one is mostly about which bird you're targeting and how much complexity you want on your first build.
Plan 1: The classic single-chamber box (best for chickadees and wrens)
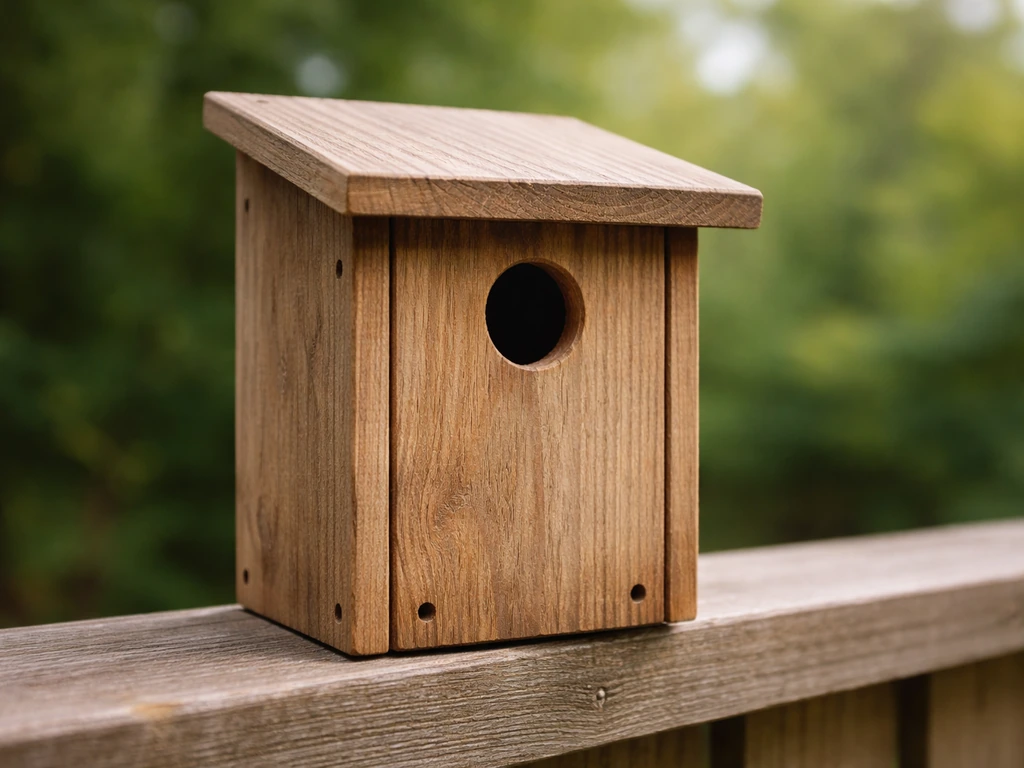
This is the box most people picture when they think of a birdhouse: four sides, a sloped roof, a circular entrance hole, and a floor with drainage. The interior is roughly 4x4 inches, the box is about 8–9 inches tall, and the entrance hole sits about 6 inches above the floor. It's the friendliest first build because every piece is a rectangle or near-rectangle, and there's no complex joinery involved. You just cut, drill, and screw it together.
Plan 2: The bluebird box (best for bluebirds and tree swallows)
The bluebird box is slightly larger (5x5-inch floor) and uses a 1 1/2-inch entrance hole centered 2 inches from the top of the front panel and 2 1/2 inches from each side, as specified in the Audubon bluebird box plan. The key difference from Plan 1 is that the front panel should pivot or hinge open at the bottom for easy annual cleaning. If you mount it on a post in an open field, you'll also want a predator guard on the pole. This box is a small step up in complexity but still very manageable on a first or second build.
Plan 3: The open-front or partially open box (best for robins and phoebes)
American Robins, Eastern Phoebes, and Barn Swallows don't use enclosed boxes with round entrance holes at all. They prefer an open-front or three-sided box with a wide open face. The floor is typically 6x6 inches, the sides are about 8 inches tall at the back tapering to around 4 inches at the front, and there's no hole to drill. These are probably the easiest build of all because you literally skip the most precise step (hole drilling), though placement under eaves or on a sheltered wall matters more for this design.
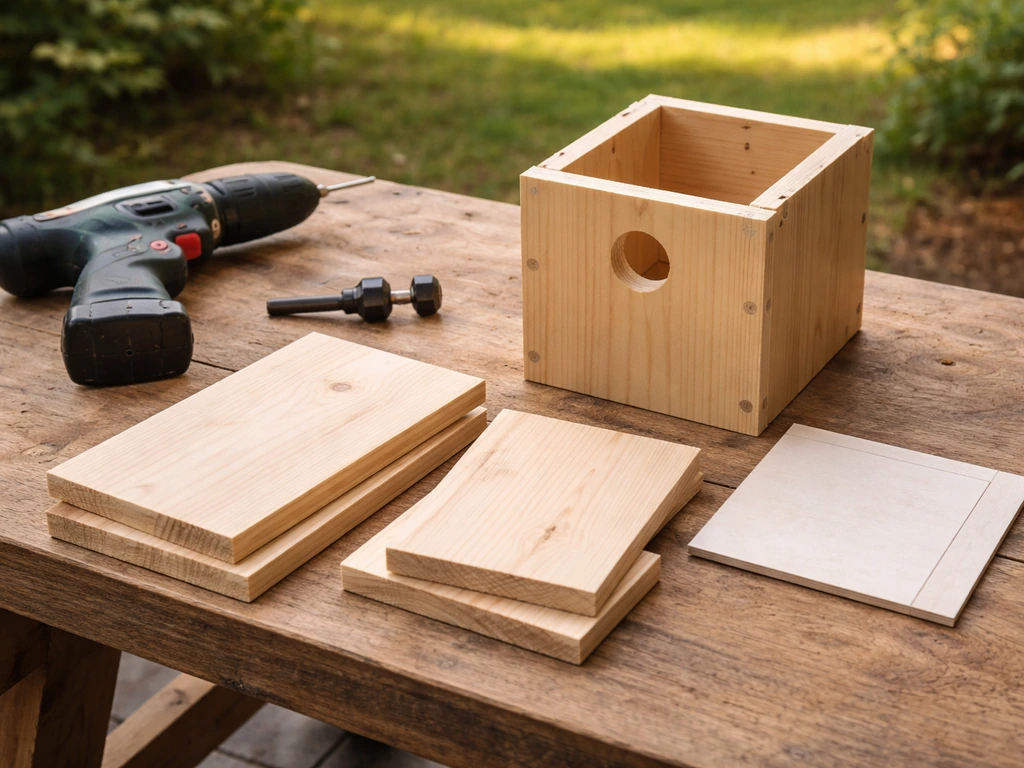
What to build with: materials, tools, and specs
The single most important material rule: use untreated wood. NestWatch (Cornell Lab) is clear that birdhouses should use untreated, unpainted wood or appropriate natural materials. NestWatch emphasizes using untreated, unpainted wood or other appropriate natural materials, because preservatives in treated wood can off-gas harmful chemicals inside the nesting cavity untreated, unpainted wood or appropriate natural materials.
Treated lumber contains preservatives that can off-gas harmful chemicals inside a closed nesting cavity where eggs and chicks live for weeks. I learned this the hard way early on, assuming 'all weather' pressure-treated boards were a smart choice for outdoor durability. They're not for birdhouses. The best options are cedar, redwood, pine, and Douglas fir.
Cedar and redwood naturally resist rot and won't need any finish at all. Pine is cheaper and works fine if you seal the exterior lightly with a water-based exterior paint or linseed oil, but leave the interior completely bare. The Alaska Department of Fish and Game also specifically warns never to use creosote-treated wood, as it can kill eggs and chicks.
Audubon's bluebird plan calls for 3/4-inch thick boards throughout, and that's a reliable standard for all three designs above. Thinner wood warps, poorly insulates the cavity, and doesn't hold screws as well. If you're working from scrap or reclaimed wood, building from scrap wood is completely viable as long as it's untreated and uncontaminated.
Here's the tool list for a beginner. You don't need a full workshop. These basics cover all three plans:
- Circular saw or handsaw (for cutting boards to length)
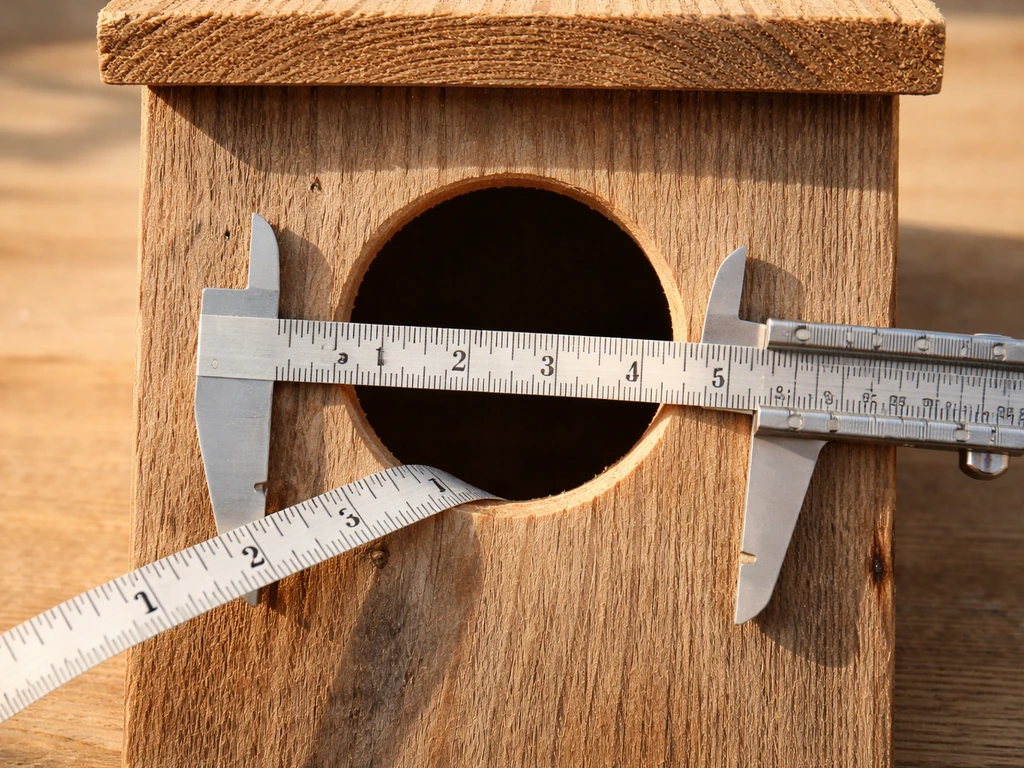
- Drill with bits (standard twist bits for pilot holes, plus a 1 1/8-inch or 1 1/2-inch spade or Forstner bit for the entrance hole)
- Hammer or cordless screwdriver/impact driver
- Tape measure and pencil
- Sandpaper (80-grit and 120-grit)
- Square or speed square (for checking right angles)
- Clamps (2–4, optional but very helpful during assembly)
If you don't have a spade bit in the right size, a hardware store will often drill the entrance hole for you for free or very cheaply if you bring your cut front panel. Don't skip getting the right diameter just because you have to buy one bit. It's the most important cut on the whole build.
Build specs that protect the birds
Beyond material choice, a few specific features separate a birdhouse that actually gets used from one that looks nice on a shelf. Drainage is non-negotiable: drill four 3/8-inch to 1/2-inch holes in the corners of the floor panel so any water that seeps in can drain out. NestWatch lists this as a core feature of a good nest box. Ventilation is equally important.
The USGS plan recommends leaving a 1/4-inch gap at the top of the side panels when assembling, and Audubon's bluebird plan specifies a 1/2-inch gap at the top of the front panel for airflow. HGTV’s bluebird house instructions also call for leaving a small 1/4-inch gap between the front panel and the roof for airflow and using a properly sized entrance hole for bluebirds leaving a 1/4-inch gap at the top of the side panels.
Hot, unventilated nest boxes in summer can be lethal to chicks. Seal the crack at the top rear with caulk to prevent rain from entering while keeping the vent gap open.
Do not add a perch below the entrance hole. I know they look charming, but perches give predators and competitor species like House Sparrows a foothold. Real cavity nesters don't need one and are actually more comfortable gripping the rough wood around the hole itself. Speaking of which: roughen the interior face of the front panel below the entrance hole with a saw or chisel. Fledglings need to grip that surface to climb out, and smooth planed wood is surprisingly hard for young birds to manage.
From cut list to finished box: step-by-step
Below are the cut list and build steps for Plan 1 (the classic chickadee/wren box). The bluebird box follows the same sequence with adjusted dimensions. All measurements assume 3/4-inch thick lumber and a finished interior of roughly 4 inches wide by 4 inches deep by 9 inches tall.
Cut list (Plan 1: Chickadee/Wren Box)
| Piece | Dimensions (finished) | Notes |
|---|---|---|
| Floor | 4 x 4 inches | Drill 4 drainage holes in corners |
| Front panel | 4 x 9 inches | Drill 1 1/8-inch entrance hole, center 6 inches from bottom |
| Back panel | 4 x 12 inches | Extra height for mounting; drill two holes for screws/nails to post |
| Side panels (x2) | 4 3/4 x 9 inches (taller at back) | Cut a slight angle on top edge for roof slope; leave 1/4-inch gap at top during assembly |
| Roof panel | 6 x 7 inches | Overhang 1.5 inches at front and both sides to shed rain |
The back panel is intentionally taller than the front to create a gentle roof slope. You don't need a dramatic pitch, just enough for rain to run off. Cut the top edge of each side panel at the matching angle so the roof sits flat.
Assembly steps
- Cut all pieces to size and label them with pencil on the back face.
- Drill the entrance hole in the front panel using a spade or Forstner bit. Clamp the panel firmly before drilling to avoid tear-out. Roughen the interior face below the hole with coarse sandpaper or a few saw cuts.
- Drill four drainage holes (3/8-inch) in the corners of the floor panel, staying about 1/2 inch from each edge.
- Attach one side panel to the floor using two 1 5/8-inch exterior screws (or nails, as the USGS plan suggests, though screws hold better and let you disassemble for cleaning). Pre-drill pilot holes to prevent splitting.
- Attach the back panel to the floor and that first side panel. Check for square with your speed square before the screws go fully home.
- Attach the second side panel, leaving that 1/4-inch ventilation gap at the top of each side (do not run the side panel flush to the top of the back panel).
- Attach the front panel. If you want a cleanout door, attach the front panel at the bottom only with two screws acting as pivots, and add a single screw at the side near the top that you can remove to swing the front panel open for cleaning.
- Attach the roof panel with screws through the top into the back and side panels, making sure it overhangs generously at the front and sides. A 1.5-inch overhang keeps rain off the entrance hole.
- Apply a thin coat of exterior linseed oil or water-based exterior paint to the outside surfaces only. Leave all interior surfaces completely bare and unfinished.
- Mount using the extended back panel. Two screws through the back panel into a post or tree is the simplest method.
One honest tip from early builds: assemble the box dry (without glue or screws) first and hold it together to check that everything lines up. It takes five minutes and saves a lot of frustration when you discover a piece is cut slightly short before you've committed to the final assembly.
Where and how to mount it so birds actually find it
Building the box right is half the job. If you are also looking to hang something in the yard, a hanging bird table can add an easy, consistent feeding spot alongside your nest box. The other half is placement. Birds are picky about location, and a perfectly built box in the wrong spot will sit empty for years. Height, orientation, and habitat context all matter.
For chickadee and wren boxes, mount between 5 and 10 feet off the ground. Bluebird boxes do well at 4 to 6 feet on open fence posts or dedicated poles in short-grass areas. Wrens are more flexible and will accept boxes hung from a branch or attached to a shed wall, which makes them forgiving for beginners. Face the entrance hole away from prevailing wind and rain, ideally toward the east or southeast. That orientation gives the box morning sun (which warms it early in the season) without cooking it in the brutal afternoon heat of summer.
Keep birdhouses at least 25 feet apart for most small species. Wrens and chickadees are territorial and will abandon a box if another box is too close. Bluebirds and swallows are an exception and can share a yard if boxes are placed at least 100 yards apart. Keep the box at least 30 feet from a busy bird feeder. Feeders attract activity and noise that nesting birds find stressful.
If cats are an issue in your yard, height alone won't solve it. Cats are better climbers than most people give them credit for. A smooth metal or PVC pole with a baffle is the most effective deterrent, and if you want to think more broadly about your setup, the topic of keeping cats away from bird feeding areas is worth reading alongside this guide. For pole-mounted boxes, NestWatch placement guidance notes that poles equipped with predator guards are significantly more effective than trees or fence posts alone.
Timing matters too. Put boxes up in late winter, ideally by February or early March in most of North America. Birds begin scouting nesting sites early, often before most people think to hang a box. A box that's been up for a few weeks before the nesting season opens will be inspected more thoroughly than one that appears two days before the birds are ready to commit.
If you're setting up a broader backyard habitat alongside your birdhouse, you might also want to think about supplemental feeding. Making a simple bird table is another approachable first project that complements a birdhouse well, especially in winter when natural food is scarce.
Securing the box and managing stability
A box that sways or wobbles in wind will be avoided by nesting birds. If you're mounting on a post, use two screws through the back panel spaced several inches apart so the box can't rotate. For fence or wall mounting, a stainless steel bracket works well and resists rust. If you're in a windy area or mounting at height, the guidance on how to secure a bird table covers some practical anchoring methods that translate directly to birdhouse posts as well.
Maintenance, cleaning, and what to do if nobody shows up
Clean your birdhouse at least once per year. The Wildlife Conservation Trusts recommend cleaning out nest boxes each fall after the nesting season ends, and ideally after each brood has fledged during active nesting seasons. Old nesting material harbors mites, parasites, and bacteria that will deter birds from using the box again next year, or worse, harm the next clutch of eggs. Wearing gloves, remove all old nesting material, scrub the interior with a stiff brush and hot water (no soap or cleaning products), rinse, and leave it open to dry fully in the sun before closing it back up.
Check for wasp nests in early spring before the birds arrive. Wasps will colonize an empty birdhouse over winter or early spring and create a real problem. A quick visual inspection in February or March lets you clear them out before the nesting season starts. Rubbing a bar of plain soap on the interior ceiling of the box can discourage wasps from building there, and it won't harm nesting birds.
If birds are inspecting but not committing, the most common culprits are: the hole is the wrong size for your local birds, the box is positioned too close to a feeder or human activity, or the interior is too hot because of poor ventilation or direct western sun exposure. If the box sits completely ignored for a full season, try relocating it. Sometimes a move of just 10 or 15 feet to a slightly shadier or more sheltered spot makes the difference.
Mold inside the box usually means drainage isn't working. Check that the floor drainage holes are clear and not blocked by nesting material. If the floor has warped and sealed against the sides, you may need to replace it. This is another reason screwed construction beats nailed construction: you can take the box apart, fix a piece, and reassemble it in 10 minutes.
Thinking beyond the basic box
Once you've built and mounted your first box and watched birds use it, the natural next step is to expand and refine your backyard setup. Some people add a mounted feeding station nearby, while others focus on attracting specific smaller species. If you're interested in catering specifically to smaller birds, the ideas around designing for small birds are worth exploring, especially for chickadees, wrens, and titmice.
For a more elevated or sheltered feeding option that works alongside a birdhouse setup, building a bird table with a roof is a satisfying follow-on project that gives birds a protected spot to feed in wet weather. If your yard has a specific challenge with larger, more aggressive birds dominating the space, learning how to keep pigeons away from a bird table can help you manage the whole habitat more effectively.
And if you're short on post-mounting options, a hanging bird table is another flexible option that suits smaller yards or balconies. Bird tables can also attract pigeons, so use a pigeon-proof design and entry restrictions to keep the feeding area safer for smaller birds.
The best birdhouse is the one you actually build, mount correctly, and maintain each year. Start with Plan 1, get the hole diameter right for your target species, use untreated 3/4-inch wood, add drainage and ventilation, face it east, clean it every fall, and you're doing everything right. The birds will find it.
FAQ
Can I paint the outside and leave the inside bare for beginner simple bird house plans?
Yes, painting the exterior is fine, but keep the interior completely unpainted. Use a water-based exterior coating, avoid staining products inside the cavity, and do not seal the inside floor or walls, since airflow and moisture release are part of the design.
What’s the best way to choose a hole size if I’m not 100 percent sure which bird will move in?
Pick one likely target species based on your local habitat, then match only that species’ entrance diameter. If you build for multiple species, you usually end up with a “universal” hole that either lets in competitors or excludes your intended birds.
How do I prevent squirrels, mice, or other animals from enlarging the entrance?
Use the correct entrance diameter, add a properly sized predator guard for pole mounting when applicable, and consider using harder untreated woods like cedar or redwood. If you notice gnaw marks, replace the front panel instead of patching, because damaged framing can allow predators in around gaps.
Do I need a roof overhang or can I use the standard sloped top?
A sloped roof is enough for rain runoff on the enclosed boxes, but the key is the orientation and keeping the rear crack sealed except for the ventilation gap. For exposed placements, make sure the box is sheltered from direct driving rain, otherwise interior dampness will increase even with drainage holes.
Is it okay to use glue instead of screws or to mix them?
Screws are strongly preferred because the box may need disassembly for annual cleaning or repairs. You can use glue sparingly, but avoid relying on glue alone, since warping or blocked drainage can require you to take the box apart quickly.
How can I tell if the ventilation gaps are correct after assembly?
After you build it, look for an actual continuous gap area at the top side seams or top front as specified by the plan, not a gap that is blocked by misalignment or caulk. If you see the cavity sealed at the top, adjust before mounting, because trapped heat is harder to fix later.
Can I mount the birdhouse facing south or west if I want more sun?
It’s safer to avoid west-facing exposure because afternoon heat can overheat the cavity. East or southeast facing gives morning warmth and typically reduces the risk of lethal summer temperatures.
What spacing should I use if I want more than one birdhouse in a small yard?
For chickadees and wrens, increase spacing, since they can abandon boxes if another box is too near. For bluebirds and swallows, the tolerable distance is much larger than for small cavity nesters, so plan yard layout carefully before you add extra boxes.
How often do I clean a birdhouse if birds are using it successfully?
Clean once per year at minimum, typically after the nesting season ends. During active seasons, follow guidance that suggests cleaning after broods fledge when possible, and always remove old material because lingering debris can increase parasites and discourage future nesting.
What should I do if I find a wasp nest in the box?
Do a visual check early in the year before birds arrive, then remove any wasp activity before nesting begins. If the problem shows up late, postpone further use of that box until the nesting window is over, since wasps can establish quickly and deter cavity nesters.
My birds are inspecting the box but not nesting, what should I check first?
Re-check entrance diameter for your target species, verify the box is far enough from feeders and human activity, and inspect for heat buildup. Direct afternoon sun and blocked ventilation are common reasons for repeated inspections without occupancy.
What’s the correct mounting method to stop wobble or rotation?
Use two attachment points that prevent twisting for post mounting (for example, two screws through the back panel spaced apart). For fence or wall mounting, use corrosion-resistant brackets, and confirm the box cannot rock when you gently push it.
Can I reuse an old birdhouse from someone else or from a previous season?
You can, but only if the wood is untreated and the entrance hole matches your target species, and the interior was not contaminated with treated materials or creosote. Inspect for mold, blocked drainage holes, and warping, then fully clean and dry it before putting it back up.
Next Articles

How to Build a Chimney Swift Bird House DIY Guide
Step-by-step DIY plans to build a chimney swift bird house, with correct dimensions, placement, and weatherproofing for

How to Build an Oriole Bird House: Step-by-Step DIY
Step-by-step DIY for building an oriole bird house with right dimensions, weatherproofing, predator-safe placement, and

How to Build a Chickadee Bird House Step by Step
Step-by-step DIY chickadee bird house with cut list, chickadee entry sizing, ventilation, drainage, and mounting tips.