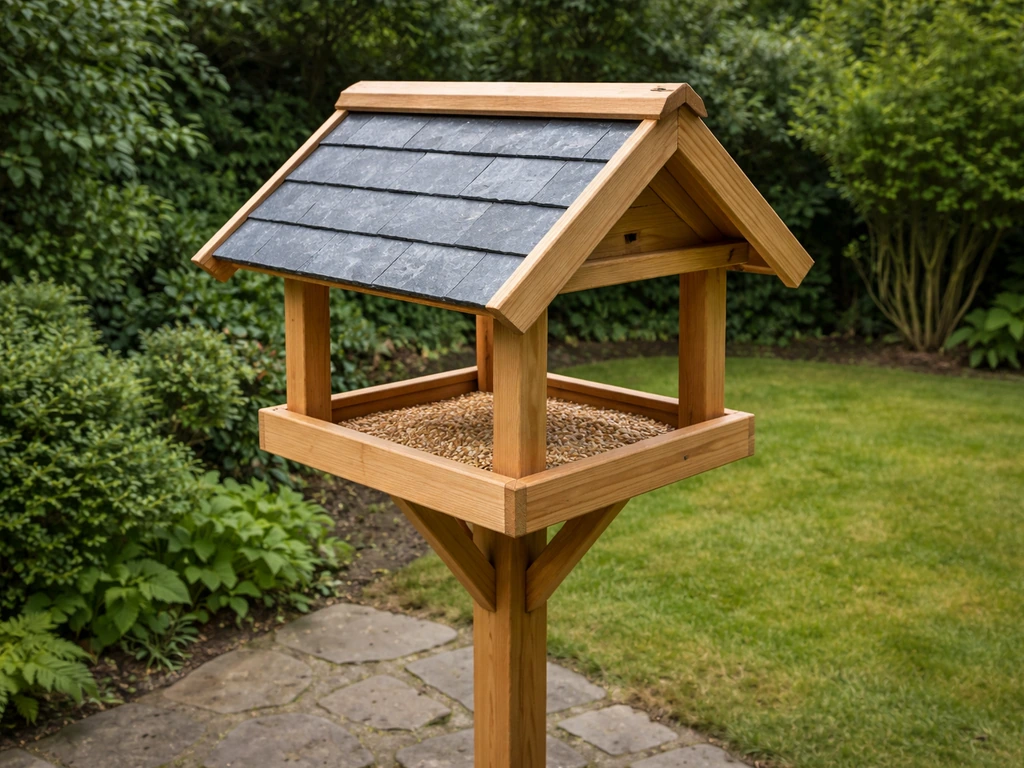
Yes, you can absolutely build a bird table with a roof in a weekend, with basic tools and a modest budget. The roof is not just a decorative touch either. It is the single most practical upgrade you can make to a feeding station, keeping food dry, reducing waste, and encouraging birds to visit even in miserable weather. This guide walks you through the whole build from scratch, including a specific version for a slate roof, plus all the waterproofing, drainage, and placement details you need to actually get birds using it.
How to Build a Bird Table With Roof: DIY Guide

Marcus Thornton
16 Apr 2026
Why a roof makes such a difference
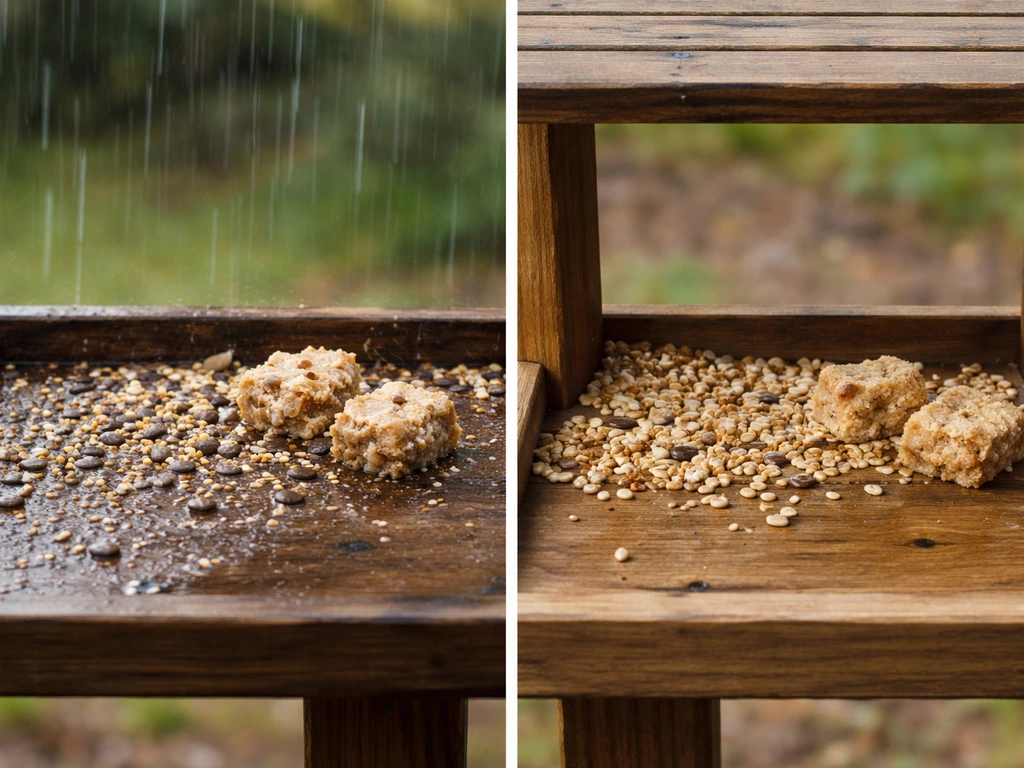
An open bird table looks charming, but in practice it is a soggy mess half the time. Rain soaks seeds within minutes, turning them into a clumped, mouldy lump that birds will ignore entirely. Suet goes soft and rancid faster in wet conditions too. Birds are not being fussy when they skip a wet feeder, they are being sensible. Wet, spoiled food is genuinely bad for them, and they know it.
A roof fixes this directly. It keeps the feeding surface dry so seed stays loose, suet stays firm, and food lasts significantly longer between top-ups. That means fewer wasted refills for you and a more reliable food source for the birds, which is what turns casual visitors into regulars. There is also a subtler benefit: the shelter a roof provides gives smaller, more nervous birds a sense of cover while they feed. Species like dunnocks, robins, and wrens are much more willing to linger when they have overhead protection. If you want to attract a wider range of birds, a roof is not optional, it is essential.
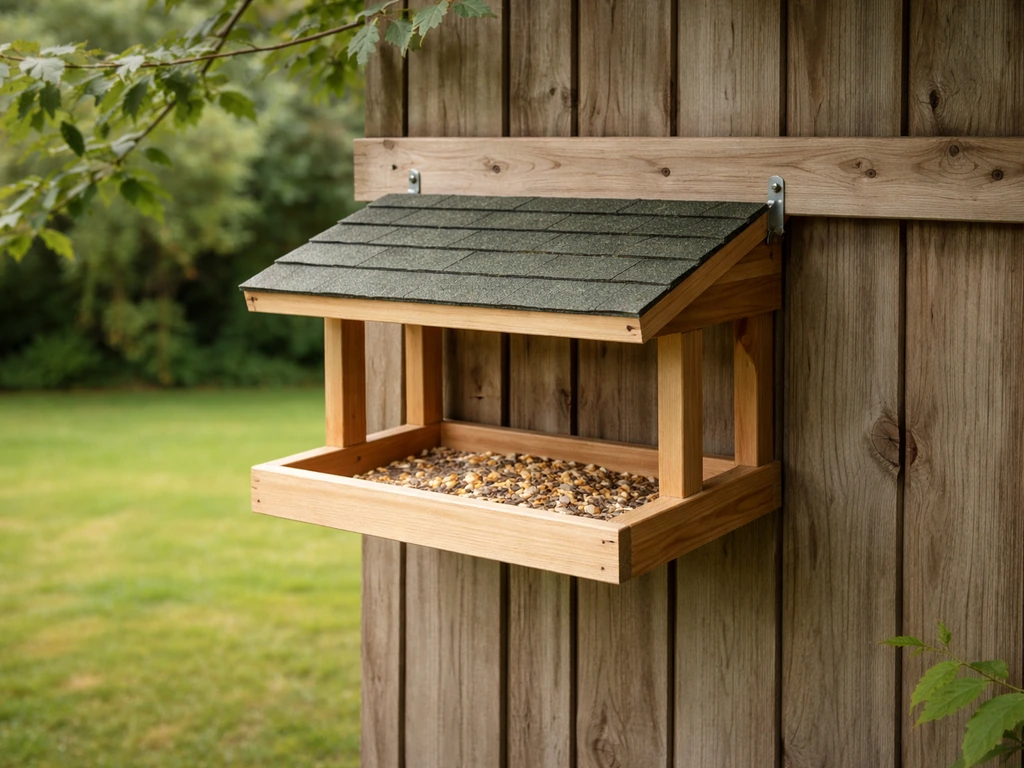
One thing worth knowing from experience: a flat roof directly above the tray is not always enough. Horizontal wind-driven rain can still soak the food from the sides. A good overhang of at least 3 to 4 inches beyond the tray edge on all sides handles this properly. Keep that in mind as we go through the design.
Picking your design and roof style
Before you cut anything, you need a clear picture of what you are building. The core structure is always the same: a post or leg assembly, a tray platform, and a roof mounted above it on uprights. Where designs diverge is mainly in the roof shape and material. The two most practical options for a DIY build are a simple apex (pitched) roof in wood or exterior-grade plywood, and a slate roof for a more traditional, longer-lasting finish.
Standard pitched wood roof
This is the go-to for most first builds and the one I'd recommend if you are new to this. Two roof panels cut at a matching angle, joined at a ridge, and given a coat of exterior paint or wood stain. It goes together quickly, it is easy to repair, and the materials cost almost nothing if you have scrap wood around. If you want to explore how to keep costs right down, making a bird table out of scrap wood is a perfectly viable route for this style.
Slate roof
A slate roof gives a bird table a handsome, cottage-garden look and it genuinely outlasts painted wood by years, sometimes decades. Natural slate is self-draining, frost-resistant, and needs zero maintenance once laid. The trade-off is weight and cost. Proper natural slate is heavy, which means your post and base need to be more substantial, and offcuts or reclaimed slates from a roofing yard are the budget-friendly way to source them. Reclaimed slate is usually fine and often cheaper than new. Avoid synthetic slate tiles for this project because they tend to be thicker and harder to cut cleanly without specialist tools.
Both roof types use the same tray and post build below the roof line, so you can decide on the roof style after you have the main structure sorted. The step-by-step below covers the full build with notes on where the slate version diverges.
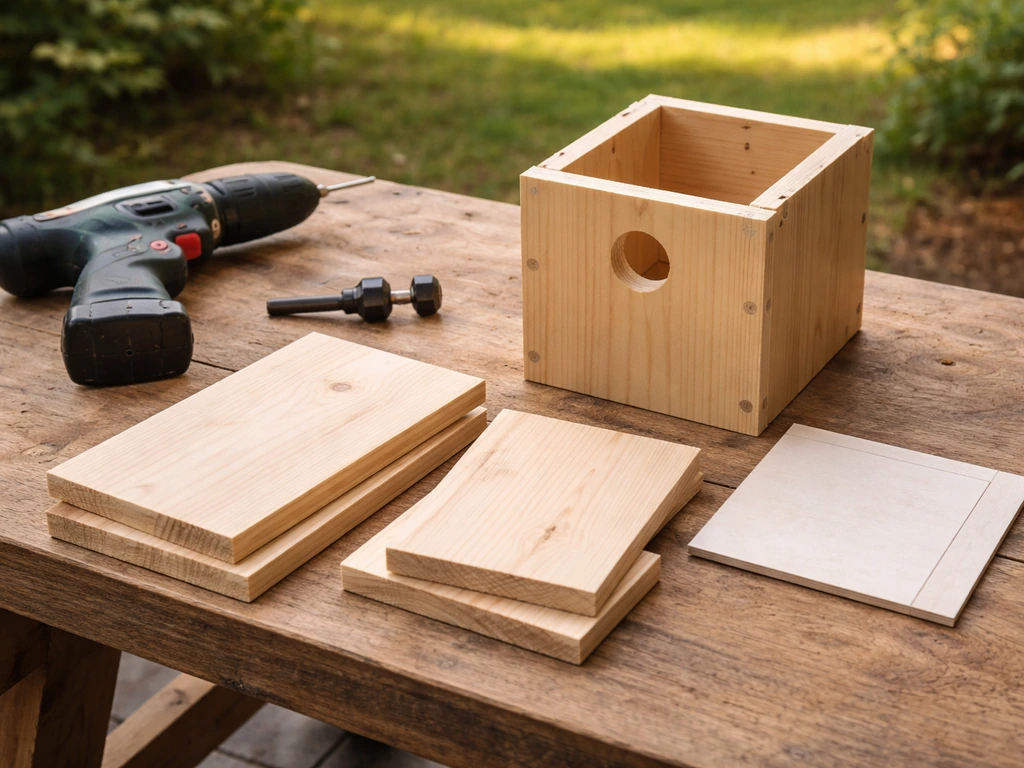
What you need: materials and tools
Here is a practical list for a standard roofed bird table with a 40 cm x 50 cm tray, mounted on a single post at roughly 1.5 m height. Adjust dimensions to suit your space. The slate roof section lists additional materials separately.
Main structure materials
- 1 length of 75 mm x 75 mm treated timber post, 180 cm long (for the main support post)
- 1 sheet of 18 mm exterior-grade plywood, at least 60 cm x 70 cm (for the tray base)
- 2 lengths of 50 mm x 25 mm roofing batten or softwood strip, 120 cm each (for tray edging/rim)
- 4 lengths of 25 mm x 25 mm square dowel or softwood, 60 cm each (for the roof uprights)
- For a wood roof: 2 pieces of 6 mm or 9 mm exterior plywood cut to your roof panel size, plus a ridge strip of 25 mm x 25 mm timber
- For a slate roof: a sub-deck of 9 mm exterior plywood cut to the same panel size, plus 6 to 10 reclaimed natural slate tiles (around 20 cm x 30 cm each), roofing nails, and waterproof roofing felt or self-adhesive flashing tape
- Galvanised screws: box of 50 mm and a box of 30 mm
- Exterior wood glue
- Exterior wood paint or preservative stain (non-toxic, bird-safe when dry)
- Coarse sandpaper (80 grit)
- Concrete mix or a steel post spike for ground anchoring
Tools
- Hand saw or circular saw
- Drill/driver with wood bits and countersink bit
- Tape measure and pencil
- Speed square or try square
- Spirit level
- Clamps (at least 2)
- Hammer
- Slate cutter or angle grinder with a diamond disc (for slate version only)
- Paintbrush
If you do not own a slate cutter, a hire shop will have one for a daily rate. An angle grinder works too but creates dust, so wear a mask. For the wood version, everything on this list is standard kit you may already own.
Building it: step by step
Work through these stages in order. Each one builds on the last, and rushing ahead usually means fixing things later.
Step 1: Cut and prep all your timber
Measure and cut everything before assembly starts. This sounds obvious but skipping it is how you end up with a wonky table. Cut your tray base from the plywood. Cut the four rim strips to form the border around the tray edge (these keep food from blowing off). Cut the four uprights that will support the roof above the tray. Cut your roof panels last because their exact size depends on how wide your uprights sit. Sand all cut edges smooth, especially the tray surface where birds will be standing.
Step 2: Assemble the tray
Attach the rim strips around the perimeter of the plywood tray base using exterior glue and 30 mm screws. Leave a gap of about 10 mm at each corner of the rim. These gaps are drainage slots and they are not optional. Without them, rainwater pools on the tray and you are back to soggy food even with a roof. The rim should be about 20 to 25 mm tall, enough to stop seed rolling off without creating a deep bowl that traps moisture. Once assembled, drill 4 to 6 additional drainage holes through the flat base with a 10 mm bit for good measure.
Step 3: Fix the tray to the post
The cleanest method is to attach a timber block (a 10 cm offcut of the same 75 mm x 75 mm post) to the underside centre of the tray, then drill down through this block into the top of the main post and secure with two long 100 mm screws. This gives a solid, stable connection. Alternatively, screw a cross-brace of two timber strips in a T or X shape under the tray, then mount that to the post. Either way, check it is level with a spirit level before the glue sets.
Step 4: Fit the roof uprights
Position your four square-section uprights at the corners of the tray, inside the rim. Screw them down through the tray base from below (pre-drill to avoid splitting) and angle a screw in from the side at the base for extra rigidity. These uprights carry the weight of the roof, so make sure they are vertical. Check each one with your speed square. At the top of each upright, cut a slight angle (the same pitch as your intended roof) so the roof panels sit flush.
Step 5: Build and fit the roof frame
For both the wood and slate versions, you need a basic roof frame. Cut two horizontal rails to span between each pair of uprights along the long sides of the tray. Screw these rails to the tops of the uprights. Then cut a central ridge piece to run along the apex between the two pairs. This ridge piece sits above the two rails and is the top of your roof triangle. The pitch angle for a bird table roof does not need to be precise, somewhere between 30 and 45 degrees gives good rain runoff. Mark your panel angles off the actual frame rather than calculating them, it is faster and more accurate.
Step 6a: Fitting a wood roof
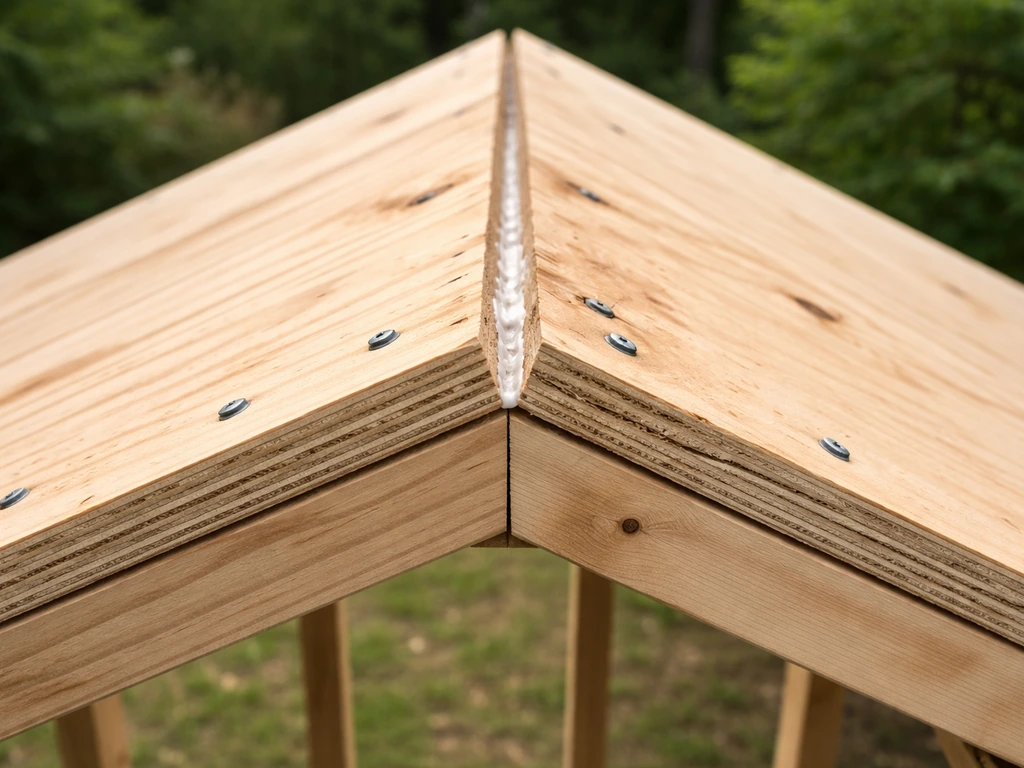
Cut two plywood panels to sit on either side of the ridge. Apply exterior glue along the ridge piece and along the top edge of your side rails, then screw the panels in place with 30 mm screws at roughly 15 cm intervals. The panels should meet at the ridge with a tight joint. Run a bead of exterior waterproof sealant along the ridge joint on the inside to stop any moisture tracking through. On the outside, screw or glue a capping strip over the ridge to cover the joint and shed water cleanly. Sand the whole roof smooth and apply two coats of exterior paint or wood preservative stain.
Step 6b: Fitting a slate roof
First, fit your plywood sub-deck panels to the frame exactly as described above for the wood roof. This gives you a solid base for the slates. Next, staple or tack a layer of self-adhesive flashing tape or traditional roofing felt over the entire sub-deck, starting from the bottom edge and overlapping each row by at least 5 cm as you work upward. This layer does the waterproofing work even before a single slate goes on, which is your insurance policy against cracked or shifted tiles later.
Now lay your slates. Start at the bottom edge and work upward, overlapping each row by at least one third of the slate length. Nail each slate with two roofing nails through pre-drilled holes (pre-drilling prevents cracking). Cut any slates to fit using your slate cutter or angle grinder. At the ridge, you have two options: bed a row of cut slates as a capping using flexible roofing sealant underneath them, or use a proprietary ridge cap flashing. The sealant method works fine for a garden structure at this scale. Once complete, the slate roof needs no painting or treatment.
Waterproofing, drainage, and weatherproofing details
The roof handles most of the weather, but a few finishing details make the difference between a table that lasts two seasons and one that lasts ten years.
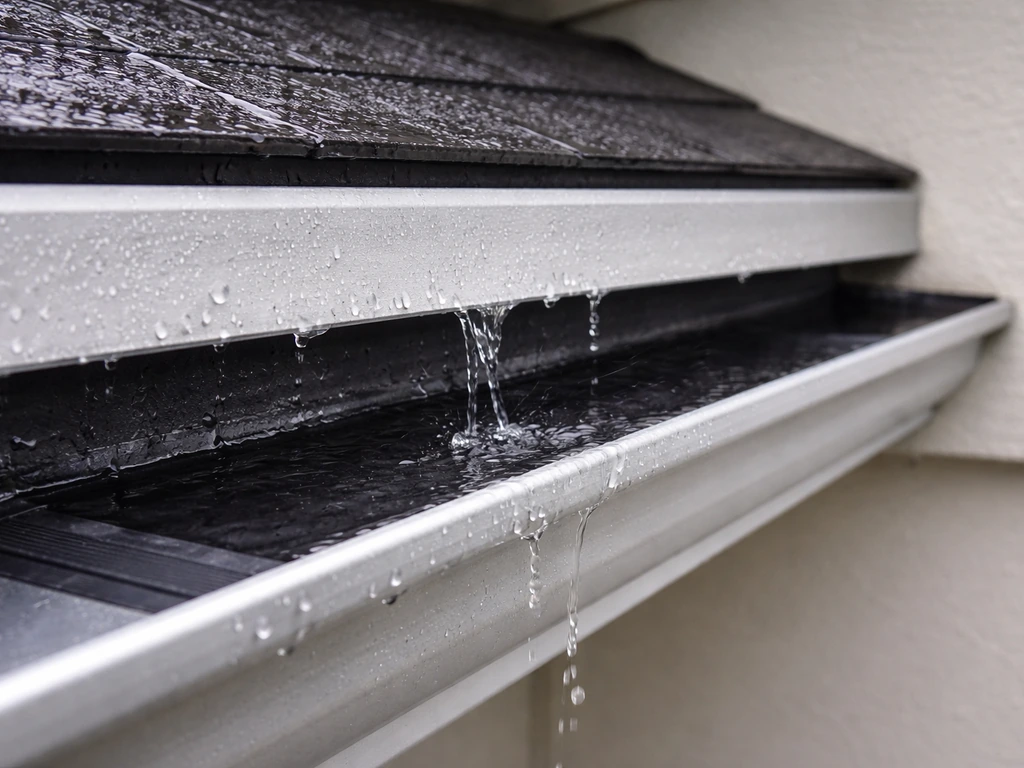
Overhang is the biggest one. Your roof panels should extend at least 75 to 100 mm beyond the tray edge on all four sides. This is what actually keeps wind-driven rain off the food. A roof that sits directly over the tray with no overhang is barely better than no roof at all in blustery conditions.
For the wood roof, the ridge joint is the most vulnerable point. Seal it from inside with waterproof exterior sealant and cap it on the outside with a batten or a piece of aluminium angle trim. Check it each spring and re-seal if there are any cracks.
The tray drainage gaps at the rim corners and the drilled holes in the base need to stay clear. Check them every couple of months and clear any debris or seed husks blocking them. A blocked drainage hole turns your tray into a puddle in minutes.
Treat all exposed timber, including the post and the underside of the tray, with an exterior wood preservative. Make sure the product you use is water-based and non-toxic to wildlife once dry. Oil-based products are fine too but take longer to dry fully before the table is safe to use. Give the whole structure at least 48 hours to off-gas before introducing food and birds.
If you want to make the tray surface even more weather-resistant, a sheet of thin galvanised mesh stapled to the tray base (under the food) improves airflow beneath seed and speeds up drainage. It also makes cleaning much easier, which matters more than people realise. A dirty tray spreads disease between birds quickly.
Wood roof vs slate roof: which should you choose?
| Feature | Wood Pitched Roof | Slate Roof |
|---|---|---|
| Build difficulty | Beginner-friendly | Intermediate (slate cutting needed) |
| Cost | Low (under £10 in materials) | Moderate (reclaimed slate: £15–£30+) |
| Weight on structure | Light | Heavier, needs sturdier post |
| Longevity | 5–10 years with maintenance | 20+ years, virtually no maintenance |
| Appearance | Cottage/rustic (with paint) | Traditional, natural stone look |
| Repair if damaged | Easy, replace plywood panel | Moderate, replace individual slates |
| Waterproofing | Needs sealant and paint upkeep | Excellent from day one with felt underlay |
| Best for | First builds, tight budgets | Long-term garden feature, heritage gardens |
My honest recommendation: if this is your first bird table build, go with the wood roof. It is faster, cheaper, and you will learn a lot about the structure that makes a slate version easier if you want to tackle it later. If you are building something you want to leave in the garden for the next twenty years and never think about again, spend the extra time and money on the slate. It really does look better with age, not worse.
Placing it, securing it, and making it bird-friendly
A beautifully built bird table that sits in the wrong spot will be ignored. Placement matters as much as the build itself, and this is where a lot of first-timers go wrong.
Position the table in a spot that is open enough for birds to see approaching predators from all sides, but within 2 to 3 metres of shrubs or hedging that they can dash into if alarmed. Completely open lawns feel exposed and stressful for smaller birds. Completely surrounded by dense cover is a gift to cats. The sweet spot is somewhere in between.
Speaking of cats, they are the number one threat to birds at ground-level and low feeding stations. If you have neighbourhood cats, the post height matters. A 1.5 m post is a minimum, but 1.8 m is better, and fitting a smooth metal collar or a cone-shaped baffle around the post 60 cm from the ground makes it almost impossible for a cat to climb. For a full breakdown of anti-cat design options, how to make a cat proof bird table covers this in detail and is worth reading before you finalise your post setup.
Securing the post properly is non-negotiable. A wobbling or leaning bird table scares birds off and is a safety hazard. The two standard methods are setting the post in a concrete base (dig a hole at least 45 cm deep, pour in mixed concrete, keep the post plumb while it sets overnight) or using a steel post spike hammered into firm ground. Post spikes are faster but less stable in soft or sandy soil. For heavier slate-roofed versions, always go with the concrete base. For tips on long-term stability options, how to secure a bird table is a practical companion guide.
Keep the table away from fences and overhanging branches that cats or squirrels can use as launching pads. A gap of at least 2 metres from any horizontal surface a cat could jump from is the general rule.
Once it is up, put out a small amount of food for the first few days rather than loading it up. Birds are cautious around new structures and a modest offering that disappears quickly signals to other birds that the spot is active. Mealworms, sunflower hearts, and grated mild cheese are reliable first-day foods that attract a broad range of species.
Clean the tray at least once a week with a mild disinfectant solution (dilute one part bleach to twenty parts water, rinse thoroughly and dry before refilling). After wet weather, clean bird feeders more often and remove seed and hulls around the feeding area to help prevent moldy or spoiled food [clean bird feeders more often after wet weather](https://www. fws. gov/sites/default/files/documents/2025-01/01.
29. 2025-learn-more-about-bird-feeding-vyfwc. pdf). PetMD also recommends cleaning bird feeders regularly, and sooner when conditions are wet or when visibly sick birds have been exposed [cleaning bird feeders regularly when conditions are wet](https://www.
petmd. com/bird/feeding-birds-in-your-backyard/).
Tweaks and variations worth knowing about
Once you have the basic roofed bird table sorted, there are some useful variations to consider depending on what you want to achieve. If you want to attract smaller garden birds specifically, such as blue tits, coal tits, and goldfinches, a smaller tray with narrower uprights discourages larger species from dominating the table. There is more on this in the guide to making a bird table for small birds, which covers tray sizing and perch design in useful detail.
Pigeons are the other common frustration. They are smart, bold, and will clear a tray in minutes. Adding a wire cage around the roof uprights with gaps of around 65 mm allows smaller birds through while blocking most pigeons and collared doves. For a full approach to this problem, how to make a bird table pigeon proof gives you the practical design options.
If you do not have space for a post-mounted table or want to feed birds on a balcony or in a small garden, a hanging version is a solid alternative. How to make a hanging bird table covers the specific design adjustments needed when the structure is suspended rather than fixed.
And if you are finding this project so enjoyable that you want to add a birdhouse alongside your feeding station, beginner simple bird house plans are a natural next step and use a very similar set of tools and materials.
For anyone who wants to nail the fundamentals of the tray and post structure before adding the roof complexity, the core walkthrough in how to make a simple bird table is a good reference to have open alongside this guide as you build.
FAQ
Can I waterproof or line the tray, and still keep drainage working?
Yes, but only if the drainage is still built in. If you line the tray or use a plastic pan, you still need (1) corner gaps or slots so water can escape, and (2) drainage holes in the tray base. Otherwise the roof simply keeps rain off top while water collects underneath, and birds will still avoid a damp tray.
Will I get condensation under the roof if the design is fully enclosed?
Use a loose door-style fit, not a tight one. Add an overhang, but also leave the sides open enough that wind can blow across the roof underside. If you fully enclose the roof with no vents, condensation can form and drip down, especially in colder months.
How often do I need to repaint or re-seal a wood-roof bird table, and what about slate?
For the timber roof, recoat before the first signs of cracking or peeling, usually every 2 to 4 years depending on sun exposure. Slate roofs do not need paint, but the ridge area and any capping trim should be inspected yearly, resealed if you see hairline gaps, and checked for loose fasteners.
What’s the best fix if wind-driven rain still reaches the tray?
Make the roof wide enough to block sideways rain, then avoid placing the table where trees or shrubs funnel wind toward it. If your only possible spot is exposed, increase the overhang slightly beyond 75 to 100 mm (for example, closer to 120 mm) and ensure the roof pitch is at the higher end of 30 to 45 degrees for better runoff.
How can I tell if my post setup is stable enough before birds arrive?
Do a quick shake test and a level check before the first refill, then again after heavy weather. If the post wobbles even slightly, birds will hesitate. For a slate-roof build, concrete bases are the safest option, because the extra roof weight makes instability more noticeable.
How do I choose the right height and clearance so I can clean it easily?
Set the roof so it clears when you reach in to clean and refill, then keep the tray accessible enough that you can remove debris without tipping wet seed. Many first builds put the tray too high or too close to a boundary, so plan around cleaning access, not just bird height.
Is it safe to use any exterior wood treatment on a bird table?
Avoid treated offcuts unless the treatment is suitable for wildlife. Many garden preservatives are fine once dry, but some wood chemicals are not. Use an exterior wood preservative labeled water-based or non-toxic to wildlife once cured, and wait the stated dry and off-gassing time before adding food.
Can I clean the tray with disinfectant every week without harming birds?
Yes, if you use a wildlife-safe disinfectant and keep it dry afterward. A mild bleach dilution can work for weekly cleaning, but you must rinse thoroughly and let the tray dry completely. Do not leave residual cleaner in drainage holes or on the rim gaps.
What changes help attract smaller birds without adding a whole new build?
Small birds often do better with an obstacle-free feeding surface, but large birds will still dominate if the opening is too roomy. If you want to reduce bully species, use narrower uprights and a tray depth that limits big footholds, and consider mesh airflow underneath so seed does not clump.
Will a pigeon guard also work on a roofed bird table, and how should it be positioned?
Pigeons can still use a roofed station because they can access from above and from the sides. A cage or guard should wrap the lower portion around the uprights (with gaps around the smaller-bird size you target) and must not create sharp edges or trap birds. Check fit during windy weather, since guards can shift.
What should I feed during the first week to confirm the roof is doing its job?
If you want a fast start, try foods that do not turn into a sticky mass when wet, like sunflower hearts and mealworms, then switch to other foods once you know the roof and drainage are performing. Avoid high-fat suet in the first days if you see any dripping during heavy rain, since even partial wetting can make it unpleasant for birds.
My tray still gets moldy, what should I check first besides cleaning?
If you see mold or clumping, do not just clean it and refill. First, clear drainage holes, check that corner rim gaps are open, and confirm the roof overhang is sufficient on the windward side. Then reduce the amount you add until you are sure the tray stays dry between top-ups.
If I build the wood roof now, can I later convert it to slate?
Most DIY builds can handle it, but the tools and materials differ. Slate adds weight, so if you choose slate later, you may need uprights and the post base upgraded to match. Also, confirm the roof frame is rigid enough for slate nailing, and use proper roofing underlay over the sub-deck.
How do I make sure an anti-cat baffle cannot be climbed or slid upward?
For garden structures, a metal post collar or baffle placed at the correct height helps, but placement and mounting matter. If the baffle can be slid up, cats will eventually reach it. Ensure it is tight, smooth, and secured so there are no climbable seams under the baffle.
Next Articles

How to Make a Bird Table Pigeon Proof: DIY Fixes
Retrofit and build tips to stop pigeons landing and feeding on a bird table with baffles, guards, and clearances.
Beginner Simple Bird House Plans: Easy Build Guide
Beginner simple bird house plans with build-ready cuts, sizes, tools, and setup tips to attract backyard birds safely.

How to Build a Chimney Swift Bird House DIY Guide
Step-by-step DIY plans to build a chimney swift bird house, with correct dimensions, placement, and weatherproofing for