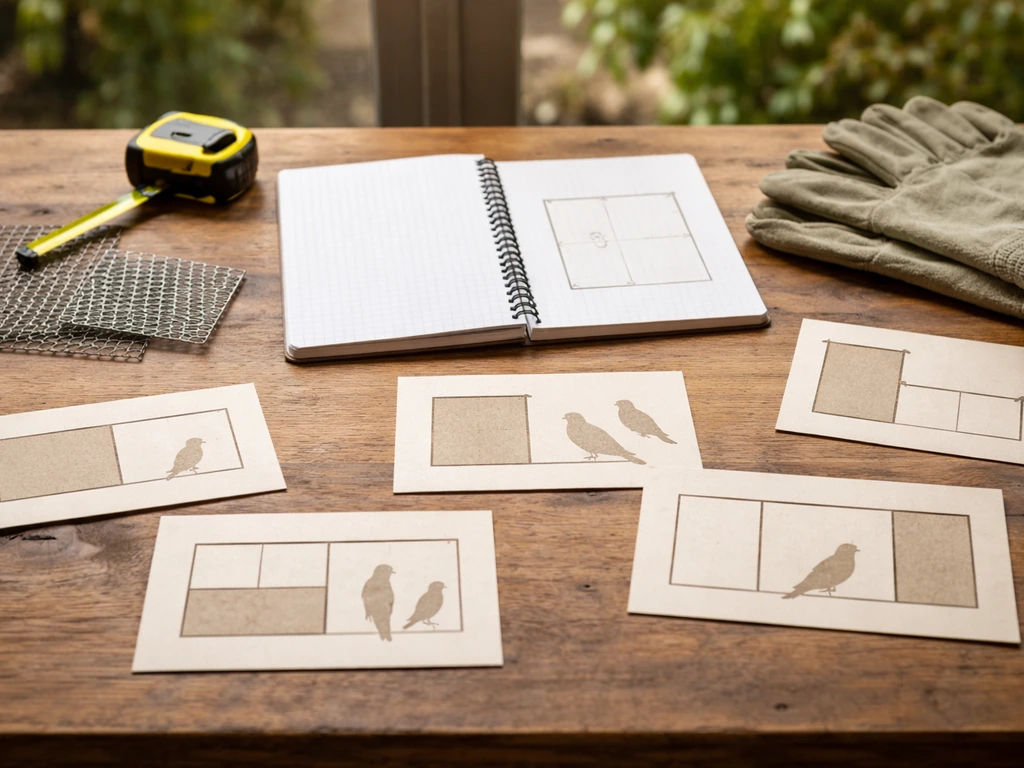
Building a bird aviary in Australia is genuinely achievable with basic tools, a weekend or two, and the right materials. The short version: frame it with treated timber or steel, clad it in galvanised welded mesh, bury the base mesh in a trench to stop foxes digging under, put a weatherproof roof over at least half the structure, and add a safety entry passage so birds can't bolt out the door. Everything else is just detail work around those five fundamentals. If you're still deciding what kind of setup to build, our guide on how to build a bird room walks you through the key planning, materials, and safety basics.
How to Build a Bird Aviary in Australia: DIY Guide

Marcus Thornton
12 May 2026
Planning your aviary: species, space, and goals
Before you cut a single piece of timber, decide what you're building for. A finch colony needs completely different dimensions than a pair of cockatiels or a group of lorikeets. Getting this backwards is the most common mistake I see, and it's a painful one to fix once everything is bolted together.
Australian councils and state codes publish minimum dimension tables, and these are worth reading even if you plan to go bigger. Queensland's Aviculture Code of Practice specifies a minimum height of 1,800 mm and minimum floor areas that scale with bird size. Logan City Council spells out minimum outdoor aviary dimensions for one pair of birds and notes that sizing increases with every additional bird added. The Avicultural Society of Australia's budgerigar fact sheet is even more specific: at least 60 cm high, 7,200 sq cm of floor area for the first bird, then an extra 3,600 sq cm per additional bird. For finches, a practical rule of thumb from Australian retailers is roughly 12 cm of aviary length per bird, with width at least half the length.
My honest advice is to ignore the minimums and build at least 50% larger than the code requires. Birds in cramped spaces stress quickly, feather-pluck, and get sick. A walk-in aviary you can actually stand inside is also far easier to clean, maintain, and enrich than a small box you have to reach into. If space is tight, go taller rather than shorter, vertical flight and height give birds a genuine sense of security.
Also think about your goal. Are you breeding, keeping pets outside, attracting native species, or creating an enrichment garden structure? Breeding set-ups need nest box attachment points, darkness control, and quieter zones. A display aviary for native birds needs natural perching, more planting space, and a design that lets you watch without disturbing. Nail down the goal first and the design almost writes itself.
Choosing the right spot: sun, wind, and predator pressure
Site selection matters more than almost any design decision. Get this wrong and you'll be fighting the environment constantly. In Australia, the main threats to site quality are the afternoon sun (which can cook a poorly positioned aviary), strong westerly or southerly winds depending on your state, and predator traffic, which in this country includes foxes, goannas, snakes, neighbourhood cats, and even aggressive birds like butcherbirds attacking through the mesh.
- Orient the back wall or solid-roof section to face south or southwest to block cold winter winds and reduce afternoon heat exposure.
- Position the aviary so it gets morning sun and afternoon shade — birds benefit from early sun for warmth and vitamin D, but afternoon shade prevents heat stress.
- Avoid placing the structure directly under overhanging trees. Leaves and droppings fall in, wild birds perch above and stress your birds, and branches can damage mesh in a storm.
- Keep at least 1 metre clearance from fences or walls that predators can climb, jump from, or use as a vantage point.
- Check the site for drainage. Wet, boggy ground under an aviary means disease risk and smells fast — choose slightly elevated or well-drained ground, or plan to lay gravel and concrete.
Predator-proofing starts at the site level. If the spot you want is in a high-fox or high-goanna corridor (and in most of regional and suburban Australia, it is), plan to use a concrete perimeter or buried mesh skirt as a non-negotiable part of the design. You can add extra security later, but retrofitting buried mesh under a finished aviary is genuinely horrible work.
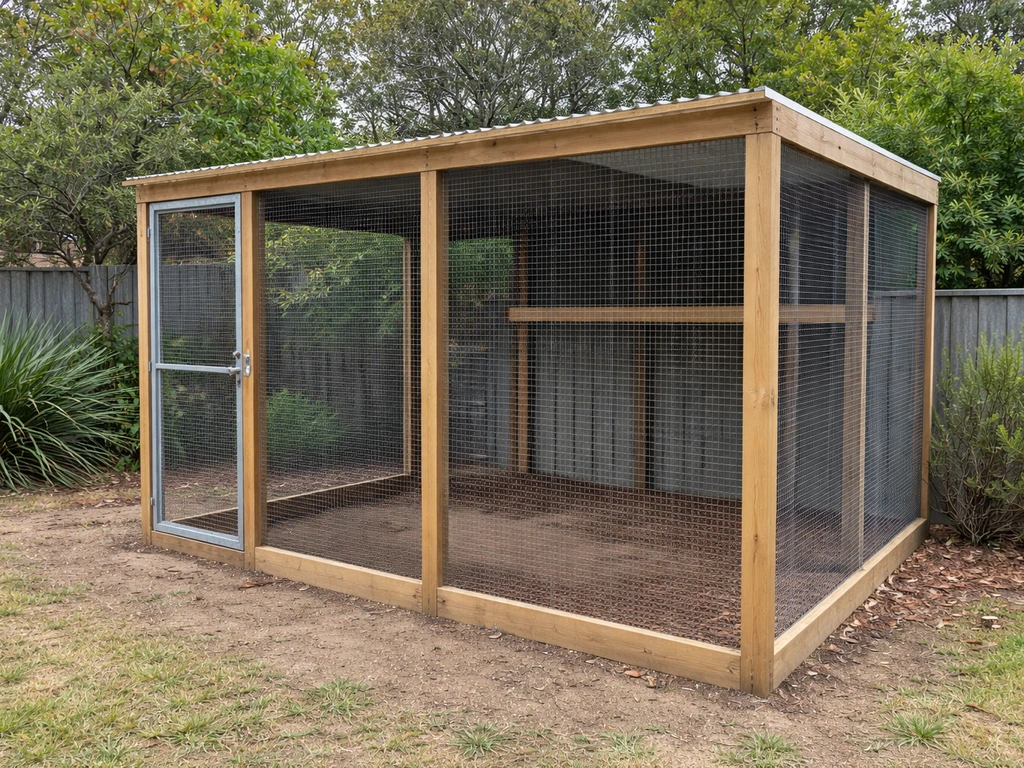
Design options: walk-in aviaries vs enclosed runs
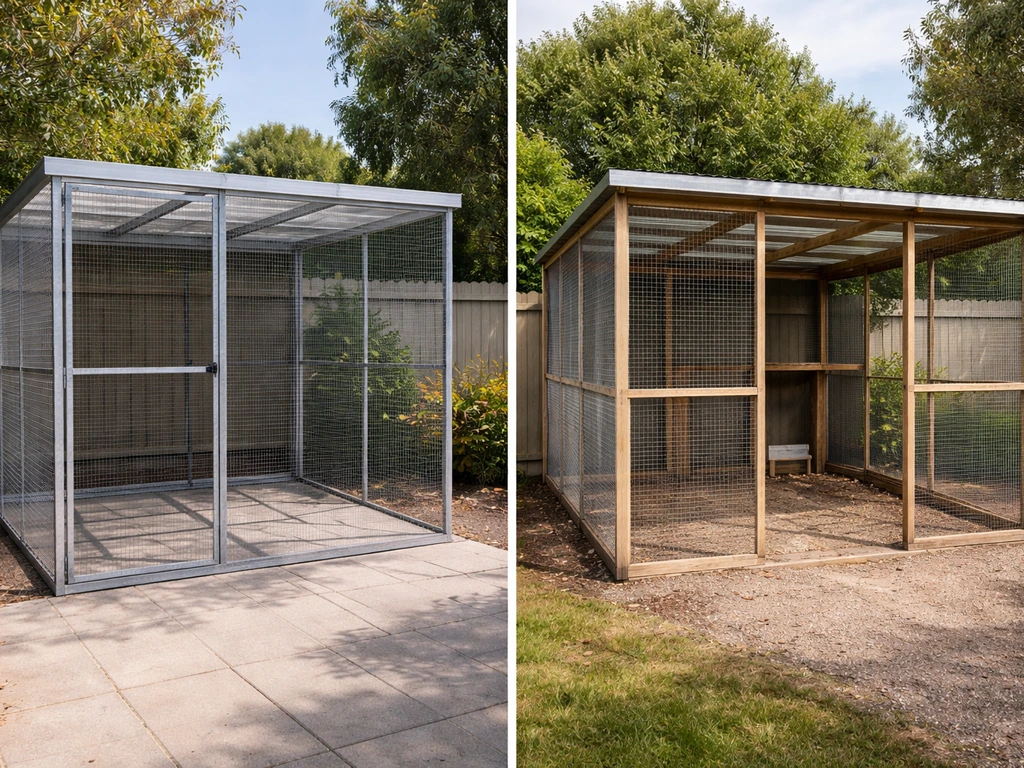
There are two main aviary styles that work well in Australian backyards: the walk-in aviary and the suspended or enclosed run. Each has real advantages depending on your birds, your budget, and how much time you want to spend cleaning.
| Feature | Walk-In Aviary | Suspended / Enclosed Run |
|---|---|---|
| Typical size | 2m x 3m or larger, 2m+ height | Smaller, often 1m x 2m or custom |
| Who it suits | Multiple birds, breeders, native species | Small colonies, finches, canaries |
| Cleaning ease | High — you walk in with a rake/hose | Moderate — slide-out trays or external access |
| Predator defence | Needs buried skirt or concrete perimeter | Raised off ground helps; still needs secure mesh |
| Cost to build | Higher due to framing and size | Lower — less material, simpler frame |
| Flight space | Excellent | Limited to moderate |
| DIY difficulty | Moderate — basic carpentry needed | Easy to beginner-moderate |
For most Australian DIY builders who want to keep a genuine colony of birds long-term, the walk-in design is the better investment. Yes it costs more upfront, but the cleaning access alone saves you hours every month. If you're starting small with a pair of finches or canaries, an enclosed run is perfectly fine and is a great learning project. You can always build a larger walk-in later once you've got the hang of mesh work and framing.
Dimensions worth aiming for
For a walk-in aviary housing small to medium birds like budgies, finches, or quail: 3m long x 1.8m wide x 2m high is a solid starting point that gives you compliance headroom above most state minimums and enough room to work inside comfortably. For larger parrots or cockatoos, scale up to at least 4m x 2m x 2.1m and use heavier gauge mesh throughout. Always plan the height so you can stand without ducking, it makes every cleaning and enrichment session much less of a chore.
Materials and hardware: what to buy before you start
Choosing the wrong mesh or timber is the number one way a DIY aviary falls apart within two or three years in the Australian climate. Between coastal salt air, high UV, and wildlife pressure, you need materials rated for outdoor longevity, not just materials that look solid in the hardware store.
Mesh
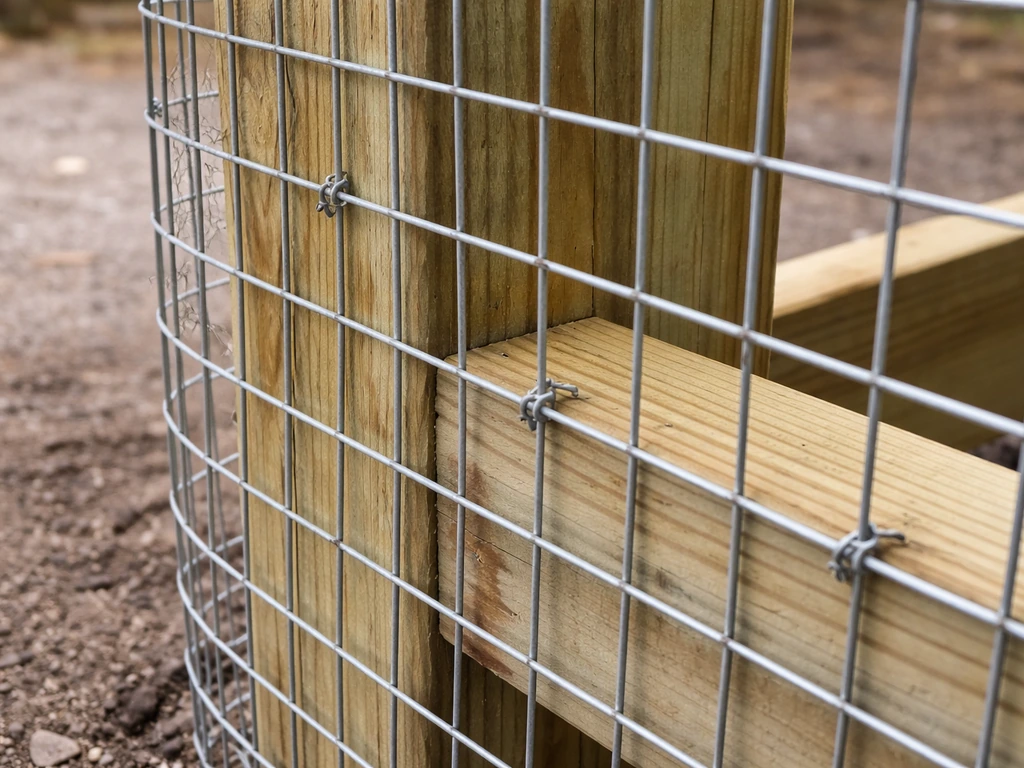
Hot-dip galvanised welded wire mesh is the standard for Australian aviaries and for good reason, it's affordable, available everywhere, and holds up to weather. Avoid cheap electro-galvanised mesh; the coating is too thin for outdoor use and rust appears within a year or two. For small birds like finches, use 12 mm x 12 mm aperture with 1.24 mm wire diameter. For budgies or mid-sized parrots, 12.7 mm x 25 mm or 25 mm x 25 mm with 1.24 mm wire is standard. For larger parrots that chew and impact the mesh, step up to heavier gauge welded mesh and consider stainless steel for high-stress panels, it's more expensive but essentially maintenance-free. For the lower 300–400 mm of the aviary walls, use fine 12 mm x 12 mm mesh specifically to block snakes, which can squeeze through standard apertures.
Framing
Treated pine (H3 or H4 rated for in-ground contact if your posts go into soil) is the most budget-friendly framing choice and easy to work with standard tools. Steel RHS (rectangular hollow section) is stronger, lasts longer, and is worth the extra cost for a permanent structure, especially in coastal areas. If you go steel, use galvanised or powder-coated sections and seal any cut ends to prevent rust creep from the inside out. A typical frame uses 90 mm x 45 mm treated pine for uprights and rails, with 1.8m post spacing as a maximum to prevent mesh sag.
Hardware and fixings
- Stainless steel or hot-dip galvanised staples, screws, and bolts throughout — standard zinc-plated hardware rusts and stains quickly outdoors.
- Positive-locking door latches — spring latches or padlockable barrel bolts that can't be nudged open by a curious bird, possum, or goanna.
- Galvanised hinge sets rated for outdoor use.
- Shadecloth (50–70% density) for partial roof and side covering to manage heat without blocking airflow.
- Corrugated Colorbond or polycarbonate roofing sheets for the solid shelter section.
- Concrete mix or compacted gravel for the floor/perimeter.
- Cable ties and J-clips for mesh joining (as a supplement to staples, not a replacement).
Floors
You have three realistic options: bare compacted earth with a gravel topping, concrete, or fine river sand over compacted gravel. Earth floors feel natural and birds love foraging in them, but they're harder to keep clean and offer no protection against burrowing predators unless you lay buried mesh beneath. Concrete is the easiest to clean and the most predator-proof, but it needs a drainage slope and is harder on birds' feet, so you must provide plenty of natural perches and substrate areas. Sand over gravel is a great middle-ground: it drains well, is easy to rake and replace, and is gentler on feet.
How to build it: foundation to final touches
This build sequence assumes a walk-in aviary on a treated pine frame. This build sequence assumes a walk-in aviary on a treated pine frame, which aligns with the practical steps in how to make bird aviary guides. A bird garden is a natural way to combine an aviary or enclosure with plantings, shade, and shelter so native birds stay comfortable and active. If you are looking for a Minecraft build instead, search for the same basics like a secure enclosure, placement, and ventilation so your birds stay safe in-game how to make a bird aviary in minecraft. This kind of step by step build sequence is the same approach you can use when planning how to build a bird hotel This build sequence assumes a walk-in aviary. Adjust the steps for steel framing or an enclosed run, but the order stays the same: ground work first, frame second, mesh and roof third, door last. Once you have your frame and mesh in place, you can follow the same build sequence to work through roofing, doors, and predator-proofing step by step frame second.
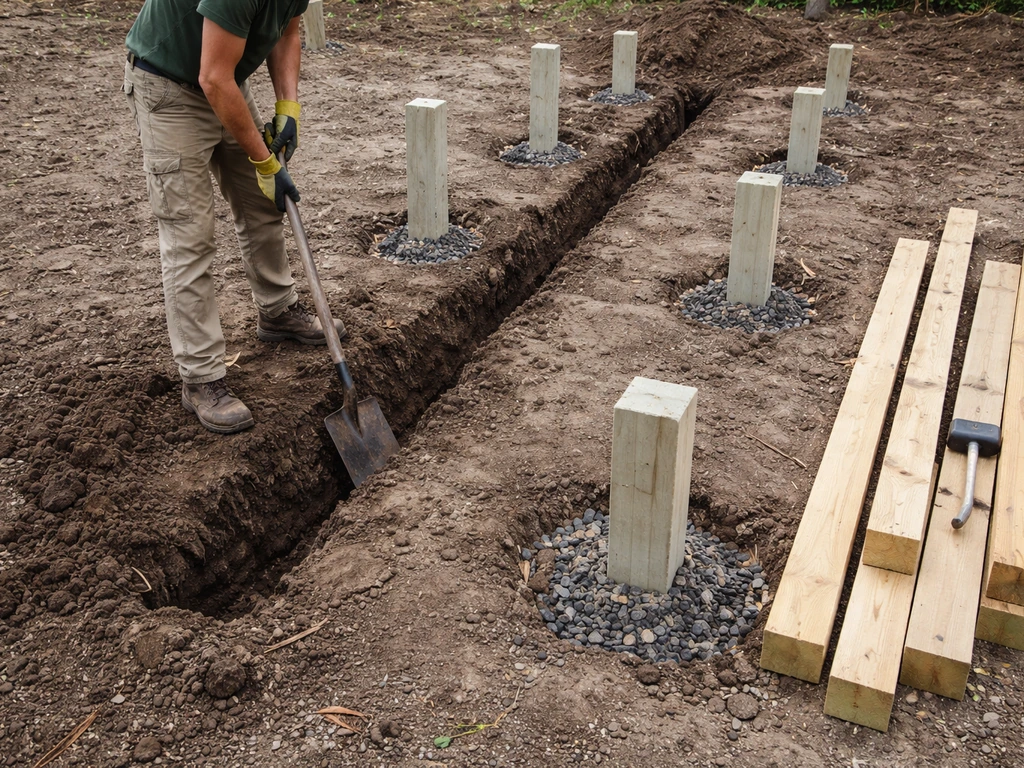
- Mark out and excavate the perimeter. Dig a trench around the footprint about 300 mm deep and 150 mm wide. This is where your anti-predator mesh skirt will go — do this before anything else.
- Lay your perimeter base or concrete footings. For a timber frame, set your corner and intermediate posts in concrete footings at the correct spacing (1.5–1.8m max). Let concrete cure for at least 48 hours before loading weight on posts.
- Install the anti-predator mesh skirt. Cut your base mesh panel so it extends at least 300 mm down into the trench and angles outward at the bottom by another 150 mm (an L-shape in the ground). Backfill and compact. Any fox or goanna digging at the base hits the buried mesh and can't get through.
- Build and square the main frame. Attach horizontal rails at the top, mid-height, and bottom of each wall panel using structural screws or bolts. Check for square with a diagonal measurement — both diagonals must be equal. A frame that isn't square will make mesh attachment and door fitting a nightmare.
- Attach the mesh to all four walls. Start at the bottom and work up, pulling the mesh tight as you go and stapling every 100–150 mm with a heavy-duty staple gun or hand staples. Overlap mesh joins by at least one full aperture and fix with stainless steel wire or J-clips. For large parrots, sandwich the mesh between timber battens and screw through — it prevents them pulling it free.
- Frame and install the roof structure. A lean-to pitch (sloping from front to back or side to side) is easiest to build and sheds rain well. Cover the back half or two-thirds with solid roofing (Colorbond or polycarbonate) for the weather shelter zone. Cover the remaining section with heavy-duty shadecloth or fine mesh to allow light and airflow. Make sure roofing screws and washers are properly sealed to prevent leaks.
- Fit the door and safety entry passage. A safety passage (also called a double-door entry or service corridor) is a small enclosed anteroom between the outside and the main aviary. You open the outer door, step in, close it behind you, then open the inner aviary door. This stops birds from bolting past you when you enter. The passage only needs to be about 600–800 mm deep, but it is genuinely essential. Fit the inner door so it swings into the aviary (not outward) and hangs tight with no gap at the base.
- Install latches and check all openings. Fit positive-locking latches on both passage doors. Check every mesh join, corner, and roof edge for gaps larger than the aperture size of your mesh. Birds and predators find gaps you never noticed — do a slow, thorough inspection before putting any birds inside.
- Lay the floor substrate. Compact gravel and top with 50–80 mm of river sand, or pour a concrete slab with a slight drainage slope. Add a concrete lip or timber board at the door threshold to retain substrate.
- Add perches, enrichment, and shelter. Use natural branches of varying diameters rather than dowel — different diameters exercise foot muscles and feel natural. Arrange perches so birds can perch at multiple heights and the droppings fall clear of food and water stations below.
Making daily access and maintenance actually practical
An aviary you can't easily clean is an aviary you'll eventually resent. Build maintenance access into the design from the start and you'll spend 15 minutes a day keeping things excellent instead of a miserable afternoon every few weeks doing damage control.
Cleaning and waste management
With a walk-in aviary on a sand floor, daily maintenance is simple: rake the top layer of sand to break up and aerate droppings, remove soiled material, top up the sand every few weeks, and do a full sand replacement two to three times a year. In concrete-floored aviaries, hose the floor regularly toward the drain point. NSW DPI guidance and ACT Government bird-keeping rules both emphasise removing droppings and food scraps consistently as a sanitary and welfare obligation, not just because it smells, but because wet, soiled ground is a direct disease vector. Position food and water stations over easy-clean areas, not over the best perches.
Feeding and water
Hang feeders and seed hoppers at a height that keeps food off the ground and out of the waste zone. NSW DPI's Code of Practice specifically flags disease risk from ground feeding, so don't just scatter seed on the floor. Use at least two water stations positioned in different parts of the aviary, birds get stressed fighting over a single drinker. Include a shallow bathing dish or tray at ground level, separate from the drinking water. A 30–40 cm terracotta saucer works perfectly and is easy to tip, scrub, and refill. Replace bath water daily.
Perches and enrichment
Replace or rotate natural branch perches every couple of months or whenever they become heavily soiled. Branches from natives like bottlebrush, grevillea, and eucalyptus are safe and birds love to strip the bark. Avoid treated timber for perches, the preservative chemicals are not safe for birds to chew. Add enrichment items like foraging toys, hanging greens, and nesting material stations seasonally. If you're building for breeding, plan separate nesting box mounting points at height before the aviary is finished, retrofitting hooks and brackets inside a mesh aviary while birds are present is genuinely fiddly.
Seasonal adjustments
In summer, hang extra shadecloth on the west-facing wall and ensure water is refreshed more frequently. In winter, check that the shelter zone is truly draught-free at floor level, a gap under a roofing sheet that's fine in March will be brutally cold in July in Victoria or a cool-climate zone. Along with being draught-free, a well-insulated bird aviary keeps temperatures stable so your birds stay comfortable in both heat and cold. Queensland's Code of Practice notes that shelter must be draught-free while still allowing birds access to rain and sunshine, which is good guidance wherever you are. You're not boxing them into a sealed shed, you're giving them a reliable weatherproof refuge they can move in and out of.
Compliance basics and predator rules to know in Australia
Australian bird-keeping law operates at both the state and local council level, and the rules apply whether you're keeping exotic pet birds or native species. Here's what you actually need to check before you build and before you put birds inside.
State codes of practice
Every state has its own code. In Queensland, the Code of Practice for Aviculture is the primary document, and it sets minimum dimensions, shelter requirements, and welfare standards. QLD Government officers can inspect your facility at any time under wildlife permit conditions. In NSW, DPI's Code of Practice No. 4 covers the keeping and trading of birds and includes enclosure design, door safety, and food and water obligations. In South Australia, the United Bird Societies publish Exotic Bird Guidelines that include specific door, passageway, and latch requirements. In the ACT, public health officers can direct you to remove birds if keeping them creates insanitary conditions. Look up your specific state code before finalising your design, dimensions and requirements do vary.
Council and local rules
Your local council may require a development application or have limits on aviary setbacks from boundaries, maximum size without a permit, and the number of birds you can keep. Logan City Council in QLD, for example, has published its own minimum aviary dimensions table that aligns with the state code. Check your council's website or call the planning desk before you build, a quick 10-minute conversation can save you a costly order to pull it down.
Native birds
Keeping native Australian birds almost always requires a state wildlife licence or permit, with stricter enclosure standards and record-keeping obligations. Even if you're building an aviary designed to attract wild natives, rather than confine them, check whether any netting or full enclosure around wild birds crosses into a licensing requirement in your state.
Predator protection as a welfare obligation
Predator-proofing isn't just about protecting your investment, in most Australian states, failing to provide adequate protection from injury or distress is a welfare issue under animal protection legislation. The buried mesh skirt, fine snake-proof mesh on the lower walls, and secure door latches described in this guide aren't optional extras. They are the baseline standard of care. Lou Lou Bells' Australian aviary guides and Burke's Backyard both document the buried-mesh-skirt method as the expected standard for outdoor aviaries, and it's worth treating it that way.
One last practical note: photograph your completed aviary from multiple angles and keep a simple build record (materials used, dimensions, date completed). If you ever need to demonstrate compliance to a council officer or state inspector, that documentation makes the conversation straightforward. It also helps enormously if you ever want to expand the structure or build a second aviary, and once you've built one, there's a good chance you will.
FAQ
Do I need a permit or development approval before I build an aviary in Australia, even for a small back-yard setup?
Often yes. Many councils treat aviaries as an outbuilding, so you may need a development application depending on size, setbacks from boundaries, and how close it is to neighbouring properties. Call your local planning desk with your planned dimensions and you can usually confirm requirements before you spend money on framing and mesh.
What’s the minimum safety spacing I should plan for doors and entry passages to stop birds escaping?
Build an entry that works like an airlock. That means one door closed before the other opens, plus enough passage width for you to move comfortably without reaching through mesh. If you use spring latches, add a secondary catch so a bird bump or wind gust cannot pull the door open.
How do I stop foxes or goannas from getting under a walk-in aviary if I already buried mesh?
Burying the perimeter mesh is the baseline, but focus on continuity. Make sure the buried skirt is continuous around corners, no gaps remain at the gate line, and the skirt ties into the frame so it cannot lift or separate. After heavy rain, re-check any edge sections for soil erosion that could expose mesh.
Can I use cheaper electro-galvanised mesh and “upgrade later” if it starts to rust?
Not usually, because the early failure is often loss of coating, then rapid rust at stress points (corners, frame joins, and tensioned runs). If you plan for long-term durability, stick to hot-dip galvanised welded mesh, and for the lowest wall panels where snakes are a risk, use the finer aperture specifically for that band.
What’s the safest way to choose mesh aperture sizes for different bird types and avoid injury?
Match aperture size to both bird head size and the ability for feet or beaks to slip through. For active chewing birds, also consider that mesh can flex, so choose the heavier gauge and reinforced panels instead of only changing hole size. When in doubt, choose the smaller aperture and stronger wire rather than relying on bird behavior.
How high should the aviary be if I want to walk inside comfortably for cleaning?
Plan height so you can stand upright near feeding and roof areas, not just at the middle. A practical approach is to design so your torso stays above the roofline when you are reaching to clean corners. Extra height also improves ventilation and makes it easier to hang feeders and service water stations.
What’s the best floor option in Australia if I want low mess without sacrificing bird health?
Sand over compacted gravel is a common middle-ground because it drains and stays easier to rake than earth. If you choose concrete, add enough natural perches and substrate areas, because concrete is harder on feet and the surface stays wet longer without proper drainage slope.
How often should I replace or disinfect perches, feeders, and bathing dishes in a DIY aviary?
Use a schedule based on how quickly surfaces foul. Branch perches usually need rotation when they become heavily soiled or are stripped unevenly. For feeders, clean weekly at minimum, and for bathing trays, refresh daily and scrub after each refill because standing bath water can build up pathogens quickly.
Is it safe to use nest boxes year-round if I’m breeding, or should I only add them seasonally?
For most breeding species, add nest boxes when you are ready to manage breeding, not continuously. Year-round nesting hardware can lead to stress or unwanted breeding attempts. If you need mounting points, install them before closing the aviary so you do not have to retrofit brackets through mesh while birds are inside.
What should I do about wind and rain so my birds have shelter but still get airflow?
Design a shelter zone that is draught-free at floor level but still ventilated, with openings positioned to avoid direct wind blast. Avoid sealing the aviary like a shed. Check the shelter in both summer afternoon sun and winter gust conditions, because small gaps under roofing can become major cold spots.
How do I manage heat in a west-facing aviary without starving birds of light?
Add shade where it blocks the harshest afternoon sun, often on the west wall or roof edge, and keep at least one side that receives gentle light. Increase water capacity and ensure drinking points are placed so birds do not crowd one area. Shadecloth should be tensioned and secured so it does not flap in wind, since flapping can startle birds and damage mesh attachments.
Are food and water stations really placement-sensitive, or is any spot inside the aviary fine?
Placement matters. Put water and food over easy-clean zones away from the main perch lines so waste does not drop directly into water sources. Also use at least two water stations in different parts of the aviary to reduce crowding and fighting, which can lead to stress and injury even in calm bird species.
What documentation should I keep to show compliance if a council or wildlife officer inspects my aviary?
Keep photos from multiple angles after completion, a simple build record with dimensions and dates, and a list of materials including mesh type, wire gauge, and how the buried skirt and door latches were installed. If you ever expand, update the record so an inspector can verify changes against your original plan.
Next Articles
How to Build a Bird Condo: Step-by-Step DIY Plan
Step-by-step DIY bird condo plans for target species, safe materials, proper placement, ventilation, predator guards, an
How to Build a Bird Hotel: DIY Step-by-Step Guide
Step-by-step DIY bird hotel build guide with sizes, materials, ventilation, drainage, predator-proofing, and maintenance
How to Build a Bird Garden: Step-by-Step DIY Guide
Step-by-step DIY how to build a bird garden: location, plants, feeders, water, nesting shelters, and maintenance for rea