You can build a safe, functional bird aviary from scratch in a weekend with basic tools, some timber, and the right wire mesh. Whether you're housing a few budgies, a pair of cockatiels, or a mixed flock, the process is the same: plan the size, pick a smart location, build a solid frame, enclose it with the right mesh, then set it up so your birds actually thrive inside it. This guide walks you through every step, start to finish.
How to Make a Bird Aviary: DIY Setup From Start to Finish

Marcus Thornton
10 Apr 2026
Planning and sizing your aviary

Size is the first thing to nail down, and the honest answer is: bigger is almost always better. That said, you need a realistic minimum to work from. The Merck Veterinary Manual lists a minimum cage size of 20 × 20 × 30 inches for budgerigars, cockatiels, lovebirds, and parrotlets, and that's for a single bird in a basic enclosure.
Merck Veterinary Manual guidance for pet birds recommends that the cage be at least one and a half times the bird’s wingspan in all directions so the bird has room to stretch. A proper aviary should give each bird at least three to four times that floor space so they can actually fly short distances, not just hop from perch to perch.
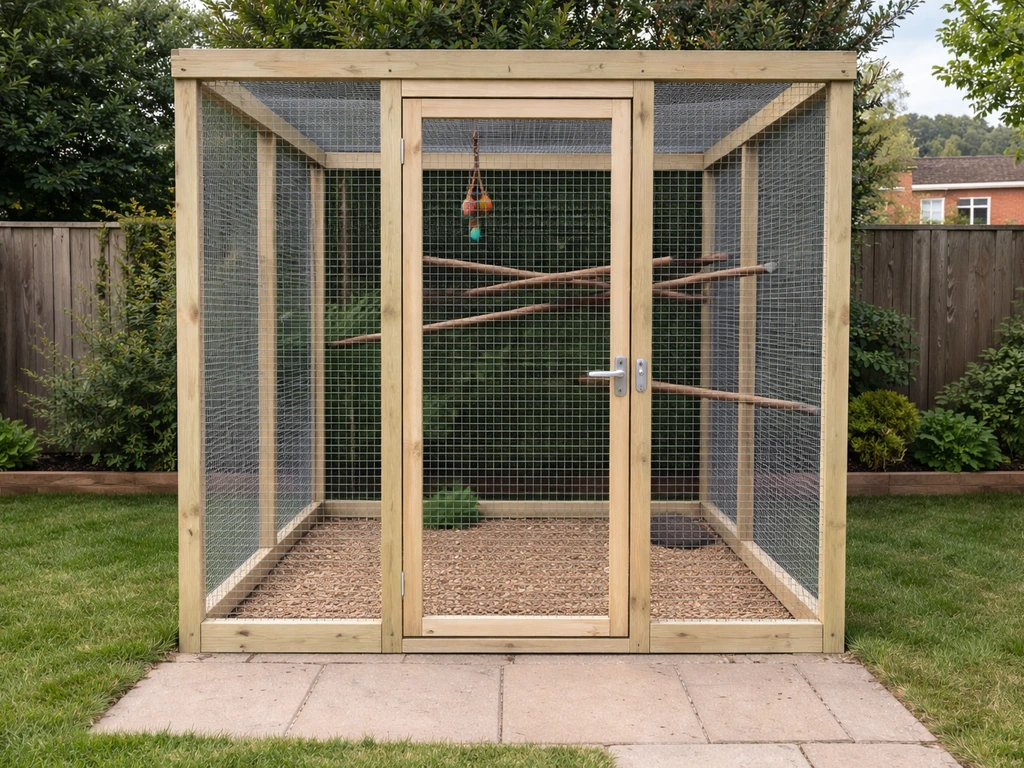
For a small outdoor aviary housing two to four budgies or canaries, a good practical target is roughly 6 feet long × 3 feet wide × 6 feet tall. That gives you an enclosure you can stand inside to clean and manage, while still being buildable in a weekend. Regulatory density guidelines (used in licensed pet housing) suggest a floor area of around 0. 15 m² (about 1.
6 square feet) for up to four budgerigars, with additional space required for each bird beyond that, treat that as your hard minimum, not your target. If you're housing cockatiels or canaries, those same guidelines provide separate per-species floor-area rules, so scale up accordingly. A pair of cockatiels really wants an aviary that's at least 8 feet long so they can get a proper flight path going.
Before you pick up a single board, sketch a simple floor plan and note the number and species of birds you're starting with, plus any you might add later. Build for the flock you'll have in 12 months, not the flock you have today. Overbuilding slightly now is far cheaper than retrofitting a cramped aviary later, trust me, I've done that retrofit and it's not fun.
Choosing the right location and orientation
Location affects your birds' health more than almost any other decision. For outdoor aviaries, the ideal orientation puts a solid wall or weatherproof panel on the north or north-west side (in the northern hemisphere) so your birds have a sheltered corner to retreat to in cold or wet weather. You want morning sun hitting the aviary early, birds love it and it helps dry out any overnight moisture, but avoid full afternoon sun on wire panels in summer, which can turn the enclosure into an oven.
Keep the aviary away from tree branches that hang directly overhead. They look natural but they create two real problems: wild birds perching above will drop droppings into the enclosure (a disease transmission risk), and overhanging branches give predators like cats a launch point. Speaking of predators, position the aviary so it can't be reached by digging animals. Foxes, raccoons, and domestic cats will absolutely test your wire at ground level. A concrete base or a hardware-cloth apron buried 12 inches into the ground around the perimeter solves this.
Basic biosecurity means keeping the aviary isolated from wild bird contact as much as possible, especially the feeding and water areas. If you're building in Australia, climate and predator pressures shift the approach a little, building a bird aviary in Australia involves extra considerations around heat management and native wildlife that are worth reading up on before you finalize your site.
Design options: indoor vs outdoor, single vs multi-bird
Your design choices flow directly from two questions: where is the aviary going, and how many birds will it house? Here's how the main options stack up.
| Design Type | Best For | Key Considerations |
|---|---|---|
| Outdoor walk-in aviary | Larger flocks, finches, canaries, budgies | Needs weatherproofing, predator apron, solid shelter section |
| Indoor bird room | Year-round keeping, parrots, cold climates | Ventilation and lighting are critical; easier cleaning access |
| Compact outdoor panel aviary | 1–4 birds, small gardens, budget builds | Pre-made panels speed build; less flight space per bird |
| Multi-section aviary | Mixed species or breeding pairs | Requires dividing walls and separate access doors |
For most beginners, a single-section outdoor walk-in aviary is the sweet spot. It's straightforward to build, gives your birds real flight room, and is much easier to clean than a small cage-style enclosure. If you're keeping birds indoors long-term, the setup is quite different, building a dedicated bird room involves different ventilation and flooring priorities that go beyond a basic aviary build.
For multi-bird setups where you're housing breeding pairs or separating species, plan dividing walls into your frame from the start. Retrofitting a divider into a finished aviary is doable but annoying. If you ever want to attract and support multiple species in a backyard setting rather than an enclosed structure, it's also worth thinking about creating a bird garden as a companion project to your aviary.
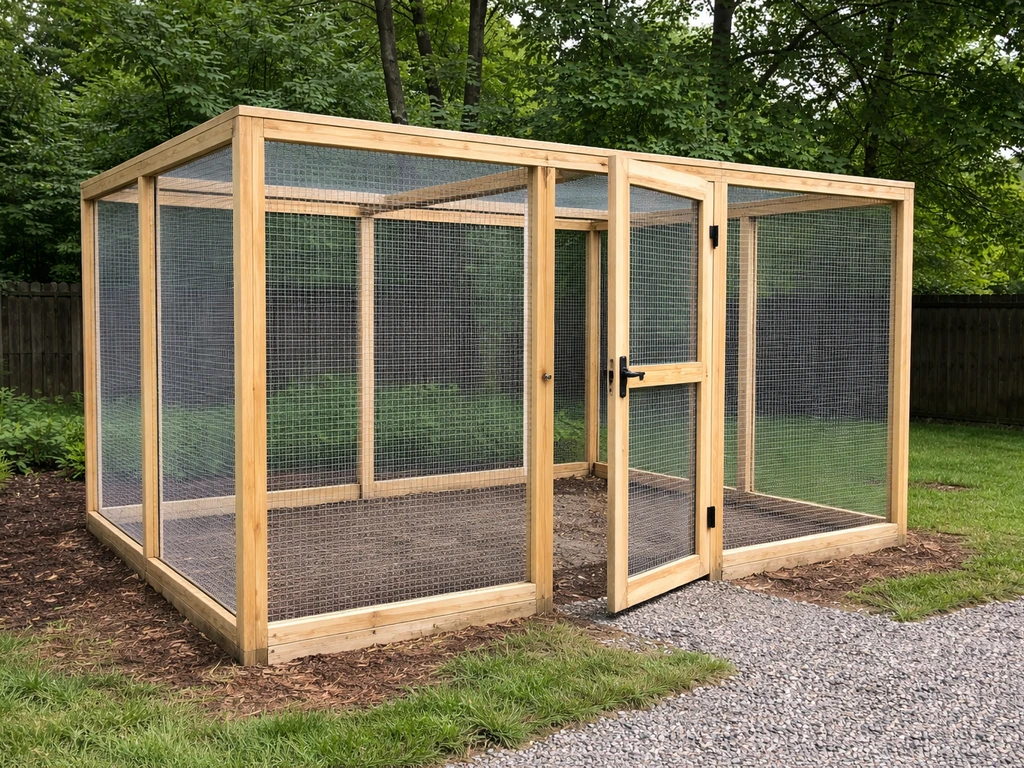
Materials and components checklist
Here's what you actually need to build a standard 6 × 3 × 6 ft outdoor aviary. I've included repurposed and budget options where they make sense without compromising bird safety.
Frame
Pressure-treated 2×2 or 2×4 timber is the standard choice for outdoor frames. It resists rot and holds fasteners well. Avoid creosote-treated wood, the fumes are toxic to birds. Galvanized steel tubing is a step up in durability and looks cleaner, but it costs more and requires different joinery. Repurposed timber from pallet frames or old fence boards can work for the roof and back wall sections as long as the wood isn't painted with lead-based paint or treated with chemicals.
Wire mesh
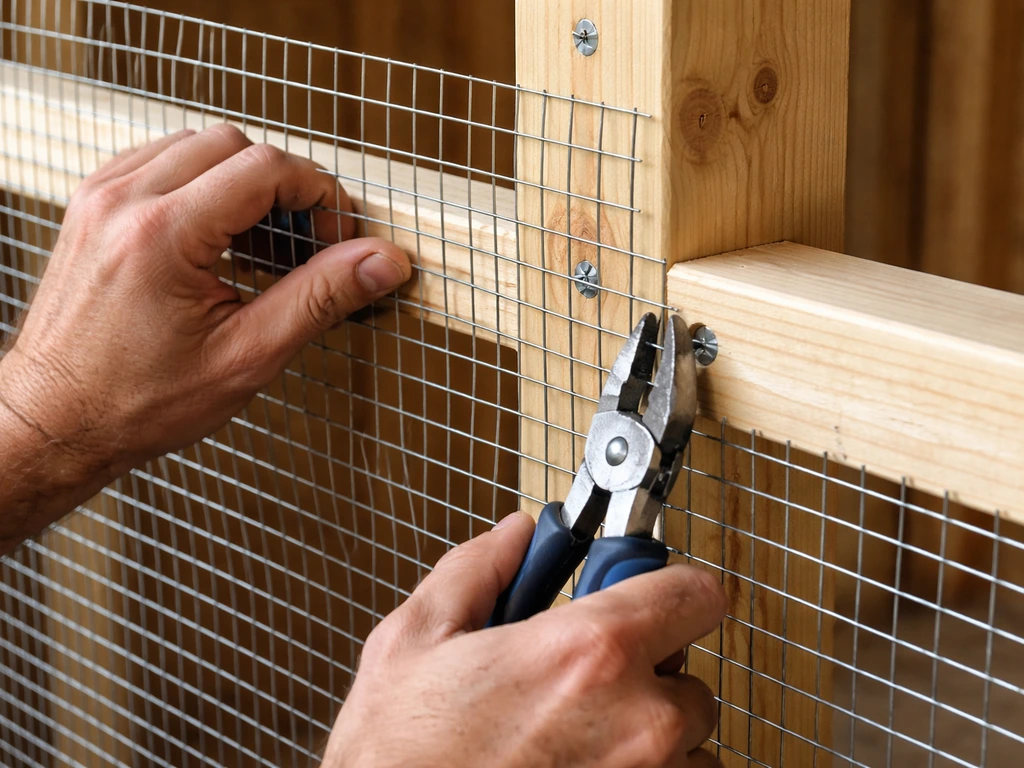
This is where you can't cut corners. Use welded galvanized wire mesh (also called hardware cloth) with a gauge of at least 19 AWG (1.0 mm wire). Mesh opening size is a safety-critical spec: for budgies, cockatiels, lovebirds, and parrotlets, use mesh with openings no larger than 0.5 inches (12 mm) so birds can't get their heads stuck, the same bar-spacing guidance the Merck Veterinary Manual applies to cages translates directly here. For larger birds like cockatiels in flight, 0.5 × 1 inch welded mesh is fine for the main panels. Avoid chicken wire: it rusts fast, the openings are too large for small birds, and it's weak enough for a determined cat to pull apart.
Doors and access points
Plan for at least one full-height entry door (so you can walk in to clean) and a smaller service hatch for feeding without entering the whole enclosure. Doors should open inward so you can check that no birds are near the floor before stepping in. Use heavy-duty hinges and fit a latch that you can operate one-handed. A double-entry system (a small anteroom or "safety porch") prevents escape when you enter, this is a cheap addition to your frame design and worth including from the start.
Flooring
Concrete is the gold standard: easy to hose down, predator-proof, and it doesn't harbor mites the way soil does. If concrete isn't an option, use paving slabs or lay a hardware-cloth apron flush with the ground surface and cover it with a few inches of sand or fine gravel. Avoid bare soil in the long term, it becomes a parasite reservoir. If you go with a raised timber floor, use exterior-grade ply and seal it thoroughly so droppings can't soak in.
Fasteners and hardware
- Galvanized or stainless screws and bolts (no bare steel — it rusts and stains timber)
- J-clips or hog rings plus the appropriate pliers for attaching mesh panels to frames
- Staple gun with heavy-duty 1/2-inch staples as a secondary fastener for mesh (not as primary)
- Exterior-grade wood glue for corner joints in timber frames
- Padlock-style or spring-loaded latches rated for outdoor use
Step-by-step construction workflow
This workflow assumes a simple rectangular walk-in timber-framed aviary. Adjust dimensions to your plan, but keep the sequence the same.
- Mark out and prepare the base. Lay out your footprint with string lines and stakes. Dig or pour a concrete base if using one, or compact and level a gravel layer. Give concrete 48 hours to cure before framing.
- Cut and assemble the base frame. Build a rectangular base frame from your 2×4 timber, screwing corner joints and adding a center support beam for spans over 5 feet. Check for square by measuring diagonals — they should match.
- Erect the corner posts. Cut four posts to your desired height (6 feet is comfortable for walk-in access). Anchor them to the base frame with metal post brackets or notch-and-screw joinery. Check vertical with a level.
- Add top and mid-rail framing. Connect the posts at the top with a perimeter rail, then add horizontal mid-rails at 3 feet on any panel wider than 3 feet. This prevents mesh sag over time.
- Frame the roof. For a simple lean-to roof, add a sloped top rail that drops 4–6 inches from front to back so water drains away. For a gable, cut angled rafters. Cover half the roof with timber boards or corrugated polycarbonate sheeting (the solid sheltered section) and leave the rest as mesh.
- Cut and attach mesh panels. Roll out your welded mesh and cut sections to fit each panel opening with tin snips. Fasten to the frame using J-clips every 4–6 inches along all edges, then add staples between clips for extra hold. Pull the mesh taut before fastening — sagging panels look bad and give predators something to push against.
- Hang the entry door and service hatch. Build door frames as separate sub-frames, hang them with heavy-duty hinges, and install latches. Test the swing and make sure there are no gaps at the frame edges wider than your mesh opening size.
- Install the double-entry porch if included. Frame a small anteroom (roughly 3 × 3 feet) at the entry point with its own outer door. Both doors should never be open simultaneously — this is the single best escape-prevention measure you can add.
- Seal and predator-proof the perimeter. If not on concrete, attach a hardware-cloth apron to the base of the walls and bury or peg it flush with the ground to prevent digging entry.
- Do a full safety check before introducing birds. Walk every seam and edge looking for protruding wire ends (fold them back or cap with silicone), gaps at corners, and any hardware that could trap a foot or beak.
If you want a deeper dive into framing techniques and panel assembly, the full step-by-step guide to building a bird aviary covers construction variations including steel-tube framing and modular panel systems.
Weatherproofing, ventilation, and predator protection
A finished frame and mesh shell is not a finished aviary. Weatherproofing and ventilation are what make it actually livable for birds through all four seasons.
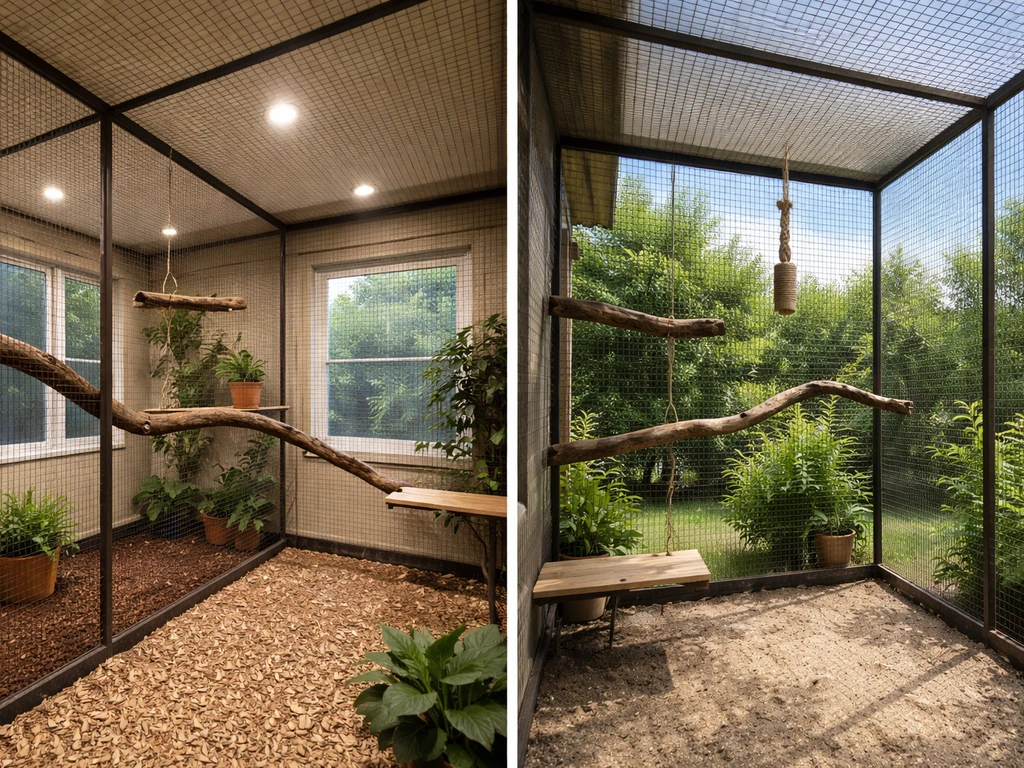
Start with the shelter section. At minimum, one-third of the total floor area should be covered overhead with a solid, weatherproof roof (polycarbonate sheet or timber boarding with roofing felt). Extend this covered zone down one side wall so birds can retreat completely out of wind and rain. Seal the junction between the solid roof panel and the wire panels with flexible silicone or foam strip, this is the most common leak point and it's easy to miss.
Ventilation is critical even in cold climates. Birds need air movement to prevent respiratory problems and control humidity, but they can't handle direct drafts. The solution is to position ventilation openings high in the aviary walls (near the roofline) so air moves across the top of the enclosure without flowing directly over perches and roosting spots at lower levels. In summer, full wire panels on two sides provide enough airflow naturally. In winter, cover exposed wire panels with clear polycarbonate or UV-stable greenhouse film to reduce windchill without eliminating light.
Insulating your aviary properly for cold-climate winters is a project in its own right. If you're dealing with temperatures that regularly drop below freezing, insulating a bird aviary involves specific panel choices and heating approaches that go beyond basic weatherproofing.
Predator protection comes down to two things: mesh strength and gap elimination. As mentioned above, welded hardware cloth beats chicken wire every time. For the roof, double up your mesh or use a solid panel, aerial predators like hawks can damage wire from above, and even a domestic cat jumping onto an unsupported mesh roof can bow it enough to create entry gaps. At ground level, the buried apron is non-negotiable if you're on soil. Check the perimeter every few weeks, especially after heavy rain, which can erode soil away from the apron edges.
Setting up the interior: perches, nesting, enrichment, and cleaning
Perches
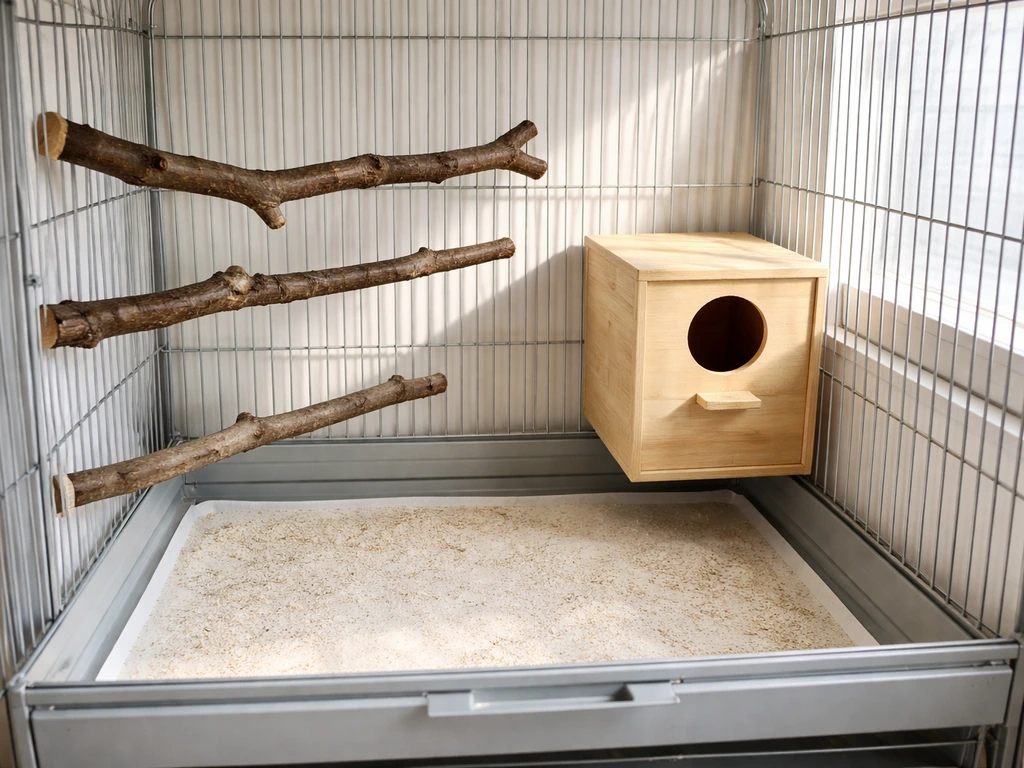
Natural branch perches are better than dowel rod perches because the varying diameter keeps your birds' feet from gripping the same position constantly, which prevents pressure sores. Use hardwood branches (apple, willow, and elder are all good choices) and avoid anything from stone fruit trees like cherry or plum, which contain compounds toxic to birds. Mount perches at multiple heights, with the highest perch at least 8 inches below the roof to prevent head injury. Space them so birds can fly between perches rather than just step across.
Nesting and shelter spots
For breeding pairs, mount nest boxes on the exterior of the aviary frame so you can check and clean them without disturbing the flock inside. Size the entrance hole to your species: budgies need roughly 1.5 inches (38 mm), cockatiels need about 2.5 inches (65 mm). For non-breeding birds, dense leafy branches and small covered ledges serve as retreat points and reduce stress. Avoid overcrowding the interior with accessories, birds need clear flight paths.
Enrichment
Rotate foraging toys, swings, and puzzle feeders every week or two so the environment stays interesting. Scatter seed on the floor occasionally to encourage natural foraging behavior. Live or dried herbs like lavender, chamomile, and basil can be hung inside as both enrichment and mild stress-relief. Keep feeders and drinkers off the floor to reduce contamination, wall-mounted bracket feeders are easy to make from scrap timber and keep food cleaner.
If you want to go further with creative enrichment structures, the concept of a bird condo style build, layered multi-level sections within a single structure, is a great next step once your basic aviary is up and running. Similarly, if you're interested in small-scale structures that support multiple species with minimal individual attention, look into building a bird hotel for inspiration on compact multi-compartment designs.
Cleaning and maintenance routine
An easy cleaning routine starts with smart design choices you make during the build. A concrete or smooth-surfaced floor means you can hose the whole thing down in minutes. Removable tray inserts under feeders catch most of the daily mess. Here's a simple schedule that actually works:
- Daily: Remove uneaten fresh food, refresh water, spot-check the floor for droppings near perches
- Weekly: Full floor sweep or hose-down, wipe down perches, clean feeders and drinkers with a dilute bird-safe disinfectant (avoid bleach directly on surfaces birds will contact)
- Monthly: Check all mesh seams, wire ends, latch hardware, and the buried apron for damage; clean nest boxes if in use; replace any perches showing heavy wear
- Seasonally: Apply a fresh coat of exterior timber sealant to all wooden frame surfaces; check roof seals and reapply silicone where needed
One thing I learned the hard way: don't wait until the cleaning job is huge before doing it. A 10-minute daily tidy prevents the hour-long monthly deep-clean from becoming a full half-day project. Design your door placement so you can hose straight through the aviary with good drainage, and the whole routine becomes genuinely quick.
If you're still in the early research phase and wondering whether a full DIY aviary build is the right scale for you, it's also worth checking out what a dedicated bird aviary in Minecraft looks like as a planning and visualization tool, some builders actually mock up their real-world design in-game first to test proportions and layout before cutting a single board. It sounds a bit unconventional, but it works.
FAQ
How do I decide what wire mesh opening size to use if I’m not sure which species I’ll add later?
Pick the smallest head-size requirement among the species you might add and use that across the whole enclosure. It’s easier to scale up safety than to swap mesh later, because retrofitting wire panels after birds are installed is disruptive and risks imperfect gap sealing. If you plan to add larger birds, consider keeping them in a divided section with mesh chosen for that species.
Is pressure-treated wood always safe for an outdoor aviary frame?
It’s generally preferred for durability outdoors, but use it with the right caution: avoid any timber that contains strong chemical odors or unknown treatments, and do not use painted or coated lumber if you cannot confirm it is bird-safe. After assembly, let fresh timber weather and cure before bringing birds in, and check for flaking residue at joints where birds might chew.
What’s the best way to prevent predators if I can’t pour a full concrete base?
Use a hardware-cloth apron (buried about 12 inches around the perimeter) and combine it with a tightly sealed frame to eliminate floor-level gaps. Also ensure the service hatch and main door frames sit firmly on the same perimeter seal plan, because most predator “wins” happen through small openings at thresholds rather than through the mesh wall itself.
How do I stop wild birds from using my aviary as a perch and spreading disease?
Physically block access points, especially overhead. Add solid roofing over at least the protected third of the floor, keep nearby branches trimmed back from the top perimeter, and locate feeders and drinkers under covered areas so they are less visible to visiting birds. Even with biosecurity measures, treat all outdoor bird-contact as a contamination risk and clean wet areas more frequently.
How can I tell if ventilation is adequate during hot weather?
Look for airflow without direct drafts at perch height. In a well-ventilated aviary, birds move normally between areas and you don’t see heavy condensation at roof corners or persistent dampness near the sheltered section. If you notice heat pooling or sticky humidity, add or adjust high-level openings, increase covered-roof shade percentage, and consider partial windward-side shielding rather than increasing airflow at perch height.
Should perches be placed at the same height throughout the aviary?
No, use multiple heights and spacing so birds can fly short distances between perches. The highest perch should stay sufficiently below the roof to reduce head injury risk, and avoid putting perches directly under roof seams where condensation or debris can fall. Also avoid smooth dowels for long-term use, because uneven natural branch diameters reduce pressure on feet.
What’s the safest way to build an entry door so birds can’t escape?
Install a double-entry system, such as a small safety porch or anteroom, and make doors open inward so you can control the entry zone before stepping deeper. Use a latch you can operate quickly with one hand, and always check the floor level and door gap before stepping in, since panic flight often starts at the threshold.
Can I hose down the aviary like a dog kennel, and will that cause problems?
You can, especially with concrete or smooth floors, but design drainage so water does not pool against the perimeter apron. Plan a slope or confirm that runoff flows away from the buried hardware-cloth area, because repeated pooling can undermine the soil edge and create pathways for moisture and pests.
What’s the right approach to cleaning frequency to avoid parasite buildup?
Do a short daily tidy to keep droppings and spilled feed from accumulating, then schedule a deeper clean less often. The key is not just how often you clean, but removing contamination from feeder and drinker zones promptly, because wet food and dirty drinkers are where most issues escalate. If you see persistent dampness or odor in the sheltered corner, clean and dry that area sooner than your normal schedule.
How do I prevent condensation leaks where solid roof meets wire mesh?
Treat that junction as a critical seal point. Use flexible strip sealing that stays flexible in weather changes, and inspect after rain and after temperature swings, because small seal gaps expand and contract. If possible, overlap panels so water sheds away from wire edges rather than relying on sealant alone.
Is it okay to scatter seed on the floor for foraging?
Yes, but do it strategically. Scatter small amounts and remove leftovers more frequently in sheltered areas, because floor seed can attract pests and becomes damp if it stays under the covered section. Also keep feeders and drinkers off the floor (wall-mounted is easiest) to reduce contamination of the foraging zone.
What nest box placement works best for breeding without stressing the whole flock?
Mount nest boxes on the exterior where you can access, inspect, and clean without entering the main enclosure. This reduces disturbance and lowers the chance of birds bolting when a door opens. Match the entrance hole size to the species so parents can enter safely without creating drafts or exposing chicks.
Next Articles
How to Build a Bird Aviary: DIY Indoor and Outdoor Plans
Step-by-step plans to build indoor or outdoor wood bird aviary, from sizing and airflow to secure doors and finishing.

How to Build a Chimney Swift Bird House DIY Guide
Step-by-step DIY plans to build a chimney swift bird house, with correct dimensions, placement, and weatherproofing for

How to Build an Oriole Bird House: Step-by-Step DIY
Step-by-step DIY for building an oriole bird house with right dimensions, weatherproofing, predator-safe placement, and