Making a bird perch is one of the most beginner-friendly woodworking projects you can tackle, and it's also one of the most useful things you can build for your birds. Whether you're outfitting a backyard aviary, building enrichment for a pet parrot, or just want a natural branch setup that looks great and keeps your bird's feet healthy, you can absolutely build this today with basic tools and the right materials. Here's everything you need to know to do it properly.
How to Make a Bird Perch: DIY Wood Steps and Sizes

Marcus Thornton
5 Apr 2026
Pick the right type of perch before you build anything
Before you cut a single piece of wood, decide what kind of perch you actually need. The main options are: a simple straight wooden perch (attached to a cage or aviary wall), a natural branch perch (cut from a safe tree), a freestanding perch stand, or a rope/flexible perch. For most DIY builds, you're working with either a straight hardwood dowel-style perch, a real branch, or both combined into a stand. Each serves a slightly different purpose.
One thing worth knowing upfront: standard smooth dowel rods are genuinely not the best choice for bird foot health. Avian rescue organizations like STAR St. Louis actually recommend removing dowel rods entirely and replacing them with varied perch types, since the uniform diameter and smooth surface create pressure points on feet over time. That doesn't mean you can't use a round wooden rod in your build, but vary the diameter across multiple perches and avoid making every perch the same size and texture. A mix of thicknesses and surfaces keeps a bird's feet working and flexing properly.
Location is part of this decision too. Think about whether you need a perch inside a cage or enclosure, a wall-mounted perch for a room or aviary, or a completely freestanding T-bar or tree-style stand that can sit on a table or floor. Once you know the placement, the build method follows naturally.
Materials and tools: wood is your best friend here
Wood is the go-to material for DIY perches, and for good reason: it's easy to work with, it's available everywhere, and when you choose the right species it's completely safe for birds. Natural branches are even better because the irregular shape and varying diameter along the branch is exactly what bird feet need. But not all wood is equal, and some choices will actually hurt your bird.
Woods that are safe
Apple and manzanita are two of the most commonly recommended safe woods for bird perches, and for good reason. Apple is relatively soft, easy to cut, and has a pleasant texture. Manzanita is harder, incredibly durable, and has a beautiful natural shape when left as a branch. Pine is also listed as acceptable by many avian resources, as long as it's untreated and properly dried. If you're sourcing lumber from a hardware store, look for kiln-dried untreated pine or poplar. If you're cutting branches from your yard, apple, willow, and elm are generally safe options.
Woods and materials to avoid
Cedar is a hard no. The aromatic oils in cedar that make it smell great to us are genuine respiratory irritants for birds, and it appears on toxic wood lists from multiple avian rescue and veterinary sources. Beyond cedar, stay away from any pressure-treated lumber entirely: the chemicals used to treat it are toxic to birds, and no amount of sealing or finishing makes it safe. The same goes for any wood that has been painted, stained, or treated with preservatives. If you're not 100% sure what a piece of wood has been treated with, don't use it.
Tools you'll need
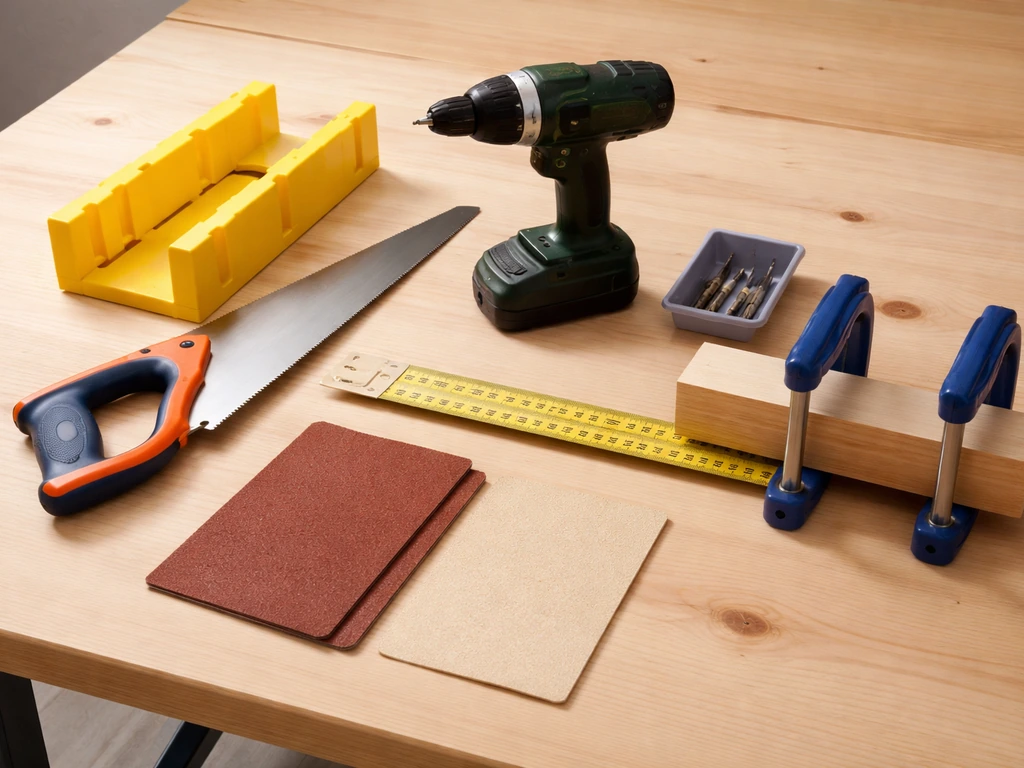
- Hand saw or miter saw (for cutting perch rods or branches to length)
- Drill with bits (for mounting holes and pilot holes in the stand base)
- Sandpaper: 80 grit and 220 grit
- Measuring tape and pencil
- Wood screws or carriage bolts (for stand assembly)
- A sturdy base piece: 3/4-inch plywood or a thick solid wood offcut works well
- Optional: wood glue for added joint strength
If you're going with a natural branch perch instead of milled lumber, you'll still need a saw and sandpaper, plus a bucket for disinfecting (more on that below). If you want to build something more flexible and fun alongside your wooden perch, making a rope bird perch is a great complement to a wooden stand build and gives birds a different foot experience.
Getting the size right for your bird
Perch diameter is probably the single most important spec to get right. The rule is simple: a bird should be able to grip the perch so its toes wrap partially around without the front and back toes meeting underneath, and without the bird standing flat-footed on top. Both of those extremes create foot problems. You want the foot working in a natural gripping position.
| Bird size / type | Recommended perch diameter | Example species |
|---|---|---|
| Very small (finches, canaries) | 3/8" to 1/2" (about 10-12mm) | Zebra finch, canary, society finch |
| Small (budgies, parrotlets) | 1/2" to 3/4" (12-18mm) | Budgerigar, parrotlet, lovebird |
| Medium (cockatiels, conures) | 3/4" to 1" (18-25mm) | Cockatiel, green cheek conure |
| Large (Amazons, African greys) | 1" to 1.5" (25-38mm) | Amazon parrot, African grey |
| Extra large (macaws, cockatoos) | 1.5" to 2.25" (38-57mm) | Blue and gold macaw, umbrella cockatoo |
These ranges match up with commercial perch sizing (small perches typically run up to about 1 inch diameter, large perches from 1.5 to 2.25 inches) and with general avian foot health guidance. When in doubt, go slightly larger rather than smaller. A perch that's a little thick forces the toes to grip actively. A perch that's too thin lets the toes wrap all the way around and meet, which puts constant pressure on tendons.
For spacing between perches in a cage or aviary, the key rule is to avoid what's sometimes called the ladder formation: perches stacked directly above each other with no offset. Droppings from the upper perch fall directly onto the lower perch and anything below it, which is both unsanitary and a genuine infection risk. If you do need perches at multiple heights, angle them so adjacent perches are no more than 45 degrees from each other, and make sure no perch sits directly below another without an intermediate perch breaking the fall line.
Building the perch and the stand, step by step
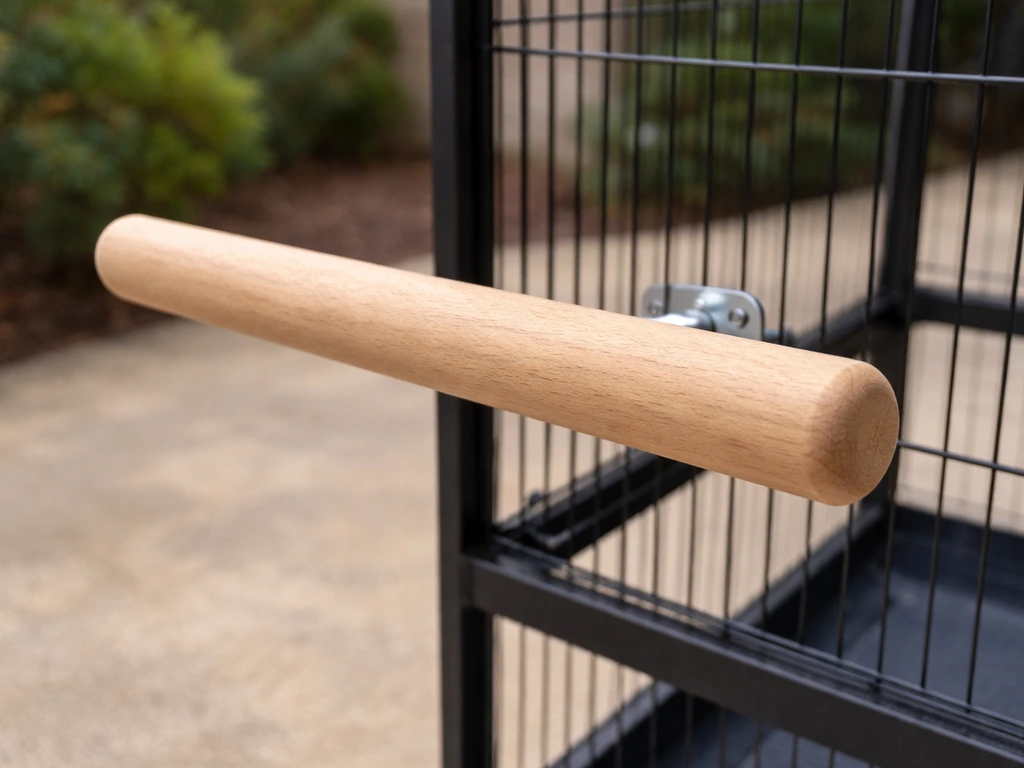
Option A: Straight wooden perch (for cage or wall mounting)
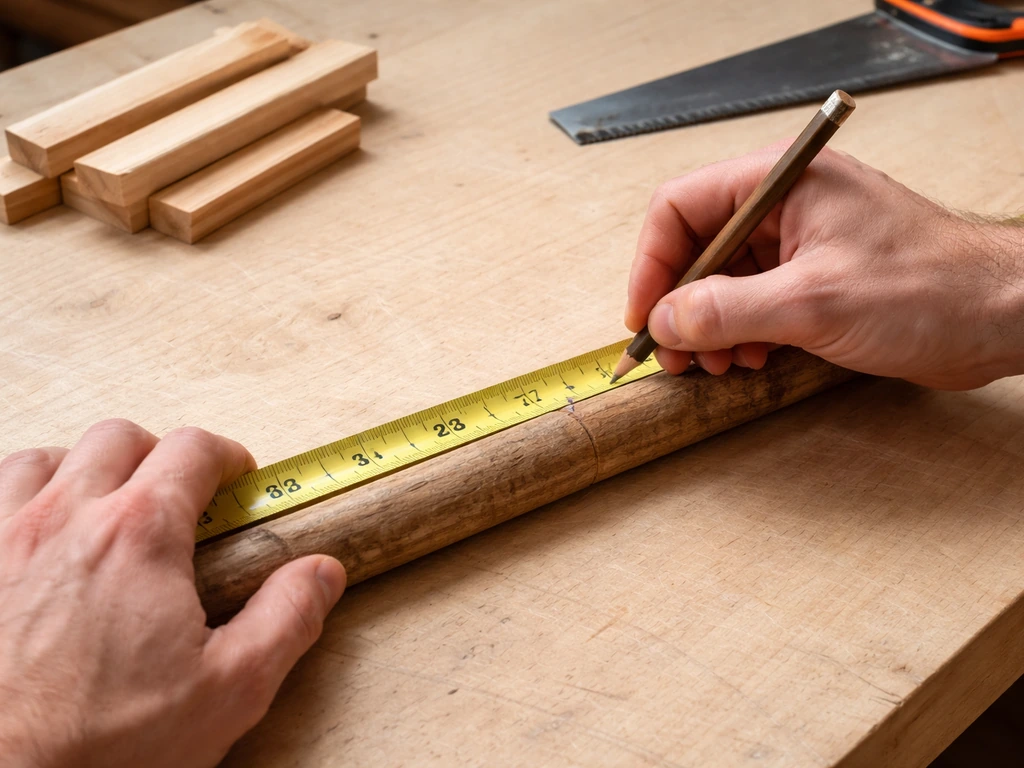
- Cut your perch rod or branch to the correct length. For a cage, measure the interior width and subtract about 1/2 inch so it fits without being jammed. For a wall-mounted perch, decide your desired length (12 to 18 inches is a comfortable working perch for most medium birds).
- Sand both ends smooth with 80-grit sandpaper, then finish with 220-grit. You want no sharp edges or splinters anywhere a foot or beak might contact the wood.
- Drill a pilot hole through the center of each end if you're using a bolt or screw to mount it. This prevents splitting.
- If mounting to a cage, use stainless steel bolts or bird-safe wing nuts to secure through the cage wire. If mounting to a wall or aviary frame, use a sturdy bracket or screw directly through the pilot hole into the support.
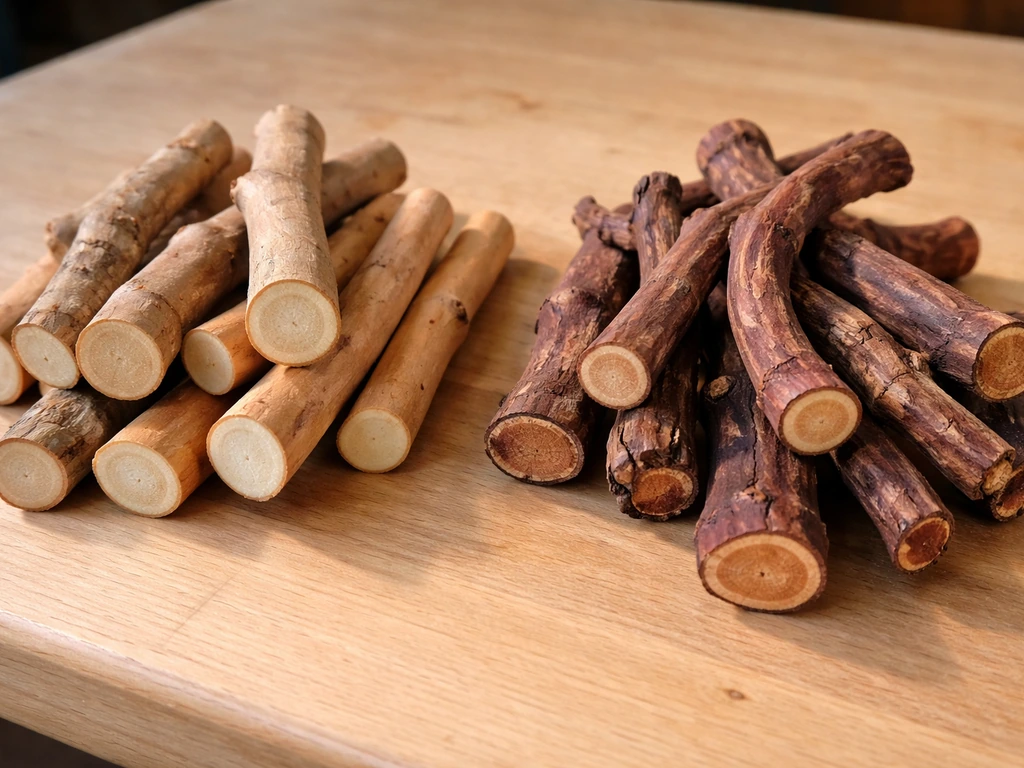
Option B: Natural branch perch
- Select a branch from a safe species (apple, willow, manzanita, elm). Choose one with some variation in diameter along its length for foot health benefits. Avoid branches with sharp forks that could trap a toe.
- Trim any small side twigs that stick out at awkward angles. Leave interesting forks if they're smooth and well-spaced.
- Disinfect the branch before use: soak it in a dilute chlorine bleach solution (roughly 1 part bleach to 10 parts water) for 20 minutes. For large branches that won't fit in a bucket, mist the solution over all surfaces thoroughly instead. Rinse well with clean water afterward.
- Let the branch dry completely in the sun or in a warm, ventilated space. Do not rush this step.
- Sand any sharp or jagged cut ends smooth. Mount the same way as a straight perch.
Building a freestanding perch stand
A freestanding T-bar or tree stand is fantastic for out-of-cage time. Here's how to build a basic but sturdy one:
- Cut your base: a piece of 3/4-inch plywood or solid wood, roughly 12x12 inches for small/medium birds or 16x16 inches for larger birds. This is your stability foundation. Heavier birds need a heavier base.
- Cut your upright post: a 1-inch to 1.5-inch diameter wooden dowel or branch, 18 to 30 inches tall depending on the bird and your preference. Sand all surfaces.
- Drill a hole in the center of the base slightly smaller than your post diameter, then drive or screw the post into it. Add wood glue around the joint for extra strength. Let it cure fully before loading any weight on it.
- Cut your crossbar (the actual perch): this should be long enough for the bird to walk a few steps in each direction. For a medium bird like a cockatiel, 14 to 18 inches works well. For a macaw, 24 to 30 inches is more appropriate.
- Attach the crossbar to the top of the upright post. The simplest method is to drill a pilot hole through the center of the crossbar and down into the post top, then drive a long wood screw through the joint. A carriage bolt with a nut is even more secure.
- Check that the whole assembly doesn't rock or tip when you press down on the crossbar end. If it does, add weight to the base (a strip of metal or tile glued underneath works well) or widen the base footprint.
If you enjoy building enrichment setups beyond just perches, check out how to make a bird rope ladder as an add-on to your stand. Attaching a rope ladder alongside the perch gives birds a climbing challenge and keeps them mentally engaged during out-of-cage time. The University of Florida also flags rope safety concerns, including unraveled rope strands that can entangle toes blank" rel="noopener noreferrer">rope safety concerns including unraveled rope strands.
For anyone who wants to take the freestanding build further and make it work for active training sessions, the principles behind building a bird training perch overlap closely with this stand design. The main difference is portability and height adjustment, both of which you can bake into your build from the start.
Finishing, weatherproofing, and making it safe
This is the step most beginners rush through, and it's where a lot of DIY perches become unsafe. The finish on your perch, or lack of it, matters a great deal for birds.
For an indoor perch or stand, the safest finish is no finish at all. Raw, sanded wood is completely fine and easy to clean. If you want to seal the base or stand components against moisture or spills, use a water-based non-toxic sealant on surfaces that birds won't directly contact (the base, the underside of the post). Do not coat the perch surface itself with any varnish, lacquer, or polyurethane. Even products marketed as 'non-toxic when dry' can off-gas compounds that affect birds, which are far more sensitive to airborne chemicals than we are. Commercial perch makers often cure their wood for a minimum of six months in controlled conditions before it touches a bird, and they're still cautious about what goes on the surface.
For outdoor or aviary perches, weatherproofing is trickier. The best approach is to use a naturally weather-resistant safe wood (manzanita is excellent for this), let it dry thoroughly between rain events, and replace it when it starts to show significant wear. Avoid exterior wood stains and sealants on any surface a bird can reach. Building a perch out of PVC pipe is worth considering for outdoor aviary setups where you want something completely weatherproof and easy to hose down, though you'll want to add texture to the surface so birds can grip it properly.
Before you introduce any perch to a bird, run through this checklist:
- No splinters, rough edges, or sharp points anywhere
- No loose joints that wobble under pressure
- No chemical smell (this is your nose telling you something is off-gassing)
- Natural branches have been disinfected and fully dried
- No paint, stain, or chemical treatment on any surface the bird contacts
- Diameter is appropriate for the bird's foot size
Mounting, placement, and keeping it safe over time
Where you put the perch matters almost as much as how you build it. The biggest placement mistake is positioning a perch directly above food or water dishes. Droppings will fall into them. It seems obvious, but it's easy to miss when you're arranging an enclosure. Keep all perches offset from feeding stations. Likewise, never position one perch directly below another: you're just routing contamination from the upper perch straight onto the lower one, and a bird standing on a feces-covered perch with even a minor foot abrasion is at real infection risk.
For freestanding stands, place them away from walls (birds will rub against them) and away from drafts, windows that get direct afternoon sun, and kitchens (fumes from non-stick cookware are lethal to birds). A spot in a main living area where you can easily supervise is ideal.
Once the perch is in use, check it weekly. You're looking for splintering, signs of mold, and excessive smoothing. Purdue’s guidance also emphasizes ongoing inspection, since natural wood perches and other chewable items can wear down and need planned replacement check perches weekly for splintering, mold, and excessive smoothing. That last one surprises people: a perch that's become too smooth from heavy use actually loses the texture that keeps a bird's feet healthy. When the surface is glassy smooth, it's time to sand it lightly to restore texture or replace the perch. Any perch that shows mold, deep cracks, or structural damage should be replaced immediately. Feces and spoiled material caked into cracks are genuinely hard to clean out and can harbor infection. The fix is easier than you think: replace the perch. Untreated wood is cheap, and a fresh perch takes 30 minutes to make.
Cleaning is straightforward: a stiff brush, hot water, and a dilute bird-safe disinfectant (or the same dilute bleach solution you used for branch prep) works well for routine cleaning. Rinse thoroughly and let it dry completely before putting the bird back on it. For anyone who enjoys building out a full enclosure beyond the perch, exploring how to build a bird house is a natural next step that uses many of the same woodworking skills and safety principles covered here.
If you've got younger builders in the house who want to practice the concepts in a lower-stakes environment first, having them work through how to make a bird perch in Minecraft is actually a surprisingly useful way to think through placement logic and design before committing to real materials. It sounds silly, but spatial thinking about perch height, spacing, and clearance translates directly to real builds.
You're ready to build
A good bird perch is not complicated to build, but the details matter: right wood species, right diameter for the bird, no toxic finishes, proper placement away from food and water, and regular inspection so it stays safe over time. If you nail those basics, everything else is just carpentry. Grab some untreated pine or apple wood, a hand saw, a drill, and some sandpaper, and you can have a solid, safe perch built in an afternoon. Your bird will use it constantly, and you'll feel good knowing exactly what went into it.
FAQ
Can I use a dowel rod or round stick if it is only temporary?
You can, but avoid making the whole perch one uniform smooth diameter. If you already have dowels, sand the surface lightly to break the shine, vary the diameters along the length (for example, use two or three sections), and plan to swap the perch sooner if the grip area becomes glossy or worn from frequent use.
What diameter should I choose if I have more than one bird size in the same cage?
Use a set of perches that step through sizes rather than one “middle” diameter. For example, install a slightly thinner perch near the preferred resting spot and a thicker one at the opposite end, then ensure no perch is thin enough for toes to fully meet underneath when your smallest bird grips it.
How do I prevent a ladder formation when building at multiple heights?
Offset each higher perch so its droppings miss the perch directly below. A practical method is to draw vertical “drop lines” on paper, then place perches so none sit under those lines. If you cannot offset enough, reduce the number of perches or add an intermediate perch at a different angle to break the fall path.
Is sanding enough to keep a perch safe, or do I need to disinfect before first use?
For natural branches, disinfect before use, then rinse and dry fully. For milled lumber, disinfecting is optional if the wood stayed clean, but you should still remove saw dust thoroughly and let it dry completely. Always confirm the perch is fully dry before introducing it, since damp wood can grow mold.
How often should I replace a perch instead of just cleaning and sanding it?
Sand back to texture when the surface becomes glassy smooth, but replace immediately if you see mold, deep cracks, persistent odor, splintering that keeps returning, or wobble at any joint. Also replace if cleaning cannot fully remove caked droppings from cracks or pores.
Can I paint or stain a perch if it is bird-safe and fully cured?
Avoid coating any surface your bird can contact. Even “non-toxic when dry” finishes can off-gas or wear off with chewing and abrasion. If you need protection, seal only underside or base components that birds cannot grab, and keep the gripping surface raw and sanded.
What should I do if the perch is in a spot with sun and drafts?
Move the stand if it gets direct afternoon heat, because warm surfaces can dry feet and increase irritation. Avoid drafts near windows and doors, since temperature swings can stress birds. For freestanding setups, place it in a calm, supervised area, and monitor footing comfort during the first week.
How do I make sure the perch won’t injure a bird if it is mounted or assembled imperfectly?
Check stability before and after installation. For wall-mounted designs, avoid small gaps where toes can slip, and ensure all edges of the gripping area are smooth with no sharp corners. After your first day of use, re-check for loosening, since birds shifting weight can loosen screws over time.
What is the safest way to add texture to a smooth round perch?
Use varied, gentle sanding patterns to prevent a mirror-smooth surface. Focus on the gripping zone only, keeping it free of burrs. If sanding reduces diameter too much, keep the overall diameter within the gripping ranges for your bird, then add additional perches rather than trying to “fix” an overly thin one.
Can I use branches from any tree, or do I need to prep them first?
Not every tree is safe. Even safe species should be cleaned and properly dried before use, since surface dirt and sap can irritate feet and airways. When in doubt about the tree source or whether it is treated by landscaping chemicals, do not use it.
Next Articles

How to Build a Chimney Swift Bird House DIY Guide
Step-by-step DIY plans to build a chimney swift bird house, with correct dimensions, placement, and weatherproofing for

How to Build an Oriole Bird House: Step-by-Step DIY
Step-by-step DIY for building an oriole bird house with right dimensions, weatherproofing, predator-safe placement, and

How to Build a Chickadee Bird House Step by Step
Step-by-step DIY chickadee bird house with cut list, chickadee entry sizing, ventilation, drainage, and mounting tips.