A DIY bird stand is one of those projects that sounds more complicated than it actually is. With a few basic materials, a couple of hours, and a little planning, you can build something sturdy, safe, and genuinely useful for the birds in your yard. This guide covers everything from choosing a design to final placement, so you can start building today.
How to Make a Bird Stand at Home: DIY Steps

Marcus Thornton
8 Apr 2026
What "bird stand" actually means for a DIY build
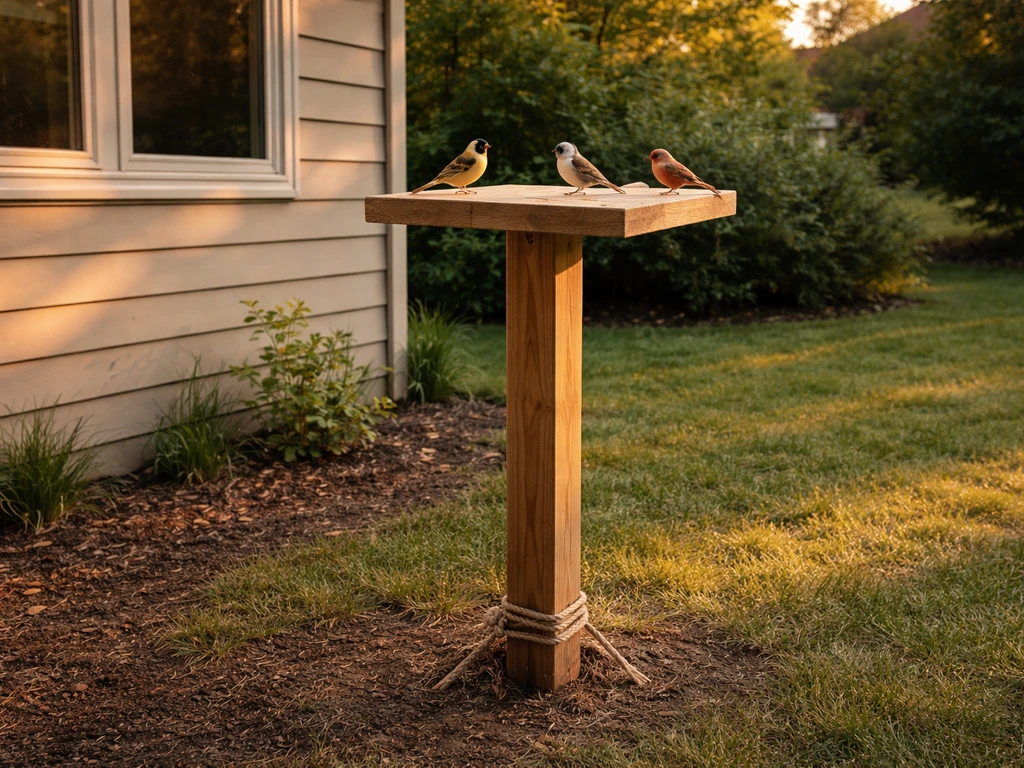
People search "how to make a bird stand" and mean a few different things, so let's sort that out before you start cutting wood. In the backyard DIY context, a bird stand usually falls into one of three categories: a freestanding perch structure (a post or branchy frame that birds land on), a stand that holds a bird feeder or birdbath off the ground, or a simple platform stand that combines perching and feeding in one unit. All three are worth knowing about, but the most practical and versatile build for most backyard setups is a freestanding post-style stand with a platform top, because it can hold a feeder, support a birdbath basin, or just serve as a landing spot depending on what you attach to it.
If you're looking for a more detailed breakdown of a specific variation, there's a thorough walkthrough on how to build a bird stand that goes deeper into structural options. But for this guide, we're focusing on the full process from scratch: choosing your design, gathering materials, building it, finishing it safely, and placing it so birds actually show up.
Perch stand vs. feeder/birdbath stand: pick the right design first
Before you grab any wood, decide what your stand needs to do. A simple perch stand is basically a post with horizontal branches or dowels attached, giving birds a place to rest, look around, and feel safe. A feeder or birdbath stand is more structural, with a stable base and a platform or hook at the top to hold weight. You can also combine both by building a post stand with a flat platform top and a few hooks or branch pegs along the sides.
| Design Type | Best For | Typical Height | Difficulty |
|---|---|---|---|
| Simple perch post | Watching and resting spots in garden beds | 4–6 feet | Beginner |
| Platform feeder stand | Offering seeds, fruit, or suet at height | 5–6 feet | Beginner–Intermediate |
| Birdbath stand | Elevated basin for water access | Around 43 inches (3.5 feet) | Beginner |
| Tree-branch stand | Natural aesthetic, garden focal point | Variable | Intermediate |
My recommendation: build the platform feeder stand. It's the most useful, the most adaptable, and it's what I've seen work best in real backyards. You can hang a feeder from a hook on the top, set a shallow birdbath basin on the platform, or leave it open as a landing perch. One build, multiple uses. If you later want something specifically for a garden bed, check out this guide on how to make a bird stand for the garden for design ideas that blend into landscaping nicely.
What you'll need: materials and tools
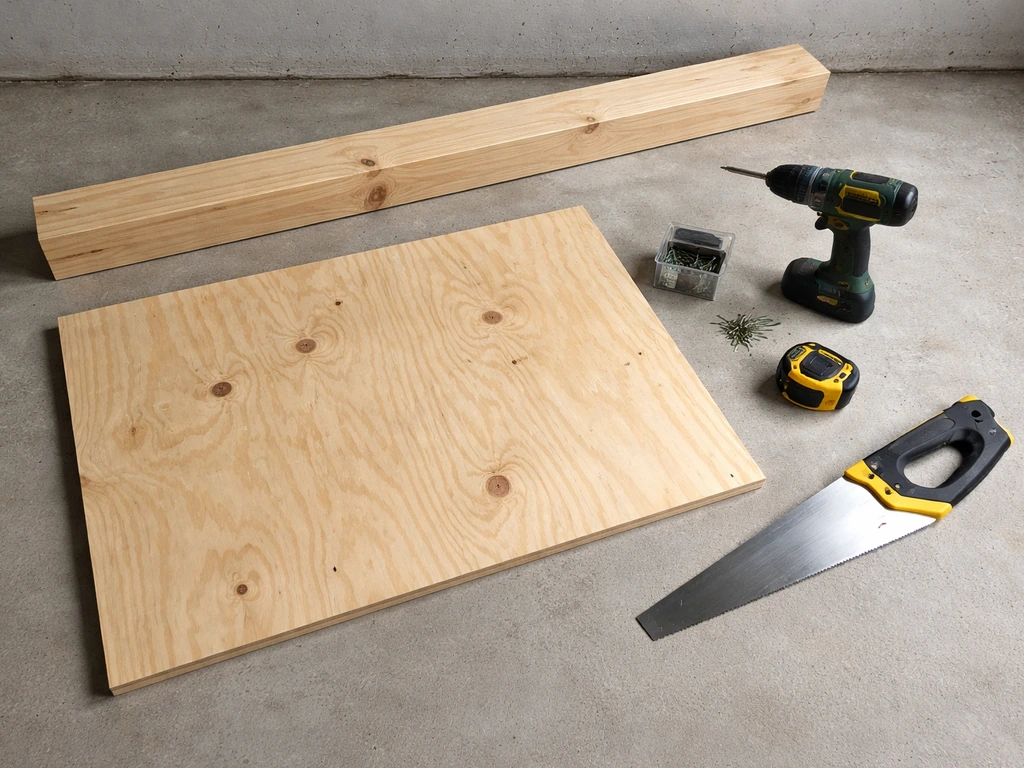
One of the best things about this build is that you don't need to spend much. A lot of the materials can be repurposed or sourced cheaply. Here's what I recommend for a solid, beginner-friendly platform stand that's about 5 to 6 feet tall.
Materials list
- One 4x4 post, 8 feet long (cedar, redwood, or untreated pine) for the main post
- One 12-inch x 12-inch piece of 3/4-inch untreated plywood or a cedar board for the platform top
- Two 18-inch x 18-inch pieces of 3/4-inch plywood for the base cross-feet (for stability)
- 1.5-inch exterior-grade screws (pre-drilling required, more on that below)
- 2.5-inch exterior-grade screws for attaching the base
- Screw-in hooks (1 or 2) for hanging feeders
- Natural rope (jute or sisal, untreated) if you want to add textured perching areas
- Food-safe or non-toxic water-based wood sealer for finishing
- Concrete mix (optional but recommended for permanent ground installation)
- Sandpaper: 80-grit and 120-grit
On wood choice: avoid pressure-treated lumber, creosote-treated wood, or anything labeled "CCA" or with a greenish tint. NestWatch and other wildlife organizations specifically advise against pressure-treated wood for bird structures because the preservative chemicals can leach out and harm birds. blank" rel="noopener noreferrer">The EPA has also flagged creosote as a cancer-risk compound. Untreated cedar is my first choice, it's naturally rot-resistant and looks great without needing much finishing. If you're repurposing wood from an old project, make sure it was never treated with preservatives or painted with lead-based paint.
Tools list
- Circular saw or handsaw (for cutting the post to height and trimming the platform)
- Drill with a screwdriver bit and a 1/8-inch drill bit for pre-drilling
- Tape measure and pencil
- Sandpaper or an orbital sander
- Clamps (helpful but not required)
- Level (a cheap bubble level works fine)
- Post hole digger or spade (for ground mounting)
- Safety glasses and gloves
How to build it: step-by-step instructions
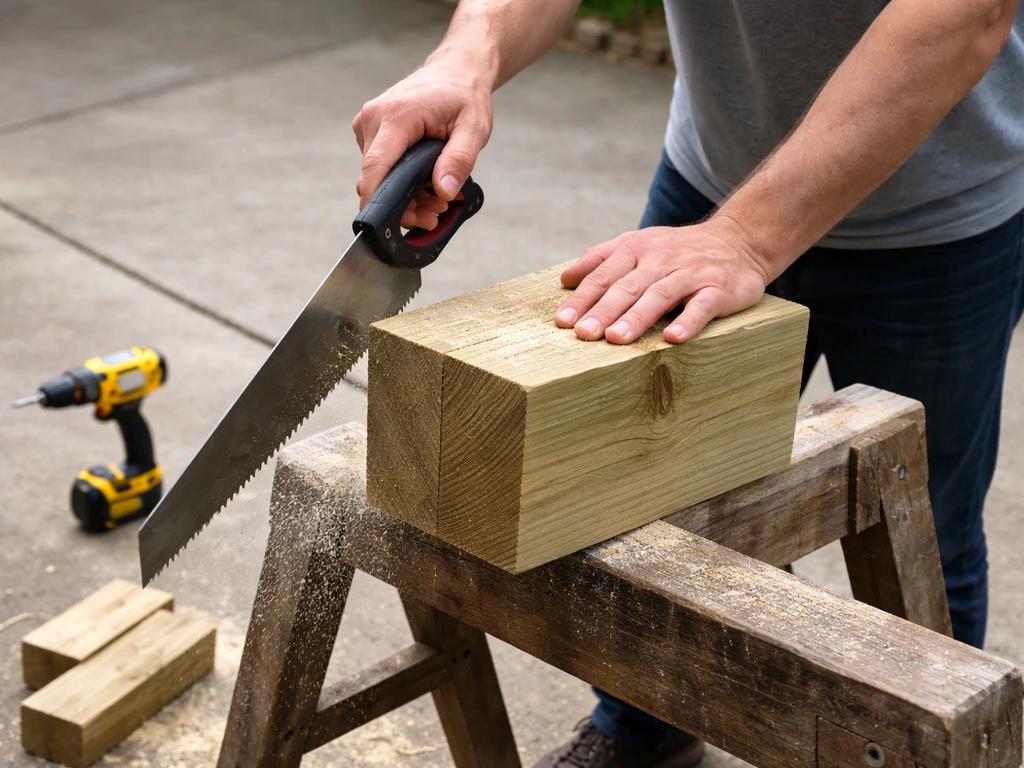
This build produces a freestanding platform stand about 5.5 feet tall with a stable cross-base so you can use it on a patio, lawn, or set it in the ground. I'll walk through each step and explain why it matters, not just what to do.
- Cut your post to height. For a freestanding (non-buried) stand, cut the 4x4 to 66 inches (5.5 feet). If you plan to bury the base 12 inches into the ground, start with 78 inches so the top ends up around 5.5 feet above grade. Sand all cut ends smooth with 80-grit, then finish with 120-grit.
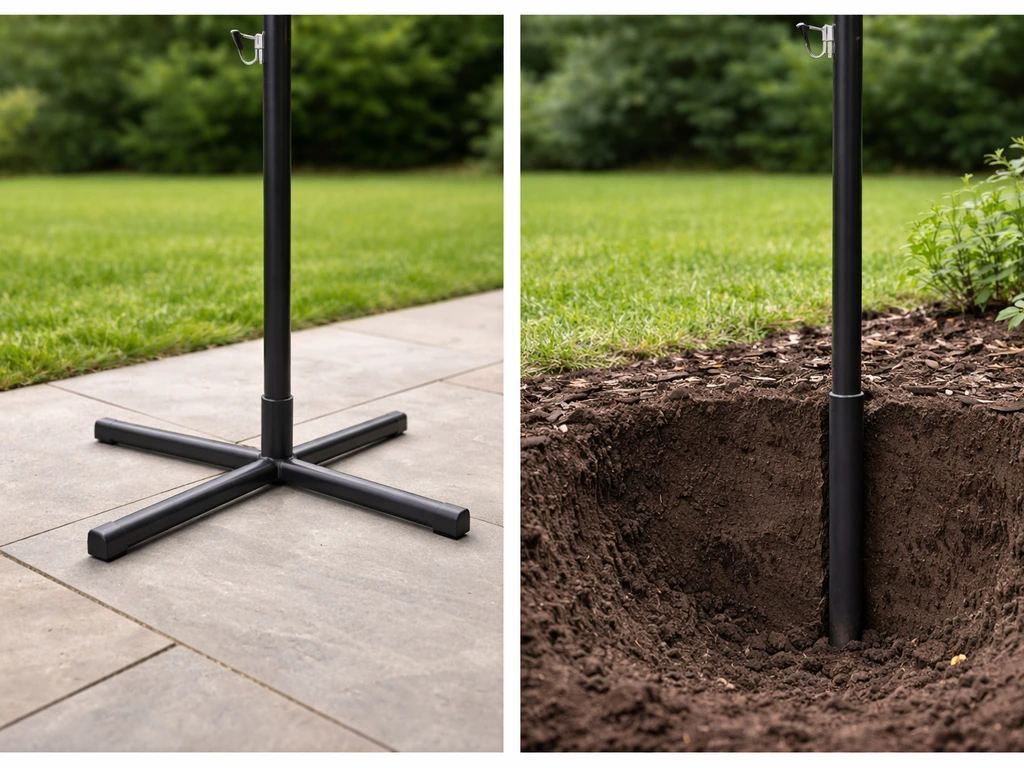
- Build the cross-base. Take your two 18-inch x 18-inch plywood base pieces. Cut a notch in the center of each piece (about 2 inches wide x 9 inches deep) so they slot together in a cross shape. This gives you a four-legged base that's far more stable than a single flat piece. Slot them together, check they're flush, then pre-drill and screw through the joint with 2.5-inch screws at a slight angle to lock them.
- Attach the post to the base. Center the post over the cross-base junction. Pre-drill corner holes, then drive 2.5-inch screws at an angle through the base pieces into the bottom of the post (four screws minimum). For extra rigidity, add a small wooden block or metal L-bracket on each side of the post at the base. The cross-base design is what keeps this from tipping, so don't skip it.
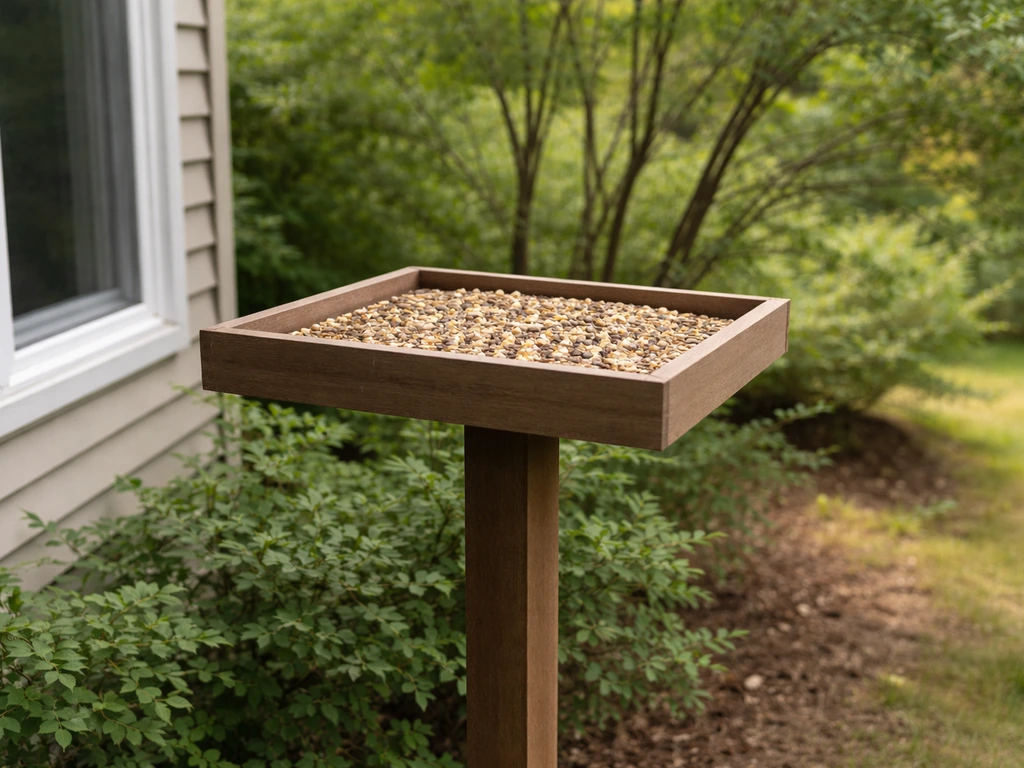
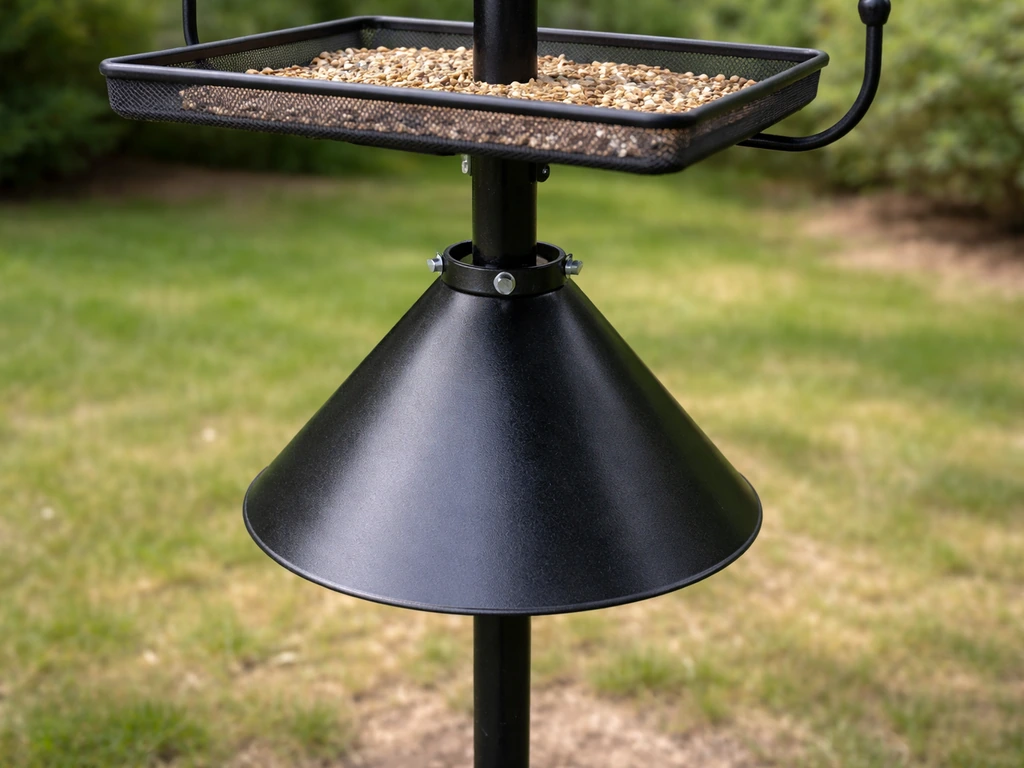
- Add the platform top. Cut your 12x12 platform piece and sand the edges smooth. Center it on top of the post. Pre-drill two holes from above into the post, then drive 1.5-inch screws down through the platform into the post. Two screws are enough if you pre-drill. This is also where platform feeder logic pays off: keep the platform flush and smooth so birdseed or a birdbath basin can sit level on top.
- Add drainage holes to the platform. Drill four 3/8-inch holes near the corners of the platform top. This lets rainwater drain out instead of pooling, which would otherwise rot the wood and create a breeding ground for bacteria. If you're using the platform for a birdbath basin, the basin itself handles drainage, but it's still good practice.
- Add rope perch texture (optional but great). If you want birds to grip the platform edges or the post more easily, drill pairs of small holes along the sides of the platform and weave a short length of jute rope through them. This rope-weaving approach, similar to techniques used in PVC-and-rope DIY perch designs, gives small birds like chickadees and finches a comfortable grip surface.
- Screw in your hooks. At the top of the post (or underneath the platform overhang), screw in one or two stainless steel or galvanized screw-in hooks. These let you hang a tube feeder, a suet cage, or a small hanging birdbath underneath the platform.
- Dry-fit everything before final assembly. Before driving any permanent screws, dry-fit all your pieces together and check with a level that the platform is truly horizontal. A wobbly or tilted stand is frustrating to use and looks unstable to birds. It's much easier to adjust at this stage than after screws are driven.
If you want to make a more nature-inspired version using branches or a log instead of a milled post, the process for how to make a bird tree stand covers that approach really well, including how to secure irregular natural wood safely.
Finishing safely: non-toxic, grippy, and easy to clean
The finish you put on the wood matters more than most people realize. Birds land on this, peck at it, and in some cases eat seeds off the platform surface. You want something that protects the wood from weather without releasing chemicals that could harm them.
Stick to water-based, non-toxic exterior sealers. Products like Vermont Natural Coatings PolyWhey or similar penetrating exterior stains are a solid choice, and the manufacturer's guidance on those products specifically suggests testing the finish on a sample piece before applying it to the full project, which is good advice for any finish. Avoid oil-based stains, varnishes with strong solvents, and anything that takes more than a day to fully cure and stop off-gassing. Let the stand dry completely outdoors before birds have access to it.
For grip on the platform surface, you have a few options. A slightly rough wood surface (stopped at 80-grit, not smoothed further) gives birds natural traction. You can also leave the platform unfinished entirely and just seal the post and base. An unsealed platform surface weathers naturally and actually becomes grippier over time.
Cleaning is something most people underestimate. If you're using the stand as a birdbath platform, plan to change the water every 2 to 4 days, and during summer heat waves that can drop to every day or two. Algae and bacteria build up fast in warm, shallow water. The platform should be scrubbed with a stiff brush and rinsed whenever you change the water. Avoid bleach-based cleaners; a diluted white vinegar solution works well and is safe. If you're running a feeder on the platform, shake out old seed and wipe down the surface weekly to prevent mold.
Where to put your stand: height, location, and window safety
Placement is where a lot of DIY bird stands go wrong, not because the build is bad but because the location wasn't thought through. Here's what actually matters.
Height off the ground
Aim for the top of your platform (where birds actually land) to be between 5 and 6 feet off the ground. This height keeps feeders accessible to you while also clearing the minimum needed for a squirrel baffle to work properly. Squirrels can jump roughly 4 to 4.5 feet vertically, so mounting a baffle with its top at around 5 feet, and keeping the feeder above that, effectively blocks most squirrel access. Position the stand at least 8 to 10 feet away from fences, low branches, or anything a squirrel could use as a launch point.
Distance from trees and shrubs
Ideally, place your stand within about 10 to 15 feet of a shrub or small tree. Birds feel safer when cover is close, and they'll use nearby branches as staging perches before committing to the feeder or stand. Too close to heavy brush (within a couple of feet) and cats can ambush from cover. A middle distance is the sweet spot.
Window placement: closer is actually safer
If you're placing your stand near the house, don't put it 10 to 20 feet from a window. That's the most dangerous zone for bird collisions because birds have enough distance to build up lethal momentum before hitting the glass. The guidance from the U.S. Fish & Wildlife Service and several bird conservation organizations is clear: keep feeders and birdbaths within 3 feet of a window, and birds simply can't accelerate enough to fatally strike it. If you can't get within 3 feet, move the stand well beyond 20 feet to eliminate the collision risk at the other end of the danger zone.
Permanent vs. freestanding placement
The cross-base design described above works great on a patio or lawn without any ground anchoring. If you want a permanent installation, you can bury the bottom 12 inches of the post in concrete. For a dedicated pole-mounted setup, the approach used in guides like how to make a bird house pole gives good guidance on post depth and concrete anchoring that applies directly here.
Optional upgrades that make a real difference
Once your basic stand is up and working, these additions are worth considering. None of them require rebuilding from scratch; they bolt or clip on to what you've already made.
- Squirrel baffle: A metal torpedo or cone baffle mounted on the post below the platform (top of baffle at 5 feet) blocks squirrels reliably. Position it correctly and it works far better than most people expect.
- Tilt-clean basin mount: If you're using the stand as a birdbath support, a hinged or tilting bracket for the basin makes cleaning dramatically easier. Some brackets let you dump the basin without lifting it off. This is the kind of upgrade that sounds minor until you're doing it twice a week every summer.
- Multiple hooks: Add a second or third hook underneath the platform overhang. This lets you hang a tube feeder, suet cage, and a small water dripper all from the same stand, which multiplies the species you'll attract.
- Branch pegs: Drill 3/4-inch holes into the sides of the post at various heights and glue in short sections of natural branch (oak or maple dowels work). These give birds extra landing and staging points along the post itself.
- Seed tray lip: Add a 1-inch wooden lip around the edge of the platform using thin scrap wood. This keeps seeds from blowing off in wind and gives you a slight edge to rest a shallow tray on securely.
- Roof over the platform: A simple A-frame roof made from a couple of cedar fence pickets protects seed from rain and reduces how often you need to replace wet, moldy feed. It also makes the stand look more finished.
If you eventually want to expand the project into a full dedicated structure for housing birds as well as feeding them, the concepts in the guide on how to make a bird house stand are a natural next step, covering how to mount nest boxes on a stand system so everything works together in the same footprint.
You can build this today
A functional bird stand doesn't require a workshop full of tools or a big budget. The build described here uses materials you can find at any hardware store for under $30, takes a couple of hours, and produces something that will genuinely attract more birds to your yard. Start with the platform post stand, get it placed correctly, add a feeder or basin, and watch what shows up. Once you see what species visit, you can customize from there, adding hooks, perches, baffles, or eventually expanding into a full backyard feeding station. The first build is always the hardest, and this one is designed to be pretty manageable.
FAQ
Can I make a bird stand using scrap or untreated wood quickly?
Yes, but only if you treat it as a temporary perch. Skip sealers and avoid anything that smells strong. Place it in a shaded spot first, check for splinters after the first week, and replace it once the wood softens. Also keep it away from predators, so a quick build should still include a stable base and enough clearance from launch points.
How do I choose what to attach to the platform for the birds I want?
Feeding varies by species, but in general offer feeders that match the birds you see. For example, if you get finches and sparrows, a platform or hopper with small openings works well. If larger birds dominate, use a feeder with higher perches and less seed spillage so you do not attract unwanted species or pests.
What attachment mistakes can make a DIY bird stand unsafe?
Do not add hot glue, metal screws that protrude, or fasteners that can rust inside the birds’ landing area. If you use brackets and hooks, sink screws below the surface and coat any exposed metal with a rust-resistant finish. Always do a hand check for splinters and sharp edges, especially on the top platform.
How can I tell when the sealant is ready and when it needs reapplying?
If you plan to leave it outdoors year-round, do not rely on a single thin coat. Apply a water-based exterior sealer/stain per label, then allow full cure outdoors before adding seed or water. Recoat when you see the surface start to darken unevenly or when water stops beading.
What should I do if the birdbath water starts getting algae or smells?
For a stand used like a birdbath, deeper cleaning matters. If you see cloudy water, stringy algae, or a strong odor, change the water immediately and scrub the platform right away. In summer heat, do not wait for the usual schedule, because microbial growth accelerates fast.
My squirrels still get the feeder, what’s the best next step?
Use a baffle if squirrels are active, but also manage access routes. Keep the stand away from fences and low branches, and avoid placing it where taller plants create a “runway” for jumpers. If squirrels still reach it, you may need to reposition the stand slightly farther from cover rather than only changing baffle size.
Can I add a cover or roof to protect the feeder or platform?
Broody birds and aggressive weather are the main situations where you might need extra coverage. If you add a roof or side shelter, keep it high enough that birds still land comfortably, and do not trap moisture under the platform. Good shelter can reduce rain splash that quickly fouls seed and water.
What if my yard layout makes the window distance guidance hard to follow?
Window collisions are mostly about the final meters of approach. If you cannot meet the close-distance rule, ensure the stand is well beyond the far edge of the danger zone and avoid lining it up with other reflective surfaces. Also remove shiny decorations nearby, since they can confuse birds’ flight paths.
Can I convert a platform stand into a feeder stand later?
You can change the stand’s function without rebuilding, but avoid creating gaps where feet can snag. If you add a feeder, keep the hook/rail height consistent with the landing perch and make sure there is an easy, stable stepping surface for smaller birds. Test with no birds at first, then observe for a few hours.
What if birds won’t land on the platform after finishing it?
If the platform surface feels too slick when wet or becomes very smooth after sealing, birds may avoid it. A practical fix is to keep the top with a slight texture during finishing (do not sand to an ultra-smooth finish) and ensure any sealant is applied only enough to protect against rot, not to create a glossy film.
How do I know whether repurposed wood is safe for birds?
If you are repurposing wood, check for any sign of preservative or old paint. Look for greenish staining, strong chemical odor, or peeling coatings. When in doubt, do not use it for a surface birds can peck or touch, and keep paint or treated scrap away from the build area.
Next Articles

How to Build a Chimney Swift Bird House DIY Guide
Step-by-step DIY plans to build a chimney swift bird house, with correct dimensions, placement, and weatherproofing for

How to Build an Oriole Bird House: Step-by-Step DIY
Step-by-step DIY for building an oriole bird house with right dimensions, weatherproofing, predator-safe placement, and

How to Build a Chickadee Bird House Step by Step
Step-by-step DIY chickadee bird house with cut list, chickadee entry sizing, ventilation, drainage, and mounting tips.