The catch is that 'bird nest' means very different things depending on the species you're trying to attract.
How to Make a Nest for a Bird: Step-by-Step Guide

Marcus Thornton
23 Mar 2026
Choose the right nest type for the bird species
Most backyard birds fall into one of three categories when it comes to nesting: cavity nesters, cup nesters, and ground nesters. Each group needs a completely different structure, so identifying which category your target bird belongs to is the single most important step.
Cavity nesters (the easiest to build for)
Cavity nesters include bluebirds, chickadees, house wrens, nuthatches, tree swallows, and woodpeckers. These birds nest inside hollow spaces, which means they'll use a properly built wooden box with an entrance hole. This is the most common DIY nest project and the most rewarding because you can directly control the dimensions that determine success. The entrance hole diameter is everything here: blank" rel="noopener noreferrer">a 1 1/8-inch hole suits chickadees, house wrens, and nuthatches, while eastern and western bluebirds need a 1.5-inch hole. Get the hole size wrong by even a quarter inch and you'll either exclude the bird you want or invite starlings, which you don't.
Cup nesters (support, not build)
Robins, mourning doves, and many songbirds build open cup nests in the forks of trees or on ledges. You can't really build a nest for these birds the way you would a box for a bluebird, but you can put up a simple nesting platform or shelf and provide nesting materials nearby, like twigs, grass, and other bits you’d use in a bird nest project. Think of it as creating the conditions rather than building the finished product.
Ground nesters (hands off)
Killdeer, quail, and some sparrows nest directly on the ground. These birds don't use structures you build, and they're easy to disturb. NestWatch notes that ground-nesting birds may scurry silently when flushed, so if you suspect one is nesting in your yard, the best thing you can do is mark the area and leave it alone. This guide focuses on cavity nest boxes and open cup platforms because those are the structures you can actually make.
If you're not sure which bird you're targeting, watch your yard for a week. Birds carrying nesting material will show you what they're working with. Cornell Lab's All About Birds notes that birds don't always fly straight to the nest with material, so track their general direction over multiple trips to narrow down where they're headed. If you see a chickadee or a bluebird investigating holes in trees, you've got your answer: build a cavity box.
Materials and tools you can use today
The good news is that you don't need a fully stocked workshop. I've built functional nest boxes with a handsaw, a drill, and a piece of untreated pine I picked up at a hardware store for under ten dollars. Here's what you need to gather before you start.
Best wood choices
Untreated pine, cedar, or cypress are your top options. Cedar and cypress resist rot naturally, which matters a lot because a nest box sits outside through rain, heat, and cold for years. Pine works fine but benefits from a coat of exterior paint or stain on the outside only. Never paint or treat the inside of a box or the entrance hole area. Pressure-treated wood contains chemicals that can harm nestlings. Avoid plywood for the floor and roof if you can: it delaminates over time and traps moisture. Reclaimed fence boards, packing crates made from untreated solid wood, and old hardwood flooring all make excellent repurposed materials.
Tools list (beginner-friendly)
- Drill with a spade bit or hole saw (matched to your target species' entrance hole diameter)
- Handsaw or circular saw for cutting boards to length
- Hammer and galvanized nails, or a drill with wood screws (screws are better for longevity)
- Tape measure and pencil
- Sandpaper (coarse grit to rough up the interior below the entrance hole so fledglings can climb out)
- A countersink bit if you're using screws (optional but cleaner)
What to skip
Don't include a perch on the outside of the entrance hole. It sounds welcoming but it actually gives predators a foothold and is unnecessary since cavity-nesting birds don't need it. Also skip string, twine, or yarn as nesting material aids. The U.S. Fish and Wildlife Service warns clearly that these materials can wrap around a bird's legs or neck and cut off circulation, often fatally. Stick to natural loose materials like dried grass, pine needles, or small dry leaves if you want to help things along.
Step-by-step: building a safe nest (DIY design options)
I'll walk you through two builds: a basic cavity nest box (the most versatile project, covering chickadees, wrens, and bluebirds depending on hole size) and a simple open cup platform for robins and doves. If your goal is a lovebird nest, you can apply these same DIY safe-nesting principles by choosing a structure that matches the birds you are keeping and ensuring it is secure and easy to clean open cup platform. Pick the one that matches your target species.
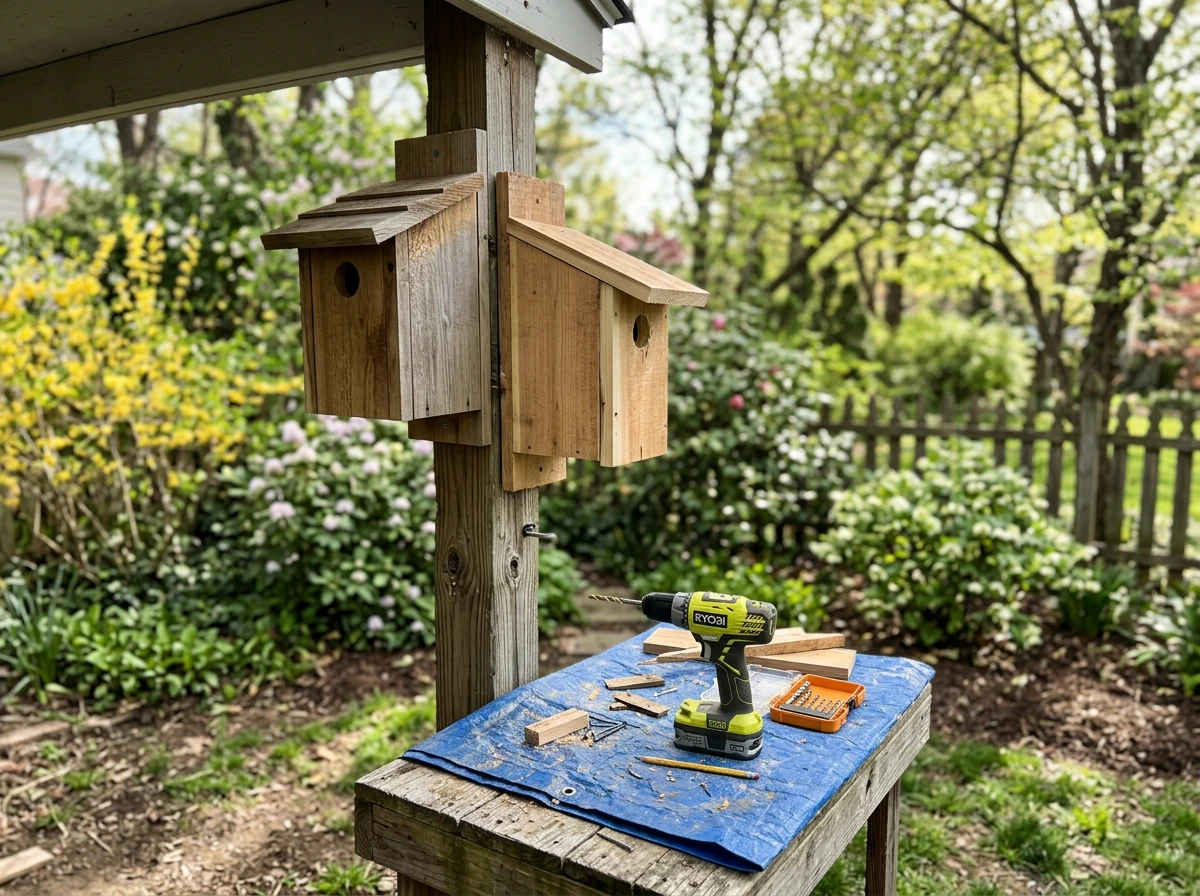
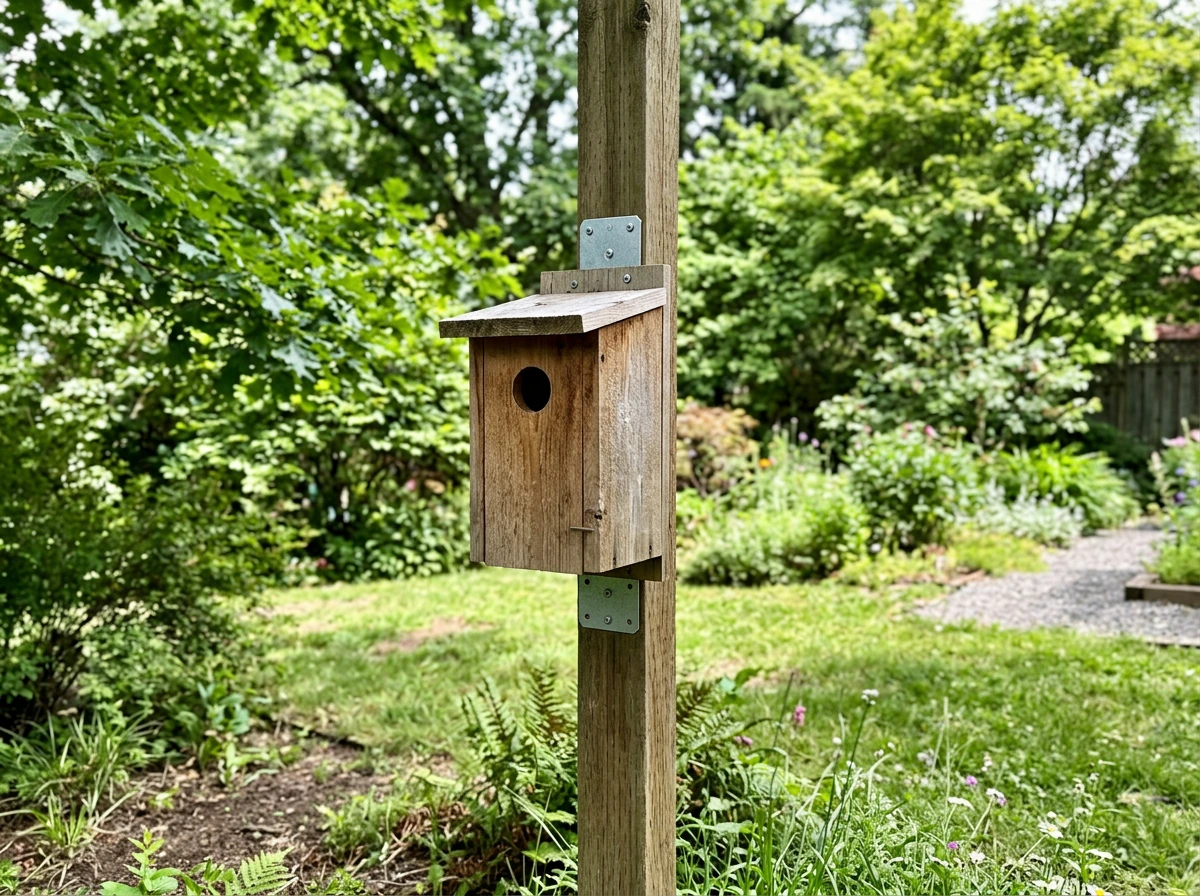
Option 1: Basic cavity nest box
This design is based on proven dimensions from wildlife agency guidelines and is the same basic structure recommended by Audubon and state wildlife departments. For a chickadee, wren, or nuthatch box, you want a floor of about 4 inches by 5.5 inches, an interior box height of around 8 inches, and an entrance hole of 1 1/8 inches in diameter, positioned approximately 5 to 6 inches above the floor. For a bluebird box, increase the floor to about 5 inches by 5 inches and use a 1.5-inch entrance hole.
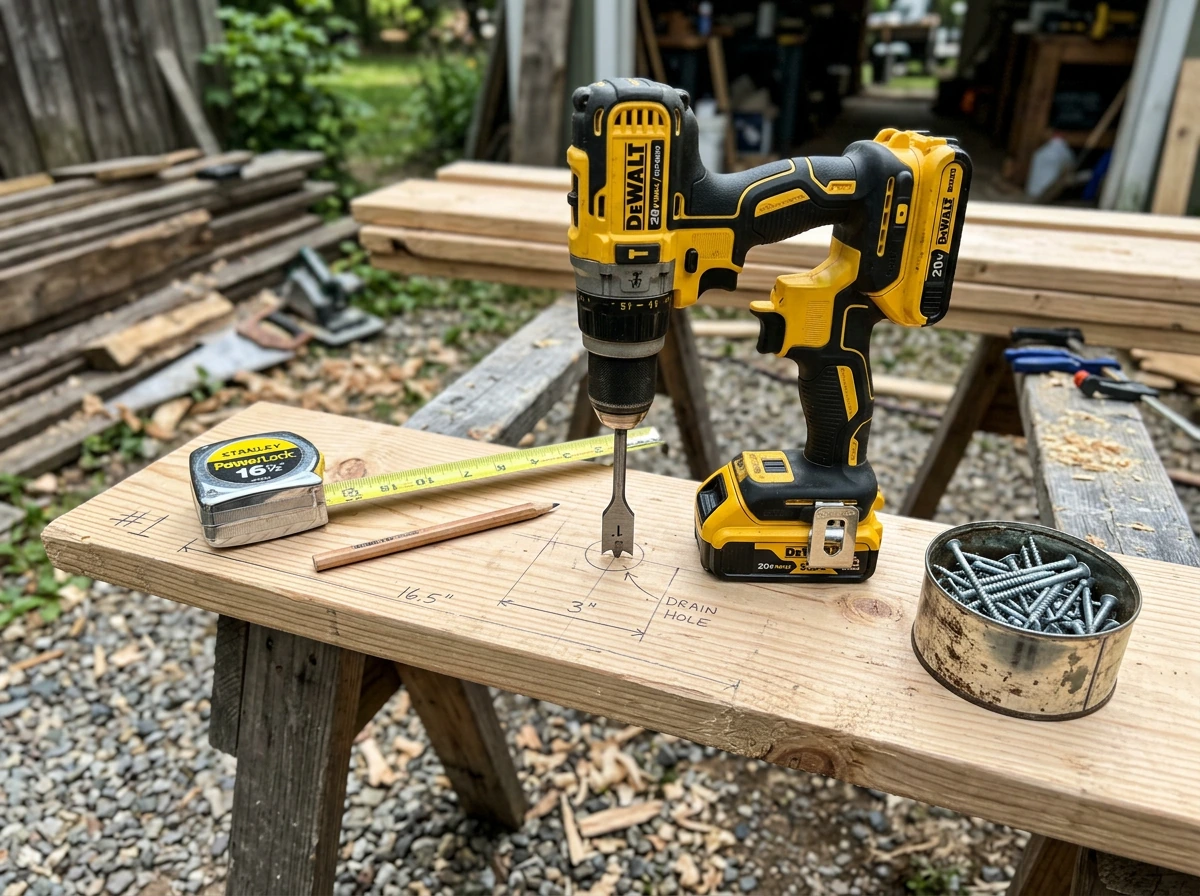
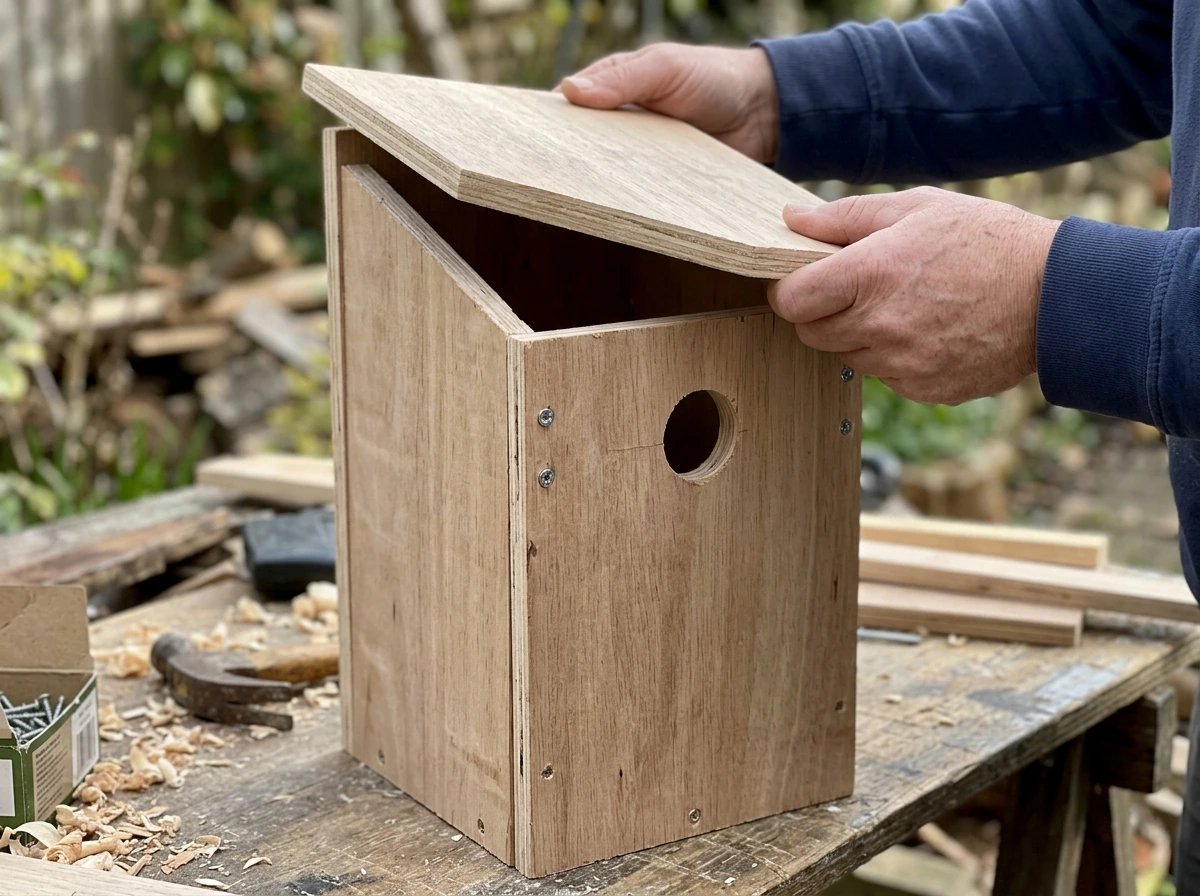
- Cut your lumber: you'll need a front, back, two sides, a floor, and a roof. Use 3/4-inch thick boards. The front and back can be cut from a single 1x6 or 1x8 board depending on your species target.
- Drill the entrance hole in the front panel before assembly. Measure up from where the floor will sit (not the bottom of the front board) and mark the center of your hole at the right height above the floor. Use a spade bit or hole saw at the exact diameter for your species.
- Roughen the interior surface of the front panel below the entrance hole with coarse sandpaper or cut shallow horizontal grooves with your saw. This gives fledglings grip to climb out.
- Drill four or five small drainage holes (about 1/4 inch) in the corners of the floor panel. Drill ventilation holes or cut narrow slits near the top of the side panels, just below where the roof will sit. These two features regulate temperature and moisture inside the box.
- Assemble the box using galvanized screws or nails. Attach the floor between the front and back panels rather than nailing it to the bottom edges, which reduces moisture wicking. Leave one side panel unattached at the top so it can swing open for cleaning. Secure it with a screw at the bottom that you can pivot open.
- Attach the roof with a slight overhang (at least 2 inches at the front) to shed rain away from the entrance. Angle it slightly if you can, sloping back to front, so water runs off.
- If you paint the exterior, use a light, neutral color. Never paint the interior or the entrance hole rim. Let the paint fully cure before mounting the box.
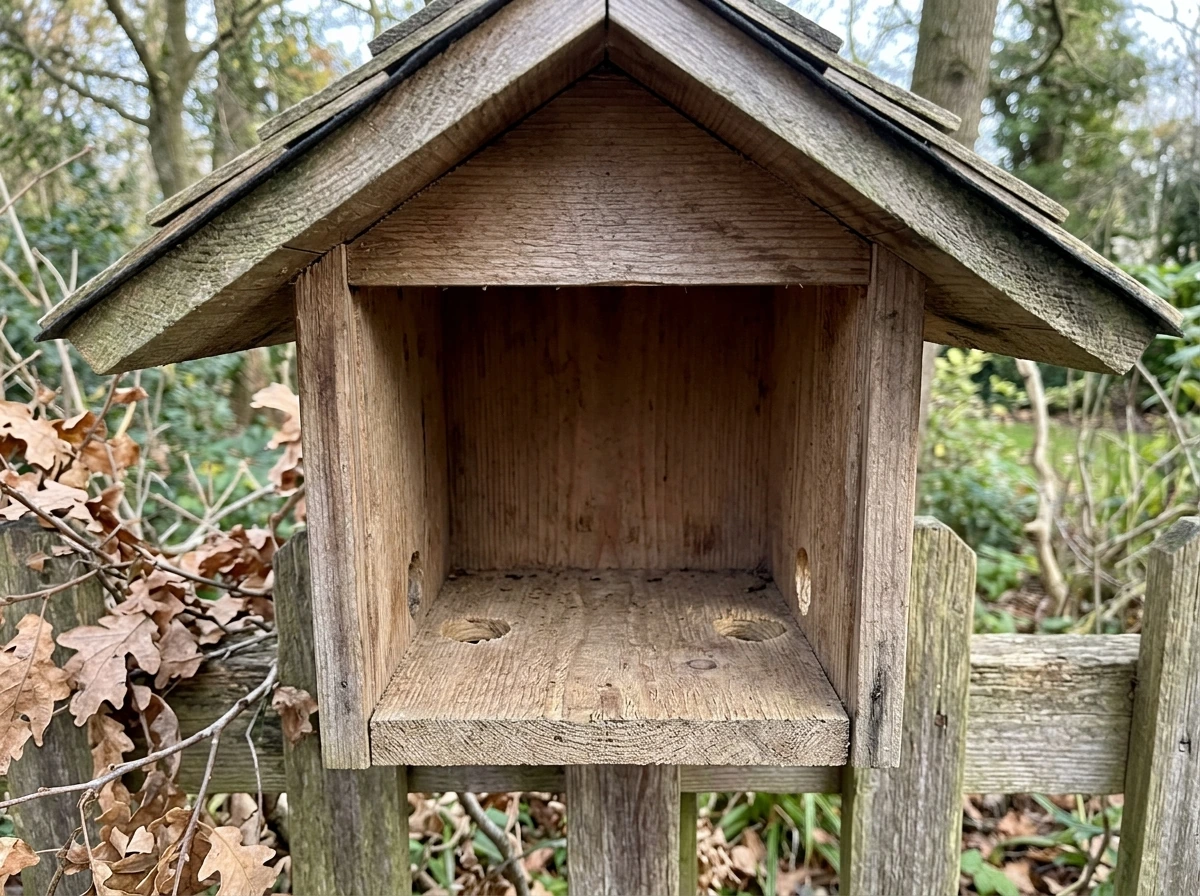
Option 2: Open cup nesting platform
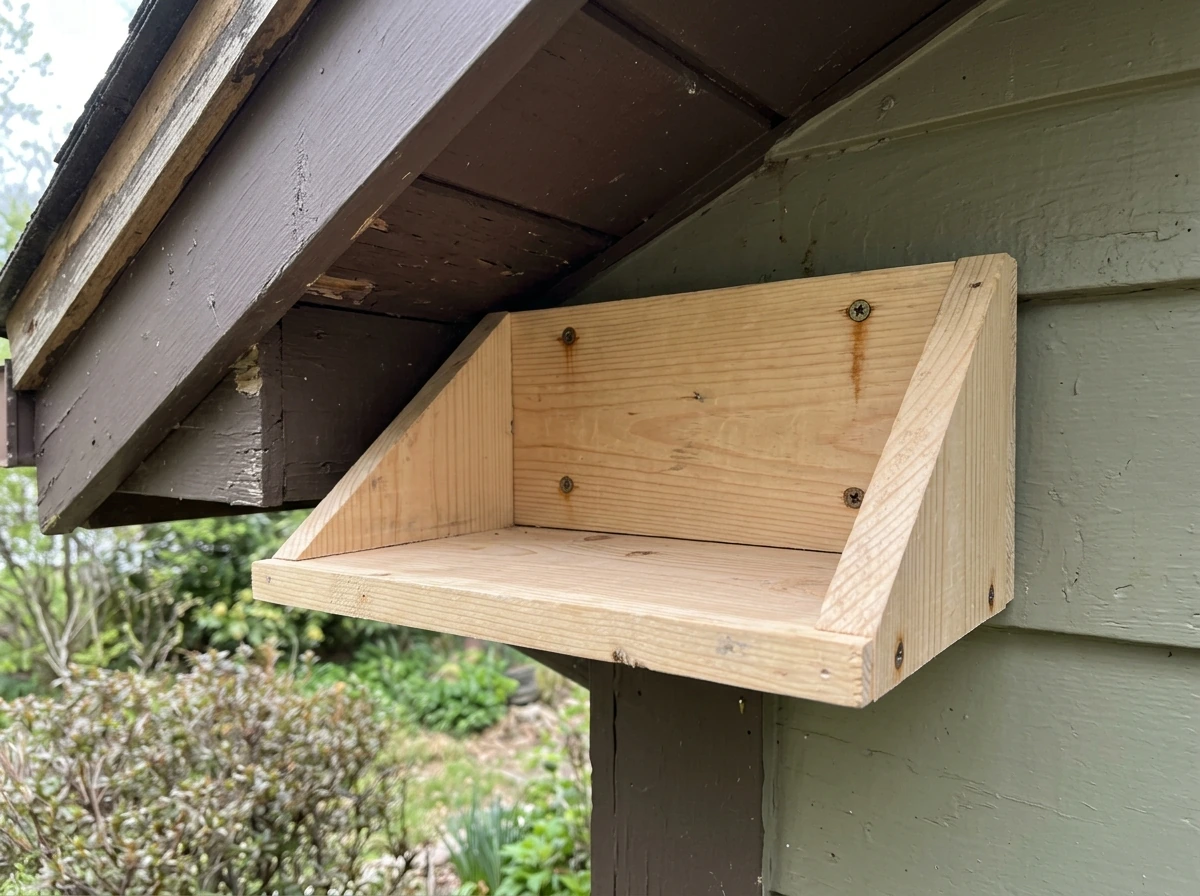
For robins, phoebes, or mourning doves, a simple three-sided shelf mounted under an eave or on a fence post works well. Cut a floor piece about 6 by 8 inches, add a back panel and two short side panels about 4 inches tall (leave the front fully open). Drill a few drainage holes in the floor. Mount it in a sheltered spot with overhead protection. You're not doing much more than giving the bird a stable platform; they'll build the actual cup nest themselves using mud, grass, and plant material.
Quick reference: cavity box dimensions by species
| Species | Floor size | Box height | Entrance hole diameter | Entrance above floor |
|---|---|---|---|---|
| Chickadee / House Wren / Nuthatch | 4" x 5.5" | ~8" | 1 1/8" | ~5 3/4 – 6" |
| Eastern / Western Bluebird | 5" x 5" | ~8 – 10" | 1 1/2" | ~6 – 8" |
| Tree Swallow | 5" x 5" | ~8 – 10" | 1 1/2" | ~6" |
| Downy Woodpecker | 4" x 4" | ~10" | 1 1/4" | ~7 – 8" |
Place, attach, and position the nest correctly
A well-built box in the wrong spot is just as useless as a poorly built one. Placement is where a lot of first-timers go wrong, and it's also the easiest thing to fix.
Height and direction
For most small cavity nesters like chickadees and wrens, mount the box between 4 and 15 feet off the ground. Bluebird boxes are typically placed 4 to 6 feet high on a free-standing pole. Face the entrance hole away from prevailing winds (usually facing east or southeast in most of North America) to keep rain out and morning sun in. Avoid facing the box south in hot climates as the interior can overheat.
Location and habitat
Different species want different surroundings. NestWatch recommends placing a house wren box within about 100 feet of woody vegetation while still leaving enough open space for the bird to fly freely to and from the entrance. Bluebirds, on the other hand, prefer open areas like meadows or lawn edges with minimal dense shrubs nearby. NJ Audubon’s nest-box placement guidance provides species-specific habitat cues, including that Eastern Bluebirds do best in open-field settings open areas like meadows or lawn edges. If you're in a suburban backyard with a mix of open lawn and some trees or shrubs, you're in good shape for wrens and chickadees.
How to mount it
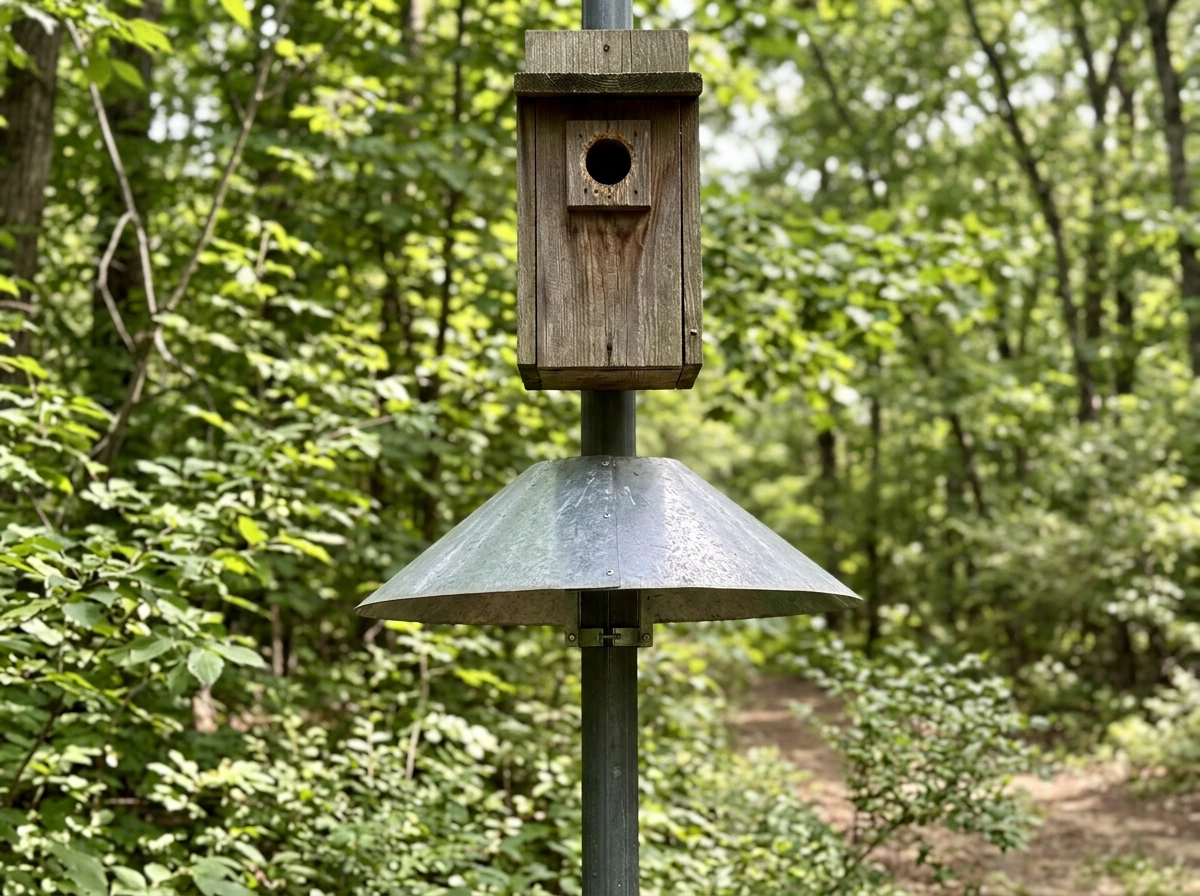
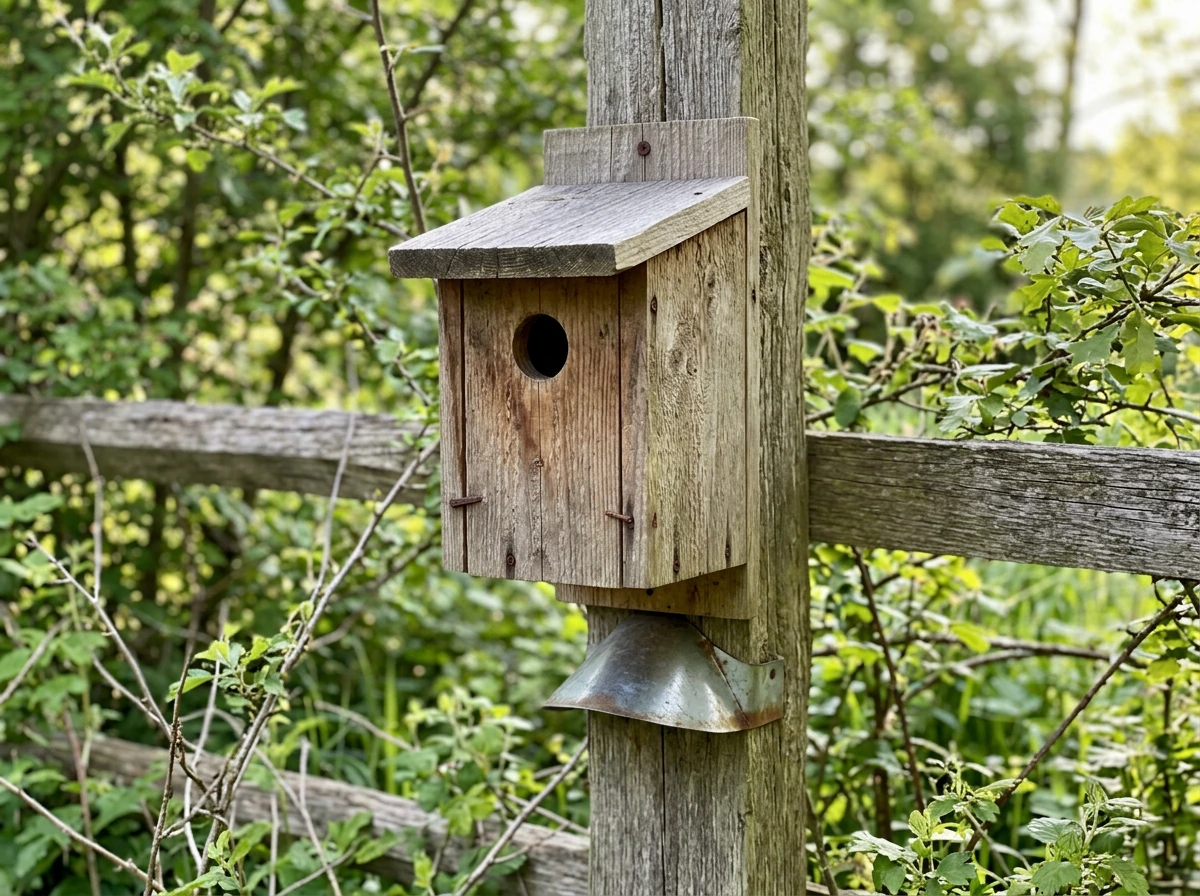
A free-standing metal pole is the best mounting option because it lets you add a baffle below the box (more on that in a moment). If you mount directly on a tree or wooden fence post, adding an effective predator guard becomes much harder. The Tennessee Wildlife Resources Agency specifically warns against placing a box where you cannot attach a predator guard, and after seeing a nest raided by a raccoon firsthand, I can tell you that warning is worth taking seriously.
Nest safety, cleaning, and protecting from predators
Predator protection
The single most effective thing you can do to protect a nest box is add a stovepipe baffle or cone-shaped metal guard on the mounting pole, positioned below the box. This stops raccoons, snakes, and cats from climbing up. It won't help if branches or fences are close enough for a predator to jump across, so clear any nearby launch points. Don't add a perch on the outside of the box (as mentioned earlier) because it gives predators a grip. OSU Extension recommends ongoing monitoring so you catch predator activity early, not after a nest has already been raided.
If squirrels are in your area, they may try to enlarge the entrance hole to access the box. A metal entrance hole guard, which is basically a metal plate with a hole drilled to the correct diameter, sits flush against the front of the box and prevents gnawing. These are inexpensive and worth adding from the start.
Cleaning schedule
Clean your nest box at least once a year, after the breeding season ends in fall. Remove all old nesting material (old nests harbor mites and parasites that can harm the next occupants) and scrub the interior with a diluted bleach solution: 1 part bleach to 10 parts water. Rinse thoroughly and let it air dry completely before the next season. The Wildlife Trusts recommends boiling or scalding nest box wood surfaces to kill any remaining parasites if you're concerned about heavy infestation.
During the active breeding season, hold off on cleaning unless the nest has been clearly abandoned. NestWatch notes that parents may raise a second or even third brood in the same box, so pulling out nesting material mid-season can disrupt that. If the nest is heavily soiled with fecal matter and appears abandoned, remove it and wipe down the interior with the diluted bleach solution, then let it dry before closing the box back up.
Weather protection
The roof overhang you built in step 6 of the construction section handles most rain. Make sure the drainage holes in the floor are clear before each season. In hot climates, consider mounting the box where it gets morning sun but afternoon shade, since overheating is a real risk for nestlings. A ventilated design (those slits near the roof you drilled during construction) helps regulate interior temperature significantly.
DIY troubleshooting and when to switch designs
If birds aren't using the box after a full season, don't give up. There's almost always a fixable reason. Here are the most common problems and what to do about each one.
Box is being ignored completely
First, check that you've placed it during or before the nesting season for your local species (late winter to early spring for most North American cavity nesters). If timing is right, look at location. Is it too close to dense brush for a bluebird? Too far from trees for a wren? Move the box and give it another full season. Birds are conservative about new structures and sometimes need a year to discover and trust a box. I've had boxes ignored for 18 months before a chickadee finally moved in.
The wrong bird is moving in
If house sparrows are taking over a box you intended for bluebirds, the entrance hole is likely too large or the location is too close to human structures. House sparrows love eaves and buildings. Move the box to a more open area and confirm the hole size. If starlings are the problem, check that your hole is no larger than 1.5 inches. Starlings cannot fit through a properly sized bluebird or wren hole.
Nest is built but eggs fail or nestlings disappear
This almost always points to a predator problem. Add or reposition the baffle on the pole. Check for branches within jumping range of the box. If you're mounting on a tree and can't add a baffle effectively, move the box to a free-standing pole. This is the number one reason to avoid mounting on trees even when it looks convenient.
When to switch designs entirely
If you've adjusted placement twice and tried two full seasons without success, it might be time to reconsider which bird you're building for. Watch carefully which species are actually present in your yard and switch your design to match them. If you're seeing robins but no bluebirds, build an open cup platform instead. If wrens are the most active birds, scale down to a smaller box with a 1 1/8-inch hole.
There are also more species-specific builds worth exploring, like a hanging woven nest for finches or a specialized nest box for parakeets, which follow the same core principles but with different dimensions and materials. If you are specifically trying to attract or care for lovebirds, you can follow a species-focused approach in this guide on how to make love bird nest.
The bottom line: start with the right hole size and the right location for the species in your area, build in drainage and ventilation from day one, mount on a pole with a baffle, and clean it every fall. Do those five things and you'll have birds using your nest box. It really is that straightforward, and the first time you see a chickadee carrying nesting material into a box you built yourself, you'll understand why this hobby is so hard to stop once you start. If you want to follow the full process from choosing a nest type to mounting it, use this guide on how to build a bird nest as your roadmap.
FAQ
Should I add nesting material inside the nest box when I build it?
For cavity-nesting birds, you should generally avoid putting out nesting material inside the box. Many species do fine with just the box structure, and adding loose material can sometimes increase parasite load or encourage unwanted species to occupy the cavity earlier. If you want to support them, place materials near the box (for open-cup platforms) or outside nearby, then let the bird decide what to carry in.
Can I use pressure-treated wood or paint the inside of the box?
No. If you want the nest box to last years, focus on exterior weather protection (paint or stain on the outside only) rather than treated wood. Keep the interior, the entrance hole area, and any surfaces inside the box untreated to avoid chemical exposure for nestlings.
Why should I not add a perch to the outside of the entrance hole?
In almost all cases, skip a decorative perch. A perch near the entrance increases predation risk because it gives predators and opportunistic birds a stable place to grab or reach the cavity. If a perch is already built into your design, remove it or use a predator baffle and clear mounting placement to reduce access.
When is it safe to clean a bird nest box during nesting season?
Some birds start nesting late, or you might only spot a second brood if the first attempt succeeded. If you see an active nest, do not clean or disturb it. Cleaning should happen after breeding season ends, and during the active season only remove material if the nest is clearly abandoned and you can do so without lingering around the box.
What if I can only mount my nest box on a tree or fence?
You should not mount boxes in ways that block predator guards. If your box is on a tree or a fixed object where you cannot install an effective baffle below, you reduce protection against climbers like raccoons and cats. Prefer a free-standing pole so the guard can be positioned correctly and consistently.
My box has a few drainage holes, do I still need to do anything else to prevent pooling water?
Drainage matters, but your main goal is preventing a waterlogged floor. Clear the drainage holes before the season and ensure the box sits level or slightly pitched to direct water away from the entrance. If you built without drainage, drill several small holes now (before the nesting season) rather than waiting until birds move in.
My nest box didn’t get used this year, what should I adjust first?
If a box is ignored after one season, try minor fixes before you replace it. Common quick checks are timing (installed during the prior late winter to early spring window), entrance hole orientation, and whether the surrounding habitat matches the species’ foraging and flight needs. Also remember birds can take one extra year to adopt a new box.
How can I reduce the risk of overheating inside the nest box?
Birds may fail to use a box because of heat, especially in exposed locations. If your summers are hot, prioritize morning sun with afternoon shade, and use a ventilated design if you included roof slits. Overheating can make the interior unsuitable even if the hole size and location are otherwise correct.
How do I stop squirrels from enlarging the entrance hole?
If squirrels or other gnawing animals are present, add a metal entrance hole guard sized to the correct opening. This prevents enlarging by gnawing while still letting the intended species enter. Install it at the start of the season because retrofitting after a nest attempt begins can cause disturbance.
What should I do if house sparrows take over the box?
If you suspect a house sparrow takeover, usually it is a combination of hole size and proximity to human structures and eaves. Confirm the entrance diameter matches your target species and consider relocating the box farther from buildings and sheltered corners that sparrows prefer.
How can I tell if my entrance hole size is causing competition with starlings or other species?
If starlings are the problem, entrance diameter is the biggest lever. Starlings generally can’t enter properly sized cavities meant for smaller birds, so verify your hole is correct (for bluebirds, use the larger specified hole size, and for wrens/chickadees the smaller one). If the hole has been damaged or chipped, replace the front piece so the opening stays exact.
Next Articles
How to Make a Bird Nest Step by Step: DIY Guide
Beginner DIY guide on how to make a safe bird nest step by step with materials, measurements, placement, and maintenance

How to Build a Chimney Swift Bird House DIY Guide
Step-by-step DIY plans to build a chimney swift bird house, with correct dimensions, placement, and weatherproofing for

How to Build an Oriole Bird House: Step-by-Step DIY
Step-by-step DIY for building an oriole bird house with right dimensions, weatherproofing, predator-safe placement, and