You can absolutely make bird toys at home that are safer, cheaper, and more engaging than most store-bought options. The key is knowing which materials are genuinely safe, sizing everything to your specific bird, and building toys that match how that bird actually plays. Whether you're outfitting a budgie's cage, a parrot's aviary, or setting up enrichment stations in the backyard for wild visitors, the process is the same: pick the right design, use verified safe materials, build it solidly, and keep up with daily checks. This guide walks you through every step.
Do It Yourself Bird Toys: Step-by-Step Safe Plans

Marcus Thornton
2 Apr 2026
Choose the right DIY bird toys for your bird
The biggest mistake people make is building a toy for "birds" in general. A toy that's perfect for a macaw is a genuine injury risk for a budgie, and a toy designed for cage use does nothing for a wild chickadee at your feeder station. Start with species and temperament, and the right design almost picks itself.
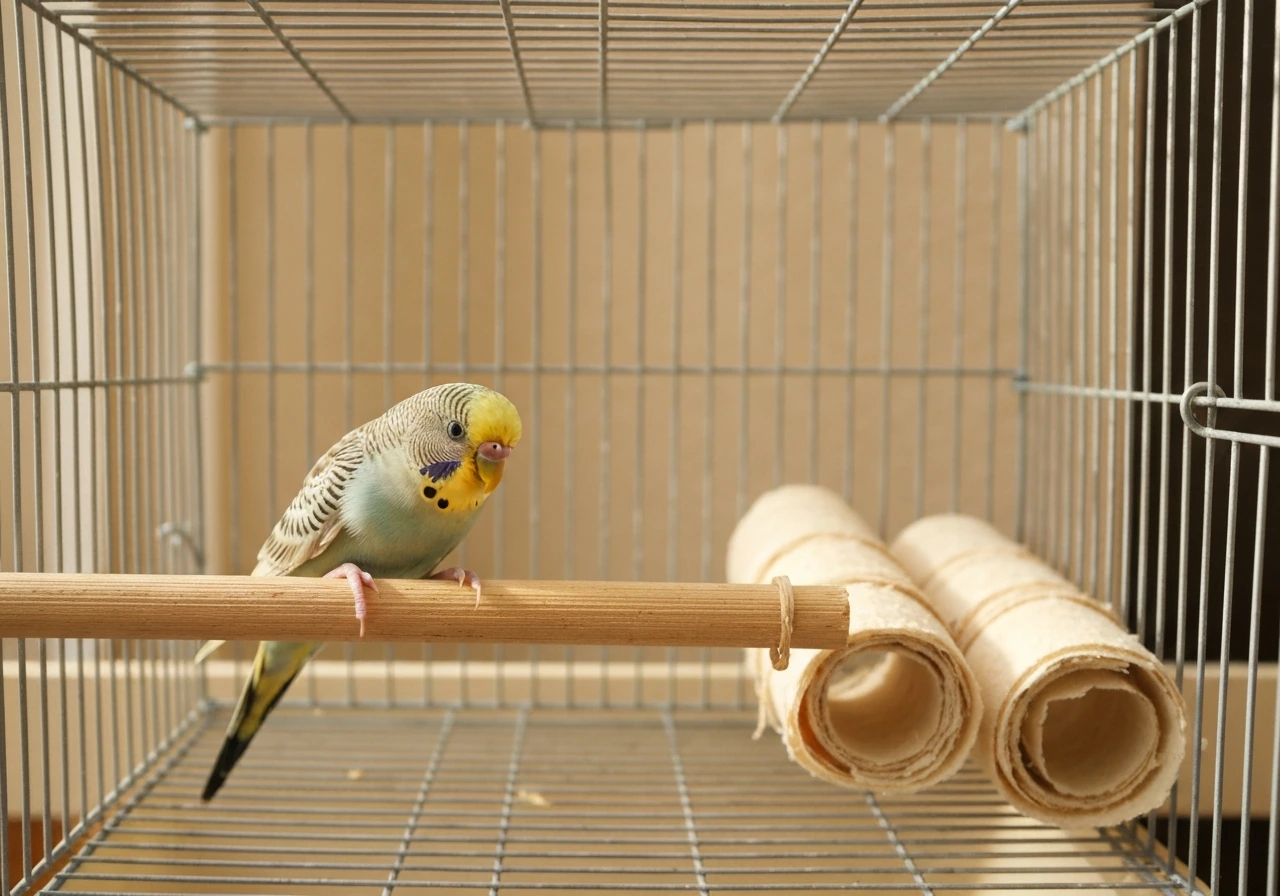
For small birds like budgies and cockatiels, think small and lightweight. Foot toys (items they can hold and chew), foraging pouches, and simple swings are the sweet spot. If you want deep guidance on how to make bird toys for budgies specifically, it's worth reading up on their particular chewing patterns and activity preferences before you cut your first piece of wood.
Medium birds like conures, caiques, and lovebirds tend to be more destructive and love puzzle-style foraging toys, ladders, and shreddable materials. Large parrots (African greys, amazons, cockatoos, macaws) need heavy-duty construction. They can and will dismantle anything flimsy in minutes, and that's actually the goal: the toy should be enriching to destroy, but the hardware holding it together should be indestructible. For parrot-specific builds, check out the guide on how to make bird toys for parrots for plans built around their strength and intelligence.
Temperament matters just as much as species. A shy, cautious bird needs toys introduced slowly and placed low in the cage first. A bold, confident bird will dive into a new toy immediately. If your bird freezes up around new objects (common with rescues or birds that weren't socialized early), start with familiar materials and shapes, and let the bird approach at its own pace.
For wild backyard birds, the goal shifts from enrichment to attraction and foraging stimulation. Seed puzzles, suet feeders with hidden pockets, and textured perches near food sources work well. Species like woodpeckers, nuthatches, and titmice actively investigate and manipulate food sources, so giving them something to work for keeps them coming back.
Safety essentials: materials, sizing, and what to avoid
This is the section most DIY guides skip over too quickly, and it's the most important one. I've seen well-meaning builds use cedar because it "smells natural" or finish wood with a water-based varnish because it said non-toxic on the label. Both are serious mistakes around birds.
Wood: what's safe and what isn't
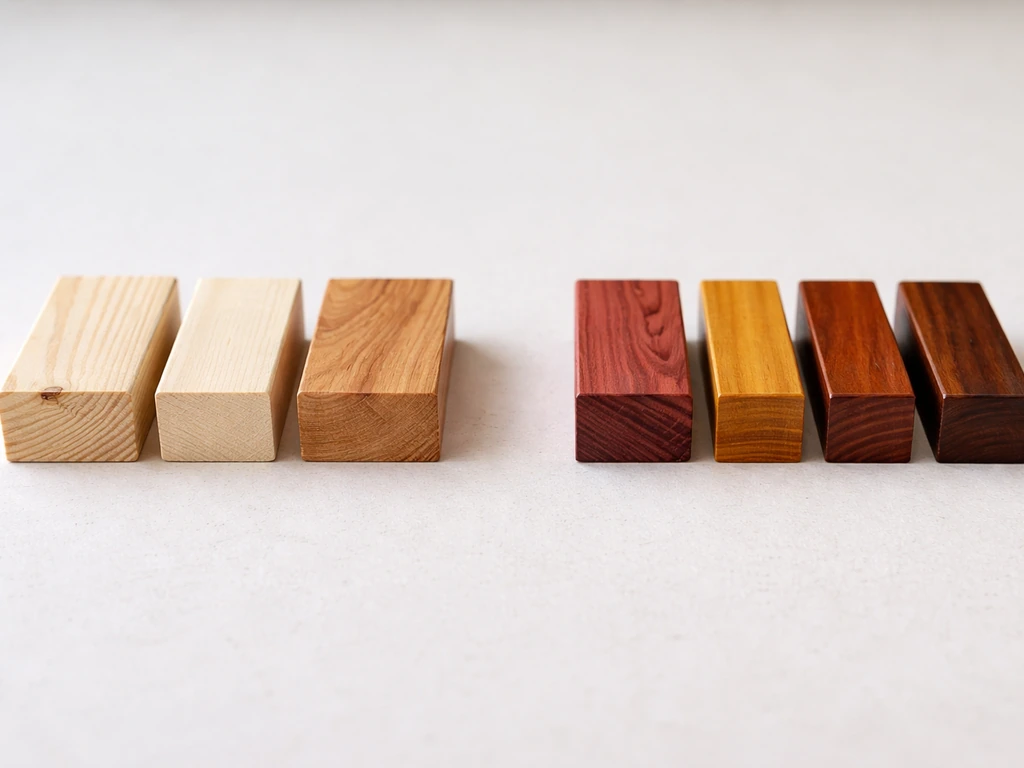
Stick to confirmed bird-safe hardwoods: pine (untreated), balsa, birch, poplar, willow, elm, and fruit woods like apple, pear, and cherry (the tree, not the processed wood). Cedar is a hard no. It contains aromatic oils that are toxic to birds, full stop. Red maple, oak, and plywood are also on the danger list. If you're using branches from outside, you need to know the exact species and confirm it hasn't been sprayed with pesticides. If you can't verify it, don't use it. As a rule of thumb: if the wood came from a hardware store and you're not 100% sure it's untreated, leave it out.
If you want to add color, skip paint, lacquer, and stain entirely. Learn how to dye wood for bird toys using food-safe dyes instead. It's easier than it sounds and eliminates the chemical risk that comes with conventional finishes.
Rope, string, and fiber: handle with care
Natural cotton rope in a thick diameter is generally considered safer than synthetic fibers, but it's not risk-free. The danger comes from fraying. When rope starts to unravel, it creates loops and long strands that can wrap around toes, wings, and necks. NW Parrot Rescue also cautions that wood can splinter and that rope should be checked for loose strands, since rope fiber types can wrap tightly around toes [fraying.
When rope starts to unravel, it creates loops and long strands that can wrap around toes](https://nwparrotrescue. org/parrot-education/toy-safety). Entanglement injuries can happen fast, and in worst cases they're fatal. This means any rope component in a DIY toy needs daily visual checks, and the moment you see significant fraying, you replace it.
Don't try to trim and keep using it. Swap it out.
Avoid long loose strings, thin twine, or leather strips as hanging or attachment materials for small birds, and skip chain or snap-hook style fasteners (like the kind on a dog leash). Best Friends Animal Society advises avoiding cowbell-style bells and jingle bells, because their slit geometry can trap a toe or beak. For parakeets and similarly sized birds, those hook styles can trap a toe or beak.
Hardware and fasteners
Quick links (also called C-links or oval links) are the safest cage attachment option because they close completely and can be sized to the bird. The link needs to be large enough that the bird's toe cannot get trapped in it, but small enough that the bird can't get its head through. Stainless steel is the best material for hardware. Avoid zinc-plated, galvanized, or coated metals because birds chew on everything including the hardware, and zinc causes heavy metal toxicity.
Sizing and small parts
Any component small enough to be fully swallowed is a choking and impaction risk. For large parrots, bead diameters under 1 inch are suspect. For small birds, anything under half an inch is off the table. Test every component: if it fits entirely in the bird's mouth, it doesn't go in the toy.
| Bird Size | Example Species | Safe Rope Diameter | Min. Bead/Part Size | Hardware Type |
|---|---|---|---|---|
| Small | Budgie, parrotlet, lovebird | 3/8 inch cotton | 1/2 inch+ | Tiny stainless quick link |
| Medium | Conure, caique, cockatiel | 1/2 inch cotton | 3/4 inch+ | Small stainless quick link |
| Large | African grey, amazon, cockatoo | 3/4 inch cotton or sisal | 1 inch+ | Medium stainless quick link |
| Extra large | Macaw | 1 inch+ sisal or manila | 1.5 inch+ | Large stainless quick link |
Quick DIY toy ideas for different setups
Not every toy project needs a weekend and a full workshop. Here are workable ideas organized by where the bird spends its time, because placement and context change what actually gets used.
Inside a cage or aviary
- Popsicle stick bundle: Stack and glue untreated popsicle sticks in a grid or fan shape using a non-toxic glue. Hang with a quick link. Small birds love to chew through these. For a full walkthrough, the guide on how to make bird toys with popsicle sticks has designs that scale from budgie to conure size.
- Foraging pouch: Fold a piece of untreated palm leaf mat (available at bird supply stores or craft shops) into a pouch and stuff with shredded paper, dried herbs, and a few small treats. Twist-tie the top with a short piece of cotton rope.
- Shreddable paper roll: Roll unbleached, unprinted paper into a tight cylinder, tie both ends with thin cotton, and hang vertically. Great for birds that like to tear.
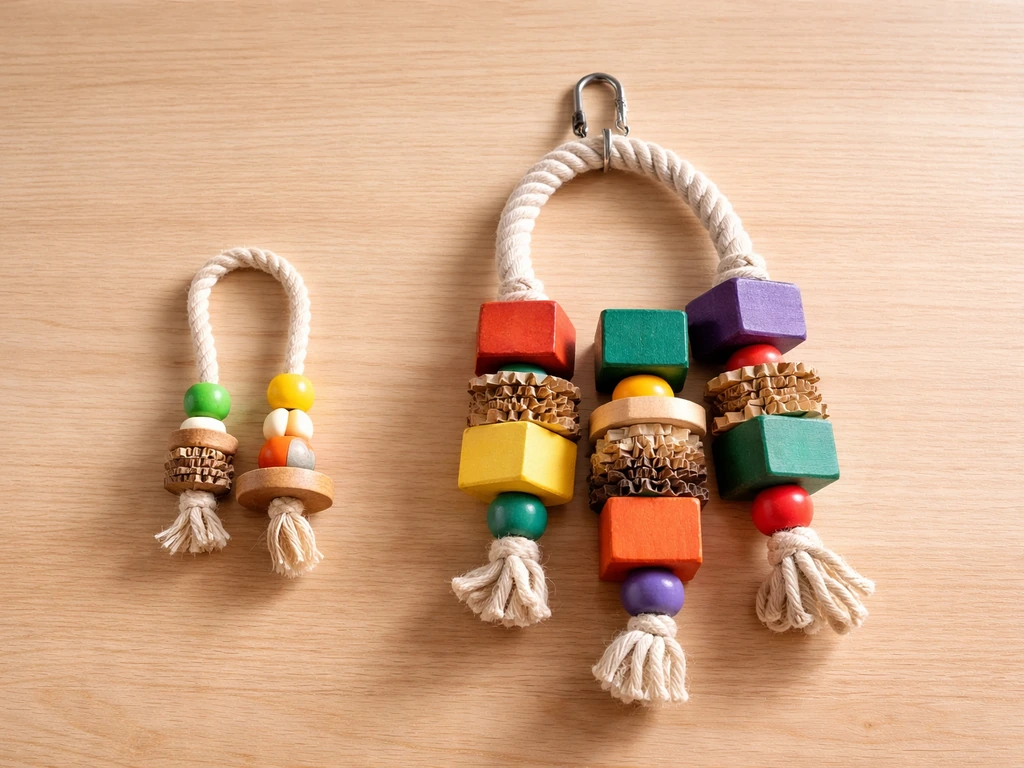
- Wooden bead ladder: Drill holes through safe wood cubes and thread them onto thick cotton rope in a ladder formation. Knot between each bead so they can't slide freely.
Outdoor feeder stations and perch areas
- Suet puzzle log: Drill 1.5-inch diameter holes into a short birch log and pack with homemade suet (lard plus seeds, no salt). Hang horizontally between two branches. Woodpeckers and nuthatches go wild for these.
- Pinecone feeder toy: Roll a clean pinecone in peanut butter (xylitol-free, no salt), press in seeds, and hang from a branch with a short piece of stainless wire twisted into a loop at the top.
- Foraging perch board: Mount a flat piece of untreated pine to a post and drill shallow cups into it. Fill with seed mix or dried mealworms. The physical act of investigating the cups is enriching for corvids, thrushes, and wrens.
- Seed spiral: Bend a piece of heavy-gauge stainless wire into a tight coil and thread small seed balls or dried flower heads onto it. Mount on a post or hang from a shepherd's hook.
For backyard wild bird stations
Wild birds interact with toys differently from pets. They're looking for food, shelter cues, and safe landing spots. The most effective "toys" for wild birds are interactive feeders and perch structures that make foraging feel natural. Think of them less as toys and more as enrichment stations. A mix of heights and styles (low platform feeders for ground feeders, elevated hopper or tube feeders for treetop birds) brings in more species variety. The same idea applies to textures: rough, natural surfaces on perches are more inviting than smooth painted wood.
How to build durable toys step by step
These two builds cover the most common scenarios: a cage toy for a pet bird and a weather-resistant enrichment feeder for outdoor use. Both are beginner-friendly and use materials you can find at a hardware store or repurpose from around the house.
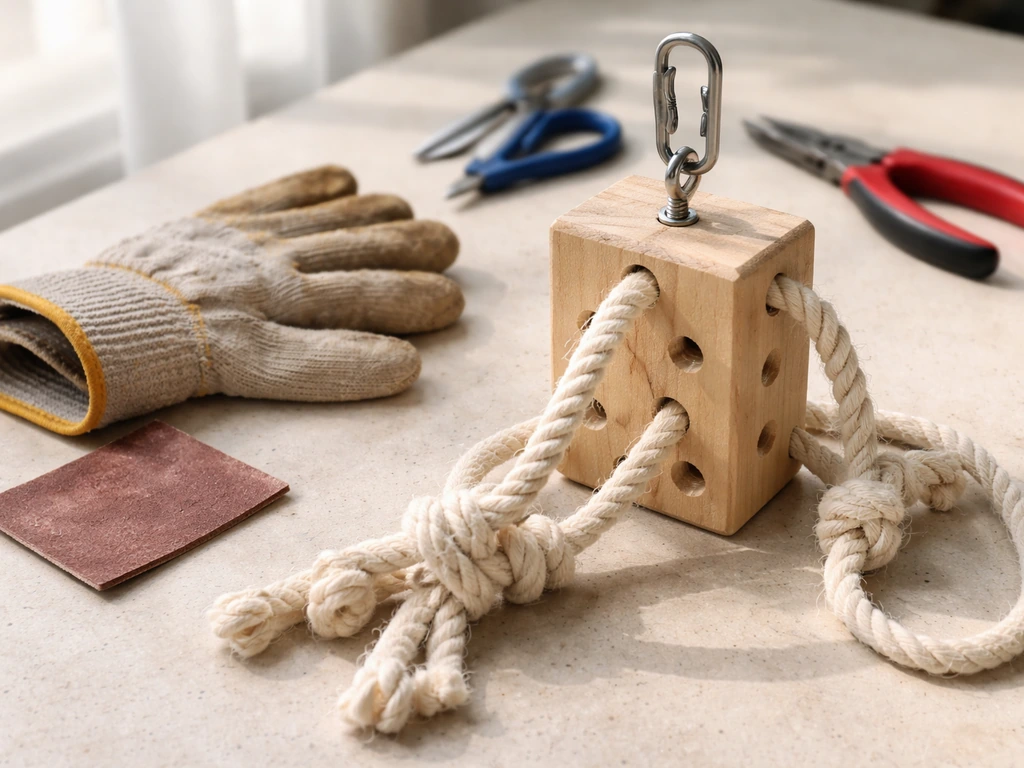
Build 1: Foraging block toy (for cage or aviary)
Materials: one untreated pine 2x4 cut to 6 inches, a 1/4-inch drill bit, a 1/2-inch drill bit, food-safe dye (optional), thick cotton rope, one stainless quick link.
- Sand the block smooth on all sides with 120-grit sandpaper. Pay attention to the edges: any splinter is a potential mouth injury.
- Use the 1/2-inch bit to drill 6 to 8 shallow cups (about 1/2 inch deep) across the top face of the block. These are your foraging holes for hiding treats.
- Use the 1/4-inch bit to drill a single hole through the center top, going all the way through. This is your hanging hole.
- If you want color, dip or brush on food-safe dye and let it dry fully before the bird touches it.
- Thread thick cotton rope through the hanging hole and knot it firmly underneath so the block cannot slide down. Attach the quick link through the loop at the top.
- Clip it to the cage bar at a height where the bird can stand on a perch and reach it comfortably.
Build 2: Drilled log foraging feeder (for outdoor use)
Materials: one birch or apple wood log (6 to 12 inches long, 3 to 4 inches diameter), a 1.5-inch spade bit or Forstner bit, a drill, suet or seed paste, stainless steel screw eye, heavy-gauge stainless wire.
- If using a fresh branch, let it dry for one to two weeks to reduce moisture and splitting risk.
- Drill 4 to 6 holes around the log at random angles, each about 1.5 inches in diameter and 2 inches deep. Stagger them so they don't break through to each other.
- Screw a stainless steel screw eye into the center of one flat end. Make sure it seats flush and doesn't wobble.
- Mix your suet: melt lard, stir in seeds, chopped dried fruit (no citrus), and a small amount of oats. Let it firm up slightly before packing the holes so it holds its shape.
- Pack the holes firmly with the suet mixture. Don't overfill: you want birds to work for it.
- Hang using a short loop of stainless wire through the screw eye. Avoid using string outside since it degrades quickly and can tangle wildlife.
For a broader library of builds to try, the collection of bird toys you can make at home covers everything from simple foot toys to more elaborate climbing structures, with materials lists for each.
Attach, hang, and maintain toys safely
Attachment and hanging

Every toy needs a secure, bird-safe attachment point. For cage toys, stainless quick links are the standard: thread through the cage bar, through the toy's hanging loop, and close fully. Check that the link is tight before leaving the bird alone with it. For outdoor feeders, use stainless wire or galvanized steel S-hooks (keep in mind birds don't chew outdoor hardware the same way, so galvanized is less of a concern outside). Never use plastic cable ties as a primary attachment point. They look strong but birds can chew through them and the sharp edge left behind is dangerous.
Positioning matters. Hang cage toys at varying heights: foraging toys near the bottom where the bird can stand and work, climbing toys along the side bars, and swings or movement toys in the middle open space. Don't pack the cage so full that the bird can't move freely between toys. A crowded cage becomes a navigation obstacle course, not an enrichment environment.
Rotation schedule and cleaning
Rotating toys every one to two weeks is one of the most effective ways to prevent boredom without constantly making new toys. Pull two or three toys out, store them clean, and reintroduce them a few weeks later. To the bird, a familiar toy that's been away for two weeks registers almost like a new toy. It's one of those low-effort tricks that genuinely works.
Cleaning is non-negotiable. Wood toys can be scrubbed with hot water and a stiff brush. Avoid soap if you can, but if you need a cleaning agent, a diluted white vinegar solution (one part vinegar to nine parts water) works well and is safe once dry. Let wood toys dry fully before returning them to the cage. Wet wood grows mold surprisingly fast in an enclosed space. Rope components should be inspected every single day. This isn't an exaggeration: a toy that was fine yesterday can develop a dangerous frayed loop overnight if the bird has been working on it.
Troubleshooting: preventing damage, boredom, and injuries
My bird ignores every toy I make
This is the most common complaint, and it almost always comes down to one of three things: the toy is too unfamiliar, it's placed in the wrong spot, or it doesn't match the bird's preferred play style. Shy or cautious birds need a slow introduction. Start by placing the toy outside the cage where the bird can see it for a few days before moving it inside. Then place it on the cage floor before hanging it. Give it a week before deciding it's a failure.
If the bird just doesn't engage with toys in general, try baiting: smear a tiny amount of favorite food on the toy, or hide a treat inside it. Once the bird interacts with it for food, it often starts interacting with it for play too.
My bird destroys toys in minutes
Good news: this means you've matched the toy type to the bird's instincts. Destruction is enrichment. The problem is usually safety after destruction, not the destruction itself. Make sure destroyed components are removed promptly. A half-demolished toy with exposed wire ends, sharp wood splinters, or unraveling rope is more dangerous than no toy at all. Plan for disposable components (popsicle sticks, palm leaf, paper) alongside a more permanent base structure.
Signs of stress or injury around toys
Watch for feather plucking near the toy, reluctance to approach a previously loved toy, holding a foot up, or any visible swelling on toes or feet. These can indicate entanglement injuries that happened while you weren't watching. Check the toy immediately for tight loops, frayed fibers, or gaps where a toe could get caught. If you see any of those, remove the toy now and don't reintroduce it without fixing the issue. When in doubt, throw it out and build a new one. The materials cost almost nothing.
The broader principles for building how to make safe bird toys cover the full hazard checklist in more depth, which is worth keeping bookmarked as a reference when you're evaluating a new design.
Outdoor toys getting damaged or ignored
For outdoor builds, weather is the main enemy. Suet melts in direct summer sun, rope degrades in rain, and untreated wood warps with moisture cycles. Position outdoor foraging feeders in partial shade to slow degradation and reduce spoilage. Wild birds also need time to discover new additions to their environment. Give a new outdoor toy or feeder station at least one to two weeks before deciding it's not working. Placing it near an existing feeder station that's already established helps bridge the discovery gap.
Where to place toys to attract or enrich birds
Backyard and outdoor setups
Placement for outdoor enrichment comes down to two things: visibility (the bird can find it) and safety (the bird can access it without predator exposure). Place feeders and enrichment stations where you can see them from a window, ideally within 10 feet of cover like shrubs or a brush pile so birds have a quick escape route. Avoid wide-open spots with no nearby shelter. Different species forage at different heights, so a vertical spread of options (a ground-level platform feeder, a mid-height suet log, and a high hanging feeder) will attract more variety than a single feeder at one height.
Seasonal adjustment matters too. In summer, shade slows spoilage and keeps suet from going rancid. In winter, placing feeders on the south or southeast side of your house gives birds a wind break and makes the station more usable during cold snaps. Move things around as conditions change and notice which spots get the most traffic.
Indoor cage and aviary placement
The general rule for cage toys is to occupy the middle and lower portions of the cage with foraging and manipulative toys, and reserve the upper area for perches and swing-style toys. This maps onto how most birds naturally use vertical space: they feel safest up high, so they rest there, and they explore and forage at mid and lower levels. Don't block the main perch with a toy the bird hasn't accepted yet. Keep pathways clear.
For aviaries with multiple birds, make sure there are more toy stations than birds so no individual gets monopolized out of enrichment. Spread toys around the perimeter so subordinate birds can access something without having to compete directly with a dominant cage mate.
If you're just getting started and want the full picture before you build your first toy, the general guide on how to make bird toys is a solid starting point that covers the foundational concepts across species and setups. Pick one project from this guide, gather your materials, and build it this week. The learning curve is genuinely short, and once you've made one toy that your bird actually uses, you'll want to keep going.
FAQ
How can I tell if a component is too small for my DIY bird toys?
Do a “mouth fit” check on every separate piece, not just the main body. If the bird can fit the component fully inside its beak or mouth, treat it as a choking risk and redesign. Also check the gaps created when pieces move or separate, for example rope knots around hardware or dangling loops near the beak.
What should I do if the cotton rope frays on one of the toys?
If a rope starts to unravel, replace the entire rope section rather than cutting frayed ends. Trimming can leave short loose fibers that still loop around toes or wings. When you replace, inspect all neighboring parts too, because fraying often spreads from a weak attachment point.
Can I dye the wood and still keep the toy safe?
Yes, but keep it targeted and test first. Food-safe dye is for color only, it should not be used with sealed finishes or mixed with varnishes and lacquers. Start with a small, dyed offcut, then rub it against a damp white cloth after it dries, if color transfers heavily, switch to undyed wood or a different dye.
My bird is afraid of new toys, how should I introduce it?
Use different introduction timing for pets versus rescues or shy birds. A cautious bird may need 3 to 7 days of visual exposure outside the cage, then several days on the floor before any hanging placement. If the bird freezes or avoids the toy, do not “force it” by moving it closer, return to the previous step for a few more days.
Why does my bird ignore a toy that seems safe and well-built?
Avoid using a new toy as a first replacement for a bird’s favorite perch location. Replace one element at a time, and keep the main perch and access pathways unchanged. If the toy blocks the bird’s movement or landing route, many birds will ignore it even if it is safe.
How often should I rotate DIY toys without stressing my bird?
Rotate gradually. If you remove too many at once, the bird loses familiar routines and may not use anything new. A practical approach is to swap 2 to 3 toys at a time, keep 1 to 2 favorites in place, and reintroduce the rotated set after 10 to 14 days.
What is the best cleaning method for wood and rope components?
For cage toys, scrub with hot water and a stiff brush, then fully dry before returning. If you use vinegar, rinse with plain water afterward if your bird is sensitive to odor, and confirm everything is completely dry because wet wood can grow mold quickly in enclosed cages.
Can I use the same DIY toys for both indoor cages and outdoor use?
Yes, weatherproofing changes materials risk. Untreated wood warps, rope degrades in rain, and suet spoils quickly, so outdoor builds should use partial shade, drainage-friendly designs, and frequent inspection. Also assume outdoor hardware can rust, if you see pitting or sharp edges, replace immediately.
Where should I place outdoor enrichment so wild birds actually use it?
Wild birds can be stressed by clutter and unsafe access. Place feeder stations where you can see them from a window, but also position the station near real escape cover like shrubs or brush piles. Avoid putting toys or feeders in wide open areas, predators can limit approach and make birds abandon the station.
How do I prevent one bird from monopolizing DIY toys in an aviary?
For multiple birds, the goal is redundancy, more stations than birds, plus multiple access routes. If all toy positions are on one side or one level, a dominant bird can guard it. Spread toys around the perimeter and vary heights so subordinate birds still have a safe way to approach.
What warning signs mean I should remove the toy immediately and get help?
If you see repeated plucking or your bird spends time holding a foot up near the toy, treat it as a possible entanglement or pressure injury, remove the toy right away, and inspect for tight loops or gaps. Persistent symptoms after removal, limping, swelling, or changes in behavior mean you should contact an avian veterinarian.
What are common attachment mistakes that make even a good toy unsafe?
For cage attachments, do not rely on any plastic tie, even temporarily. If you cannot fully confirm closure and fit with a metal quick link or properly secured stainless hardware, rebuild the connection. A safe attachment is one you can physically verify is closed, tight, and not able to rotate into a pinch point.
Next Articles
How to Make Bird Toys for Budgies: DIY Safe Builds
DIY step-by-step budgie toy guide: safe materials, 5+ builds for chewing, shredding, climbing, foraging, and cage fit.

How to Build a Chimney Swift Bird House DIY Guide
Step-by-step DIY plans to build a chimney swift bird house, with correct dimensions, placement, and weatherproofing for

How to Build an Oriole Bird House: Step-by-Step DIY
Step-by-step DIY for building an oriole bird house with right dimensions, weatherproofing, predator-safe placement, and