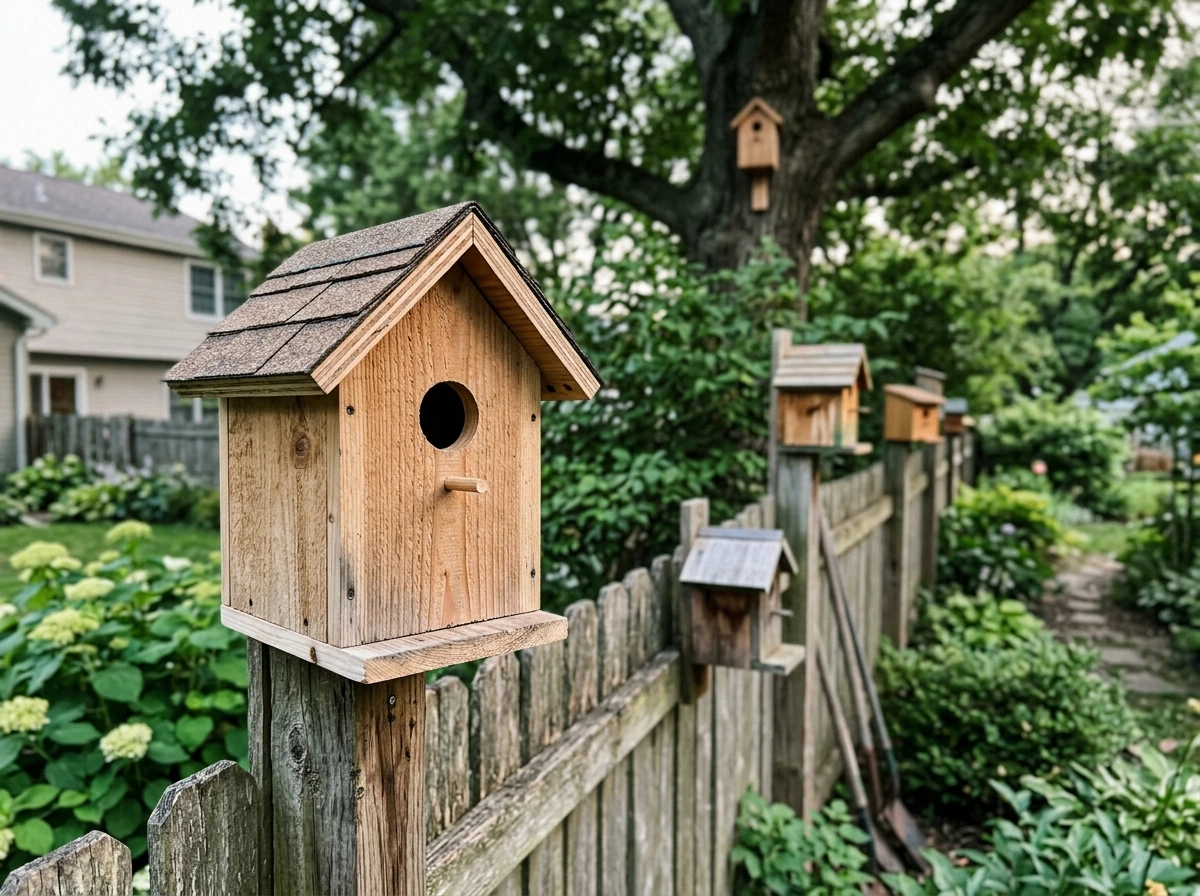
Yes, you can absolutely build a bird house yourself, one that looks great AND actually gets used by real birds. The trick is balancing the "cool" factor with the practical stuff birds actually need: the right entrance hole size, enough interior depth, ventilation, drainage, and a spot that feels safe to a nesting pair. Get those things right, and you can make the outside look however you want. Skip them, and you'll end up with a decorative box that sits empty all season. Let's walk through everything from choosing a design to hanging it up and keeping it clean.
Do It Yourself Bird Houses: Plans, Kits, and Build Steps

Marcus Thornton
23 Mar 2026
Choosing the Right DIY Bird House Design

The first decision isn't about aesthetics, it's about which bird you want to attract. A bluebird-style box is all about matching the right measurements to the birds you want, so the entrance hole and interior depth matter most. Different cavity-nesting species have very different requirements, and a box built for a bluebird won't work for a chickadee, and vice versa. The entrance hole diameter is the single most critical measurement. It controls which birds can enter and, just as importantly, which competitors and predators get kept out.
Here's a quick look at common backyard species and their entrance hole needs:
| Species | Entrance Hole Diameter | Interior Floor Size | Mounting Height |
|---|---|---|---|
| Eastern Bluebird | 1 1/2 in | 4x4 in to 5x5 in | 3–6 ft |
| Black-capped Chickadee | 1 1/8 in | 4x4 in | 4–8 ft |
| House Wren | 1 1/4 in (or smaller) | 4x4 in | 5–10 ft |
| Northern Flicker | 2 1/2 in | 7x7 in | 6–20 ft |
| Wood Duck | 4x3 in oval | 10x10 in | 4–6 ft above water |
For most backyard builders, the Eastern Bluebird is a great starting point. The 1.5 in entrance hole is well-documented, widely tested, and does something really useful: it physically excludes European Starlings, which need a larger opening to get in. That's not a small thing, starlings are aggressive cavity competitors and will take over an unprotected box fast. If you're drawn to House Wrens instead, they actually prefer a slightly smaller opening, around 1 to 1 1/4 inches, which keeps bluebirds out and reduces competition between species.
Once you know your target species, your design options open up. A bluebird box can have a shed-style angled roof, a gabled roof, a flat cedar slab top, whatever you like visually, as long as the interior dimensions and hole size stay correct. That's the design freedom you actually have. The structure is flexible; the specs are not.
DIY Bird House Plans and Layout Basics
A good bird house plan isn't just a cut list, it's a checklist of functional features that protect the birds inside. Here's what every plan needs to account for, regardless of how creative the outside looks.
Interior dimensions
For a bluebird-style box, shoot for a floor area of about 4x4 inches to 5x5 inches. The interior should be 8 to 12 inches deep from the floor to the underside of the roof. The entrance hole's bottom edge should sit roughly 5 to 6 inches above the floor, this gives the nestlings enough depth to stay hidden and safe from predators reaching in, while not being so deep that the adults struggle to exit. Leave about 1 1/2 inches between the top of the entrance hole and the underside of the roof for ventilation space.
Ventilation and drainage
Heat kills nestlings. A box with no ventilation can turn into an oven on a sunny afternoon, and this is one of the most common design failures I see on decorative boxes that were never meant to be functional. Drill at least two or four small ventilation holes (around 1/4 inch diameter) near the top of the side panels. Peoria Audubon’s Nest Box Tips also note that even imperfect workmanship, such as small gaps or imperfections, can still support good ventilation and airflow cross-ventilation and prevent heat buildup. You can also leave a small gap at the top of the front panel, the Audubon bluebird plan uses this approach and it works well. For drainage, drill four small holes in the corners of the floor, or cut the floor panel slightly smaller than the walls so water can escape around the edges. Neither solution is complicated, but skipping both is a real problem.
Roof overhang

Your roof should extend at least 2 inches past the front of the box and ideally a bit over the sides too. This keeps rain from driving directly into the entrance hole and shields the front panel from weather. An angled roof sheds water better than a flat one, and if you're using cedar or pine, it also reduces warping over time.
Access for monitoring and cleaning
Build in an access door. This is non-negotiable if you want to actually monitor the nest, remove non-native House Sparrow nests (which you should do promptly), and clean the box out between seasons. A hinged side panel or a pivoting front panel held by a single screw or nail at the bottom works well. I've built boxes without easy access before and immediately regretted it when I needed to check on a nest or do a mid-season cleanout.
Interior texture near the entrance
The inside of the front panel below the entrance hole should be rough or scored with horizontal kerfs (shallow saw cuts). This gives fledglings something to grip when they're climbing up to exit for the first time. Smooth wood right below the hole is a safety hazard. Don't sand this surface, score it or leave it rough.
DIY Bird House Kits vs Building from Scratch

Kits are a solid option for beginners or for doing a project with kids, and there's no shame in using one. But they're not all created equal, and a few things are worth checking before you buy.
What a kit typically includes
Most DIY bird house kits come with pre-cut wood panels, pre-drilled holes (sometimes including the entrance hole), sandpaper, and basic hardware like nails or screws. Some include paint or stain. The assembly is usually designed to take 30 to 60 minutes with basic tools.
What to check before buying a kit
- Entrance hole diameter: Confirm it matches your target species. Some kits use a generic 1.5 in hole; others use odd sizes that don't match any common cavity nester well.
- Wood type and thickness: Look for untreated wood at least 3/4 inch thick. Thin plywood warps fast and offers poor insulation.
- Ventilation and drainage: Check that the design includes both. Many decorative kits skip these entirely.
- Access door: If the kit has no way to open the box for cleaning, it's a decorative item, not a functional nest box.
- Pre-drilled interior texture: The inside below the hole should be rough or scored. If it's smooth, you'll want to add scoring yourself before assembly.
- No pressure-treated wood: Treated lumber contains preservative chemicals that are harmful to birds. If the kit doesn't specify untreated, ask or skip it.
Building from scratch: the case for it
When you build from scratch, you control every dimension. You can nail the species-specific specs, choose the best wood, add a predator guard baffle, and design the exterior however you want. It costs less per box once you've got the tools, and a single 1x6x8 ft cedar board can yield two complete bluebird boxes. It costs less per box once you've got the tools, and a single 1x6x8 ft cedar board can yield two complete bluebird boxes. the step-by-step guide below is built around scratch construction, but if you're starting with a kit, use those same principles to verify and improve what the kit gives you.
Materials, Tools, and Safety for Beginner-Friendly Builds
Best wood choices
Cedar is the gold standard for outdoor bird houses, it's naturally rot-resistant, dimensionally stable, and weathers beautifully without paint. Pine and fir work fine too, especially for a first build. Use 3/4 inch to 1 inch thick lumber throughout. Avoid pressure-treated wood entirely; the preservatives used in treated lumber are genuinely harmful to birds and you should not use it regardless of how it's marketed. Plywood thinner than 1/2 inch warps quickly outdoors and isn't worth the savings.
Repurposed wood is a great option if it's untreated and solid. Old fence boards, pallet wood (check that it's heat-treated, not chemically treated, look for the HT stamp), and barn wood all work and give the box a great rustic character.
Paint, stain, and finish
If you want to paint the outside, use latex (water-based) paint in a light, natural color, earth tones, muted greens, or unpainted natural wood are best. Dark colors absorb heat. Never paint the inside of the box, and never paint around or inside the entrance hole. The fumes from even dried paint inside a small enclosed box can be harmful, and painted entrance holes can deter birds from investigating. If you want to weatherproof untreated pine, a water-based exterior stain on the outside only is fine.
Tools you'll actually need
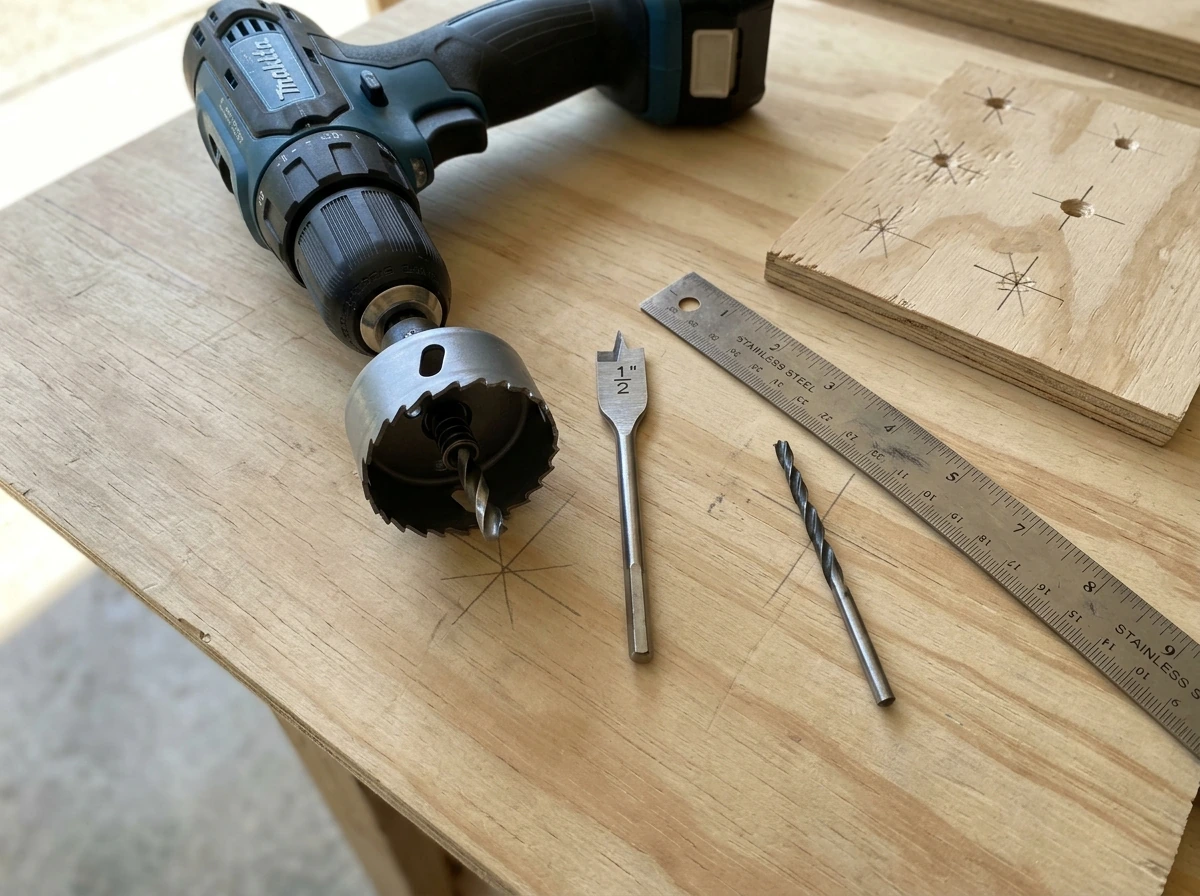
- Drill with a 1 1/2 in (or species-appropriate) hole saw bit for the entrance
- 1/4 in drill bit for ventilation holes
- Small drill bit (1/8 in) for pilot holes and drainage
- Hand saw or circular saw for cutting panels
- Tape measure and pencil
- Sandpaper (80 grit for rough spots, leave interior below entrance hole unfinished)
- Exterior wood screws (1 5/8 in or 2 in) — screws hold better than nails outdoors
- Clamps or a helper to hold pieces during assembly
- Safety glasses and ear protection
If you don't own a hole saw, a spade bit in the right diameter works fine and costs a few dollars. A jigsaw can cut the entrance hole too, though circles are harder to keep clean by hand. For the panel cuts, many hardware stores will rip lumber to width for a small fee, totally worth it if you don't have a saw.
Building a Cool Bird House: Step-by-Step Construction Workflow
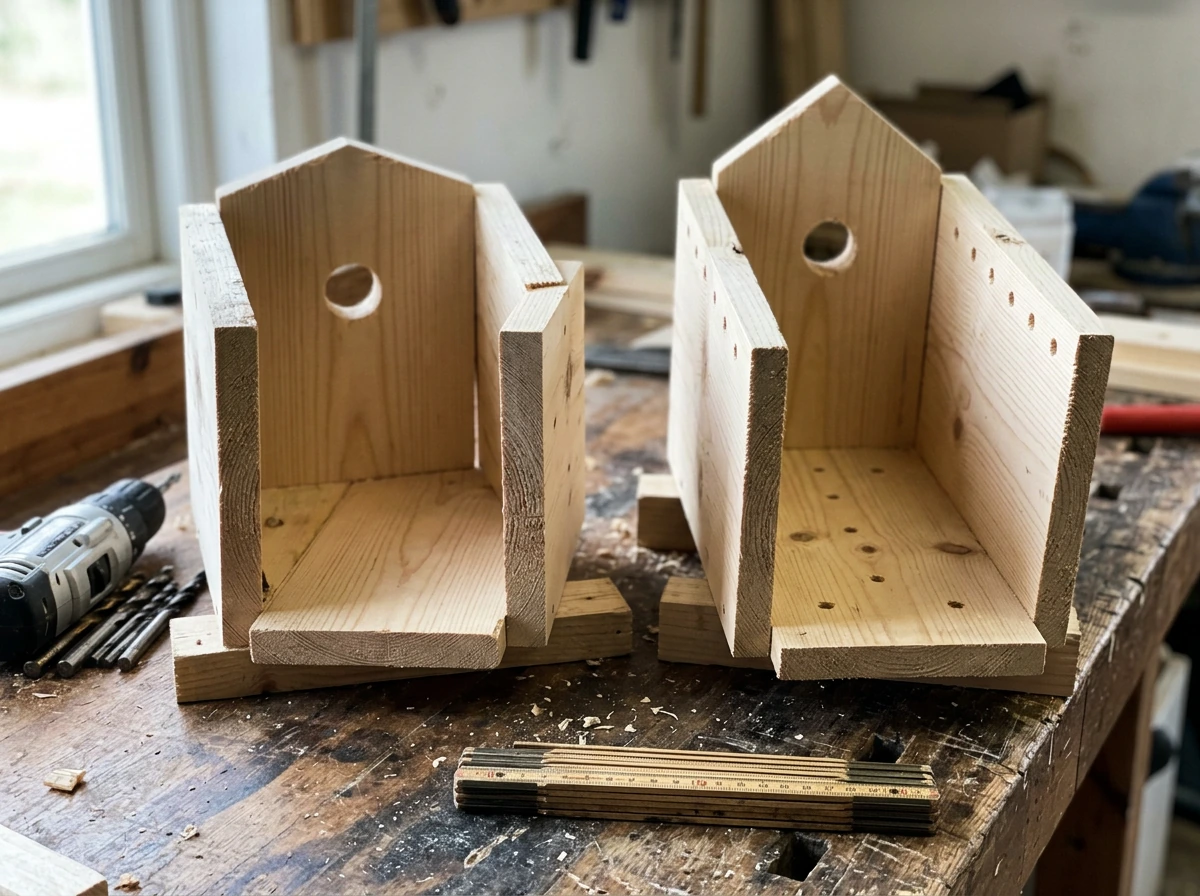
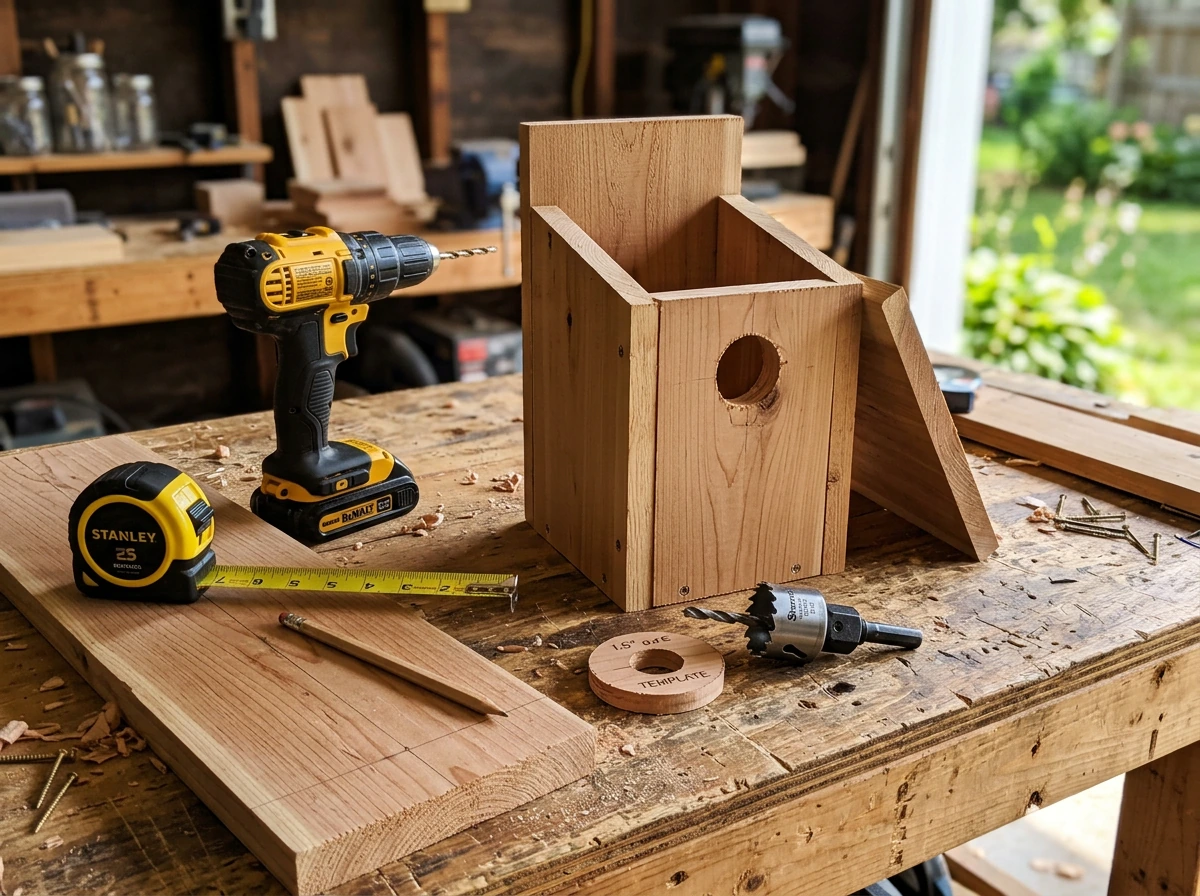
This build is a classic bluebird-style box with a shed roof (single angled slope), a hinged side panel for access, and enough room for a creative exterior finish. The dimensions hit the Eastern Bluebird spec, but you could adapt the exterior design freely. I'm using a standard 1x6 cedar board, which cuts to about 5 1/2 inches wide, close enough to the target floor dimension and easy to work with.
Step 1: Cut your panels
From a 1x6x8 cedar board (which gives you about 5 1/2 inches of usable width), cut the following pieces. The roof panel gets an angled cut at the top of the front panel (or you can cut the back panel taller) to create the slope, a 15 to 20 degree pitch is plenty.
| Panel | Width | Length | Notes |
|---|---|---|---|
| Floor | 4 in | 4 in | Cut down to 4 in square; smaller than walls allows drainage gap |
| Front | 5.5 in | 9 in | Taller side cut at angle for roof slope; entrance hole drilled here |
| Back | 5.5 in | 11 in | Taller than front to create shed roof angle; mounting hole here |
| Two Side Panels | 5.5 in | 9 in each | Ventilation holes drilled near top on both sides |
| Roof | 7–8 in | 8 in | Wider than box for 1–2 in overhang front and sides |
Step 2: Drill the entrance hole
On the front panel, measure up from the bottom edge 7 to 8 inches and mark the center of the entrance hole. Use your 1 1/2 inch hole saw or spade bit and drill slowly and steadily. The center of the hole should sit about 6 to 7 inches above the floor once assembled. After drilling, score the interior surface below the hole with a chisel or rough saw cuts to give fledglings a grip surface. Do not sand this area.
Step 3: Drill ventilation and drainage holes
On each side panel, drill two or three 1/4 inch holes near the top edge, about 1/2 inch down from the top. These allow cross-ventilation and prevent heat buildup. On the floor panel, drill four 1/4 inch holes in the corners, or leave a 1/4 inch gap around the perimeter when you attach the floor (by making the floor panel slightly undersized, which you've already done by cutting it to 4 inches square). Both ventilation and drainage should be in place before assembly.
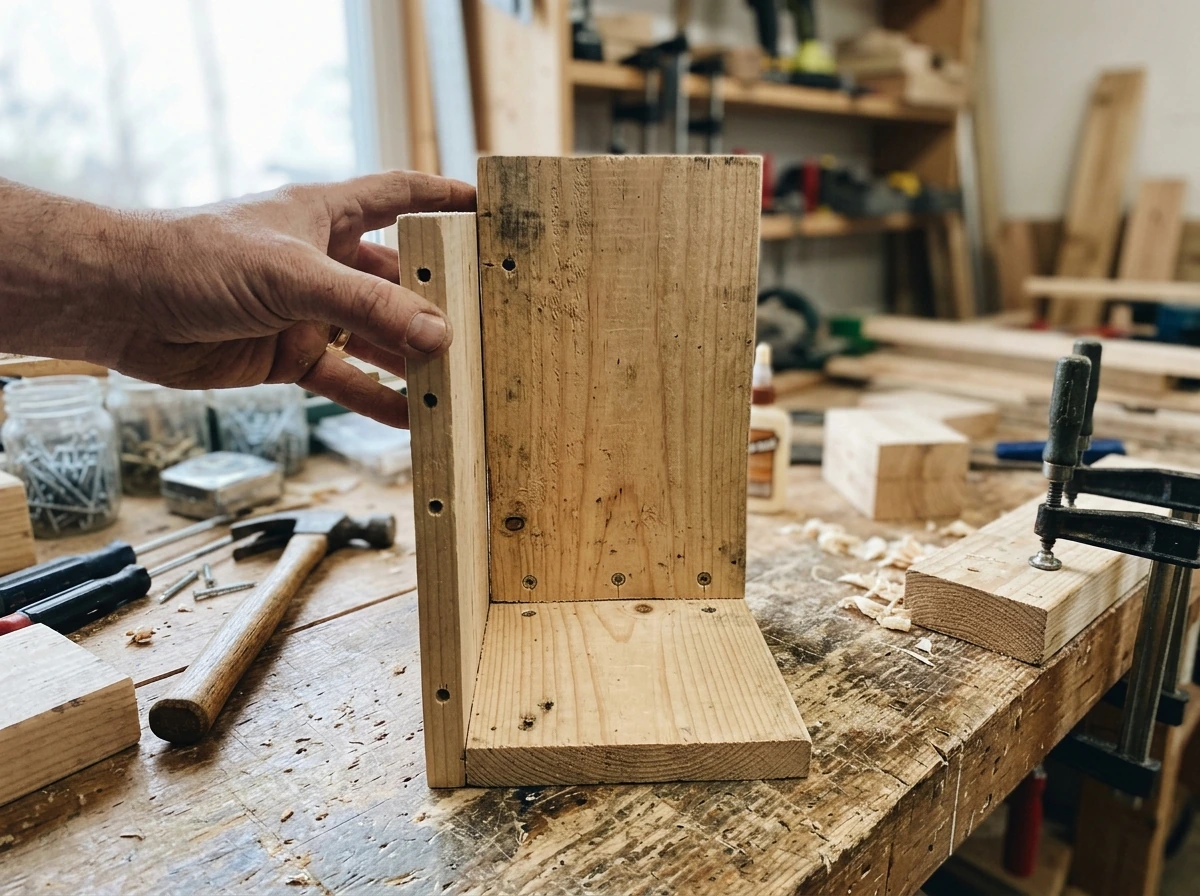
Step 4: Assemble the box
Start by attaching the floor to the back panel using two screws. Then attach one fixed side panel to the back, then the front to the floor and fixed side. Pre-drill all screw holes to avoid splitting the wood. Leave the second side panel as your access door: attach it at the bottom with a single screw on each side that acts as a pivot point, then add a nail or twist-lock at the top to hold it closed. This gives you a side panel that swings open for cleaning without any tools needed.
Step 5: Attach the roof
Position the roof panel so it overhangs the front by at least 2 inches and the sides by about 1 inch each. Screw down through the roof into the top of the back panel and front panel. If you've cut a slope into the top of your front and back panels, the roof should sit flush against them. The roof overhang is doing real work here, it's keeping rain out of the entrance hole and protecting the front panel from water damage.
Step 6: Add exterior design details
Now's the time to make it look cool. You can add thin decorative trim pieces to the roof edges, burn a pattern into the wood with a woodburning tool, attach a rustic branch or twig as a decorative perch element on the sides (avoid adding a perch below the entrance hole, predators and House Sparrows use them to harass nesting birds inside). You can paint the exterior in earthy tones or leave the cedar natural. Just keep paint and stain off the interior and the entrance hole area.
Maintenance, Cleaning, and Setup for Attracting Birds
Where and how to mount it
For bluebirds, mount the box 3 to 6 feet above the ground in an open area, a lawn, meadow edge, or open field is ideal. Face the entrance hole toward an open area, preferably east, north, or south rather than west, to avoid afternoon sun heating the interior. Mount on a smooth metal pole rather than a wooden post or fence, the smooth surface makes it much harder for raccoons and squirrels to climb. If you're using a wooden post, add a predator baffle below the box. If you're in an area with cats or other ground predators, mounting toward the higher end of the 3 to 6 foot range (or slightly above it) adds a meaningful safety margin.
If you're putting up more than one bluebird box, space them at least 300 feet apart (about 100 yards) so nesting pairs don't compete with each other. In areas where mountain bluebirds or western bluebirds mix with eastern birds, stretch that spacing to 200 to 300 yards. Boxes out of sight of each other work well too.
Monitoring during nesting season
Check the box every week or two during nesting season. A quick look inside to count eggs or check on nestlings takes about 30 seconds and gives you a chance to catch problems early. If you find a nest made of coarse grass with no lining, or a domed nest stuffed with plastic and debris, that's likely a House Sparrow nest, remove it promptly and repeatedly. House Sparrows are non-native and not protected, and leaving their nests discourages bluebirds from ever settling in your box. If the right birds are using it, you'll see a neat cup of fine grass or pine needles, often with feathers added as the chicks get bigger.
End-of-season cleaning
After the last brood has fledged (usually by late summer in most regions), open your access door and remove all nesting material. Scrub the interior with a stiff brush, no soap or chemicals needed, just physical removal of old nest, parasites, and debris. Let the box dry completely before closing it back up. Leaving old nest material in over winter just gives parasites and pests a cozy home. Some boxes in mild climates get checked and cleaned between broods mid-season if a pair raises two clutches in the same box.
Weatherproofing and longevity
Cedar holds up for years without any finish, but pine and fir benefit from a water-based exterior stain on the outside. Check screws and mounting hardware each spring before birds return, outdoor screws loosen and rust over winter. If the entrance hole has enlarged from weathering or woodpecker activity, fit a hole reducer (a small wooden insert with the correct-size opening) rather than replacing the whole box. Hole reducers are inexpensive, easy to make yourself, and can also be used to temporarily downsize an opening if House Sparrows are persistently targeting your box.
Your build and setup checklist
- Choose your target species and confirm the correct entrance hole diameter
- Cut panels to correct dimensions (floor, front, back, two sides, roof)
- Drill entrance hole at correct height above floor (5–6 in from floor bottom to hole bottom)
- Score interior surface below entrance hole for fledgling grip
- Drill ventilation holes near top of both side panels (1/4 in diameter)
- Drill or cut drainage provision into floor panel
- Assemble box with exterior screws; designate one side panel as the hinged access door
- Attach roof with 2 in front overhang and 1 in side overhang
- Add exterior design, paint (outside only, earth tones, no entrance hole area)
- Mount on smooth metal pole 3–6 ft high in open habitat, entrance facing away from west
- Add predator baffle to pole below the box
- Check weekly during nesting season; remove House Sparrow nests promptly
- Clean out all nesting material after final brood fledges
- Inspect hardware and entrance hole size each spring before birds return
Building your own bird house gives you something a store-bought box almost never does: a structure that's actually spec'd for the birds in your yard, built from materials you trust, designed the way you want it to look. Start with one box, get it mounted this season, and see what moves in. If you want to go deeper on species-specific builds, we've got detailed guides on bluebird houses, homemade bird houses using found materials, and even gourd-style houses that many cavity nesters love.. One build has a way of turning into ten.
FAQ
Can I build a do it yourself bird houses project that looks unique, but still be safe for nesting birds?
Not if you want nesting birds. A bird house needs to have the right entrance opening, interior depth, and ventilation and drainage, otherwise it becomes a seasonal decoration. Even when the outside looks perfect, the wrong measurements can invite competitors or predators or overheat the nestbox.
What should I do if my entrance hole is slightly too large after drilling?
Use species-specific hole size targets, and if you cannot get the exact size, fit a hole reducer insert rather than leaving a larger opening. Also check that the entrance bottom edge sits at the correct height above the floor so adults can exit while nestlings stay protected.
Can I clean a do it yourself bird house with soap or disinfectant between seasons?
If the box has been used previously, remove old nest material and scrub with only a stiff brush, then let it dry fully. Avoid adding any disinfectant or chemical residue, and do not close the box until it is completely dry, because trapped moisture can chill nestlings.
Is it okay to paint or stain the inside of a bird house to extend its life?
In general, you want to avoid treating the interior surface at all. Only use water-based exterior stain or paint on the outside, skip the area around the entrance hole, and never paint the entrance itself. Scented finishes can deter birds from investigating.
Do I need to add a perch inside do it yourself bird houses designs to help birds exit?
It depends on the bird. For the standard bluebird-style setup, a slightly rough or kerfed surface below the entrance helps fledglings climb out. Do not add any interior perch, and keep the wall surfaces smooth above the exit area if your plan includes any climbing aids.
How can I stop House Sparrows from taking over a do it yourself bird house?
If you get repeated House Sparrow attempts, treat it as an ongoing competition issue, not a one-time fix. Remove sparrow nests promptly, keep an eye out weekly, and use a hole reducer to bring the opening down to your target species size.
What mounting mistakes prevent do it yourself bird houses from being used?
Mounting height and placement matter more than most people think. For bluebirds, aim for roughly 3 to 6 feet in an open area, face the entrance away from harsh late-day sun, and use a smooth metal pole when possible. If you must use a wooden post, add a predator baffle.
How often should I inspect a DIY bird house during the nesting season?
Yes, but timing is important. Start checking once nesting season begins, and be consistent every week or two. Quick checks are usually less disruptive than long gaps, and early detection helps you remove competitor nests before they spread to multiple clutches.
What are the signs my do it yourself bird house is no longer safe or properly sized?
If you notice enlargement, warping, or gaps that change the entrance opening or allow predators in, address it immediately. Use a hole reducer if the entrance got larger, tighten or replace loose hardware, and ensure ventilation and drainage holes stay clear of debris.
Can I build a do it yourself bird house without an access door?
It can, but plan for easy access. An access door lets you remove nests and clean out debris between broods, and it also helps you react quickly to non-native nesting. A design that cannot be opened safely and promptly often leads to missed cleanouts.
How far apart should I place multiple DIY bird houses?
More than one box can work, but spacing and visibility count. Keep boxes far enough apart to reduce territorial overlap, and avoid placing them where birds can easily see or access the entrance of a nearby box. For mixed western and eastern bluebird areas, increase spacing.
Can I change the exterior design while keeping the bird-house measurements the same?
Absolutely, as long as you preserve the functional specs. You can modify the roof style, add exterior trim, and change the exterior finish, but do not change entrance diameter, interior depth, ventilation near the top, drainage at the floor, or the height of the entrance relative to the floor.
Next Articles
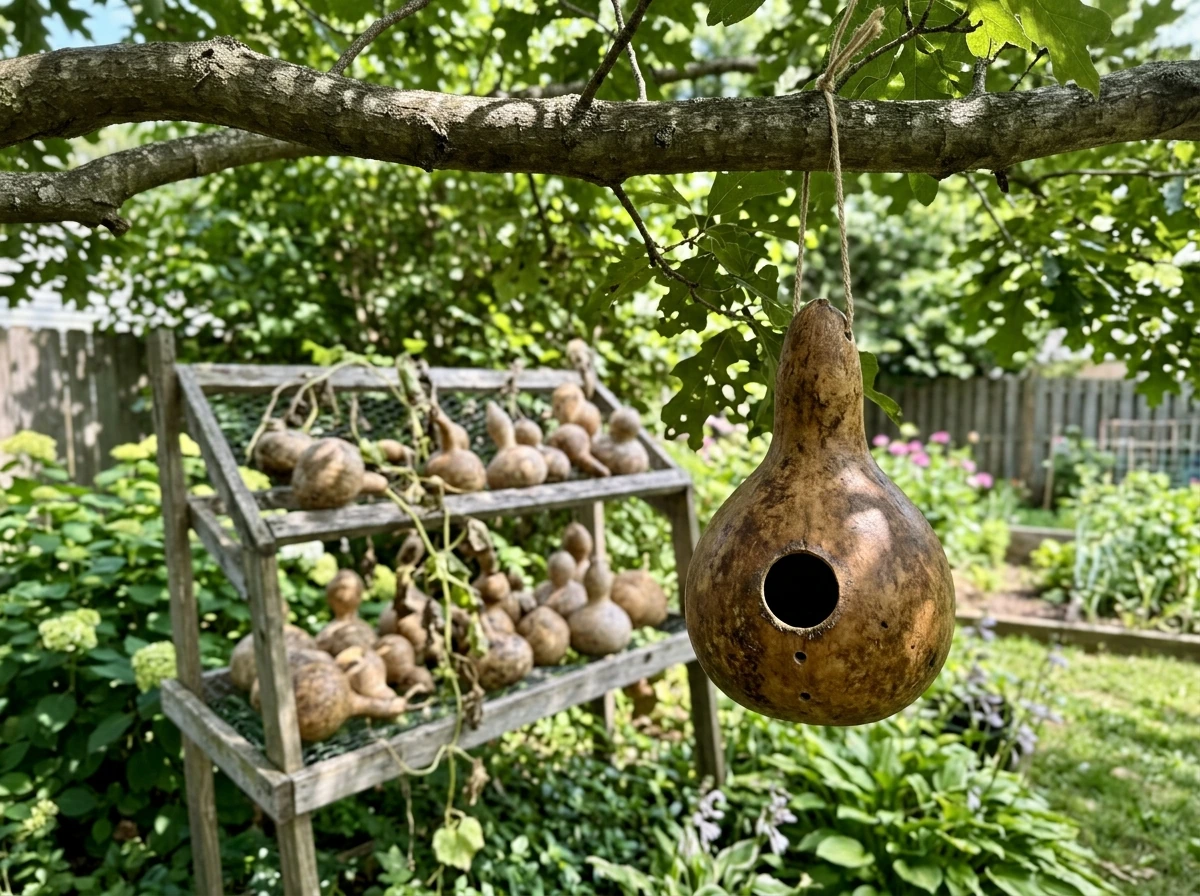
How to Make Gourd Bird Houses: Drying to Mounting
Step by step gourd bird house DIY: dry and cure gourds, cut openings, add drainage, mount safely, finish for outdoors.
How to Build Bird Houses Step-by-Step: Simple DIY Plans
Beginner-friendly DIY guide with wood cut list, step-by-step build, design tips, placement, and clean-out for nesting

How to Build a Chimney Swift Bird House DIY Guide
Step-by-step DIY plans to build a chimney swift bird house, with correct dimensions, placement, and weatherproofing for