You can absolutely make a gourd bird house DIY bird houses, and it is one of the most satisfying backyard projects out there. The short version: grow or buy a birdhouse gourd, dry it for two to four months until it rattles when you shake it, drill the entrance hole to the right diameter for your target bird, add ventilation and drainage holes, clean out the interior, and hang it up. That is the whole workflow. Everything below just fills in the details so yours actually works, lasts, and attracts birds instead of sitting empty. Once you have the right gourd and dry it properly, you are ready to start assembling your homemade bird house step by step.
How to Make Gourd Bird Houses: Drying to Mounting

Marcus Thornton
23 Mar 2026
Choosing the right gourd for bird housing
Not every gourd you find at the farm stand will work as a bird house. You want a birdhouse gourd (Lagenaria siceraria), sometimes called a bottle gourd or hardshell gourd. These are the ones with a thick, woody shell once dried. Decorative gourds from the pumpkin family will rot on you. Birdhouse gourds have a tough, almost plastic-like shell after curing that holds up outdoors for years.
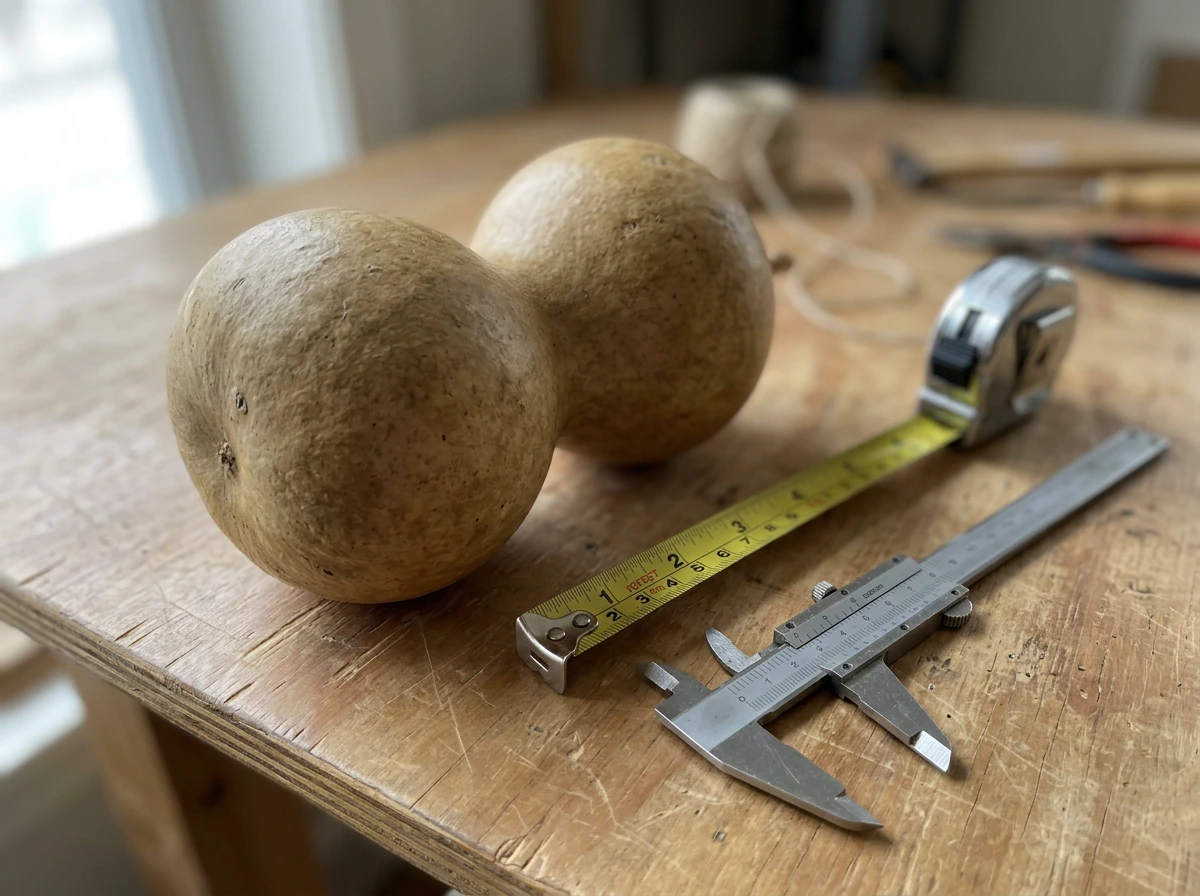
Size matters because the gourd determines which birds you can attract. A smaller gourd around 5 to 6 inches wide is ideal for wrens. Chickadees do well in a gourd closer to 8 inches wide. If you want bluebirds, you need a larger gourd, at least 8 to 10 inches wide, to give them enough interior space. Buying or growing gourds in a range of sizes gives you options once you sit down with a drill.
When you are picking gourds at a market or evaluating your harvest, look for ones with a long neck (that becomes your hanging point) and a round, full body. Avoid any that already have soft spots or obvious damage to the skin before drying. Small blemishes and surface mold during curing are totally normal, but structural soft spots before drying starts are a sign the gourd will not cure well.
How to dry and cure gourds so they do not mold or crack
This is the step most beginners skip or rush, and it is the one that determines whether your gourd bird house lasts one season or ten. Drying takes two to four months or longer depending on the size of the gourd. Larger gourds just take more time. There is no shortcut, and trying to use an oven or heat gun will crack the shell.
Where and how to dry them
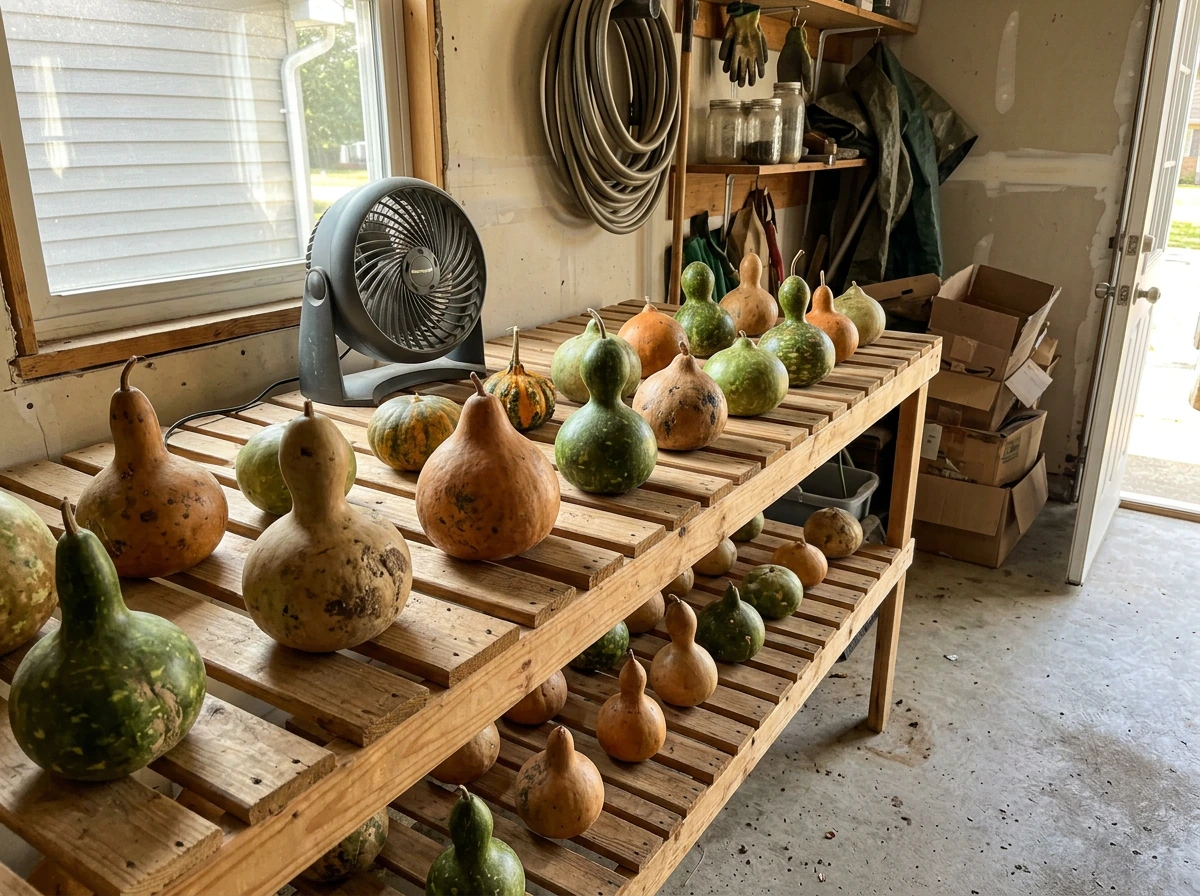
Set your gourds in a single layer in a warm, dry spot with good airflow. A garage shelf, a covered porch, or a basement with a fan running all work well. Do not stack them or put them in a sealed bin. They need air circulation or they will rot from the outside in. Turn them every few days for the first couple of weeks so the bottom does not sit in any trapped moisture.
What to do when mold shows up
Here is where a lot of first-timers panic and throw gourds away: mold on the outside during curing is completely normal. It is part of the natural drying process. The mold will die once the gourd is thoroughly dried. If you see it building up, just wipe it off with a bleach solution (roughly one part bleach to ten parts water), rinse with plain water, and let the gourd dry again. Do not bag it or seal it right after wiping. Keep the airflow going.
How to know when the gourd is ready
A fully cured gourd will feel noticeably light compared to when it was fresh, the outer skin will be hard, and here is the best test: pick it up and shake it. If you hear the seeds rattling around inside, the gourd is dry and ready to work with. If it sounds dull or feels heavy, give it more time. Grit puts it simply: a gourd is cured when it is thoroughly dry and hard-shelled. Do not rush past this test.
Preparing the gourd shell before you drill anything
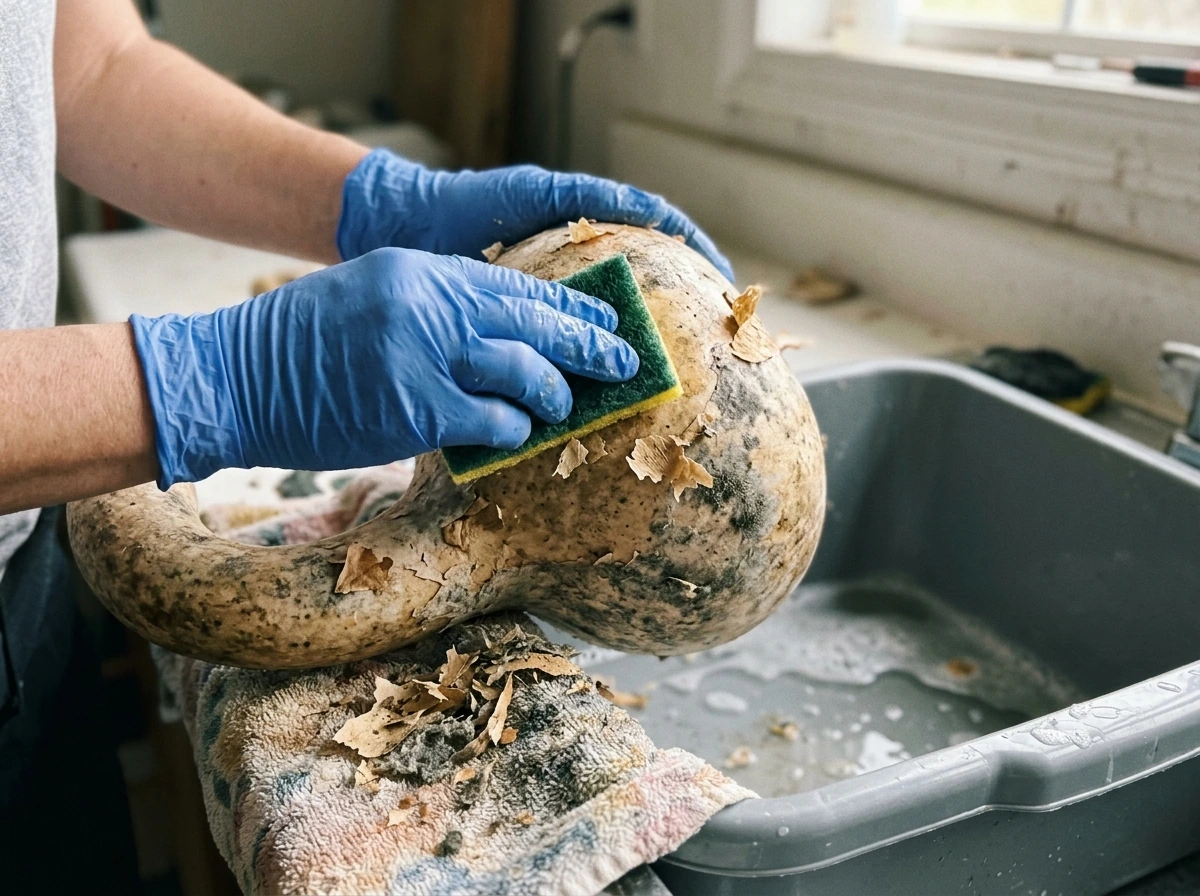
Before you cut or drill, clean the outside of the cured gourd. Use a scrubbing pad and warm soapy water to remove the papery outer skin and any dried mold residue. Some people use a mild bleach solution here as a final sanitizing step. Once it is clean and dry, lightly sand the surface with 80 to 100 grit sandpaper. This helps any exterior finish adhere later and removes rough patches that could catch water.
One important safety note that I learned the hard way: wear a dust mask or respirator any time you are drilling, cutting, or sanding a gourd shell. The dust is caustic and genuinely irritating to your lungs and eyes. Safety glasses too. This is not optional advice. Gourd dust is no joke.
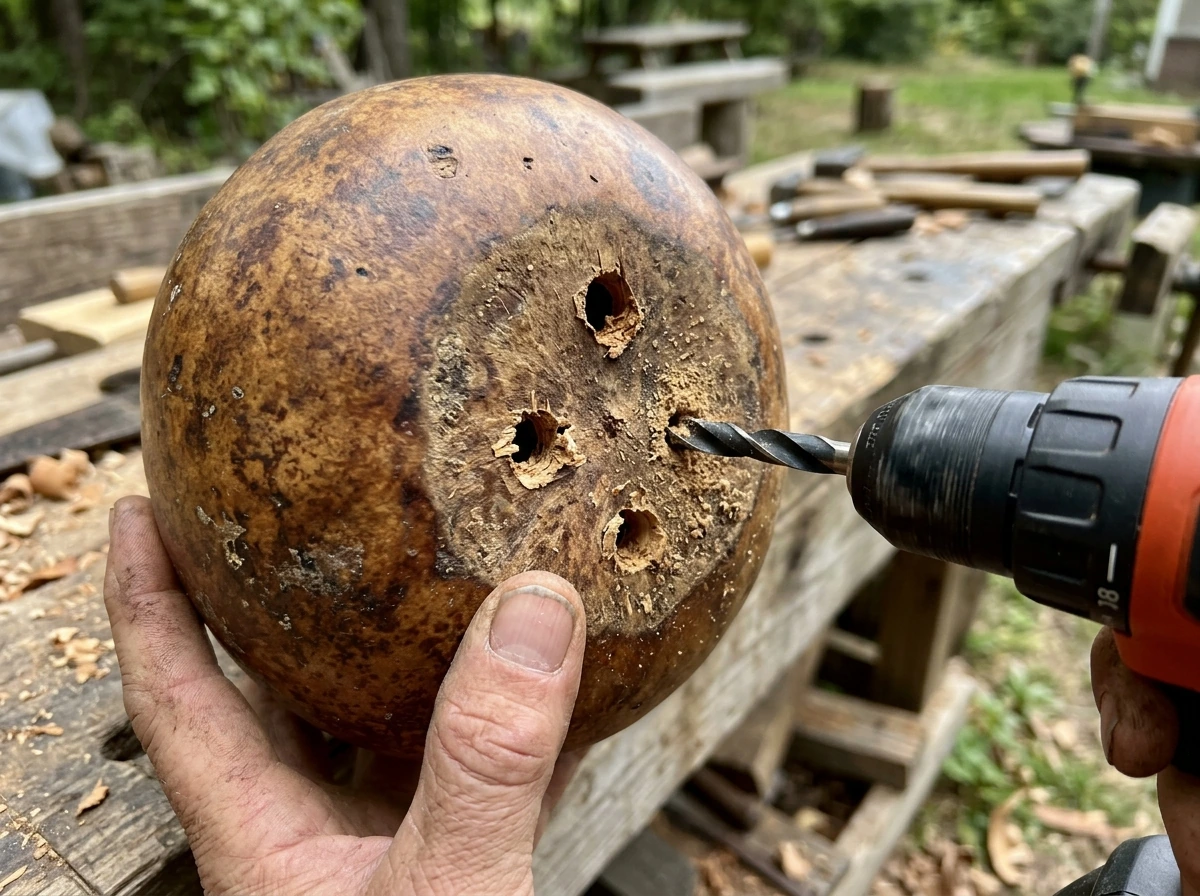
Cutting the entrance hole and adding ventilation and drainage
This is the most important technical step in the whole project because the entrance hole diameter determines which bird species will actually use the house. For common cavity-nesting birds, TPWD provides a nestbox and birdhouse checklist that includes entrance-hole sizing guidance, including bluebird-related measurements blank" rel="noopener noreferrer">entrance-hole sizing guidance for common cavity-nesting birds. The Ogden Nature Center birdhouse size requirements PDF also emphasizes that entry hole size, including species-appropriate sizing for smaller openings, helps ensure the right birds can access the house blank" rel="noopener noreferrer">entry hole diameter determines which bird species will actually use the house. Too small and your target bird cannot get in. Too large and you invite starlings or house sparrows that will displace native cavity nesters.
Entrance hole sizes by species
| Target Bird | Gourd Width | Entrance Hole Diameter | Hole Height Above Bottom |
|---|---|---|---|
| House Wren | 5-6 inches | 1 inch | 7 inches |
| Chickadee | 8 inches | 1 1/8 inches | 7 inches |
| Eastern Bluebird | 8-10 inches | 1 1/2 inches | 6-7 inches |
Use a hole saw or spade bit to cut the entrance. A hole saw gives you a cleaner edge, but a sharp spade bit works fine. Drill slowly and let the bit do the work. Mark the spot first with a pencil so you do not drift. Position the hole on the front of the gourd at roughly the right height above the bottom, as shown in the table above. After cutting, use sandpaper or a small round file to smooth any rough edges around the opening.
Cleaning out the interior
Once the entrance hole is cut, reach in (or use a stick, spoon, or wire) to pull out the dried seeds and fiber. The interior contents of a fully dried gourd can vary quite a bit in texture, some come out almost dusty and some are more fibrous. Get as much out as you can, then shake the rest loose. Give the inside a light rinse if needed, let it dry completely again before hanging. Do not paint or varnish the interior. This is a firm rule from the American Gourd Society and it makes sense: birds need a natural surface inside for nesting, and fumes from finishes in an enclosed space are not something you want near eggs or chicks.
Ventilation holes
Drill a few ventilation holes near the top of the gourd body, just below the neck. Use a 1/4-inch drill bit and make two to four holes spaced around the upper sides. These let heat escape during hot weather, which is critical because overheating is genuinely hazardous to nestlings. Do not skip this step even if the gourd is going in a shady spot.
Drainage holes
Drill four to five holes in the bottom of the gourd using a 3/8-inch bit. Some builders also add two or three small holes on the lower sides. These let any rain that blows in through the entrance drain out instead of pooling and soaking the nest. A wet nest is a dead nest, so do not skip drainage either. You can also drill a couple of small holes in the sides near the bottom as a backup.
One more thing: do not add a perch below the entrance hole. It seems like a nice touch but it actually helps predators and nest competitors, not your target birds. Native cavity nesters do not need a perch to enter their own house.
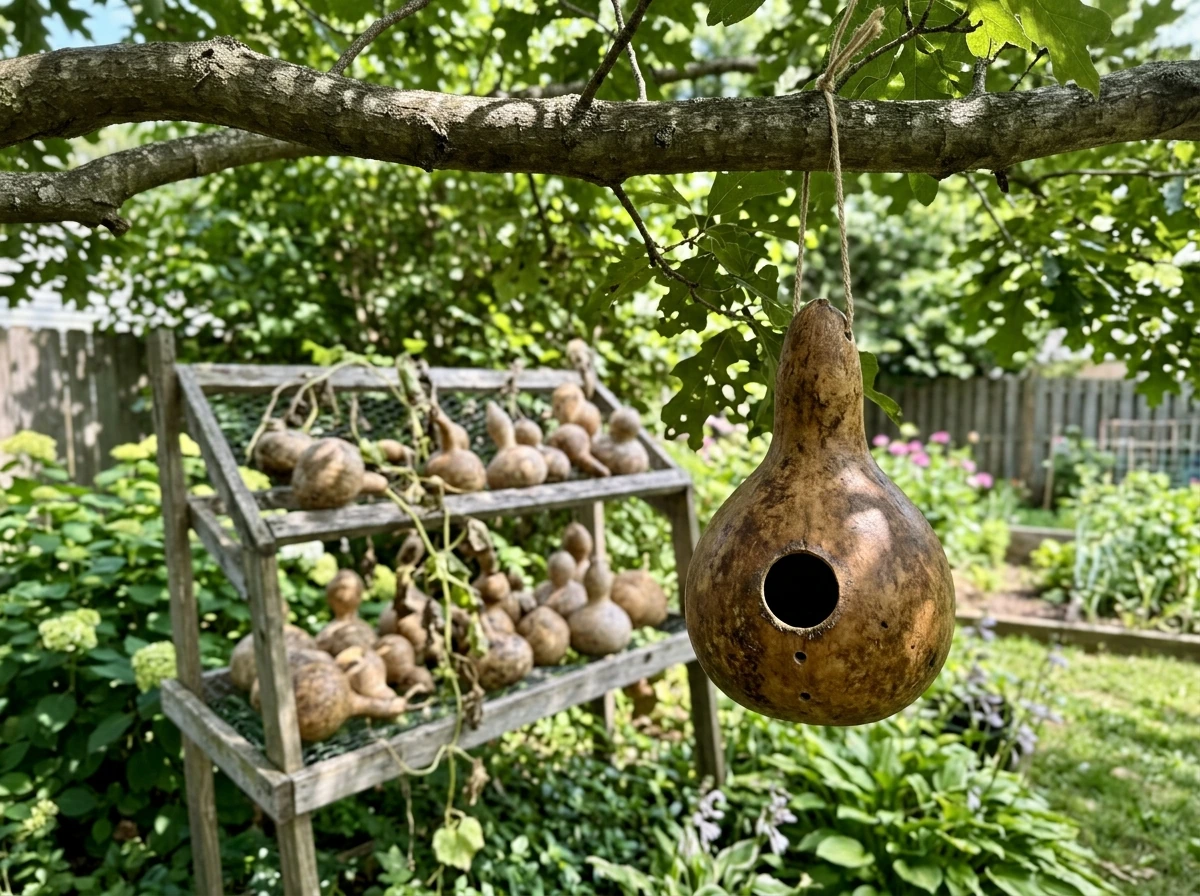
Hanging and mounting your gourd bird house
The most common and reliable method is a hanging wire through the neck of the gourd. Mark two points directly across from each other near the top of the neck, then drill through both with a 1/4-inch bit. Thread a length of galvanized wire (at least 14 gauge) through both holes and twist the ends together to form a loop or connect to your hanging point. Galvanized wire resists rust, which matters when the house is outside year-round.
Where you hang it matters as much as how. Point the entrance hole away from the direction your prevailing weather comes from. If storms typically roll in from the west, face the entrance east or south. This keeps rain from blowing directly into the entrance and soaking the interior. Height depends on the species you are targeting, but most cavity nesters are happy with a house mounted five to eight feet off the ground.
Mounting options
- Wire from a tree branch or wooden post: the simplest setup. Use a shepherd's hook or screw a cup hook into a post and loop the wire over it.
- Bracket mount: screw a J-hook or L-bracket to the side of a fence post or wooden beam, then loop your hanger wire over it. This gives you a stable hang that does not swing as wildly in wind.
- Conduit or metal pole: set a 1/2-inch conduit pipe in the ground and use a wire loop around the top. This keeps the house away from fence lines that give squirrels and raccoons easy access.
- Wooden stand or tripod: if you want freestanding placement in the garden, build a simple three-legged stand from scrap lumber and wire the gourd near the top.
If bluebirds are your target, consider adding a predator guard around the entrance hole. A wooden block or metal plate with a 1.5-inch hole drilled through it, mounted flush against the gourd's entrance, extends the depth of the entry tunnel and makes it harder for raccoons to reach in. This is sometimes called a hole extender and it genuinely helps in areas with active predator pressure.
Finishing for outdoor durability without harming birds
The exterior of a gourd bird house does need some protection to hold up outdoors for more than a season. The approach that works best and keeps things bird-safe is a couple of coats of exterior latex paint on the outside only, or a penetrating linseed oil finish. Stick to light or natural earth tones, nothing bright or reflective. Earthy browns, tans, or sage greens blend into the environment and do not attract the heat that dark colors can.
Whatever you use on the exterior, let it cure fully before you hang the house. A day or two of off-gassing time in a well-ventilated spot is enough for latex paint. The key rule here bears repeating: nothing on the interior. No paint, no varnish, no sealant inside the cavity. The American Gourd Society is explicit about this, and it is one of those rules worth following without exception.
Some builders prefer raw linseed oil on the exterior for a more natural look. It soaks into the gourd shell and hardens, giving decent weather resistance without the look of painted craft. It does need to be reapplied every year or two. Either approach works, just keep finishes away from the drainage and ventilation holes so they do not get plugged.
End-of-season care
At the end of nesting season, take the gourd down, clean out all the old nest material, and store it somewhere dry like a basement or garage. Freezing temperatures and repeated freeze-thaw cycles are what crack gourd shells over time, not just rain. Bringing it inside for the winter extends its life significantly. Clean it out after each brood fledges too, since some cavity nesters will raise multiple broods per season and prefer a fresh nest each time. A quick rinse and dry between broods keeps things sanitary and encourages reuse.
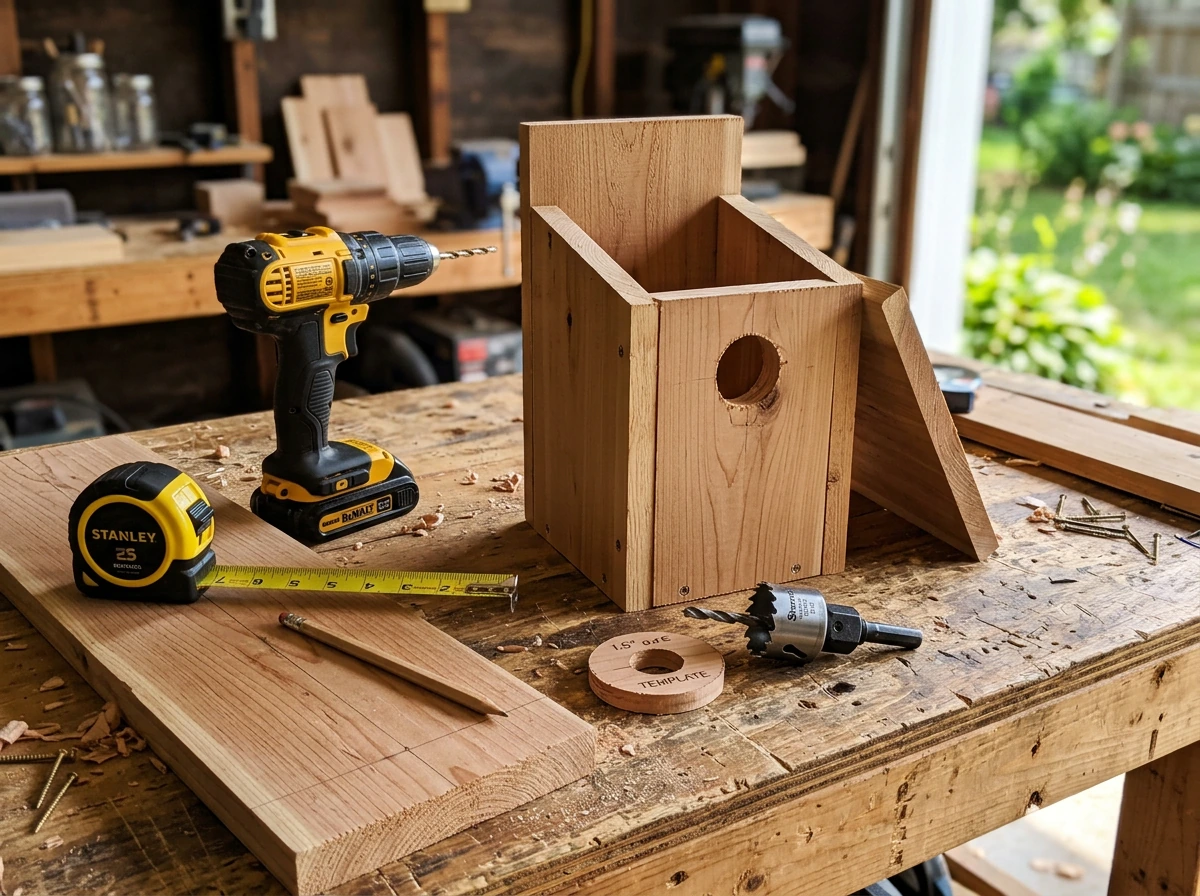
What you need to get started today
If you already have a cured gourd, you can have a finished bird house in an afternoon, using the how to build bird houses step-by-step approach. If you are starting from scratch with fresh gourds, plan for two to four months of drying time before you pick up a drill. Once your gourd is fully dried and ready to drill, you can also follow a pigeon-specific plan for the right entry size and placement how to make pigeon bird house. Either way, the materials list is short and inexpensive.
- A cured birdhouse gourd in the right size for your target species
- Hole saw or spade bits in 1-inch, 1 1/8-inch, and 1 1/2-inch sizes
- A standard drill with a 1/4-inch and 3/8-inch bit for ventilation and drainage holes
- Galvanized wire (14 gauge or heavier) for hanging
- 80 to 100 grit sandpaper
- Exterior latex paint or linseed oil for the outside finish
- Dust mask, safety glasses, and gloves for prep and drilling
From here, the next logical step is deciding which species you are building for, because that single decision drives your gourd size, hole diameter, and placement height. If you are new to building bird houses in general and want a broader overview of materials and design options, it is worth checking out the general DIY bird house guides on this site before you finalize your build plan. If you are ready to start your do it yourself bird houses project, focus on the gourd, the entrance size, and the drying timeline so your setup attracts the right birds. And if you get hooked on gourd projects, bluebird-specific and wren-specific house builds each have their own nuances in entrance sizing and placement that make a real difference in whether birds actually move in.
FAQ
What should I do if my gourd never “rattles” after drying for months?
Keep drying and check airflow first, do not seal it. A gourd that stays heavy or sounds dull usually needs more time, try turning it more frequently and moving it to a warmer, drier spot with better ventilation. If you see fresh soft spots forming during additional drying, discard it because the shell likely won’t hold up outdoors.
Is it safe to speed-dry a gourd with a heat gun, oven, or microwave?
No. Direct heat can create cracks and weak spots before the inside fully dries, and once cracking starts the gourd can fail during nesting season. Stick to slow curing with airflow for at least two to four months, longer for larger gourds.
I wiped off mold with bleach, can I hang the gourd right away?
Wait until the gourd is completely dry again after wiping. Bleach removes surface growth, but moisture trapped inside can still lead to more problems. Let it return to its fully cured state (hard shell and rattling seeds) before you cut the entrance or mount it.
How do I know I have the right entrance height for my target bird if I do not have a table?
Use the bird’s typical nesting behavior: cavity nesters generally prefer the entrance opening near the upper third of the house, not near the bottom. Measure relative to the bottom of the gourd, and if you are unsure, err slightly higher rather than lower to reduce draft and make the interior feel less accessible to some predators.
Can I make one gourd work for multiple bird species by choosing a “middle” entrance size?
Usually not. Entrance diameter strongly favors one or two species, and a compromise size can lead to unwanted occupants like starlings or house sparrows. The safest approach is to decide your target species first, then size the entrance hole and place the house to match that bird.
What if the entrance hole ends up too large or chipped during drilling?
If the hole is slightly oversize, you can sometimes correct the fit by adding a shallow, smooth entrance collar or bushing from the outside, but you should not reduce the hole in a way that creates rough interior edges. If the opening is badly chipped, or the shell cracks, it is better to start over because instability and drafts reduce occupancy.
Can I leave the seeds and fiber inside to reduce work and mess?
It is better to remove as much as possible. Seeds and thick fiber can hold moisture and create odors, and they can make it harder for birds to start the nest. A light shake is usually not enough if there is packed material, especially in larger gourds.
Should I sanitize the inside with bleach or vinegar before hanging?
Avoid treating the inside with chemicals. The article emphasizes leaving the interior natural, so if you rinse at all, do it lightly, then fully air-dry with no lingering residues. If you want extra cleanliness, focus on removing debris dry, then let the gourd air out completely.
Do I need ventilation holes if my gourd is hung in shade?
Yes. Shade reduces direct sun, but it does not prevent heat buildup inside the cavity during warm days. Ventilation holes near the top are still important for safety of nestlings and for helping the interior stay dry.
How can I prevent drainage holes from clogging over time?
After you drill, inspect that the bottom holes stay clear. When you clean out the house between broods and seasons, remove any mud, feathers, or nesting debris that could block those openings. Do not apply exterior finishes near the ventilation and drainage holes in a way that can seep inward.
My gourd is facing the wrong way after hanging. Can I rotate it mid-season?
Try to avoid changing orientation once birds are using the house, because traffic and disturbances can discourage nesting. If you must adjust, do it carefully when activity is low (before nesting starts, or outside active incubation) and avoid handling the house repeatedly.
Can I add a roof or cover to make the gourd last longer?
A full roof is possible, but it should not create an enclosed space where moisture gets trapped around the gourd. If you add any cover, leave the gourd’s ventilation and drainage areas unobstructed, and make sure the entrance tunnel still has unobstructed airflow.
What is the best way to store gourds between seasons without causing cracking?
Store them indoors in a dry space like a garage or basement, avoid freeze-thaw cycles. Do not store in sealed containers that trap humidity, and keep them supported so the shell is not stressed by pressure points.
Will painting the exterior in dark colors affect nesting success?
Yes. Dark, reflective, or heat-absorbing colors can raise internal temperatures, which is risky for nestlings. Stick to light or earth tones as recommended, and if you use paint, apply it only on the exterior and let it fully cure before hanging.
Do I need to clean the gourd after every brood, or just at the end of the season?
Cleaning after each brood fledges helps reduce parasites and encourages reuse, especially in areas where birds may raise multiple broods. A quick removal of old nest material, followed by a rinse-and-dry only if needed, is more effective than leaving the residue to accumulate.
Next Articles
How to Build Bird Houses Step-by-Step: Simple DIY Plans
Beginner-friendly DIY guide with wood cut list, step-by-step build, design tips, placement, and clean-out for nesting

How to Build a Chimney Swift Bird House DIY Guide
Step-by-step DIY plans to build a chimney swift bird house, with correct dimensions, placement, and weatherproofing for

How to Build an Oriole Bird House: Step-by-Step DIY
Step-by-step DIY for building an oriole bird house with right dimensions, weatherproofing, predator-safe placement, and