Yes, you can build a do it yourself bird houses today. A simple, functional wooden birdhouse takes a single afternoon, a few basic tools, and one board. The key is getting the dimensions right for the species you want to attract, because a hole that is a quarter inch too wide can invite predators or the wrong tenants entirely. Everything else, the shape, the finish, the style, is secondary. Let me walk you through the whole thing from picking a design to hanging it outside.
How to Build Bird Houses Step-by-Step: Simple DIY Plans

Marcus Thornton
23 Mar 2026
Pick your design based on which bird you want to attract
Before you cut a single piece of wood, decide who you are building for. Different species need different floor sizes, box depths, and entrance hole diameters. Getting these numbers wrong means the house sits empty, or worse, gets taken over by starlings and house sparrows that crowd out the birds you actually want. The entrance hole diameter is the single most important measurement in the whole build.
Two of the most beginner-friendly species to build for are eastern bluebirds and black-capped chickadees. Both are cavity nesters, both are widespread, and both have well-documented nest box specs that have been refined over decades of backyard conservation work. Here are the core numbers you need:
| Species | Floor Size | Interior Depth | Entrance Height Above Floor | Hole Diameter | Mounting Height |
|---|---|---|---|---|---|
| Eastern Bluebird | 5 × 5 in | 8 in | 6 in | 1½ in | 5–10 ft |
| Black-capped Chickadee | 4 × 4 in | 8–10 in | 6–8 in | 1⅛ in | 6–15 ft |
| House Wren | 4 × 4 in | 6–8 in | 4–6 in | 1–1¼ in | 5–10 ft |
For a first build, I always recommend the bluebird box. The 5x5 floor and 1½ inch entrance hole are forgiving to cut, the dimensions are well-documented, and bluebird populations have genuinely benefited from backyard nest boxes over the past few decades. If you are in a wooded yard with a lot of shrubs and undergrowth, a chickadee box with its smaller 1⅛ inch hole is a better fit. Wrens are also great for beginners because they are less picky about exact placement.
On style: a classic single-chamber rectangular box with a sloped roof is all you need. Avoid decorative perches below the entrance hole. I know they look charming, but perches give predators and house sparrows a foothold to harass nesting birds. Every serious birdhouse resource I have ever read says the same thing: leave the perch off.
What to build with: wood, tools, and budget options
The best wood for birdhouses
Untreated wood is your best friend here. Cedar and pine are the most common choices. Cedar is naturally rot-resistant and weathers beautifully without any finish, which is why it shows up in almost every nest box plan. Pine is cheaper and easier to find at any hardware store, and it works perfectly well if you keep the walls at least three quarters of an inch thick. Thicker walls insulate against heat and cold, which matters a lot to nesting birds in early spring or late summer. I have built boxes from both and honestly the birds do not care, as long as the wood is untreated and unfinished on the inside.
A single 1×6 cedar or pine board, 6 feet long, is enough wood to build one complete bluebird box. That one board gives you all your panels: front, back, two sides, floor, and roof. You can pick one up at most lumber yards or big-box home improvement stores for just a few dollars. If you have scrap wood lying around from another project, check the thickness first. Anything under half an inch is too thin for a nest box.
One option I love recommending for beginners is repurposed pallet wood. It is rough-sawn, which gives birds good grip on the interior walls when fledglings are climbing toward the entrance hole. Just make sure the pallet is not chemically treated. Look for a stamp that says HT (heat treated) rather than MB (methyl bromide fumigated). HT pallets are safe; MB ones are not.
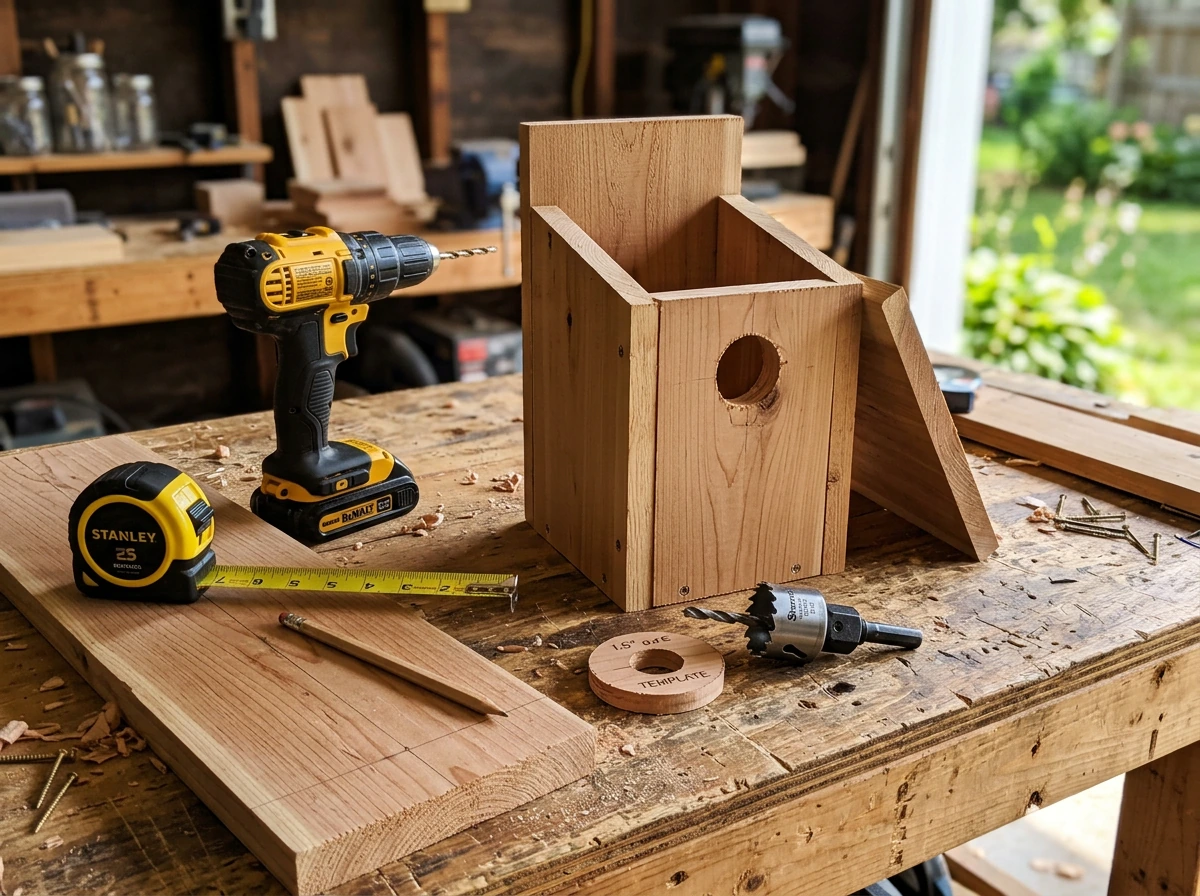
Tools you actually need
You do not need a fully equipped workshop. Here is an honest minimum tool list:
- Hand saw or circular saw (to cut the panels)
- Drill with a standard drill bit set
- Hole saw or spade bit in the correct diameter for your entrance hole (1½ in for bluebirds, 1⅛ in for chickadees)
- Hammer and galvanized nails, or a drill and exterior wood screws
- Measuring tape and pencil
- Sandpaper (medium grit, around 80–100)
A hole saw gives the cleanest entrance hole and is worth the small investment if you plan to build more than one box. A spade bit works fine too, especially if you go slowly and clean up the edges with sandpaper afterward. Rough or splintered edges around the entrance hole can injure birds, so take a minute to smooth them out.
What about log or natural-style birdhouses?
Natural log birdhouses are exactly what they sound like: a short section of a hollow or partially hollowed log, capped with a flat piece of wood as a roof. Woodpeckers and nuthatches especially like the rough interior texture of a log cavity.
If you have a birch, cedar, or pine log with a natural hollow, you can drill out the interior with a large spade bit, add drainage holes in the base, cut a proper entrance hole in the side, and attach a removable roof. The same dimension rules apply: the entrance hole diameter still needs to match your target species.
A log box is more rustic and takes a bit more patience to hollow cleanly, but it is genuinely beautiful hanging in a wooded yard and gives you a lot of flexibility in shape.
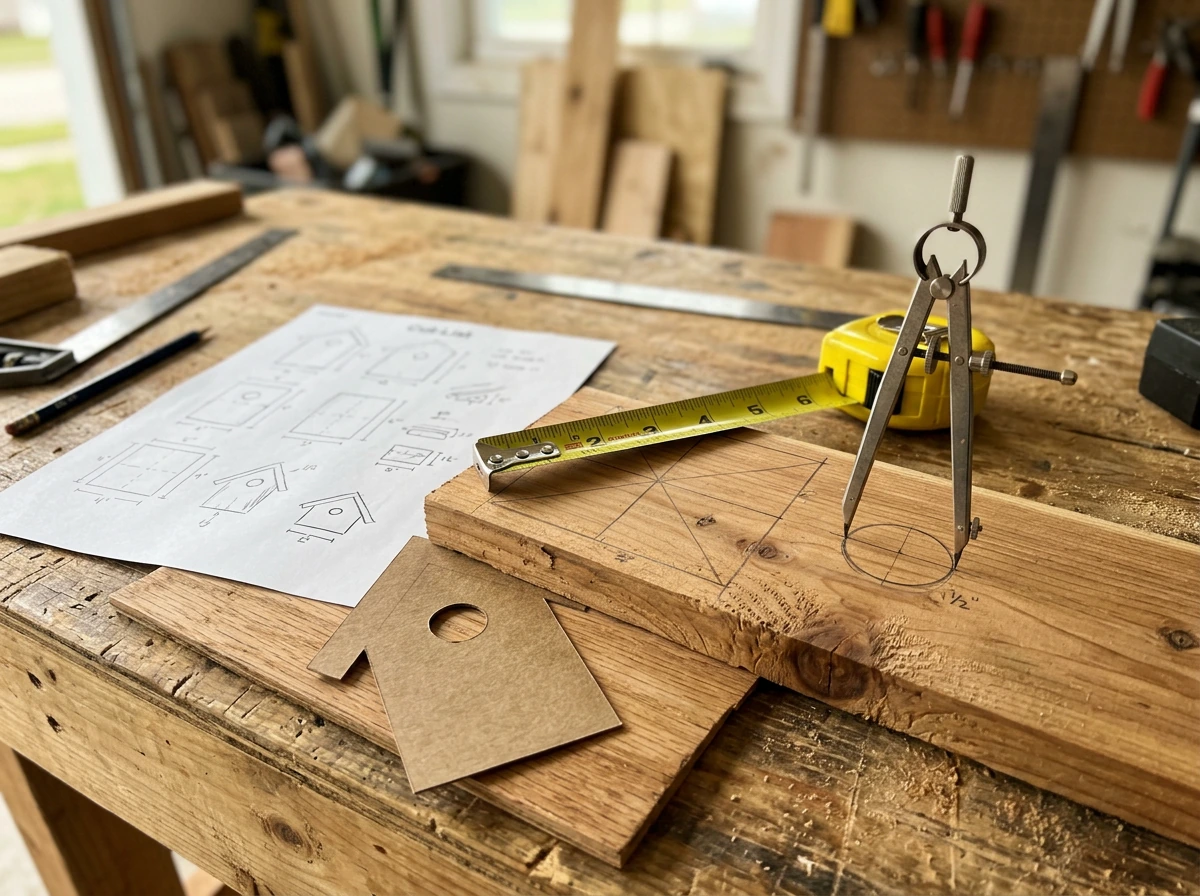
How to build a basic birdhouse: step-by-step
This plan is for a standard bluebird box using a single 1×6 cedar or pine board. The actual finished width of a 1×6 board is 5½ inches, which is close enough to the 5×5 floor spec. You will trim the floor panel slightly to get a proper fit. Here is your cut list:
| Panel | Dimensions (cut to) | Notes |
|---|---|---|
| Front | 5½ in wide × 9 in tall | Entrance hole centered 6 in above floor bottom edge |
| Back | 5½ in wide × 14 in tall | Extra length for mounting tab at top |
| Two sides | 4 in wide × 10 in tall | Taper top edge to match roof slope if desired |
| Floor | 4 in × 4 in | Trim to fit inside front and back |
| Roof | 7 in wide × 8 in deep | Overhang front and sides by 1 in on each side |
Step 1: Measure and cut your panels
Mark all your cuts on the board before you start sawing. Double-check every measurement with your tape measure. A mistake I made on my first box was cutting the front panel too short, which put the entrance hole too close to the floor. Birds need at least 6 inches of depth below the hole so predators cannot reach in and grab nestlings. Once you have your lines marked, cut each panel. Take your time on the side panels because clean edges make assembly much easier.
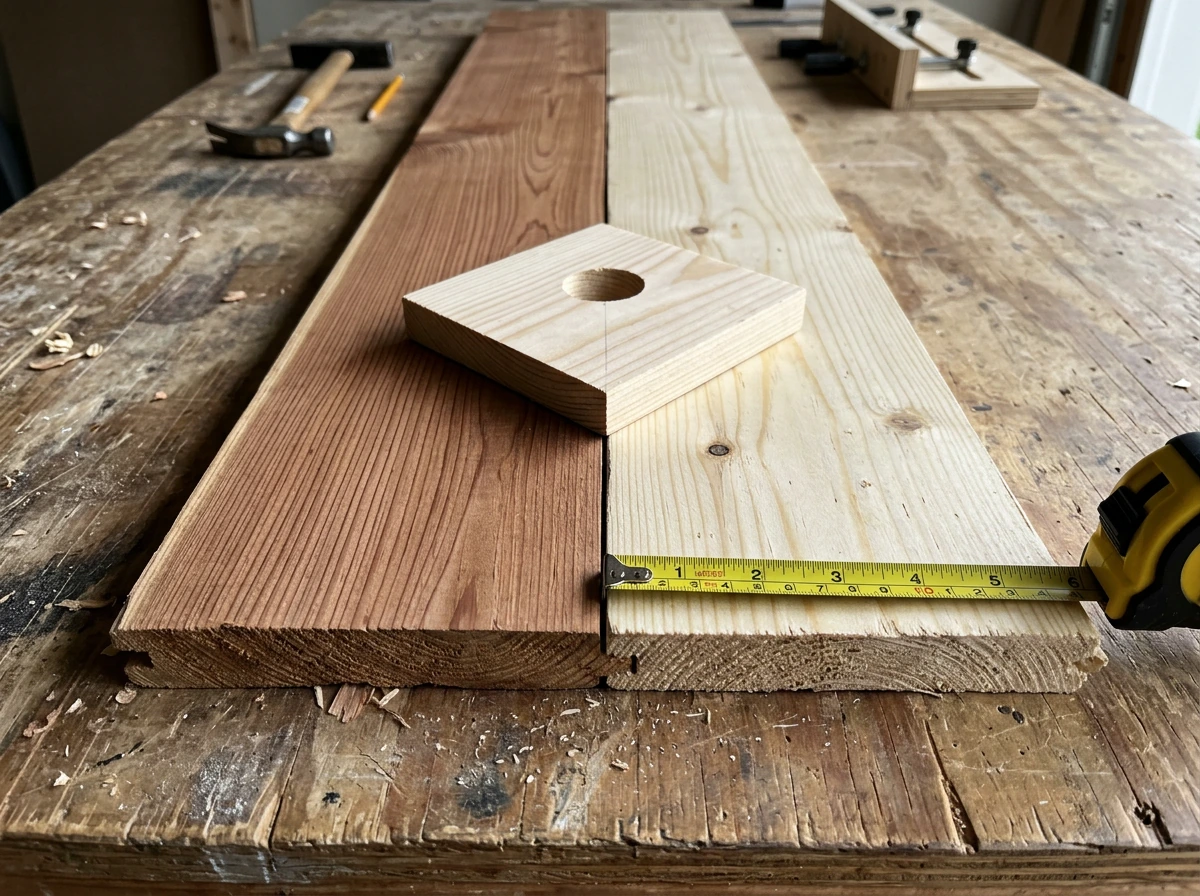
Step 2: Drill the entrance hole
On the front panel, measure up 6 inches from the bottom edge and mark the center of your entrance hole. For a bluebird box, use a 1½ inch hole saw or spade bit. Drill slowly and keep the bit perpendicular to the board. Once the hole is through, sand the edges smooth on both sides. This is one of those steps that directly affects bird safety, so do not rush it. A rough, splintered hole can catch feathers or injure a bird's feet.
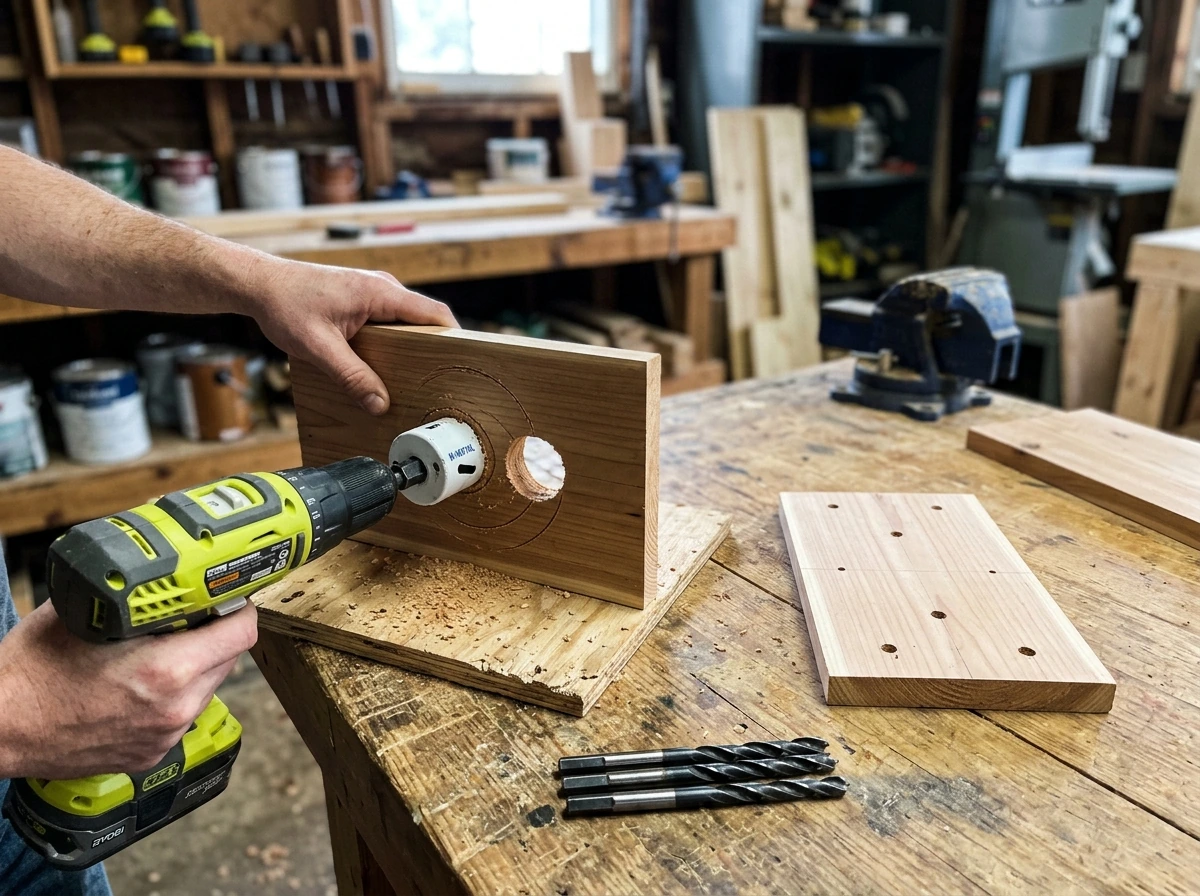
Step 3: Drill ventilation and drainage holes
Before assembly, drill at least four 3/8 inch drainage holes in the corners of the floor panel. Then drill ventilation holes near the top of each side panel, at least two per side, also around 3/8 inch in diameter. These holes do two important things: drainage prevents a wet nest from becoming a mold problem, and ventilation keeps the interior from overheating on hot days. Nestlings in an unventilated box in direct sun can die from heat stress. This step takes five minutes and makes a real difference.
Step 4: Rough up the interior of the front panel
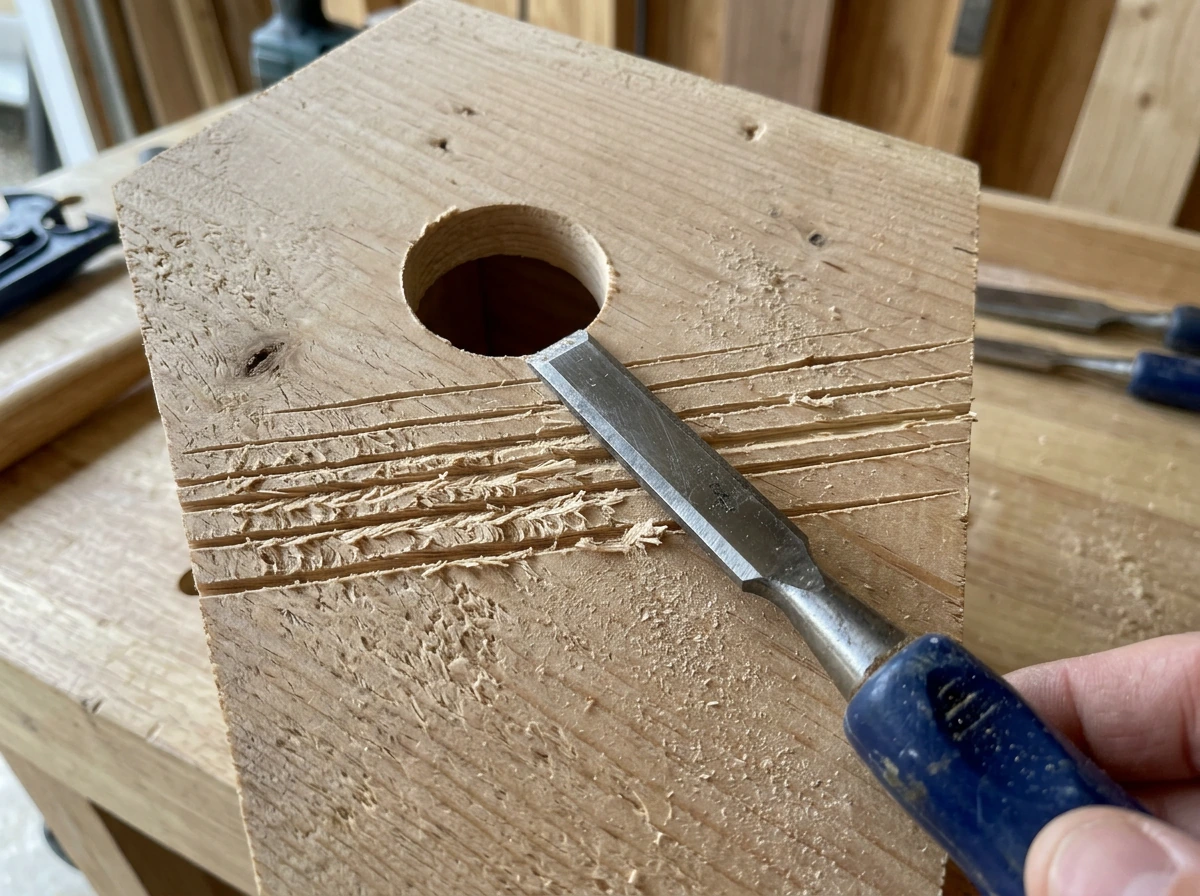
Use a chisel, coarse sandpaper, or the corner of your saw blade to score horizontal grooves on the inside face of the front panel, below the entrance hole. This gives fledglings something to grip when they climb up toward the hole to fledge. It is a small detail that makes a big difference in survival rates for the first brood.
Step 5: Assemble the box
Start by attaching the floor panel between the front and back panels using galvanized nails or exterior screws. Galvanized or stainless steel fasteners are important here because they will not rust out over a couple of seasons the way standard hardware store nails do. Attach the two side panels next, sandwiching the floor. Leave the front panel or one side panel hinged or removable so you can clean the box out at the end of nesting season. A simple piano hinge on one side and a single screw latch at the bottom works great. I have also seen people just leave one nail out of the bottom of the front panel so it pivots open for cleaning.
Step 6: Attach the roof
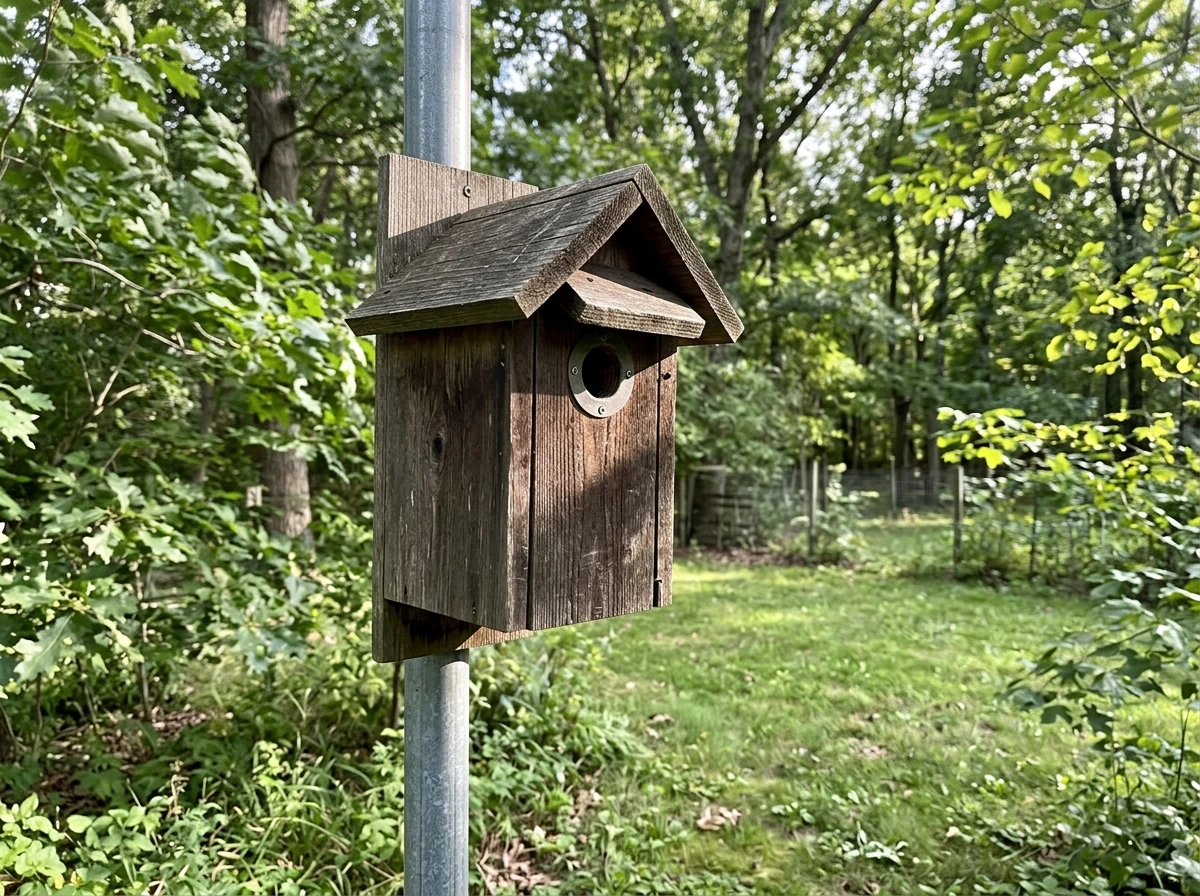
The roof should slope slightly forward and overhang the front and sides by at least 1 inch. This keeps rain from running into the entrance hole and gives the box a little shade. Cut the roof panel at a slight angle if you want a cleaner slope, or just let the naturally taller back panel hold the roof at a tilt. Attach it with screws from the top into the back panel, and optionally add a small cleat at the front to hold the front edge of the roof down. Do not glue the roof permanently if you can help it, because you may want to access the interior from the top for monitoring.
Design tips that make a birdhouse actually safe and attractive to birds
The outside of the box can be as simple or as creative as you want, but a few design choices directly affect whether birds use it and whether chicks survive. Here is what actually matters:
- Never paint or stain the interior of the box. Fumes from paint and stain can be toxic to developing chicks, and even dried paint can off-gas in a hot box. Leave the inside raw.
- On the exterior, you can paint or stain if you want, but keep it to light, neutral colors that do not absorb heat. Flat earth tones work well. Avoid black or dark colors on boxes in sunny locations.
- Skip the perch below the entrance hole. It looks decorative but it genuinely helps predators and invasive species access the nest.
- Use thick walls, at least ¾ inch, for insulation. Thinner walls lead to temperature swings that stress nesting birds.
- A sloped roof with a 1 to 2 inch overhang on all sides keeps rain out and provides shade.
- One panel must be removable or hinged for annual cleaning. A box you cannot clean becomes a nest parasite breeding ground after the first season.
- Avoid hardware cloth or mesh on the entrance hole extension. Some plans suggest predator guards, which are great, but avoid anything with sharp metal edges near the entrance.
If you want a more natural-looking birdhouse, leave the exterior cedar unpainted and let it weather to a silver-gray. Cedar weathers beautifully and blends into a wooded yard in a way that painted boxes never quite do. Another option is to use rough-sawn wood rather than smooth-planed lumber. The rough texture on the exterior looks more organic and provides better grip if the box is mounted on a natural branch.
Free plans and building from scratch: where to find templates
You do not need to buy plans. Several excellent organizations publish free, downloadable nest box plans that are species-specific and based on decades of real-world data. The Cornell Lab's All About Birds site offers a free 3-page Nest Box Construction and Installation Guide that covers dimensions and mounting for common backyard species.
NestWatch (also from Cornell Lab) has a searchable tool called Right Bird, Right House that lets you filter by region and habitat, then links to PDF construction plans for each species. NestWatch (Cornell Lab) also provides a Right Bird, Right House tool and nest box plan selection within its nest box resources hub NestWatch (also from Cornell Lab) has a searchable tool called Right Bird, Right House.
Audubon publishes a detailed bluebird box build plan with exact panel dimensions and a diagram showing the entrance hole placement: centered 2 inches from the top of the front panel and 2½ inches from each side.
For a simple beginner template, the bluebird box plan in this article gives you everything you need to start cutting wood today, essentially a straightforward way on how to make blue bird houses. If you want to adapt the plan for chickadees, keep the same basic layout and just change the floor to 4×4 inches, the interior depth to 8–10 inches, and the entrance hole to 1⅛ inches. Every other step is identical. That is one of the things I like most about building nest boxes: once you understand the basic structure, adapting it for different species is mostly just a matter of swapping out a few measurements. how to make homemade bird houses
If you are interested in building for other species, there are sibling projects worth exploring alongside this basic box: gourd birdhouses are a natural alternative for purple martins and some swallows, and pigeon lofts and bluebird-specific trail boxes each have their own construction requirements. But for a first build, stick with the rectangular wooden box. It is the fastest path from raw lumber to a bird moving in.
Where to mount it, how high, and how to keep it working year after year
Mounting height and location
Height matters, but it is not as finicky as some guides make it sound. For bluebirds, mount the box between 5 and 10 feet above the ground, ideally on a metal pole rather than a wooden post or tree trunk. Texas Parks & Wildlife Department recommends mounting cavity-nesting birdhouses at least 5 feet above the ground, ideally on a metal pole. Metal poles are much harder for raccoons and snakes to climb, especially if you add a predator baffle (a cone or cylinder of metal below the box). Chickadee boxes can go anywhere from 6 to 15 feet up, typically on a tree at the edge of a wooded area.
Face the entrance hole away from prevailing winds, which are usually from the west or northwest in most of North America. A southeast or east-facing entrance is a common recommendation because it catches the morning sun, which helps warm the box early in the season without overheating it in the afternoon. Bluebirds especially like boxes with an open field or lawn in front of them because they hunt insects from low perches and need clear sightlines.
If you are placing multiple boxes in the same yard, spacing matters. Bluebirds are territorial and generally will not tolerate another bluebird pair within 100 yards. You can place a tree swallow box closer, as they are compatible neighbors for bluebirds and do not compete for the same food.
Timing: when to put the box up
Earlier is almost always better. Bluebirds start scouting nest sites in late February and early March in warmer regions, and as early as late March in northern areas. Chickadees begin nesting from late April into early May. Putting the box up in late winter gives birds time to find it before nesting season begins. If you are reading this and it is already spring, put the box up anyway. Many species raise two or even three broods per season, so a box installed in May can still see active use.
Cleaning and maintenance
Clean the box at least once a year, ideally in fall after the nesting season ends. Open the removable panel, remove all old nesting material, and scrub the interior with a stiff brush. A diluted bleach solution (one part bleach to nine parts water) can help knock down parasites and bacteria, but make sure the box is completely dry before you close it back up.
If you can monitor the box through the season and a brood fledges, go ahead and clean it out right away so the pair can potentially raise another brood in the same box. Leaving old nests in place means the next clutch sits on top of parasites and bacteria from the previous brood, which is genuinely harmful to chick survival rates.
Check the hardware every spring before nesting season starts. Tighten any loose screws, make sure the roof is still sealed against rain, and confirm the drainage holes have not become clogged with debris. A well-built cedar box can last 10 to 15 years with basic annual maintenance. That is a lot of nesting seasons from one afternoon of work and a single board of lumber.
A note on predator guards
If you mount the box on a wooden fence post or tree, add a predator baffle. A simple cone baffle made from sheet metal, mounted on the post below the box, stops most climbing predators. You can also extend the entrance hole with a 1½ inch thick wooden block, essentially a short tube through a thick piece of wood, which makes it much harder for a raccoon to reach through the hole with its paw. These two additions do more for nesting success than almost any other modification.
FAQ
If my entrance hole is a little off, is it better to enlarge or keep it smaller when building bird houses step-by-step?
Aim for a snug fit with the target species in mind, and do a quick “measure twice” check before drilling. For bluebirds specifically, keep depth under the entrance at about 6 inches, and confirm the entrance diameter using the actual bit size you have (hole saw labels and real cut diameters can vary slightly).
Can I clean my birdhouse with bleach, and how soon can I put it back up?
Remove old nests and scrub yearly, but avoid chemical treatments on the wood surface where birds will touch. If you use any diluted bleach, let the box dry completely and rinse only if the smell persists, then fully air-dry before closing. This prevents residues from irritating adult birds or nestlings.
What finishes are safe inside the birdhouse, and what should I avoid?
Do not treat the interior with stains, paint, or sealers. Even “non-toxic” finishes can off-gas or create slick surfaces. Keep the build untreated inside, and if you want protection, apply exterior-only finish to the outside after assembly (and choose products that are dry and odor-free before installation).
What should I troubleshoot if my birdhouse is built correctly but no birds use it?
Mounting height is one variable, but the surrounding yard matters too. If you are getting no activity, check for competing species presence (house sparrows, starlings), clear sightlines for bluebirds, and direct morning light without afternoon overheating. Moving a box a few yards or changing facing direction can help, especially if the first location is windy or heavily shaded.
Are predator baffles and avoiding perches enough, or are there other things that stop predators?
If you want to reduce predator access, prioritize a predator baffle under the box and remove any near-perch options within reach of the entrance. Also make sure the opening is not within arm’s length of fencing, branches, or ladders that predators can use to jump or climb.
What if the inside of the birdhouse gets wet or develops mold?
If you notice mold or persistent wetness, it usually means drainage or ventilation holes are missing, too small, or clogged. Confirm there are drainage holes at the corners of the floor, and check the box after heavy rain. Sand or remove debris, then re-secure the roof so water cannot pool or run into the entrance.
Do I really need a removable side or roof, and what’s the simplest cleaning design?
If you can’t open the front or top easily, plan for at least one access method before you hang it. A hinged panel, removable roof, or a single-screw latch at the bottom-front area makes fall cleanout practical and encourages proper maintenance, which is key to long-term bird use.
How far apart should birdhouses be when I’m installing more than one in the same yard?
Spacing rules depend on species. For bluebirds, territorial behavior means closer placements can lead to conflict. If you are placing multiple boxes, separate bluebird pairs by roughly 100 yards when possible, and for other compatible species, still avoid clustering boxes so close that adults can’t maintain separate territories.
I’m using scrap wood, how thick does it need to be for how to build bird houses step-by-step?
Yes, but use the board thickness to guide your interior spacing. If your scrap wood is thinner than the typical minimum, birds may experience less insulation and the box can warp faster. At minimum, match or exceed about half-inch material thickness and keep interior depth consistent with the species so the hole-to-floor relationship stays correct.
What’s the best entrance direction and placement if my yard gets strong wind or afternoon heat?
Avoid placing the box where rain can directly blast the entrance, even if the roof overhang exists. Also keep the entrance facing away from prevailing winds when possible, and if you’re in a hot climate, prioritize shade from intense afternoon sun (morning light is helpful).
Next Articles

How to Build a Chimney Swift Bird House DIY Guide
Step-by-step DIY plans to build a chimney swift bird house, with correct dimensions, placement, and weatherproofing for

How to Build an Oriole Bird House: Step-by-Step DIY
Step-by-step DIY for building an oriole bird house with right dimensions, weatherproofing, predator-safe placement, and

How to Build a Chickadee Bird House Step by Step
Step-by-step DIY chickadee bird house with cut list, chickadee entry sizing, ventilation, drainage, and mounting tips.