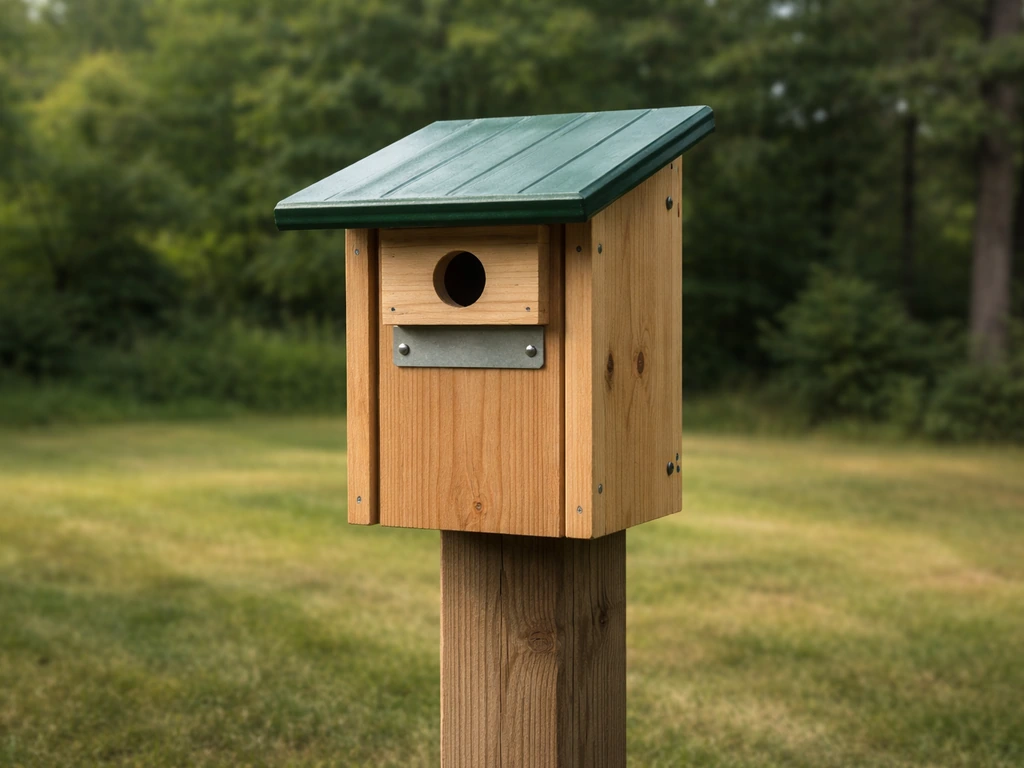
You can build a chimney swift tower using cedar or pine boards, a straightforward box design roughly 12 inches square and 5 to 6 feet tall, with a single entry hole between 1.5 and 2 inches wide near the top. Mount it on a pole in an open area, at least 10 to 15 feet off the ground, away from tree canopy. That's the core of it. Everything else is about getting the details right so swifts actually move in instead of flying past. If you're specifically looking for sparrows, you can follow the same idea of offering a safe nesting cavity while using the right entrance size and placement sparrow bird house.
How to Build a Chimney Swift Bird House DIY Guide

Marcus Thornton
27 Apr 2026

Why chimney swifts are unlike any bird you've built for before
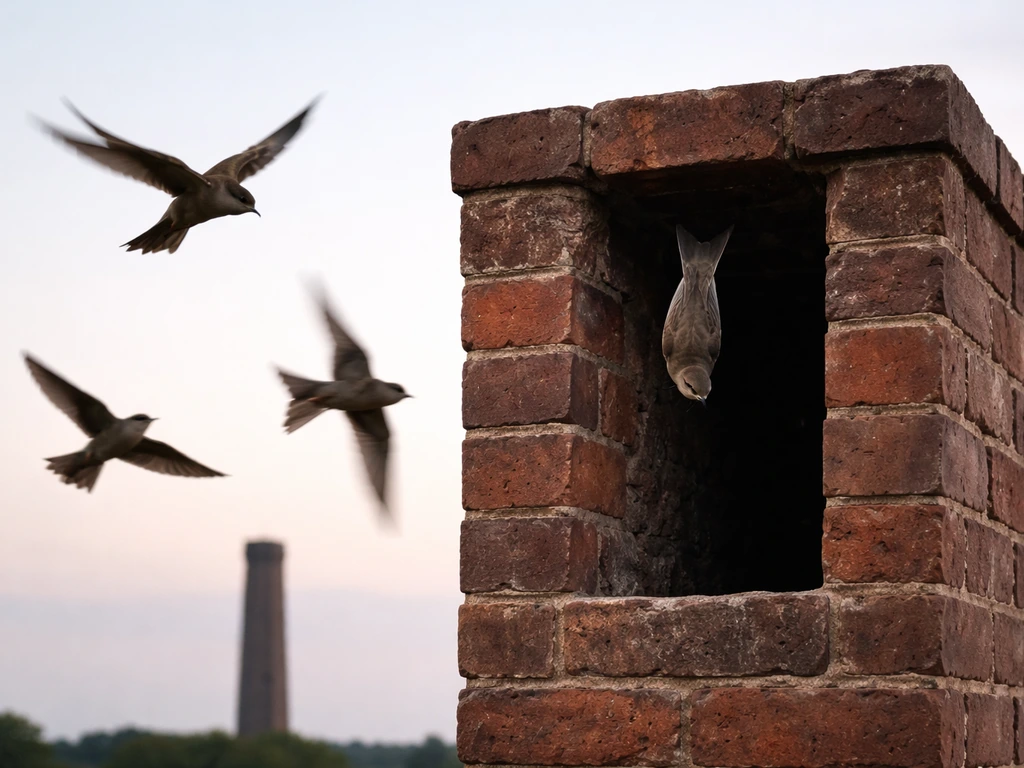
Chimney swifts are aerial insectivores, meaning they eat, sleep, and mate almost entirely in flight. The only time they land is to nest. They can't perch on a branch like a sparrow or chickadee. Their tiny feet are designed exclusively to grip vertical surfaces inside enclosed, chimney-like spaces. That single behavioral fact drives every design decision you'll make.
blank" rel="noopener noreferrer">In the wild, chimney swifts nested in large hollow trees. As those disappeared, they adapted to masonry chimneys, old wells, silos, barns, and similar human-made structures. The U.S. Fish and Wildlife Service notes they now nest primarily in chimneys and other artificial sites. The problem is that modern chimneys are often capped, lined with smooth metal that swifts can't grip, or cleaned during nesting season. Cornell Lab of Ornithology specifically warns that chimney cleaning during nesting season can destroy nests and kill birds. That's exactly why a purpose-built swift tower matters so much right now.
Swifts arrive in the eastern U.S. in March and April, depending on your region (Mid-Atlantic arrivals tend to peak around mid-April), and they depart for South America by August or September. You've got a real window to build and install before the season peaks. If you're reading this in late April, get moving.
Design basics: what chimney swifts actually need
Think of your build as a short artificial chimney, not a traditional birdhouse. Swifts don't use a perch. They fly in, drop vertically, and cling to the inner walls using their stiff tail feathers as a prop. The interior needs to be tall, dark, narrow enough to feel enclosed, and rough-textured so they can grip it. Here are the non-negotiables:
- Interior height of at least 4 to 6 feet so swifts have room to drop and cling below the entry
- Interior width of roughly 10 to 14 inches square (around 12 inches is the sweet spot most wildlife organizations recommend)
- Entry hole positioned near the very top of the structure, between 1.5 and 2 inches in diameter
- Rough interior walls, not smooth: swifts physically cannot cling to painted or sealed surfaces inside
- Dark interior with minimal light penetration below the entry hole
- No perch at the entrance: swifts don't need one and a perch actually invites starlings and house sparrows to move in instead
The entry hole placement is worth pausing on. Unlike a chickadee box where the hole sits a certain distance above the floor, a swift tower's entry hole goes near the top, within about 4 to 6 inches of the roof. If you are also wondering how to build chickadee bird house styles for a different kind of cavity nesting bird, plan around their perch-friendly box layout and typical entrance placement. The birds drop down into the dark interior below. If your hole is too low, the interior above the entry becomes wasted space and the structure loses that chimney-feel swifts are drawn to.
Pick a proven style and dimensions before you start cutting

There are a few recognized chimney swift tower designs used by wildlife organizations across North America. I recommend starting with the standard single-chamber tower because it's beginner-friendly, uses common lumber dimensions, and has a documented track record of attracting swifts. Here are the two most practical options for a DIY builder:
| Design | Interior Size | Height | Best For |
|---|---|---|---|
| Standard single-chamber tower | 12" x 12" interior | 5 to 6 feet total structure | Most backyards, beginners, standard lumber |
| Wide-base community tower | 14" x 14" interior | 6 to 8 feet total structure | Experienced builders, larger properties, higher colony potential |
For your first build, go with the 12x12 interior, 6-foot tower. The exact cut list: four side panels at 12 inches wide and 72 inches (6 feet) tall, a top cap or roof section, and a simple base if you're pole-mounting (more on that in the mounting section). The entry hole is a single oval or circle cut 1. 5 to 1.
75 inches wide, centered horizontally on one panel, positioned 4 to 5 inches from the top of that panel. Keep the hole tight. A hole wider than 2 inches risks starling intrusion, and starlings will take over. To help you avoid common problems like wrong entrance size, you can also review how to build a starling bird house before you finalize your plan.
If you've built swallow houses or other open-faced designs before, resist the urge to add ventilation slots, multiple holes, or a viewing window. If you are coming from building swallow houses, remember that swifts need a dark, enclosed, chimney-style tower instead of an open-faced design. Swifts want it dark, enclosed, and chimney-like. Compared to something like a swallow nest box (which typically has a wide open front), the swift tower is almost the opposite: closed on all sides with only that one small entry near the top.
Materials and tools: keep it simple and rough
Good news: this project is genuinely budget-friendly and repurposed-material-friendly. The only strong caution is the interior surface. Whatever you use, the inside walls need texture. Rough-sawn lumber is ideal. If you're using standard planed pine or cedar, score the interior faces with a utility knife or router in a crosshatch or horizontal groove pattern before assembly. Swifts need something to grip.
Recommended materials
- Rough-sawn cedar (best choice: naturally rot-resistant, rough texture, holds up outdoors for 10+ years)
- Rough-sawn pine (budget option, works well if you prime and paint exterior only, never interior)
- Reclaimed barn wood or fence boards (excellent repurposed option; already weathered and rough-textured)
- Exterior-grade plywood at 3/4 inch thick (workable for beginners; score interior face before assembling)
- Galvanized deck screws, 2 to 2.5 inches (avoid nails for structural panels; screws hold through seasonal expansion)
- Exterior wood glue for seam reinforcement
- Waterproof caulk for exterior seams
- Linseed oil or exterior latex paint for outside surfaces only
Tools you need (and acceptable substitutes)
- Circular saw or miter saw for panel cuts (a hand saw works if that's what you have; just take your time)
- Drill and 1.5-inch spade bit or Forstner bit for the entry hole
- Square and tape measure
- Clamps for assembly
- Sandpaper (for exterior edges only; don't smooth the interior)
- Paintbrush for weatherproofing
One thing I learned early: don't over-engineer the entry hole with a jigsaw or by freehand drilling a rough oval. Use a proper spade or Forstner bit for a clean, consistent circle. Swifts navigate that opening at speed, so a ragged or splintered edge is both a deterrent and a hazard. Drill it clean, then lightly de-burr the entry with a folded piece of sandpaper, inside and out.
Step-by-step: cut, assemble, and weatherproof your tower
- Cut your four side panels: each should be 12 inches wide and 72 inches tall. If you're using 1x12 lumber, you're working with actual widths of about 11.25 inches, which is fine. Account for this when planning your box assembly so all four sides meet cleanly.
- Score the interior faces before assembly. Use a utility knife, chisel, or router to create horizontal grooves roughly 1/4 inch deep and spaced every inch or so across the full interior height of all four panels. This is the step most beginners skip, and it's one of the top reasons swifts don't use new towers.
- Drill the entry hole in one panel, centered horizontally, positioned 4 to 5 inches from the top edge. Use a 1.5-inch spade bit for a snug chimney swift-appropriate opening. De-burr the edges lightly.
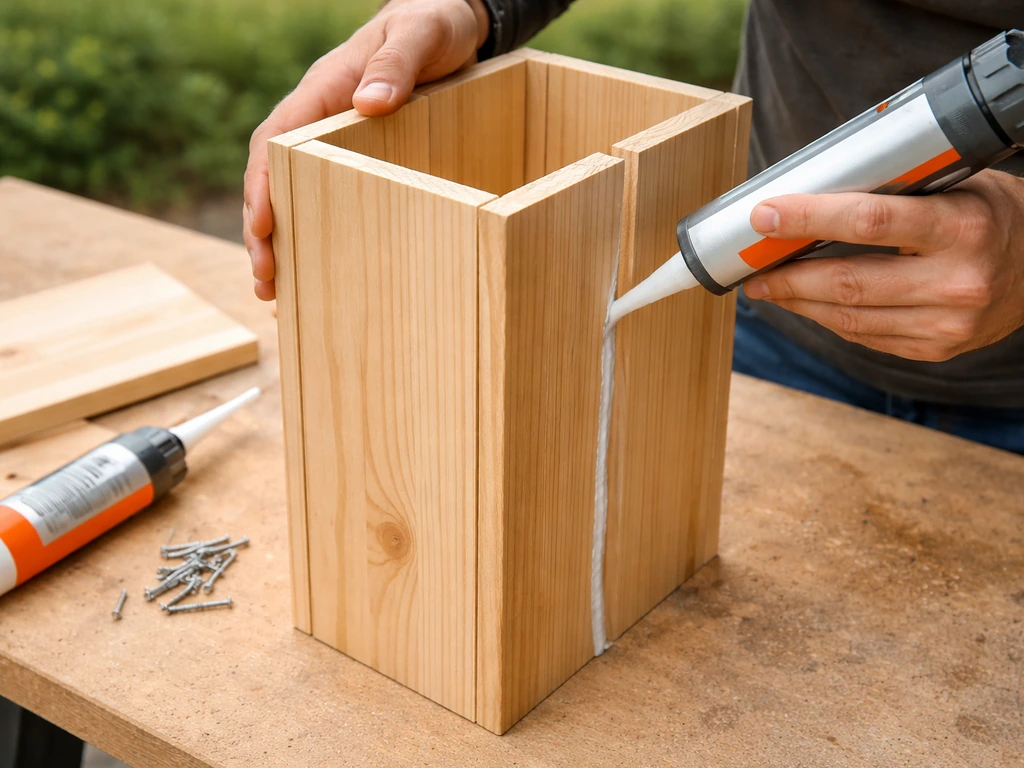
- Assemble the box using a butt-joint construction: two opposite panels overlap the edges of the other two. Predrill to avoid splitting. Apply a bead of exterior wood glue to each joint, then drive galvanized deck screws every 8 to 10 inches along each seam. Clamp while the glue sets if possible.
- Add the roof cap. A simple flat or slightly pitched cap works fine. Cut it 1 to 2 inches wider and deeper than the box so it overhangs and sheds rain. Attach it with screws from the top through the panel edges. Do not seal the roof shut permanently since you'll want to open the top for annual inspection.
- Apply waterproof caulk to all exterior seams. You're sealing the outside to prevent water intrusion, not painting the inside. Let it cure fully before painting.
- Paint or treat exterior surfaces only with a dark exterior paint (dark brown or dark gray mimics a chimney), or apply two coats of linseed oil if you prefer a natural finish. Never treat interior surfaces with paint, stain, or preservative since fumes are harmful to birds and coatings eliminate the gripping texture.
- Install a small access panel for monitoring if desired. Cut a 4x6-inch section from the back panel near the bottom third of the tower, hinge it, and secure it with a hook-and-eye latch. This lets you check for nesting activity later in the season without climbing to the top.
Assembly tip: the box doesn't need to be perfectly square for birds to use it, but it does need to be structurally solid. A tower that wobbles or flexes in wind will deter occupancy. If your joints feel soft, add a metal angle bracket inside each corner at the top and bottom for rigidity.
Mounting and placement: making it feel like a chimney
Swifts are picky about one thing above all else: open airspace. { how to make a finch bird house. They need a clear flight path in all directions around the tower so they can approach, circle, and dive in without obstruction. This is the placement mistake I see most often. People tuck the tower near a fence or under a tree because it looks tidy, and then wonder why no swifts show up. If you want to attract a different species, learn how to build an oriole bird house next and tailor the entry style and placement to their needs.
Placement rules
- Minimum 10 feet of clear airspace on all sides, 30 feet or more is better
- No tree canopy directly overhead: swifts need to be able to drop in from above
- Position in the most open part of your yard, ideally a lawn or garden area away from the property edge
- Avoid locations directly beside buildings, walls, or dense shrubs
- Some proximity to water (a pond, stream, or wet area nearby) is a bonus since swifts drink on the wing and insects concentrate near water
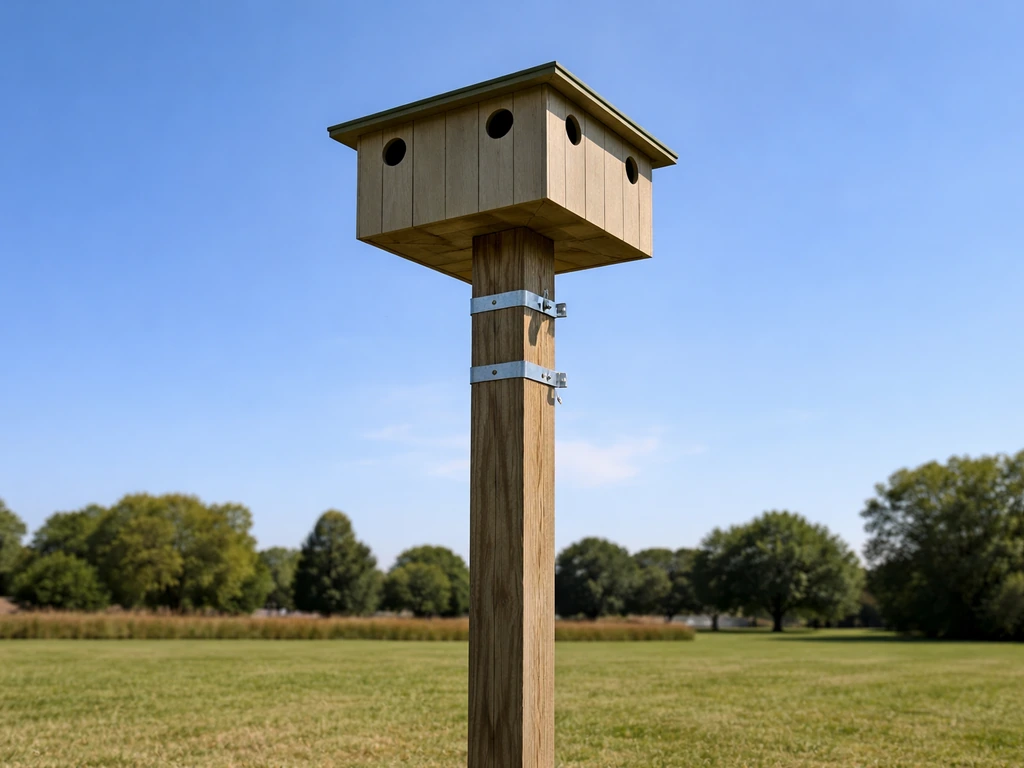
Height and mounting method
Mount your tower so the top (where the entry hole is) sits at least 10 feet off the ground. Most successful installations have the entry at 12 to 16 feet. The full structure is 6 feet tall, so your mounting pole needs to position the base of the tower at roughly 6 to 10 feet high. Use a 4x4 pressure-treated post or a 10-foot metal fence post as the support. Sink it at least 2 feet into the ground (3 feet is better in loose soil) or set it in concrete for maximum stability. Chimney swift towers act like sails in wind, and an undersized post will fail.
Attach the tower to the post using two galvanized carriage bolts through the base of the tower and post, plus a metal post cap or bracket. The connection needs to be rigid, not just screwed at an angle. A tower that sways or tilts will not attract swifts. Orient the entry hole away from the prevailing wind direction in your area (typically facing south or southeast in most of the U.S.) to keep rain from driving into the opening.
One practical shortcut: if you have an existing tall fence post or outbuilding corner pole in an open enough spot, you can mount the tower directly to that structure rather than sinking a new post. Just make sure the surface is solid and the attachment points use bolts, not just screws into wood grain.
Setup checklist, monitoring, and what to expect over the season
Before you call the project done, run through this checklist to make sure everything is in order: If you're specifically looking for dove house plans, see our guide on how to build a dove bird house and follow its suggested entrance, ventilation, and placement tips.
- Interior walls are rough and unfinished (grooved or textured, not painted or sealed)
- Entry hole is 1.5 to 1.75 inches wide, clean-edged, positioned 4 to 5 inches from the top
- No perch at or near the entry hole
- Exterior seams are caulked and painted or oiled
- Tower is mounted with entry hole at least 10 feet off the ground
- 30 feet or more of clear airspace on all sides with no overhead canopy
- Entry hole faces away from prevailing wind (south or southeast preferred)
- Post is sunk or set in concrete and the tower does not move when you push it firmly
- Access panel or removable roof is in place for future inspection
How to know if swifts are using it
The first sign is usually aerial activity: swifts circling the tower repeatedly, swooping low, and making their distinctive chittering call near the structure. That behavior often precedes actual entry by several days. Don't be alarmed if swifts investigate for a week or two before committing. Once a pair moves in, you may hear soft vocalizations from inside, especially in the evening. Nesting begins in late May through June. Do not open the access panel between late May and early August unless you have a specific reason to check nest status; disturbing an active nest can cause abandonment.
First-year occupancy rates are variable. Some towers get claimed in the first season, others take two or three years. Don't take it personally if swifts don't show up immediately. Consistent placement in the right habitat, with a quality build, is what you can control. Keep the tower up year after year and occupancy odds increase significantly.
Seasonal maintenance
- After swifts depart in August or September, open the access panel or remove the roof cap and inspect the interior
- Remove any old nest material and debris from the previous season (dry swift nests are made of small twigs glued with saliva; they're compact and easy to remove)
- Check interior walls: re-score any areas where the texture has smoothed or deteriorated
- Inspect exterior seams and re-caulk any that show cracking or gaps
- Touch up exterior paint or oil treatment if weathering is significant
- Check the post and mounting hardware for rust, rot, or loosening; tighten or replace as needed before the next spring
- Have the tower ready and inspected by early March, well before swifts arrive, so it's not a last-minute scramble
A well-built cedar tower with annual maintenance should last 15 to 20 years. The investment of a weekend's work and around 30 to 50 dollars in materials can support a nesting pair (or eventually a small colony) for decades. Chimney swifts eat thousands of flying insects per day, so beyond the satisfaction of watching them, you're also getting genuine pest control for your backyard. That's a pretty good return on a Saturday afternoon project.
FAQ
Can I add a perch or landing board to make it easier for chimney swifts to enter?
No. Chimney swifts rarely use horizontal perches, and any landing surface can make the tower less appealing or increase unwanted species. Keep the design fully enclosed on the sides, with only the single small opening near the top, and avoid adding roost brackets, landing platforms, or decorative “front” boards.
What if my lumber is already smooth, can I still use it for a chimney swift bird house?
Yes, but only if you still preserve the chimney feel. Rough interior texture is the priority, even for interior finishes. If you use smooth boards, score or groove the inside faces before assembly, and keep the opening size in the 1.5 to 1.75 inch range so starling control depends on the entrance, not the material.
What should I do if I notice other birds using the tower besides chimney swifts?
If you see multiple birds entering and exiting quickly, that can be curiosity or predation risk, but the safest response is to avoid opening anything. Wait until after the nesting window to inspect. If you suspect starlings, the most effective action is prevention next season, meaning confirming the entrance diameter stays under 2 inches and that there are no extra openings.
Is ventilation required inside a chimney swift tower?
Don’t drill extra holes for ventilation or add viewing windows. Swifts want darkness and enclosure, and added openings can reduce the temperature and gripping conditions inside and may invite starlings or other cavities users. If you need airflow for wood longevity, handle it through exterior design decisions, not by compromising the chamber.
When can I clean or inspect the tower without harming active nests?
For maintenance, plan a light, external inspection only. In late fall or early winter (after nesting is finished), you can clean out debris if you must, but do it gently and keep disturbance minimal. Avoid any mid-season opening, because active nests can be abandoned by human interference.
How far should the tower be from fences, trees, or buildings?
Start with a pole-mount only if the surrounding area gives clear approach space, meaning no fence, branches, or outbuildings within the flight corridor. If you are constrained, pick the clearest corner of the yard and rotate the entry so wind-driven rain is minimized, but never sacrifice open sky access near the top of the tower.
Does the direction the entrance faces affect whether swifts use the house?
The “entry facing” matters mostly for rain and glare, not for swifts’ ability to find the box. If you can, orient the opening away from prevailing storm winds, and keep the top edge slightly protected from direct spray. Use a sturdy post and rigid bolts so the hole doesn’t tilt, because a shifting opening can reduce successful approaches.
If swifts do not move in the first year, should I relocate or rebuild?
Typically, yes. If swifts won’t enter in the first year, you should not assume the tower is wrong, because some towers take multiple seasons. The high-leverage checks are: correct entry diameter, entry near the top (about 4 to 6 inches below the roof), interior roughness, and an unobstructed flight path. Then leave it up year-round rather than moving it weekly.
Are there any finishing or sealing products I should avoid on the inside of the tower?
Use galvanized hardware as described, and also check that the entrance edges are not splintered after drilling. Treat the post properly against rot, and make sure any caulk or sealant you use is confined to exterior joints, not smeared inside the chamber. Anything sticky or strongly scented on the interior can discourage use.
How can I tell if the tower is working, do I need to use calls or lures?
Sound matters, but placement matters more. If you hear chittering and circling, that indicates the tower is in their search pattern. Don’t rely on playback or lure attempts. Instead, maintain consistent placement and keep the top at the recommended height range so swifts can dive and cling with minimal obstacles.
Next Articles

How to Build an Oriole Bird House: Step-by-Step DIY
Step-by-step DIY for building an oriole bird house with right dimensions, weatherproofing, predator-safe placement, and

How to Build a Chickadee Bird House Step by Step
Step-by-step DIY chickadee bird house with cut list, chickadee entry sizing, ventilation, drainage, and mounting tips.
How to Build a Starling Bird House Step by Step
Step-by-step DIY guide to build a predator-resistant starling nesting box with correct hole size, ventilation, drainage,