You can build a finch birdhouse in an afternoon with a single board, a few screws, and basic hand tools. The key is getting the dimensions right, especially the entry hole, because that one measurement determines whether House Finches actually move in or whether you end up housing sparrows and starlings instead. This guide walks you through the whole build, from picking the right design to mounting it in the right spot, so you're not guessing.
How to Make a Finch Bird House: DIY Build Guide

Marcus Thornton
15 Apr 2026
Choose the right finch bird house design
House Finches are not obligate cavity-nesters the way woodpeckers or bluebirds are. They'll happily nest on a porch ledge, in a hanging basket, or in a dense shrub. That's actually documented: NestWatch has recorded cases where House Finches chose an enclosed nest box even when more open nesting sites were available nearby. So a standard enclosed box design absolutely works, and it's what we're building here.
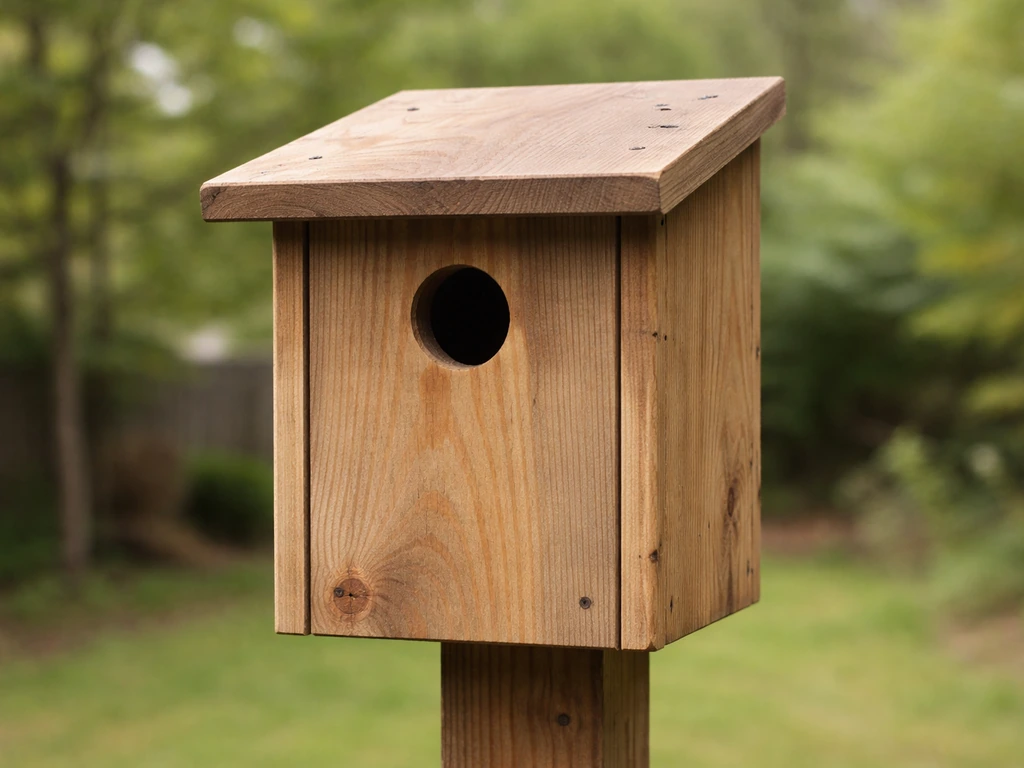
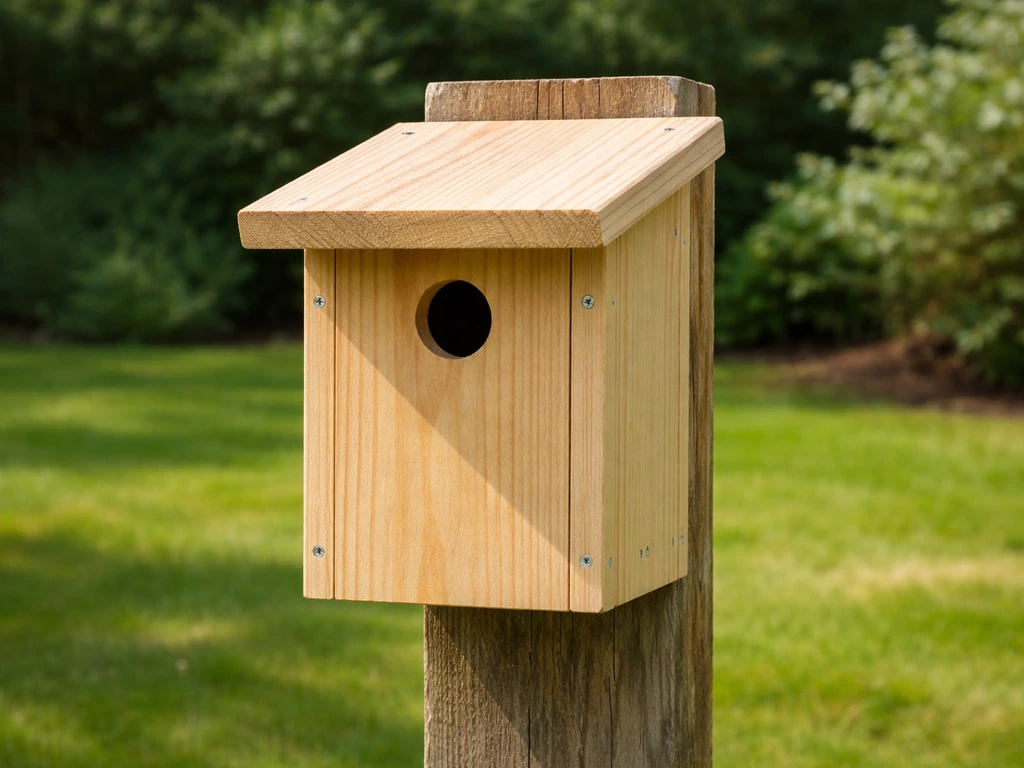
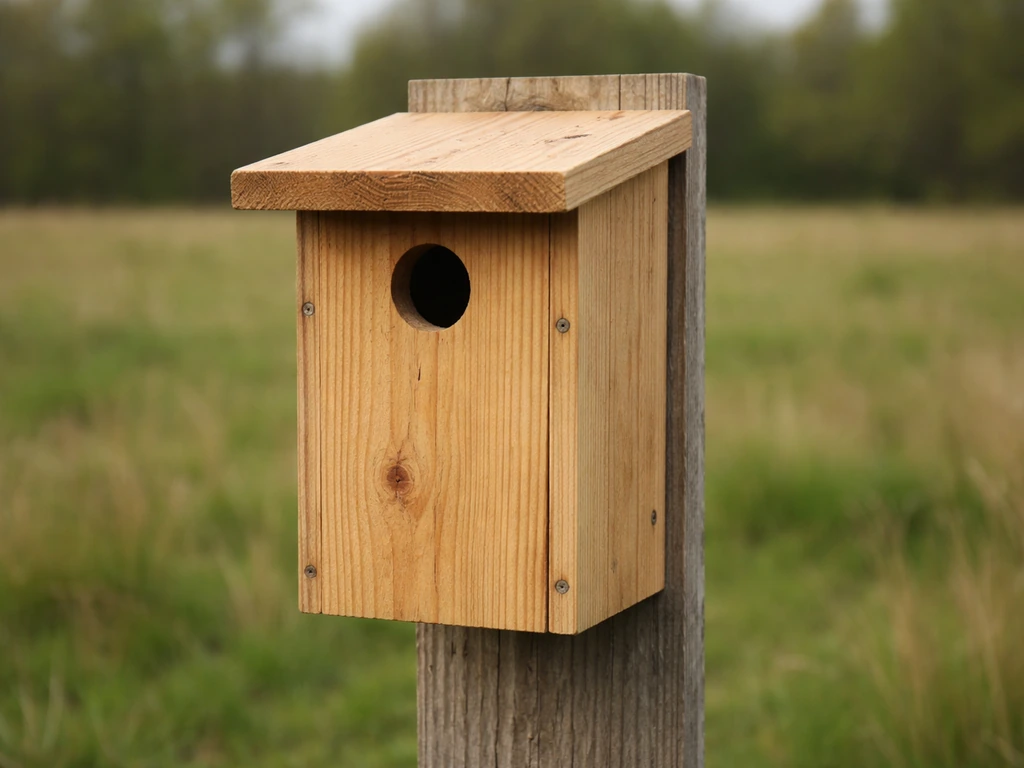
The classic enclosed songbird nest box is the right shape for this project. Think a simple rectangular box: four sides, a sloped roof, a floor with drainage holes, and one round entry hole near the top of the front panel. No fancy angles, no elaborate roof overhangs, no decorative perches. Keep it simple, and you'll keep the build achievable and the birds safer.
One thing worth knowing: not every finch species will use a small round hole. The National Finch and Softbill Society points out that some finches flatly refuse a small circular opening, so if you're targeting House Finches specifically, a 2-inch diameter round hole is the sweet spot. It's wide enough for them to enter comfortably but small enough to deter most competitors. Do not add a perch below the entrance hole. It seems helpful, but it actually gives predators and nest competitors a better foothold to harass your finches. Leave it off.
Materials and tools for building a finch house
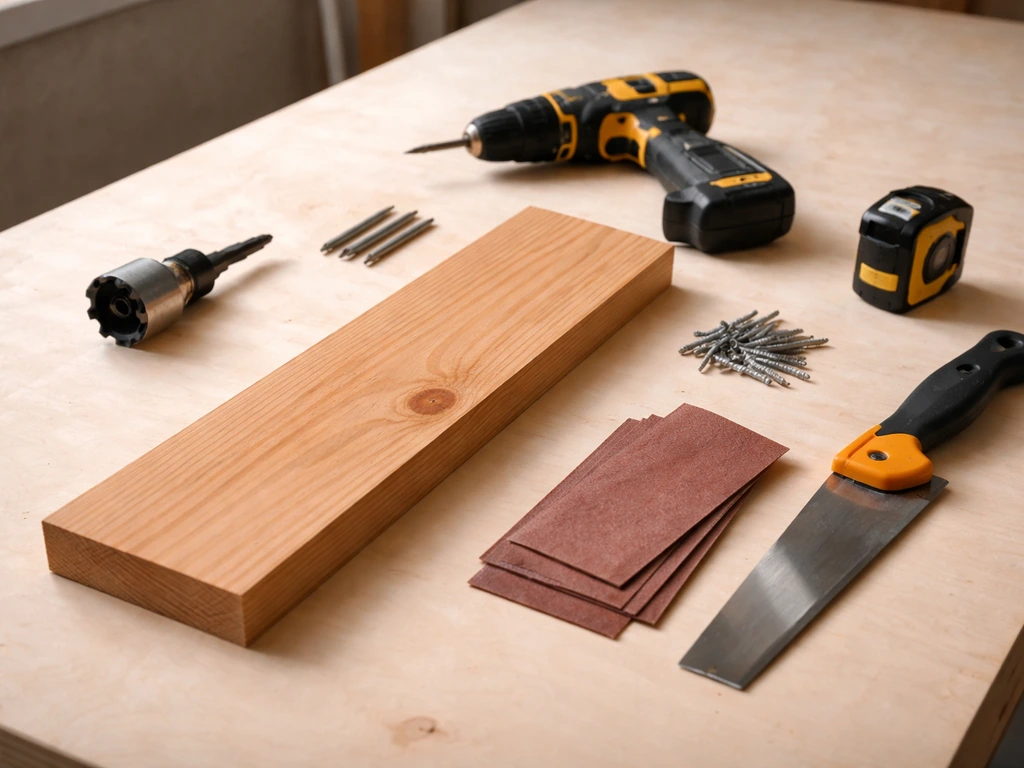
Cedar is my first recommendation for wood. It's naturally rot-resistant, weathers well without paint or stain, and it's widely available at any lumber yard or big box store. Pine works too, especially if you're repurposing scrap lumber from another project. Avoid pressure-treated wood entirely: the chemicals are harmful to nesting birds. Also skip plywood for the walls if you can, since it tends to delaminate after a couple of seasons outdoors. A single 1x6 cedar board about 5 feet long is genuinely all you need for most of this build.
Here's what to gather before you start cutting:
- One 1x6 cedar or pine board, approximately 5 feet long (actual dimension 3/4" thick x 5 1/2" wide)
- One piece for the roof, roughly 7" x 8" (can be cut from the same board or a scrap piece)
- 1 5/8" or 2" exterior screws (deck screws work great, at least 24)
- Waterproof wood glue for reinforcing joints
- A 2" hole saw bit or spade bit for the entry hole
- Sandpaper (80-grit and 120-grit)
- Measuring tape and pencil
- Jigsaw or circular saw for ripping cuts, hand saw works fine too
- Drill or driver
- Optional: metal entrance hole guard plate sized to 2" (about 50mm), which protects the opening from squirrels and larger birds chewing it wider
If you don't own a hole saw, a 2" spade bit does the job. Clamp a scrap piece behind your panel when you drill through to prevent blowout on the back face. That's one of those small details I learned after ruining a couple of front panels early on.
Step-by-step build instructions
These dimensions are based on consensus across multiple wildlife and ornithology sources. For House Finches, a 6" x 6" floor, a box height of about 8 to 10 inches, and a 2" entry hole centered 4 to 4.5 inches above the floor hits the target range across the board. That's your build goal.
Cut list
| Part | Dimensions (inches) | Notes |
|---|---|---|
| Front panel | 5 1/2" wide x 10" tall | Entry hole: 2" diameter, center 4" to 4.5" above floor |
| Back panel | 5 1/2" wide x 12" tall | Extra height allows for mounting screw placement |
| Two side panels | 5 1/2" wide x 9" tall | Angle top edge to match roof pitch if desired |
| Floor | 5 1/2" x 5 1/2" | Drill four 1/4" drainage holes in corners |
| Roof | 7" x 8" | Overhang protects the entry hole from rain |
Assembly sequence
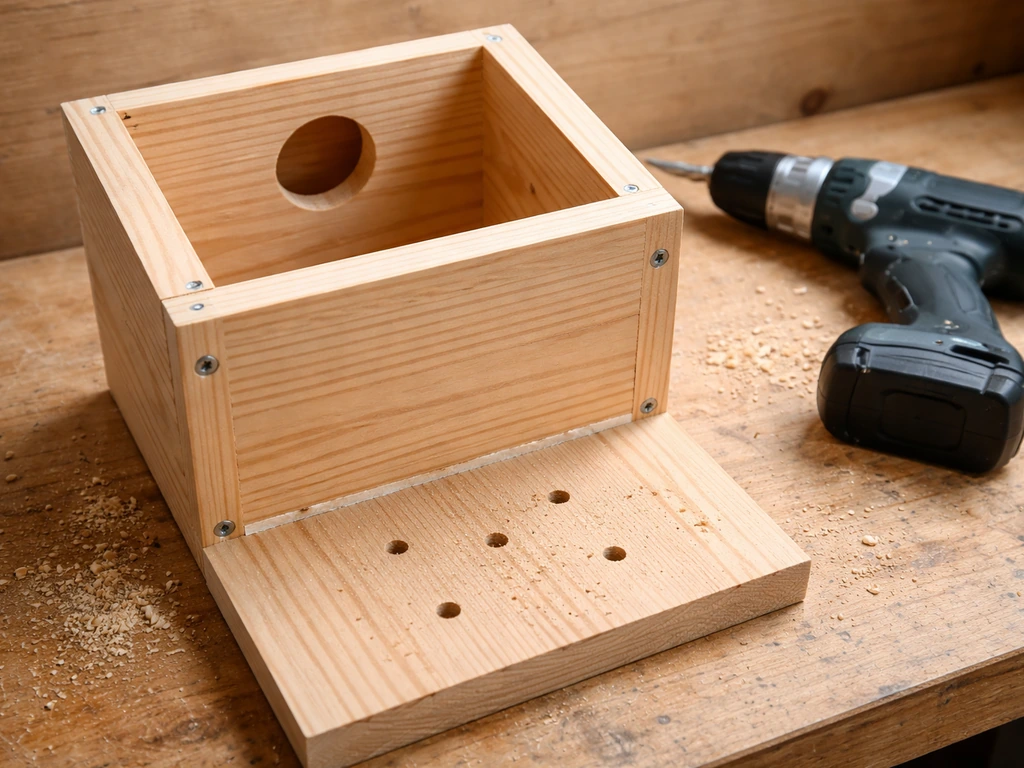
- Cut all pieces according to the cut list above. Sand the edges smooth, especially the entry hole rim, so birds don't snag feathers going in and out.
- Drill four 1/4" drainage holes in the corners of the floor panel. These are non-negotiable: water pooling inside a nest box kills eggs and chicks.
- Drill the 2" entry hole in the front panel, centered side to side, with the center of the hole sitting 4 to 4.5 inches above where the floor will sit.
- Attach the floor to the two side panels first using two screws per side, with a small recess (about 1/4") so the floor sits up inside rather than flush with the bottom. This creates a tiny gap for additional drainage and prevents wicking.
- Screw the front panel to the assembled floor-and-sides unit. Apply a thin bead of waterproof wood glue to each joint before driving screws for a stronger, weather-tight connection.
- Attach the back panel. If you want an easy-clean design, hinge one side panel at the top so it swings open for seasonal cleaning instead of permanently screwing it shut.
- Mount the roof with at least a 1.5" to 2" overhang over the front entry hole. This keeps rain from pouring directly into the hole during storms. Texas Parks and Wildlife's birdhouse plans emphasize this overhang measurement specifically for keeping nests dry, and it really does make a difference.
- Lightly rough up the interior front wall below the entry hole with a chisel or coarse sandpaper. This gives fledglings something to grip when they're ready to leave the nest.
- Optionally, fit a metal entrance hole guard plate over the entry. A guard sized to 2" (approximately 50mm) stops squirrels and larger birds from gnawing the hole wider and taking over the box.
- Do not paint the interior. If you paint or stain the exterior, use a light, neutral color and keep it to the outside only. Let the interior stay natural wood.
Entry hole size, ventilation, drainage, and predator resistance
The entry hole is genuinely the most critical measurement in this entire build. Get it wrong and you'll either lock out House Finches or invite every starling and house sparrow in the neighborhood. A 2-inch diameter hole is the standard for House Finches across multiple wildlife references, though some sources suggest 1.5 inches works if you're getting aggressive sparrow competition. I'd go with 2 inches and add the metal entrance guard, which gives you the best of both: easy entry for finches and resistance to enlargement by pests.
Ventilation is easy to overlook, but a box that traps heat in summer can bake eggs. TPWD notes that overheating is hazardous and recommends drilling ventilation holes under the roof overhang so excess heat can escape a box that traps heat in summer can bake eggs. Drill two to four 1/4" holes just under the roofline on the side panels. These let hot air escape without creating a draft that cools the nest too much on cold spring nights. Drainage holes in the floor handle the other side of the moisture problem: any rain that blows in or condensation that forms drains out rather than soaking the nest material.
For predator resistance, placement matters as much as design (more on that below), but there are two things you can do structurally. First, skip the perch. A perch below the entry hole gives raccoons and house sparrows a convenient handhold to reach in and harass nesting birds. Second, if you're mounting on a post, add a baffle: a cone or cylinder of smooth metal or PVC that wraps the pole about 5 feet off the ground. The National Wildlife Federation specifically calls out raccoons, snakes, and domestic cats as the main nest box predators, and a pole baffle stops most of them cold.
Placement, mounting, and spacing for finches
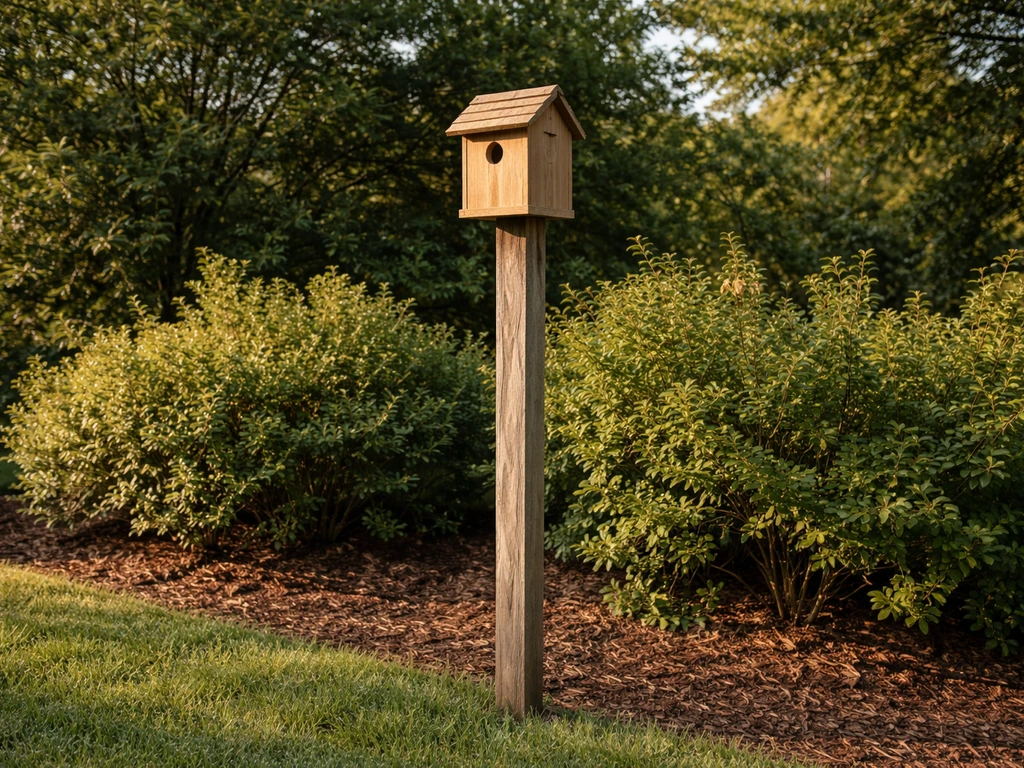
Mount your finch house between 8 and 12 feet off the ground. That height range appears consistently across wildlife references, and it keeps the box high enough to deter casual predators while staying reachable by you for maintenance. Bird Nature's spec chart puts the lower end at 5 feet for House Finches specifically, so if your yard makes 8 to 12 feet difficult, 5 to 7 feet can still work, especially if you have a good predator baffle on the post.
Face the entry hole east or southeast where possible. This catches the gentle morning sun, which helps keep the interior warm in early spring when House Finches start nesting, and avoids the harsh afternoon heat that can bake a west-facing box in summer. Avoid pointing the hole directly into the prevailing wind direction in your area.
House Finches are comfortable nesting near human activity, which makes them a great target for backyard boxes. A porch, eave, or post near the house is genuinely fine. They prefer areas with nearby shrubs or trees for cover but don't need deep woodland. Mounting on a wooden fence post, a steel shepherd's hook, or the side of a shed all work. If you mount to a structure (like a shed wall), make sure the box is tilted very slightly forward, just a degree or two, so any water that does get in runs toward the floor drainage holes rather than pooling.
If you're putting up more than one box, space them at least 25 to 30 feet apart. House Finches aren't as territorial as bluebirds, but crowding nest boxes invites competition and stress. This is also worth thinking about if you're planning a broader backyard bird setup: the spacing and placement logic that works here is similar to what you'd apply if you were building boxes for other songbirds. For example, building a sparrow bird house involves similar height and spacing considerations, though the entry hole dimensions differ.
Maintenance, cleaning, and what to do if finches don't show up
Seasonal cleaning routine
Clean the box once a year, ideally in late fall after the breeding season wraps up and before winter. Open the access panel (or unscrew it), remove the old nest material, and dispose of it. If the interior walls have significant fecal buildup, NestWatch recommends a solution of 1 part bleach to 10 parts water. Scrub with a stiff brush, rinse well, and let it dry completely in the sun before closing it back up. Do not rush the drying step: a damp box going into winter is a mold factory.
Never clean a box during active nesting season. If you're not sure whether a box is still in use, wait and watch from a distance for a few days before opening it. NestWatch is clear on this: if there's any question about active use, hold off. Disturbing an active nest can cause abandonment.
Troubleshooting when finches ignore the box
Give a newly mounted box at least one full breeding season before deciding it's a failure. House Finches in your area need time to find it, evaluate it, and trust it. That said, here are the most common reasons a box goes unused, and what to fix:
- Wrong location: Too exposed with no nearby vegetation, or too isolated from areas where finches are already active. Move it closer to where you already see finches feeding or perching.
- Competitor takeover: House sparrows are aggressive and will claim boxes early. Check for sparrow nests (loose, messy grass nests with feathers) and remove them promptly. An entrance hole guard helps deter sparrows from expanding the hole.
- Entry hole too small or too large: A hole under 1.5 inches may be too tight; over 2.25 inches invites starlings. Re-drill or replace the front panel if needed.
- Box placed too low: Below 5 feet, ground predators are a serious deterrent to nesting. Raise the mount.
- Interior too hot: A box in full afternoon sun with no ventilation gets brutally hot. Drill more vent holes and consider relocating to a spot with afternoon shade.
- Box is too new and smells like fresh-cut lumber or paint: Let it weather for a few weeks before the breeding season. You can speed this up by leaving it outside through rain and sun before mounting.
The good news is that House Finches are adaptable and genuinely willing to use nest boxes when the setup is right. Unlike some species that require extremely precise habitat conditions, finches are relatively forgiving neighbors. Getting the core specs right (2" hole, 6x6 floor, 8-10" height, mounted 8-12 feet up) puts you in a very good position.
How this compares to boxes for other backyard birds
If you've already built or are planning to build boxes for other species, here's how the House Finch build stacks up dimensionally. It's helpful context if you're expanding your backyard setup beyond a single box.
| Species | Floor Size | Box Height | Entry Hole Diameter | Hole Above Floor | Mounting Height |
|---|---|---|---|---|---|
| House Finch | 6" x 6" | 8–10" | 2" | 4–4.5" | 8–12 ft |
| Chickadee | 4" x 4" | 8–10" | 1 1/8" | 6–8" | 4–15 ft |
| House Sparrow | 4" x 4" | 9" | 1 1/4" | 6" | 5–15 ft |
| Swallow | 5" x 5" | 6–8" | 1 1/2" | 4–6" | 5–15 ft |
| Dove | 8" x 8" | 8" | Open front (no hole) | N/A | 8–12 ft |
The House Finch box is one of the larger songbird boxes, mostly because of that 6x6 floor. Chickadees, for comparison, want a much tighter space, which is why building a chickadee bird house uses a noticeably smaller floor and a narrower entry hole. If you're interested in attracting swallows alongside finches, building a swallow bird house uses a similar mounting height but a smaller floor and a 1.5-inch entry, so the front panel dimensions differ. Doves are a different story entirely: if you want to add one of those to your yard, check out the guide to building a dove bird house, since they prefer an open-front platform rather than an enclosed box. And if you've been curious about attracting orioles, a finch box won't do it: building an oriole bird house is a completely different type of structure. If you're ever dealing with starling competition around your finch box, it's worth knowing what they prefer too: the guide to building a starling bird house covers their specs, which helps you understand why your finch-specific entry hole keeps them out. Finally, if you're drawn to less common backyard projects, building a chimney swift bird house is a fascinating but completely separate build that supports a different kind of aerial insectivore.
You've got everything you need to start today
This is genuinely a beginner-friendly build. A single cedar board, a hole saw, a drill, and a Saturday morning is all it takes to have a finished finch house ready to mount. The dimensions are well-established, the construction is straightforward, and House Finches are enthusiastic adopters once the box is in the right spot. Focus on that 2-inch entry hole, get the box up at 8 to 12 feet, skip the perch, add drainage, and let the birds do the rest. Most people who try this project end up with occupied boxes within a season, often sooner than they expected.
FAQ
Do I really need an entrance guard around the 2-inch hole, or is that optional?
It is optional, but it helps a lot in high-competition areas. An entrance guard (thin metal ring or cone) reduces enlargement by persistent house sparrows and other competitors, and it also stiffens the front panel around the hole so it does not split after repeated weather cycles.
What wood thickness should I use for the walls and the roof so the box lasts?
If your design uses a single-board build, aim for a typical board thickness around 3/4 inch, which is sturdy enough to resist warping and gives you material depth for a well-fitted entry ring. Too-thin walls can loosen at the screws and create gaps that let competitors reach the nest.
Can I mount the finch house on a fence post without using a baffle?
You can, but a baffle is the safer choice, especially if raccoons, cats, or snakes are common where you live. If you skip the baffle, raise the box toward the upper end of the height range and keep nearby cover trimmed so predators have fewer routes to reach the entrance.
How do I prevent the roof from leaking if my build uses a simple sloped top?
Make sure the roof overhangs the box by at least a small margin (even 1/2 to 3/4 inch helps) so runoff drips below the front opening and side seams. Also seal exterior end grain with an exterior-safe wood finish if you choose to finish the wood, but keep finishes off the interior where nesting contact happens.
Should I paint or stain the finch bird house?
You can, but do it sparingly and only on the exterior. Avoid strong odors and do not coat the interior. If you leave cedar bare, you already get good weather resistance, and you avoid chemical exposure near the nest.
What should I use as nesting material, or should I fill the box with anything?
Do not add nesting material. House Finches build nests themselves from fibers and plant material they collect, and providing materials can sometimes introduce unwanted plants, mold, or parasites. Keep the box clean between seasons so only natural materials get inside.
If my box attracts sparrows instead of finches, what’s the first change to make?
Start with the entrance hole and competition control. A strict 2-inch opening (plus an entrance guard) is the most common fix. Also remove any nearby perching or easy access points (like a nearby branch that aligns directly with the hole) because sparrows use those to harass and reach in.
How often should I check the box before the first nesting starts?
Limit checks to quick observations from a distance. If you open the access panel too early, you can discourage nesting or cause abandonment. A good rule is to avoid opening until after breeding season, unless you see clear signs it is unused and you need to inspect for damage.
What’s the best way to ventilate without making drafts?
Ventilation holes should be placed just under the roofline on the sides, not directly facing the nest cup. Drilling 1/4-inch holes in the upper side panels is usually enough to let hot air escape while minimizing direct airflow through the nest area.
Are 1 or 2 drainage holes in the floor enough?
Usually, yes. Aim for multiple small holes (for example, 2 to 4 depending on floor size) rather than one large one so water does not pool. Keep the holes clear of sawdust during assembly, because clogged drainage defeats the moisture-control design.
How do I know whether to increase spacing if I’m adding multiple boxes?
If you add more than one finch box, keep at least 25 to 30 feet between them, and more if you have a small yard with dense shrub lines. Crowding increases competition even when the entrance specs are perfect, and it can push birds to choose only one box while the others remain unused.
What should I do if the box gets moldy in summer or early fall?
Remove it from use only long enough to clean and dry it completely, then return it after it is dry. In the future, improve moisture control by confirming the roof slope is correct and the interior fully air-dries after rain. Avoid storing the box wet, because hidden moisture can keep re-triggering mold.
Next Articles
How to Build a Sparrow Bird House Step by Step
Step-by-step DIY sparrow house plans with sizes, entry-hole specs, materials, mounting, and troubleshooting for success.

How to Build a Dove Bird House Step by Step
Step-by-step DIY instructions, cut list, and placement tips to build a safe dove bird house that attracts nesting pairs.
How to Build a Swallow Bird House for Barn and Tree Swallows
Step-by-step DIY plans to build barn and tree swallow bird houses, with entry size, mounting, and care tips.