You can make safe, engaging bird toys at home today using materials you already own, a few basic tools, and about 30 minutes. The key is knowing which toy types actually matter for your bird's mental health, which household materials are genuinely safe, and how to size everything correctly so nothing becomes a hazard. This guide walks you through all of it, from your first paper-tube forager to slightly more ambitious builds, with concrete steps and real measurements.
How to Make Bird Toys: Easy DIY Chewing, Climbing, Foraging

Marcus Thornton
4 Apr 2026
The four toy types every bird needs
Before you start cutting and tying, it helps to understand why toy variety matters. Birds in the wild spend most of their waking hours chewing, shredding, climbing, and searching for food. A single hanging toy doesn't cover all of that. The four categories you want to hit are chewing, shredding, climbing/interactive, and foraging. Hitting all four, even with simple builds, makes a real difference in behavior and keeps birds from getting bored or destructive.
- Chewing toys: Untreated wood blocks, cork, and dried branches that birds can gnaw and splinter apart. These wear down naturally and need replacing often, which is part of the point.
- Shredding toys: Layers of palm leaf, paper, or soft cardboard that birds can rip into pieces. Think layered strips hanging from a ring or a tightly rolled paper log.
- Climbing/interactive toys: Rope ladders, swing perches, wooden bead chains, or stacked block arrangements that encourage movement and problem-solving. Adding beads and knots to rope sections is a simple way to increase complexity.
- Foraging toys: Any build that hides or wraps food so the bird has to manipulate, seek, or dismantle something to reach it. These mimic natural feeding behavior more closely than any other category.
Many of the best DIY builds combine more than one category at once. A hanging wood-and-bead skewer, for example, gives your bird something to chew, climb, and bat around in a single toy. That's the target. If you can build something that checks two or three boxes, you're ahead of most store-bought options.
What's actually safe to build with
Material choice is where most DIY bird toy projects go wrong, usually not because people use wildly dangerous things, but because they don't realize that some very common household materials are genuinely toxic to birds. Here's what to reach for and what to skip.
Safe materials
- Untreated softwoods: Pine, balsa, and basswood are fine. Hardwoods like oak and maple work too. The Association of Avian Veterinarians maintains a bird-safe wood list, and it's worth checking before you grab a random board from the garage.
- Stainless steel hardware: Stainless steel is non-toxic and easy to clean. Use it for hooks, rings, and skewers whenever you can.
- Plain cardboard and paper: Brown paper bags, plain cardboard tubes (toilet paper and paper towel rolls), cardboard egg cartons, and unprinted paper are all good. Avoid anything with colored ink or glossy coating.
- Natural fiber rope (with supervision): Sisal and hemp rope are popular, but you need to watch your bird with these. If you see them eating the fibers rather than just chewing, remove the rope. Ingested fibers can cause crop obstructions.
- Untreated leather: Vegetable-tanned leather strips work well as connectors and texture elements. Avoid chrome-tanned or dyed leather.
- Food-safe dyes only: If you want to add color to wood beads or blocks, use bird-safe food coloring. If you want to go further with that, there's a solid walkthrough on how to dye wood for bird toys safely.
What to avoid
- Zinc and lead: Both are poisonous to birds, and lead poisoning can be fatal if not treated quickly. Avoid galvanized hardware, cheap imported toy clasps, and anything with a flaking metallic coating.
- Treated, stained, or pressure-treated wood: The chemicals used in these processes are toxic. Never grab a piece of decking or fence board from outside.
- Flavored or scented wood: Some craft stores sell flavored wood pieces meant for pet rodents. These are not safe for birds.
- Glue and adhesives: Most craft glues are not bird-safe. If you need to bond something, mechanical fastening (stainless steel screws, knots, or threading) is always preferable.
- Magazines and glossy paper: The inks and coatings are hazardous if ingested. Stick to plain brown paper and cardboard.
- Cotton rope as a staple material: It looks soft and harmless, but birds frequently eat it, and the fibers can cause obstructions.
One rule that's saved me from a few bad material decisions: if you're not sure whether something is safe, don't use it. There's always a safer alternative that's just as easy to work with. You can find a thorough breakdown of this in any guide focused on how to make safe bird toys, but the short version is: natural, untreated, and stainless whenever possible.
Repurposed vs. store-bought materials
| Material Source | Pros | Cons | Best For |
|---|---|---|---|
| Repurposed household items (tubes, egg cartons, paper bags) | Free, immediately available, easy to replace | Must verify ink/coating safety, shorter lifespan | Foraging inserts, shredding layers, single-use builds |
| Craft store wood (balsa, pine blocks, wood beads) | Inexpensive, pre-cut sizes, predictable grain | Check for treatment or coating before buying | Chew blocks, bead skewers, perch sections |
| Stainless steel hardware (hooks, rings, skewers) | Non-toxic, durable, easy to sanitize | Slightly higher cost than galvanized alternatives | Hangers, connectors, skewer rods |
| Natural fiber rope (sisal, hemp) | Tactile variety, good for climbing textures | Requires supervision, replace if ingested | Ladder rungs, knot sections, texture elements |
Repurposed materials win on cost and accessibility, and they're perfectly valid for most builds. The catch is that you do need to verify each item rather than assume it's safe just because it came from your kitchen. Store-bought craft supplies give you more consistency but need the same safety check. My recommendation: use repurposed cardboard and paper for foraging inserts (they're meant to be destroyed), and invest in proper stainless hardware and verified wood for anything structural that stays in the cage long-term.
Easy DIY bird toy projects you can make today
These are the builds I actually make and use. They're ordered roughly from simplest to slightly more involved. All of them can be made with no power tools. Most use things you probably have on hand right now. For anyone who wants a broader collection of ideas before diving in, this roundup of bird toys you can make at home is a great place to browse first.
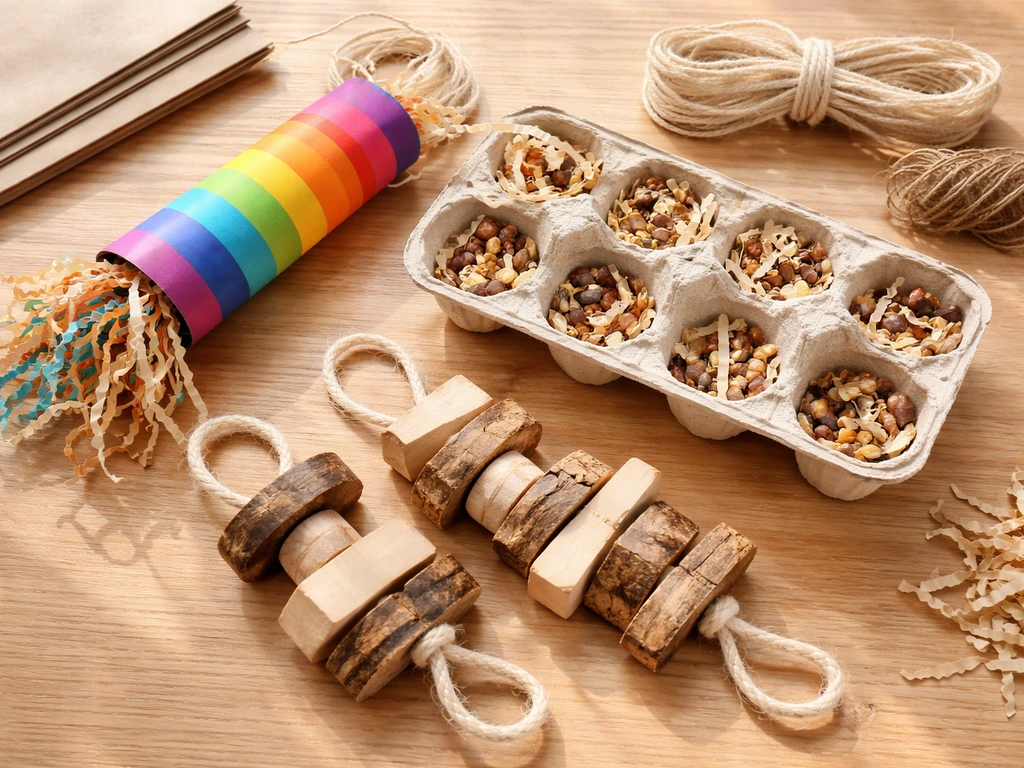
Project 1: Paper tube forager (beginner, 5 minutes)
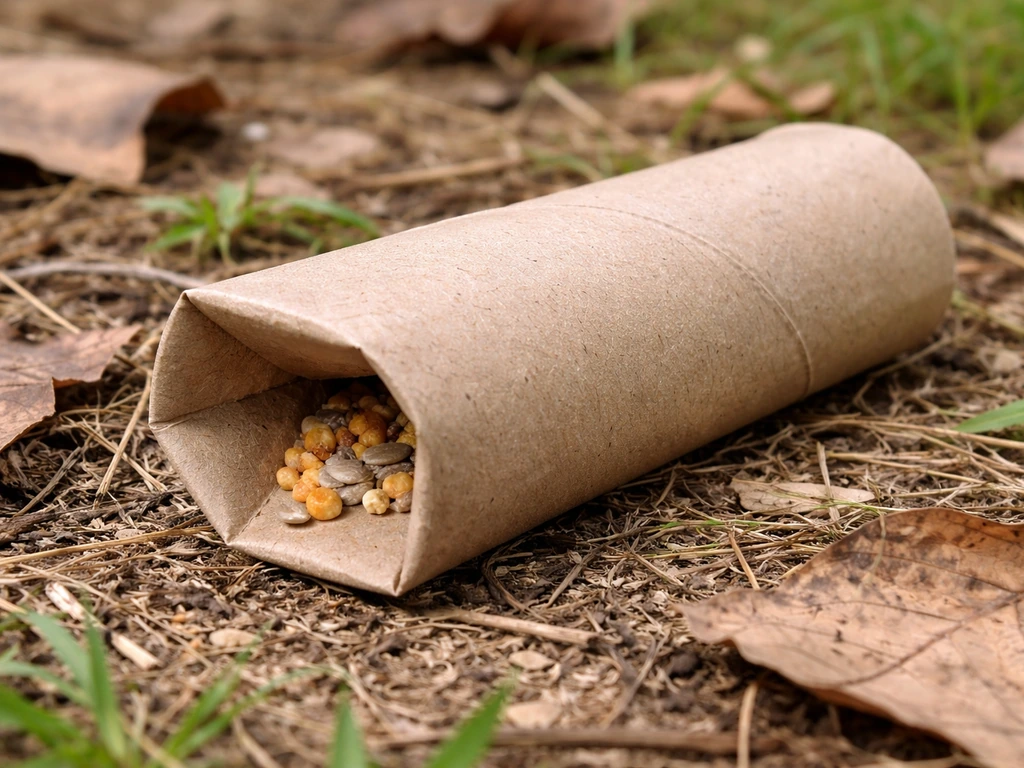
This is the easiest foraging toy you can make, and birds consistently love it. Take a cardboard toilet paper roll or paper towel roll (plain, unprinted interior). Fold one end shut. Fill the tube with a small amount of seed, dried fruit, or a few pellets. Fold the other end shut. You can poke 4 to 6 holes (about 1/4 inch diameter for small birds, 1/2 inch for medium birds) using a pencil or skewer so the bird can smell the food inside. Hang it from a cage bar using a stainless steel quick-link, or simply place it on the cage floor for ground-foraging species. That's it. The bird has to roll, chew, and manipulate the tube to access the food. Replace it every one to two days.
Project 2: Egg carton treat puzzle (beginner, 5 minutes)
Grab a plain cardboard egg carton (no foam, no foil lining). Place a small treat, piece of dried fruit, or a pellet into several of the egg cups. Close the carton. You can poke holes in the top over the filled cups using a pencil to give the bird a scent clue. Set it on the cage floor or a flat play surface. The bird will peck, flip, and tear the carton open to get to the food. This is one of the simplest enrichment builds out there and it comes directly from ASPCA upcycling guidance. The carton is single-use and goes in the compost after.
Project 3: Bead and block skewer (beginner to intermediate, 20 minutes)
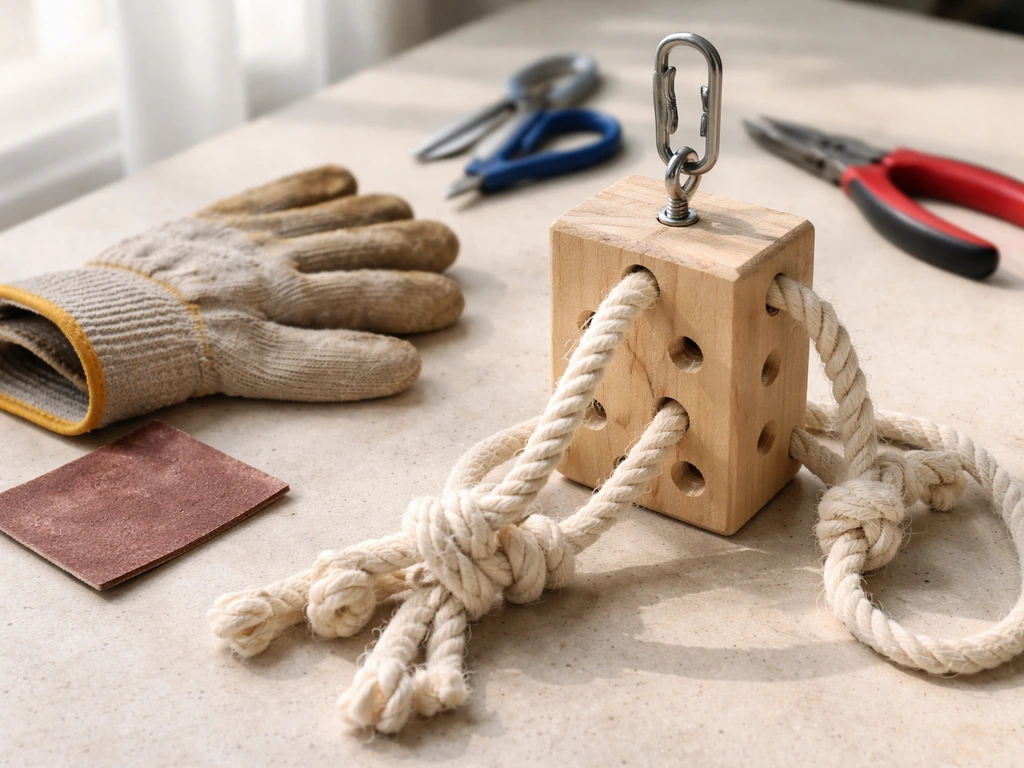
Materials: one stainless steel bird-toy skewer (available at pet and craft stores, 6 to 10 inches long), wooden beads with holes (untreated, 1/2 inch to 1 inch diameter depending on bird size), small untreated wood blocks or cork pieces, and a stainless steel quick-link for hanging. Thread the beads and wood blocks alternately onto the skewer. Leave about 1 inch at each end. Bend or cap the bottom end of the skewer following the manufacturer's method so pieces don't slide off (most toy skewers have a locking nut or wing nut). Attach the quick-link at the top and hang from the cage top or a playstand. This toy combines chewing (the wood blocks), manipulation (the movable beads), and movement. It's a good multi-behavior build for parakeets, cockatiels, and conures.
Project 4: Paper ball shredder (beginner, 2 minutes)
Take three to five sheets of unprinted paper or plain brown paper. Crinkle each sheet into a loose ball. You can nest the balls inside each other for a layered effect, or string them on a sisal strand and hang the whole thing. This is as simple as it gets, but many birds, especially those that love shredding, will spend 20 minutes on a single paper ball. Kaytee's DIY toy guidance specifically calls out the crinkling method as a legitimate and bird-approved design, which honestly validated a lot of what I'd already been doing by accident.
Building foraging toys that make birds work for their food
Foraging toys are in a category of their own because they tap into something deep and natural. Parrots, and birds generally, are built physically and mentally for foraging. They spend hours in the wild searching, manipulating, and retrieving food. A bowl of seed sitting in the same spot every day doesn't come close to satisfying that drive. These builds do.
Layered paper bag surprise
Take a small plain paper bag (brown lunch bag size works for most medium birds). Place a treat inside. Fold the top over twice and secure with a small strip of plain paper twisted around it. Then place that bag inside a slightly larger bag and repeat. You end up with a nested package the bird has to tear through layer by layer. The key safety note here: use an appropriately sized bag for your bird. If you notice your bird eating the paper rather than just shredding it, remove the toy and try a different foraging build instead.
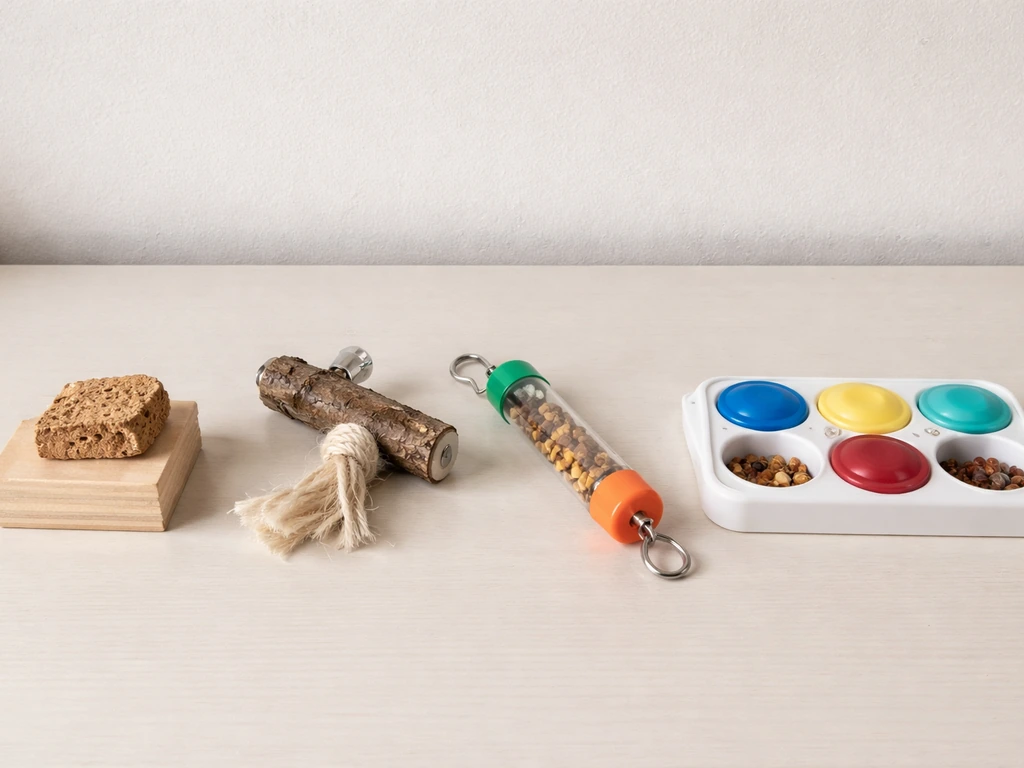
The cork and seed plug
Drill or poke a 1/2-inch hole (or larger, depending on bird size) into a wine cork or cork block. Pack the hole with a seed mix or small treat. Hang the cork from a stainless skewer or sisal strand. The bird has to dig, chew, and manipulate the cork to excavate the food. Cork is soft enough that even small birds can work it. This build encourages the exact behaviors VCA describes as natural foraging instincts: manipulating, seeking, licking, chewing, and crunching. If your bird struggles with it at first, pack the hole loosely and let a bit of food show at the surface. Make it easier until they get the idea, then increase the difficulty.
Treat-stuffed vine ball
Wicker or vine balls are available cheaply at craft stores (check the floral section). Make sure they're untreated. Stuff dried fruit, pellet pieces, or seed clusters into the gaps in the weave. Hang the ball using a stainless quick-link. The bird has to reach through the weave, rotate the ball, and pick out each piece. You can increase complexity by weaving small pieces of plain paper or palm leaf through the ball so the food is partially hidden. This is the kind of design that pairs food items with a physical structure to create a genuine retrieval task, which is exactly what good foraging enrichment looks like.
Box with poked holes
Take any small plain cardboard box (a matchbox or a small gift box works). Place dry food or treats inside. Close the lid and poke 6 to 10 holes in the sides and top with a pencil. The holes let the bird smell the food and give them a starting point for tearing. This is one of the ASPCA's recommended upcycling builds, and it works because the bird has to problem-solve before they even get to chewing. Place it on the cage floor or inside the cage on a flat surface. Don't hang it; it needs to be able to move and roll as the bird works it.
Assembly tips, safe mounting, and keeping things clean
Putting it all together safely
Before anything goes into your bird's cage, do a quick safety inspection. Check every connector, knot, and join point. Look for loose ends of rope or wire that could catch a toe or a beak. Make sure no hardware has a flaking or peeling coating. Stainless steel quick-links are the safest hanging method because they close fully and don't have the small open gaps that some spring clasps and chain links do. Avoid key-ring style attachments; a bird can get its beak or a toenail caught in the gap.
No bird toy is 100% safe regardless of how carefully you build it. The first time you introduce any new toy, watch your bird with it for at least 15 to 20 minutes before leaving them unsupervised. This is especially true for foraging builds with multiple components. If something seems to confuse or frighten your bird, remove it and reintroduce it later. Birds can be surprisingly suspicious of new objects in their space.
Mounting inside cages
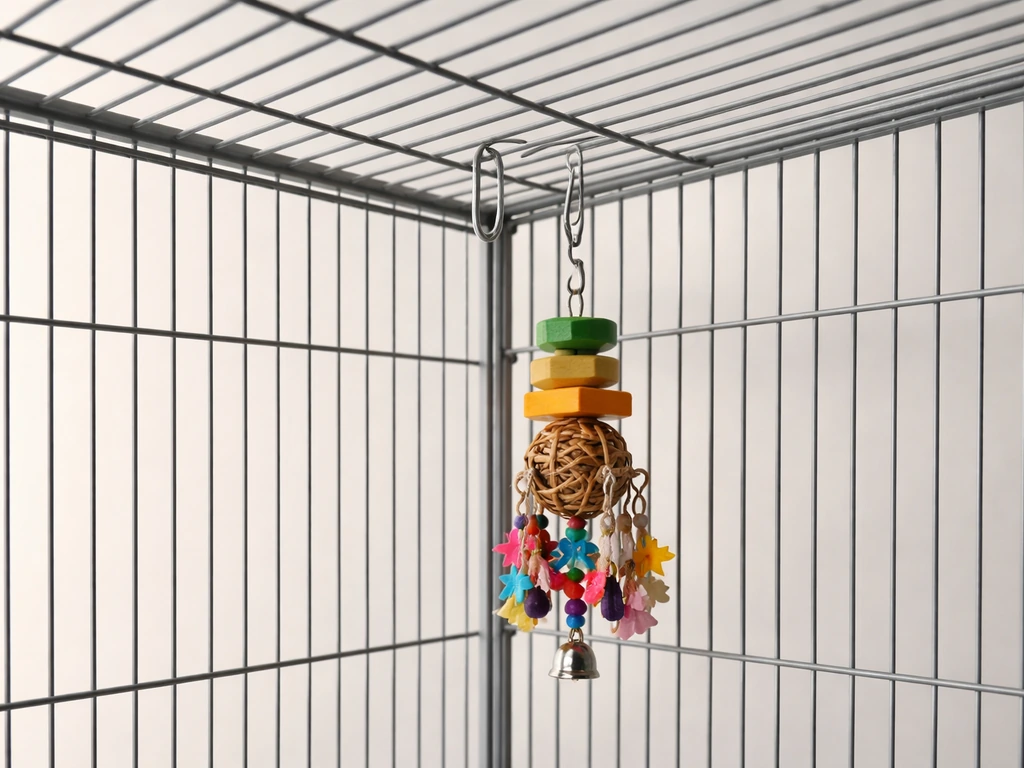
Hang toys from the top or top corners of the cage using stainless quick-links attached to the cage bars. Avoid the very center of the cage ceiling if possible, as this can interfere with movement. For climbing toys like ladders or bead chains, anchor both the top and the bottom so the bird has stable contact points while moving along it. Don't place toys directly over food or water bowls where debris and droppings can contaminate the bird's supplies.
Cleaning your DIY toys
For wooden and stainless steel components, clean with mild unscented dish soap and warm water, rinse thoroughly, and let them air dry completely before returning them to the cage. For a deeper sanitize, a solution of 1 part bleach to 9 parts hot water works well. Rinse extremely well after using bleach, and make absolutely sure the toy is fully dry before reintroducing it. Moisture trapped in wood or rope can grow mold quickly, which is its own hazard. Paper and cardboard toys are single-use and should just be discarded and replaced.
Sizing your toys for the right bird
A toy that's perfect for a macaw can be a serious hazard for a budgie. Size everything to your bird, not just for aesthetic reasons but for real physical safety. Small birds can get their heads or bodies stuck in openings that are designed for larger birds, and oversized toys can be heavy enough to injure a small bird if they fall or swing hard.
| Bird Size | Example Species | Safe Bead Diameter | Hole/Opening Size | Toy Weight |
|---|---|---|---|---|
| Extra small | Budgies, parrotlets, finches | 3/8 to 1/2 inch | 1/4 to 3/8 inch | Lightweight only (under 2 oz) |
| Small | Cockatiels, lovebirds | 1/2 to 3/4 inch | 3/8 to 1/2 inch | Light to medium (2 to 4 oz) |
| Medium | Conures, Caiques, Senegals | 3/4 to 1 inch | 1/2 to 3/4 inch | Medium (4 to 8 oz) |
| Large | African Greys, Amazons, Eclectus | 1 to 1.5 inch | 3/4 to 1 inch | Medium to heavy (up to 12 oz) |
| Extra large | Macaws, Cockatoos | 1.5 inch and up | 1 inch and up | Heavy builds fine |
Bar spacing is also relevant here. Cage bar spacing for budgies is typically 1/2 inch, and for cockatiels it's 1/2 to 5/8 inch. Any toy part that could slip through those gaps is a potential entrapment hazard. This is especially important for ring-type and loop-type components. Make sure all ring openings are either large enough that the bird could never get stuck (meaning larger than its whole head) or small enough that they can't get a beak or toe through at all.
Budgies and cockatiels have specific build considerations that go beyond just sizing down from a larger bird's toy. If you want a full breakdown for those species, both how to make bird toys for budgies and a dedicated guide on how to make bird toys for parrots go into species-specific detail that's worth reading before you build for those birds specifically.
Beginner builds vs. more advanced projects (and what to do when things go wrong)
Beginner-friendly starting points
If this is your first time making a bird toy, start with the paper tube forager or the egg carton puzzle. Both are zero-risk in terms of construction errors because there's almost nothing to get wrong. No hardware, no assembly, no tools beyond a pencil. Once you're comfortable with how your bird interacts with those, move to the bead skewer. That's the first build that requires a bit of planning (getting the hardware, checking the bead size) but it's still well within beginner range. The do it yourself bird toys approach really starts here: use what you have, build simple, and observe.
Stepping up the complexity
Once you've built a few basic toys and watched how your bird interacts with them, you can start adding layers. A more advanced foraging toy might involve a wooden box with a sliding door the bird has to push open, or a series of cups threaded onto a rope where each cup has to be flipped upright to reveal the treat inside. Tying treats or toy bits into braided sections of sisal is another good intermediate step: it slows the bird down and adds manipulation complexity without requiring any tools. You can also try a dedicated build using accessible craft store materials like how to make bird toys with popsicle sticks, which adds a bit more structure than paper builds while still keeping costs minimal.
Common problems and how to fix them
- Bird ignores the toy: This is normal, especially with foraging builds. Make the food reward more obvious at first, like letting seed spill out of the tube opening, and gradually close it up as the bird learns. Starting easier always works better than forcing a harder version.
- Bird seems frightened of the new toy: Place the toy near the cage but outside it for a day or two before putting it inside. Birds are naturally suspicious of new objects near their territory.
- Toy falls apart too quickly: Upgrade your hardware. A lot of early DIY failures come from using cotton string or cheap craft-store rings instead of stainless steel components. The structural parts need to outlast the chewing parts.
- Bird eats the rope or paper instead of playing with it: Remove it immediately and substitute a different toy type. Some birds are more ingestion-prone than others. Skip fiber rope entirely for those birds and stick to wood, cork, and cardboard.
- Hardware corrodes or discolors: You almost certainly have zinc or galvanized steel somewhere in the build. Replace it with stainless steel. This is non-negotiable.
- Toy gets moldy or smelly fast: You're not drying it completely after cleaning. Air dry for several hours minimum, or let it sit in a dry spot overnight before putting it back.
One thing I've learned over a lot of builds: the first prototype almost never works perfectly. The paper bag is too big, the hole is in the wrong spot, the bead is slightly too small. That's fine. Bird toys are cheap to make and easy to iterate. Make the first version, watch what your bird does with it, and adjust. You'll figure out your bird's preferences faster than any guide can predict them.
The last thing to remember is that toys need to be refreshed regularly. Birds habituate quickly to the same object, and enrichment value drops fast once novelty wears off. Rotate toys every week or two, introduce new builds regularly, and plan ahead rather than leaving the same toy hanging for months. That cycle of building, introducing, observing, and replacing is the whole practice, and once you're in that rhythm, making bird toys stops feeling like a project and starts feeling like a normal part of keeping birds.
FAQ
Can I use printed cardboard or paper packaging to make bird toys?
For paper and cardboard toys, treat any printed ink, glossy coating, or labels as unsafe until you can confirm the material is plain, unprinted, and non-toxic. If the tube or carton is from the outside of packaging, cut off the printed sections entirely, or replace it with plain brown paper. When in doubt, use untreated interior portions only, and introduce a new paper toy under supervision the first time to confirm your bird is shredding, not ingesting large paper pieces.
How do I know when a DIY bird toy is worn out or unsafe?
If you see frayed rope fibers, loose wood splinters, cracking cork, or beads that can wobble free, retire the toy immediately. For toys with natural fibers (like sisal or palm leaf), replace when the fibers look fuzzy or weakened, because birds can pick at the degraded material and end up swallowing bits. A good rule is to re-check tightness and structural integrity every time you refresh the toy.
My bird destroys the foraging toy instead of working it. What should I change?
Foraging toys should be sized to the bird's comfort level, not the treat size alone. If your bird keeps eating the paper bag or shredding the egg carton faster than it can access the food, make the entry harder by using a smaller bag, fewer layers, smaller holes, or putting food deeper inside. If the bird seems stressed or ignores the toy, make it easier first by leaving a small portion of food visible or reducing the number of layers.
Is it okay to put several DIY toys in the cage at the same time?
Yes, you can offer multiple toy types in the same session, but avoid stacking too many complex components at once (for example, a foraging box plus a hanging skewer). Start with one new toy, observe for 15 to 20 minutes, then add the next. If you notice reduced interest, confusion, or aggressive guarding of one toy, reduce to fewer items and rotate more frequently.
Should foraging toys be hung or placed on the cage floor?
If your bird is a floor-forager, placing a foraging toy on the cage floor is safer and often more effective than hanging it. However, make sure it cannot roll into bedding, under feeders, or into corners where it can be wedged and become hard to inspect. For ground toys, use a tray or dedicated flat surface during supervised play, then remove it promptly when the bird finishes.
What’s the best way to clean DIY bird toys, especially after treats get stuck?
For stainless and wooden parts, you can use mild unscented dish soap and warm water, then air dry completely before reintroducing. If you use a deeper sanitize mix, rinse extremely well and ensure the toy is fully dry, because trapped moisture can promote mold in rope and wood. Do not sanitize paper or cardboard, since they are designed for single-use, discard, and replacement.
Why are some store-style attachments riskier than others for hanging toys?
Birds can get entangled with any attachment that forms a narrow gap or a loose loop. Avoid key rings and anything that leaves an open seam, gap, or rotating connector. Quick-links that close fully are safer because the gap is eliminated, and you should also check that the connector cannot spin into a position where a rope or bead line slips into a pinch point.
How do I pick the right toy size for a budgie or cockatiel versus a larger bird?
Size matters, both for openings and for weight. If your bird is small, keep bead and hole sizes small enough that the bird cannot get its head or toe trapped, and prevent heavy sections from dropping if the toy swings loose. As a practical check, test the toy in a gentle way (wiggle by hand) to ensure it cannot fall hard, twist into a loop, or create a clamp-like opening between parts.
Can I glue or paint parts of DIY bird toys to make them stronger?
Yes, but avoid adding glue, paint, varnish, or sealants unless the product is specifically bird-safe and fully cured. Even then, many DIY adhesives can off-gas or soften under cage moisture. Prefer mechanical methods you can undo later (twist ties with bird-safe materials, knots that can be inspected, and stainless hardware) so you can retire the toy when it ages or loosens.
My bird is scared of the new DIY toy, what’s the safest way to introduce it?
If your bird is hesitant, change only one variable at a time. For example, keep the same toy build but adjust the treat scent and placement (a little food at the entrance), or reduce the difficulty slightly (larger holes, fewer layers, less packed cork). If the bird still ignores it after a supervised introduction, rotate it out and try the simpler forager first (paper tube or egg carton) for a faster success experience.
Next Articles
Do It Yourself Bird Toys: Step-by-Step Safe Plans
Step-by-step DIY bird toy plans with safety rules, toy types by species, and how to attach, rotate, clean, and troublesh

How to Make Bird Toys for Budgies: DIY Safe Builds
DIY step-by-step budgie toy guide: safe materials, 5+ builds for chewing, shredding, climbing, foraging, and cage fit.
How to Build a Chimney Swift Bird House DIY Guide
Step-by-step DIY plans to build a chimney swift bird house, with correct dimensions, placement, and weatherproofing for