You can build a solid, wildlife-safe bird box in a single afternoon with basic tools, a plank of untreated wood, and a handful of screws. The core build is genuinely beginner-friendly, and once you understand a few key measurements (entrance hole diameter, floor size, depth to entrance) you can adapt the same plan for different species or scale up to something more ambitious. This guide walks you through the whole process: choosing the right type of box, cutting and assembling it, finishing it safely, and getting it up on a wall or tree in the right spot.
How to Build a Bird Box: Step-by-Step DIY Guide

Marcus Thornton
4 Apr 2026
Nesting box, decorative box, or 'singing' bird box, pick the right type first
Before you cut anything, it helps to be clear about what you're actually making, because 'bird box' covers a few genuinely different things. A nesting box (sometimes called a nest box) is a functional wildlife structure where real birds will live, breed, and raise chicks. That's what most people searching this topic want, and it's the main focus of this guide. If you're interested in the finer details of the nesting function, the article on how to make a bird nesting box goes deeper on species-specific cavity design.
A 'singing bird box,' on the other hand, is something quite different. In the DIY and collectibles world, a singing bird box is an automaton, a decorative mechanical or electronic object with an internal mechanism that produces whistling, bird-song-like sounds. It is not a nesting box and is not designed for live birds.
If that's what you want to make, the key safety rule is this: never route any motor, linkage, speaker, or cam mechanism through or into the nesting cavity. If you want a box that both houses birds and plays ambient birdsong nearby, keep the sound-producing element in a completely separate, sealed exterior compartment where birds cannot contact any moving parts. That way there's no entanglement or heat risk near the entrance.
A wind-chime style add-on is tempting but comes with its own problems, dangling parts tangle easily and are very awkward to sort out once the box is mounted in a tree.
For the rest of this guide, we're building a real nesting box for real birds. Let's get into it.
Materials, tools, and what to avoid
Wood choice matters more than most beginners expect. The best options are naturally rot-resistant, untreated softwoods: cedar, white pine, yellow pine, and cypress all work well. Avoid pressure-treated lumber entirely, it contains pesticide and fungicide chemicals that off-gas inside the box and can harm chicks. Hardwoods like oak are fine structurally, but they split easily when you drive nails in, so always drill starter holes first. Planed smooth boards from a DIY store work fine; rough-sawn is even better because the interior texture helps fledglings grip the walls when they're learning to climb up to the entrance.
Thickness matters too. Go for boards at least 15mm (about 5/8 inch) thick, thinner than that and the box won't insulate well or hold screws reliably. A standard plank of 150mm x 22mm timber from a hardware store is almost exactly what you need; one 1.5-metre length covers all the panels for a basic tit box.
For fasteners, use galvanised or stainless steel screws rather than nails where possible. Screws hold better in damp conditions and make it much easier to open the box later for annual cleaning. A 35mm or 40mm screw works well for 15–22mm boards.
Finishes: what's safe and what to skip
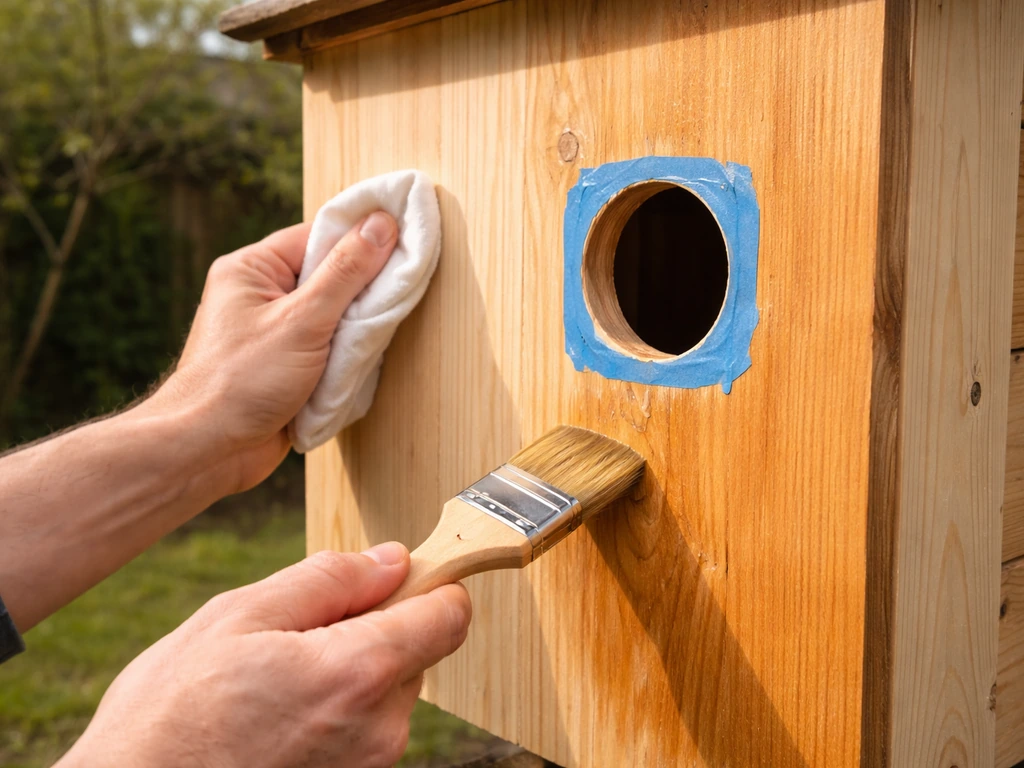
The outside of the box can be treated with a water-based wood preservative to improve longevity, but apply it only to exterior surfaces and keep it well clear of the entrance hole area. Do not use creosote. Do not use lacquer, shellac, urethane, or varnish on any surface, these clear film finishes trap moisture, peel, and can release fumes inside the cavity. The inside of the box should be left completely bare and unfinished. If you want to colour the box, a thin coat of a non-toxic, water-based outdoor paint on the outside only is the safest option, but honestly, bare treated wood weathers nicely and looks more natural in a garden.
Your tool list
- Hand saw or circular saw (for cutting panels)
- Drill with bits: a flat/spade bit or hole saw for the entrance hole, a 3–4mm bit for pilot/drainage holes, and a bit to match your screw size
- Tape measure and pencil
- Clamps (at least two — they make assembly much easier solo)
- Sandpaper (80 grit for rough edges, 120 for finishing)
- Screwdriver or impact driver
- Square (for checking corners)
- Optional: jigsaw if you want an open-fronted robin/wren style box
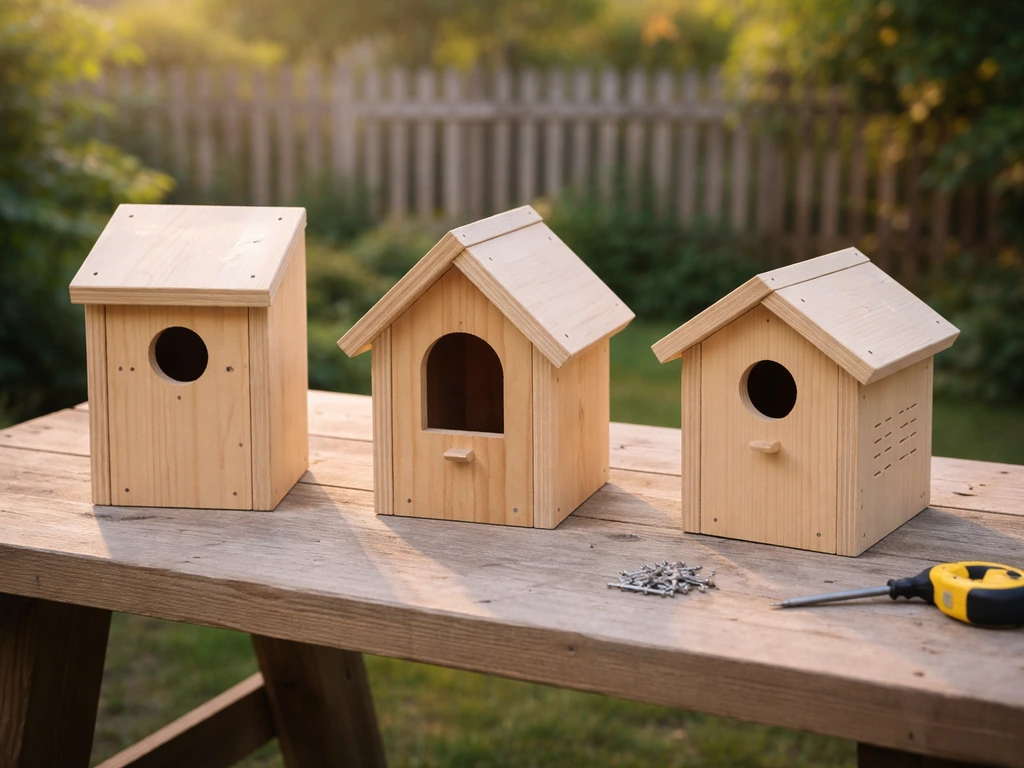
A simple bird box plan: measurements and cutting list
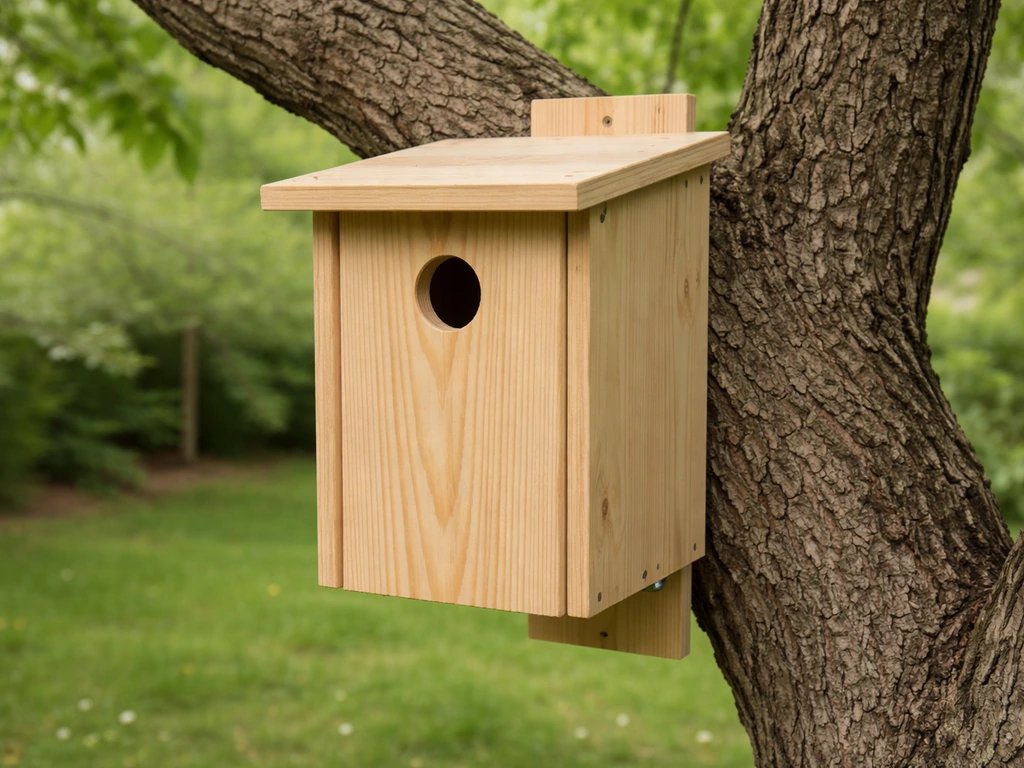
The plan below is for a hole-fronted tit box, which is the most versatile and beginner-friendly design. One set of dimensions works for blue tits, coal tits, and with a slightly larger entrance hole, great tits. The overall box size is based on a 150mm x 22mm planed timber board, widely available and easy to work with.
| Panel | Width | Length | Notes |
|---|---|---|---|
| Base (floor) | 120mm | 150mm | Drill 4 x 5mm drainage holes near corners |
| Back | 150mm | 350mm | Extend 50mm below floor for mounting; drill two holes for wire/screws at top and bottom |
| Front | 150mm | 250mm | Entrance hole drilled before assembly |
| Two sides | 120mm | 250mm (front edge) / 300mm (back edge) | Cut at an angle so the roof slopes forward |
| Roof | 200mm | 200mm | Overhang 50mm at front, sits on angled side tops |
These dimensions give you an internal floor of approximately 120mm x 120mm (just under 5 inches square), which comfortably meets the minimum for small hole-nesting species. The depth from the entrance hole to the floor should be at least 120–150mm so that chicks can't be reached by predators poking through the entrance, and so the entrance itself sits at least 125mm above the floor of the cavity.
Entrance hole sizes by species
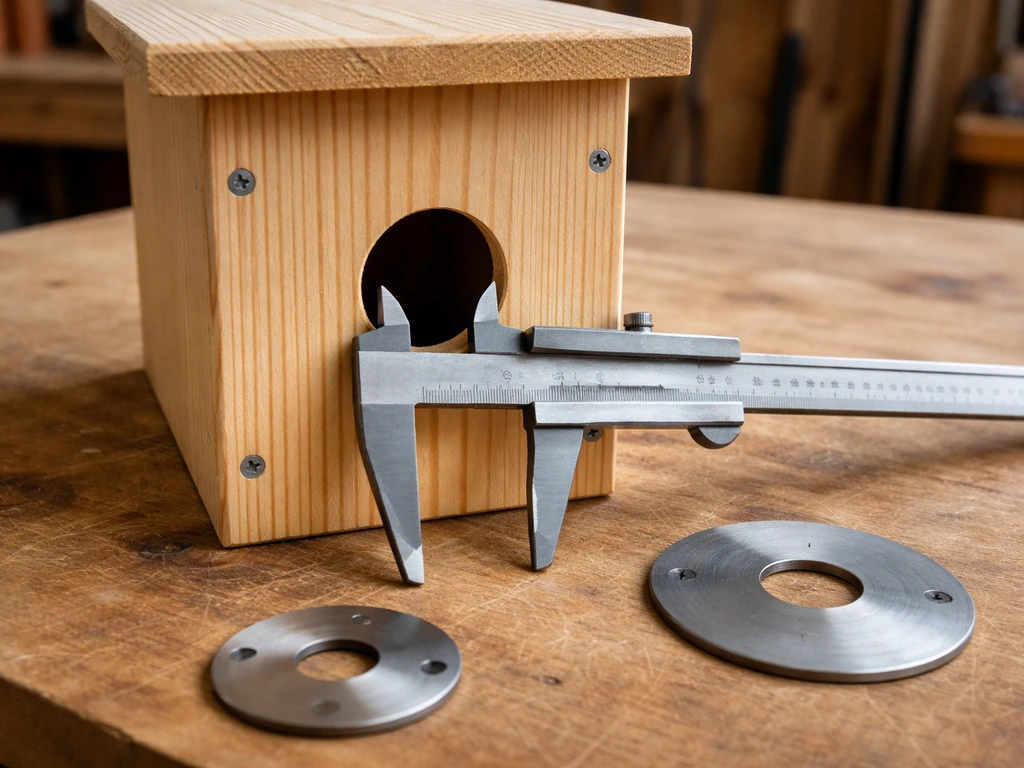
This is the single most important measurement in the whole build. Too large and predators get in; the right size and you effectively decide which species can use the box. If you're building for a specific bird, use these as your guide:
| Species | Entrance Hole Diameter (UK) | Entrance Hole Diameter (US equivalent) | Floor Size |
|---|---|---|---|
| Blue tit / Coal tit | 25–27mm | ~1 inch | 120 x 150mm |
| Great tit | 28–32mm | ~1.25 inches | 150 x 120mm |
| House sparrow | 32–38mm | ~1.5 inches | 150 x 120mm |
| Eastern bluebird (US) | N/A | 1.5 inches (38mm) | 100 x 100mm (4" x 4") minimum |
| Robin (UK) | Open front, no round hole | N/A | 140 x 140mm |
If you're not sure which species you want to attract and you're in the UK, blank" rel="noopener noreferrer">a 32mm entrance hole is a solid general-purpose choice that suits great tits, house sparrows, and a few other common garden birds. For US bluebird boxes specifically, the standard entrance is 1.5 inches (38mm), with an internal floor of at least 4 inches by 4 inches and a box height of around 12 inches. If you're interested in building specifically for sparrows, there's a dedicated guide covering how to make a bird box for sparrows that covers the open-cup variants too.
Framing and assembly: build it in this order
Assembly order sounds boring but it genuinely saves you from having to unscrew things and start over. I've done that more than once. Follow this sequence and the box goes together cleanly.
- Cut all panels first. Measure twice, cut once — yes, it's a cliché, but a 5mm error on the front panel means the roof won't sit flat. Cut the side panels with an angled top edge (about 10 degrees is enough) so the roof slopes forward and sheds rain.
- Drill the entrance hole in the front panel before assembly. It's much harder to hold the front panel steady once it's part of a box. Use a flat bit or hole saw at the correct diameter for your target species. The centre of the hole should be at least 125mm above the bottom edge of the front panel.
- Drill drainage holes in the floor panel. Four holes, roughly 5mm in diameter, positioned near the four corners. This prevents water pooling inside if condensation or rain gets in.
- Attach the back panel to the floor panel first. Hold the floor so it sits flush on the inner face of the back, about 50mm up from the bottom of the back panel (the extra length becomes your mounting tab). Drive two screws through the back into the end-grain of the floor.
- Attach the two side panels. Clamp one side panel against the back/floor assembly and screw through the back into the side, then screw up through the floor into the bottom edge of the side. Repeat for the other side.
- Attach the front panel. Hold it flush with the front edges of the side panels and screw in from the front into the sides. Two screws per side is enough.
- Fit the roof last. The roof should overhang the front by at least 40–50mm to keep rain off the entrance. Don't glue or permanently fix the roof — either hinge it or attach it with a single screw at each side so it can be lifted off for annual cleaning.
If you want to see this kind of process in video form to check your technique, searching for bird box build tutorials on YouTube is genuinely useful for visualising the angled cuts and the screw placement. That said, the steps above cover everything you'd see in those videos, you don't need to watch before you start.
One thing worth knowing: if you're building something closer to a full birdhouse with a more complex structure (a base, decorative cladding, a perch, or a porch roof), the process is similar but you're essentially building a small frame first and cladding it. There's a useful walkthrough of that approach in the guide on how to make bird house with box construction methods.
Getting the box ready before you mount it
Before the box goes up on a wall or tree, run through this checklist. It's worth doing at ground level where it's easy, not halfway up a ladder.
Ventilation
The box needs airflow to stop it overheating in summer and to reduce condensation. The angled roof-to-side gap (if you cut the sides at a slight slope) naturally provides some ventilation. If your roof sits flush, drill two 10–15mm holes on the upper sides, roughly 25mm down from the roof line, on the sides rather than the back or front. Some builders drill 5/8-inch vent holes about 1 inch down from the top on each side panel, that works well too. The goal is air movement without creating a wind tunnel.
Drainage
You already drilled floor drainage holes in the assembly step, double-check they're clear and not blocked by sawdust. Some builders also cut the bottom corners of the floor panel off at 45 degrees (removing a small triangle from each corner) to improve drainage. For the drainage holes themselves, 4–5 holes of around 5mm (roughly 3/16 to 1/4 inch) placed near the corners does the job without weakening the floor.
Surface finishing
Apply water-based wood preservative to the exterior only. Let it dry completely, at least 24 hours in warm weather, 48 hours if it's cold and damp, before you mount the box. Don't rush this. Paint or preservative that hasn't fully off-gassed can deter birds from entering or harm chicks. Leave the interior bare. Leave the area immediately around the entrance hole bare too, even on the outside. If you want to make suet-based enrichment blocks to hang nearby and attract birds to the area while the box settles in, there's a guide on how to make bird blocks that covers the basics.
Mounting hardware prep
Pre-drill two holes through the extended back panel: one near the top and one near the bottom. These are your mounting holes. Threading galvanised wire through these points lets you loop the box around a tree or post without driving screws into living wood. If you're mounting to a wall or fence post, the holes take screws directly. Mounting via wire also makes annual removal for cleaning much easier, which the Wildlife Trusts specifically recommend for maintenance access.
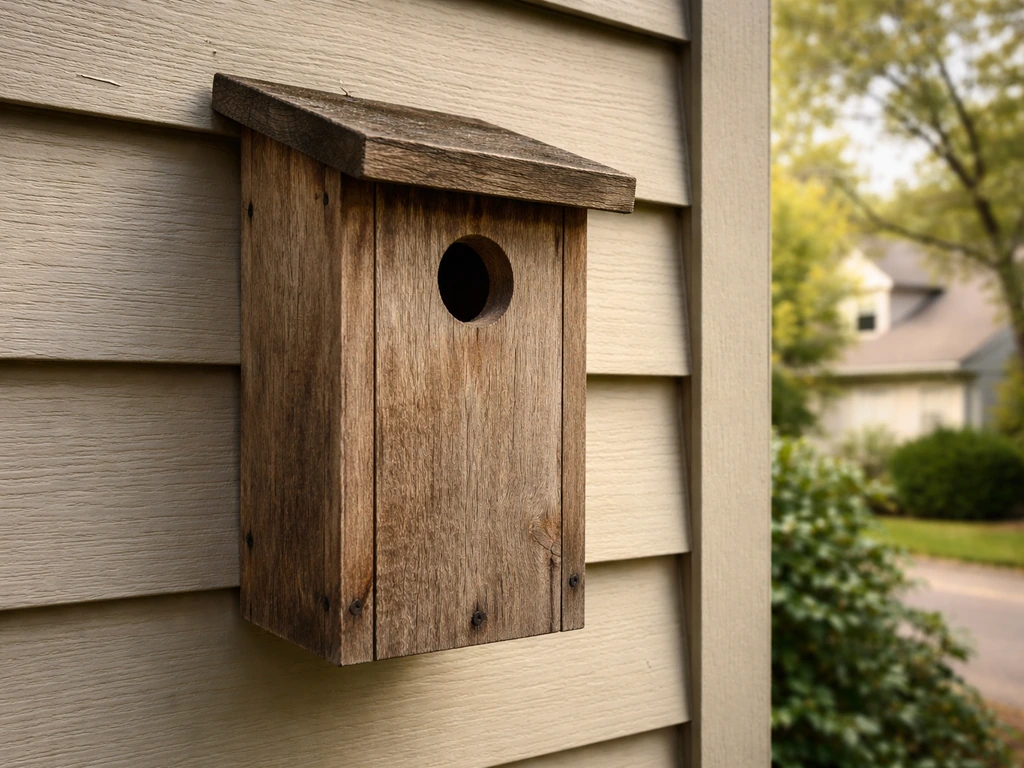
Installing the bird box on a house or in the garden
Getting the placement right is just as important as the build itself. A perfectly built box in the wrong spot will sit empty for years.
Height and position
Mount the box between 3 and 5 metres from the ground. Lower than 3 metres and cats and other predators become a serious problem. Higher than 5 metres is fine structurally but makes annual maintenance a pain. The entrance should face somewhere between north and east to avoid the box overheating in afternoon sun and to shelter the entrance from the prevailing rain direction (in the UK that's typically from the south-west). A slight forward tilt of 5–10 degrees helps rain run off the roof and away from the entrance.
Flight path and surroundings
Birds need a clear flight path to the entrance, no branches or fence panels directly in front of the hole that they'd have to dodge on the way in. At the same time, having nearby foliage (a shrub, hedge, or climber) a metre or two away gives fledglings somewhere to land when they first leave the box. Don't position the box close to a bird feeder or bird table. The constant traffic around feeding stations stresses breeding birds and often deters them from using a box even if it's otherwise perfect.
Mounting to a house wall
A brick or rendered wall is a great mounting surface, especially on a north- or east-facing elevation. Use masonry anchors (raw plugs) and galvanised screws through the pre-drilled holes in the back panel. If you're mounting to timber cladding or a wooden fascia board, use 50mm exterior screws directly into the timber. Make sure the box sits flush against the wall with no gap behind, a gap becomes a draught channel and makes the box cold. One important note: if you're attaching to a house wall, check that the cable routes (for TV aerials, wiring, etc.) aren't hidden behind your mounting point. A stud finder or cable detector takes ten seconds and saves a nasty surprise.
Timing and first-season expectations
Put the box up in autumn or early winter if you can, birds start scouting nest sites from late January or February in the UK, and having the box weathered in and smelling natural by then makes a big difference. Don't expect occupancy in the first season, especially if you've used fresh timber. Give it time. Once birds do move in, leave them completely alone until the breeding season is over (typically August in the UK). Clean the box out in autumn: remove old nesting material, check for parasites, and let it air for a couple of days before closing it up again.
Adapting the basic plan for different species and styles
The hole-fronted box we've built here is ideal for tit species and sparrows, but a lot of common garden birds need a different design. Robins and wrens, for example, use open-fronted boxes where the top half of the front panel is left completely open rather than having a round entrance hole. If you want to build for robins specifically, the guide on how to make bird boxes for robins covers the open-front design in detail, including the lower mounting heights robins prefer.
If you're in a colder climate and want a box that birds can also use for overnight roosting in winter (a roosting box, not just a nesting box), the entrance hole goes near the bottom rather than the top, and interior perch dowels are added so multiple birds can huddle inside for warmth. That's a distinct build with its own considerations, the guide on how to build a bird roosting box is worth reading if that's what you're after.
For birders who want to observe nesting behaviour without disturbing the birds, a bird hide or blind positioned near (but not too near) the box can make a real difference. If you're planning a more complete garden setup with a viewing position, the articles on how to build a bird hide and how to build a bird blind cover both fixed and portable approaches.
Quick comparison: hole-fronted box vs. open-fronted box vs. singing box
| Type | Best for | Entrance style | Wildlife-safe? | Difficulty |
|---|---|---|---|---|
| Hole-fronted nesting box | Blue tits, great tits, sparrows, bluebirds | Round hole, 25–38mm diameter | Yes | Beginner |
| Open-fronted nesting box | Robins, wrens, spotted flycatchers | Open top half of front panel | Yes | Beginner |
| Roosting box | Winter birds seeking shelter | Hole near bottom, internal perches | Yes | Intermediate |
| Singing/automaton box | Decorative display, craft project | No functional entrance for birds | Only if sealed from birds | Intermediate to advanced |
| Singing box with external mechanism | Ambiance near a real nest box | Separate external unit | Yes, if mechanism is fully sealed | Advanced |
If you're building a hole-fronted box and you want the simplest possible version with the fewest cuts, start with a design where all panels are rectangular (no angled cuts at all) and use a flat offcut as the roof with a generous overhang. That version has no angled side panels, which means the roof won't slope, compensate by making the roof overhang larger at the front (60mm rather than 40mm) and ensure the gap between roof and side panels is at least 5mm for ventilation. It's not as weatherproof as the angled version, but it works and it's genuinely achievable in an hour.
Building a bird box is one of those projects where the doing teaches you most of what you need to know. The first one will have a slightly wobbly panel or a screw that went in at an angle, that's fine, birds don't care about cosmetic imperfections. What they care about is the right entrance size, a dry interior, and a safe location. Nail those three things and you've built a home that could be used for a decade or more.
FAQ
Can I build a bird box from scrap wood or offcuts instead of a new plank?
Yes, as long as it is untreated and rot-resistant (cedar, cypress, pine, or similar). Avoid reclaimed timber of unknown treatment (especially any that looks stained, chemically sealed, or pressure-treated). Also check for old metal contamination, sharp edges, and warped boards that could leave gaps at the roof and sides.
How do I know what entrance hole size to use if I want more than one species to have options?
Use the smallest hole size you can that still matches your target species, because entrance diameter effectively sets the “species filter.” If you pick a general-purpose size, expect it to be best for a few common cavity nesters, while larger-hole species may dominate. You cannot reliably “balance” for very different species without building multiple boxes or using a dedicated multi-height or multi-compartment design.
What should I do if my cuts or panels leave small gaps, is that a problem?
Small gaps at the sides or roof are usually not fatal, but larger cracks near the entrance can let predators reach the cavity or create drafts that chill chicks. Aim for flush seams on the interior edges, then seal only the exterior face seams with a breathable exterior wood sealant if needed. Avoid sealing the inside, and do not use expanding foam.
Is it okay to add a perch inside the entrance for convenience?
For many small hole nesters (like tits), a perch can actually make it easier for predators to access the entrance and can also affect how birds land and enter. If you are not following a species-specific plan that calls for a perch, keep the interior smooth and simple, with a textured interior wall and appropriate entrance height instead.
How often should I clean the bird box and what’s the safest cleaning method?
Clean after the breeding season, typically in autumn, and avoid disturbing any active nest. Remove old material and inspect the floor and corners for pests, then let the box air out for a day or two before closing it. Wear gloves, use a stiff brush rather than chemicals inside, and do not pressure wash the interior.
Can I paint or stain the bird box to match my garden?
You can, but keep finishes limited to the outside and use non-toxic, water-based outdoor paint or preservative. Do not coat the interior, and keep paint away from the entrance rim. If you used anything that smells strongly or feels tacky, wait longer than 24 to 48 hours, because fresh off-gassing can deter birds.
Do drainage and ventilation holes matter in cold or rainy weather?
Yes, they are even more important in damp climates because wet bedding and condensation can chill chicks. Keep drainage holes clear of sawdust, and for ventilation use small side gaps or properly placed vent holes near the roof line. Avoid drilling large holes that weaken the floor or create predator entry points.
What’s the best way to mount a box so it stays secure and doesn’t wobble?
Use the pre-drilled mounting holes on the back panel and mount flush to the surface. For walls, use proper masonry anchors and galvanised screws, and for timber use long exterior screws that bite into the structural timber. If the box wobbles, birds may avoid it, and gaps can create a cold draft, so re-check alignment before the first winter.
How far from a bird feeder should I place the box?
Try to avoid placing the box directly adjacent to active feeding areas, because traffic and stress can reduce nesting interest. A practical approach is to keep a noticeable buffer distance (often several metres) and ensure the entrance has a clear flight path. If you must place it near feeding, keep feeding consistent and reduce “hotspot” crowding around the entrance area.
Will putting the box up in autumn guarantee birds will move in that year?
Not necessarily. Weathered, natural-smelling timber helps, but first-season occupancy can still be low, especially if local birds are already using other cavities. Think of autumn placement as preparation for the next breeding cycle, then expect the highest likelihood in the following spring.
What if I find the box being used by other animals or it seems “empty” but there are signs of activity?
Check entrance and floor for evidence of non-bird occupants like rodents or wasps. If the box is occupied by insects or repeatedly chewed, you may need a different entrance design or a more predator-resistant mounting location. If you suspect birds are present but cannot see them, do not open the box mid-season, monitor from a distance, and wait for a safe cleaning window in autumn.
Can I mount the box on a tree instead of a wall, and does that change the build?
You can mount it on a tree using wire through the mounting holes, but choose a stable location on the trunk with minimal sway and good protection from prevailing rain. Ensure the entrance still faces the right general direction, keep branches out of the direct flight path, and confirm the box can be removed annually for cleaning without damaging the tree.
Next Articles
How to Make a Bird Nesting Box: Step-by-Step DIY Guide
Step-by-step DIY guide to build and install a safe bird nesting box, with specs, materials, and maintenance tips.

How to Build a Chimney Swift Bird House DIY Guide
Step-by-step DIY plans to build a chimney swift bird house, with correct dimensions, placement, and weatherproofing for

How to Build an Oriole Bird House: Step-by-Step DIY
Step-by-step DIY for building an oriole bird house with right dimensions, weatherproofing, predator-safe placement, and