Here's the thing most people miss when they search for how to make bird boxes for robins: American robins are not cavity nesters. They won't move into an enclosed birdhouse with an entry hole, no matter how perfectly you build it. What they actually want is an open nesting shelf or platform, something that mimics the broad horizontal branch or sheltered ledge they'd naturally choose. Once you know that, building the right structure is genuinely straightforward, and this guide will walk you through the whole thing from materials to mounting.
How to Make Bird Boxes for Robins Step by Step

Marcus Thornton
14 Apr 2026
Robin-friendly bird box basics
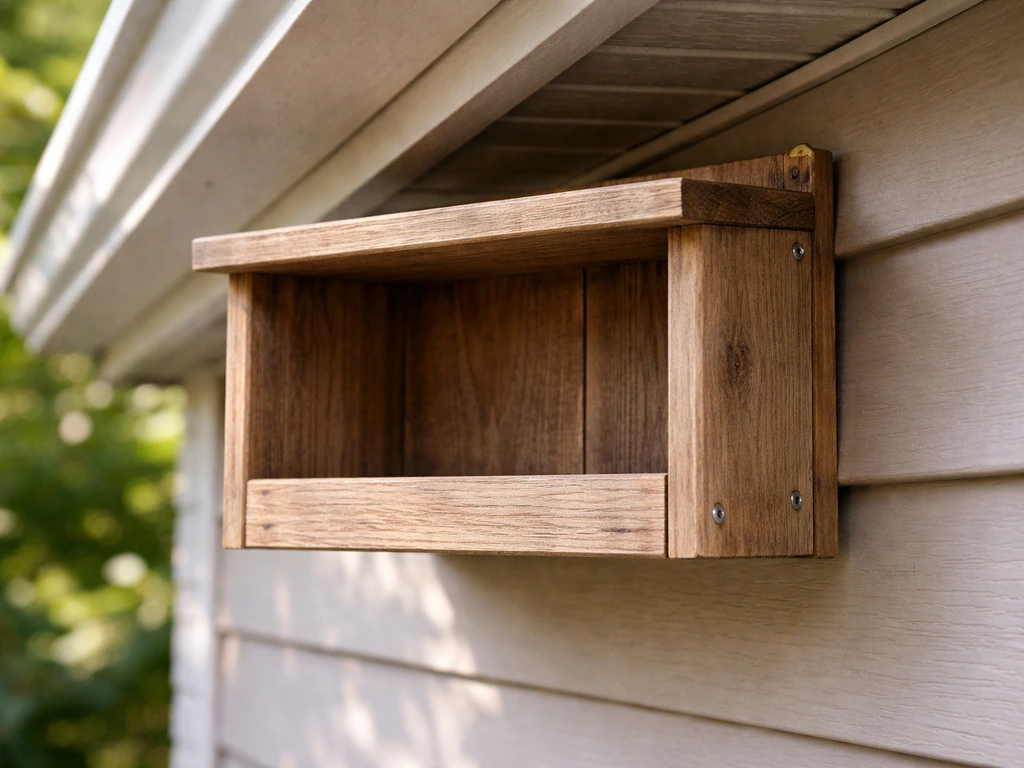
Robins build open-cup nests from grasses, twigs, and plant debris, with a solid mud foundation and a soft inner lining of fine grasses. They don't chip holes in trees or squeeze through round entrances. In the wild, they nest on horizontal branches of trees and shrubs, typically between 5 and 25 feet off the ground, and they'll also happily use ledges on barns, houses, and bridges. So what you're building isn't really an enclosed bird box at all. It's a nesting shelf: a flat platform with a partial back and sides to give the nest a little protection, ideally tucked under an overhang.
This is a really important distinction. If you build a standard enclosed box with an entry hole and mount it hoping robins will move in, they almost certainly won't. That's the single most common mistake people make. If you want to learn more about building enclosed boxes for other species, the article on how to build a bird box covers cavity-nester designs in detail, but for robins, we're doing something different.
A robin nesting shelf is actually one of the easier bird structures you can build. There's no precise entry hole to measure or drill. The open front design is forgiving of small measurement variations. It's a great first project if you're just getting into DIY bird housing, and it can be knocked together in an afternoon with basic tools.
Materials and tools you'll need
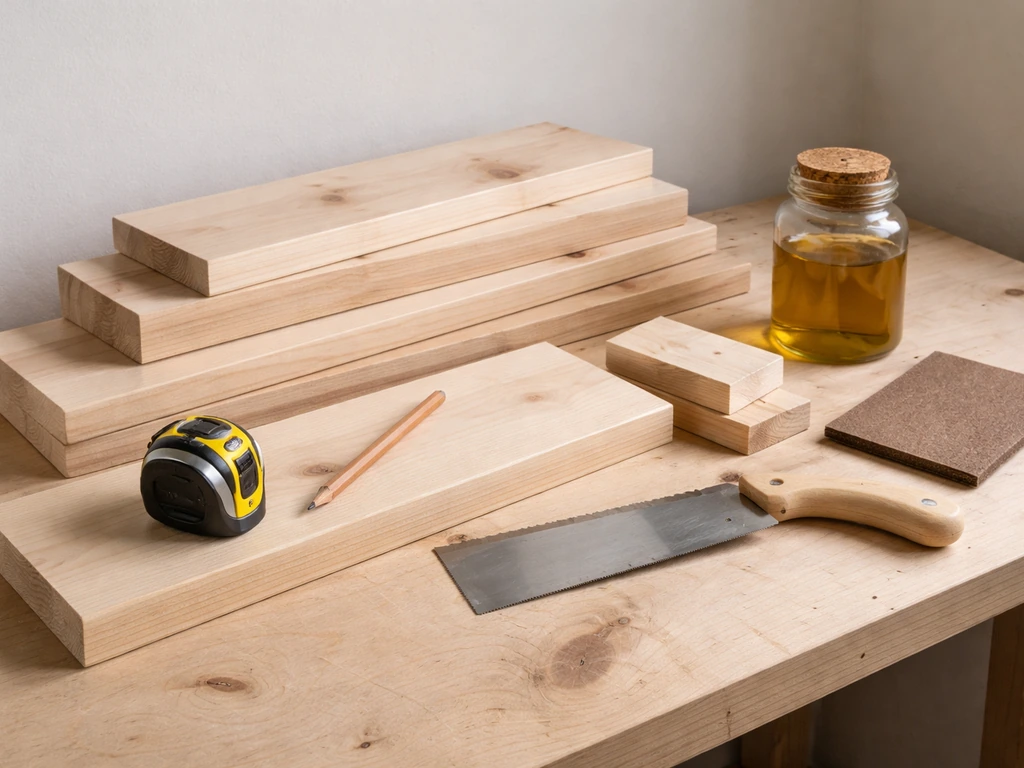
The golden rule for any nest structure: never use pressure-treated, stained, or chemically treated wood. Treated lumber contains pesticides and fungicides that can harm nesting birds and their young. Stick to untreated natural wood, and don't paint or stain the interior surfaces. Cedar and pine are the most popular choices because they're widely available, relatively affordable, and hold up well outdoors. Cedar is more rot-resistant naturally, so if you can source it, it'll extend the life of your shelf without any chemical help. Rough-cut lumber is actually preferable to smooth planed boards because the texture gives birds better grip and helps the nest material bond to the surface.
If you want to keep costs down or use what you already have, repurposed lumber works great. Old fence boards, pallet wood (untreated), or reclaimed barn wood are all excellent candidates. Just make sure whatever you're using hasn't been treated with preservatives or stains. When in doubt, leave it out and grab a fresh piece of pine from the hardware store. A single 6-foot length of 1x8 or 1x10 untreated pine will give you everything you need for one shelf.
For joining pieces together, use exterior-grade wood glue on all joints before you nail or screw them. This dramatically extends the life of the structure by sealing out moisture at the joints, which is where rot tends to start. Galvanized or stainless steel screws are much better than standard nails for outdoor use because they don't rust and loosen over time.
- Untreated cedar, pine, or reclaimed lumber (1 inch thick stock, at least 8 inches wide)
- Exterior wood glue
- Galvanized or stainless steel screws (1.5 inch and 2 inch lengths)
- Drill with bits (including a 3/8 inch bit for drainage holes)
- Hand saw or circular saw
- Sandpaper (80-grit for rough edges)
- Tape measure and pencil
- Mounting hardware: screws, L-brackets, or a metal pole with baffle depending on your chosen location
You don't need a workshop full of equipment. A hand saw, a drill, and a screwdriver will get the job done. If you're cutting lumber for the first time, many hardware stores will make cuts for you if you bring your measurements in. That's a completely valid approach and nothing to be embarrassed about.
Design specs: dimensions, drainage, and ventilation
The recommended floor size for a robin nesting platform is 7 inches by 8 inches. That's the sweet spot from Carrol Henderson's well-regarded Woodworking for Wildlife specs, and it gives the robin enough room to build a proper mud-cup nest without wasting material. The back panel should be around 8 to 10 inches tall to anchor the shelf against a wall or post and give the nest some rear protection. The side panels should be roughly 6 to 8 inches tall at the back, tapering down toward the open front to allow easy access for the birds while still deflecting wind and rain.
There's no entry hole to cut because the front is fully or mostly open. Some builders add a partial front lip (about 1.5 to 2 inches tall) to help contain the nest, but this is optional. What isn't optional is drainage. Drill at least four drainage holes, each 3/8 to 1/2 inch in diameter, through the floor panel. This lets any rainwater that blows in drain out rather than pooling and rotting the nest or chilling the eggs. Spacing them toward the corners of the floor works well.
Ventilation is less of a concern with an open-front design than it is with enclosed cavity boxes, but you can still add a couple of small gaps or holes near the top of the side panels if you want extra airflow in hot weather. The open front naturally provides most of the ventilation a robin nest needs. The priority with this design is shelter from above (a roof or mounting under an overhang) and drainage below.
| Component | Recommended Dimension | Notes |
|---|---|---|
| Floor | 7 inches x 8 inches | Drill 4 drainage holes, 3/8 to 1/2 inch diameter |
| Back panel | 8 to 10 inches tall | Taller gives more mounting surface and wind protection |
| Side panels | 6 to 8 inches tall at back, tapering to 3 to 4 inches at front | Taper helps water shed and keeps front open for access |
| Roof/top | 8 to 10 inches deep, overhangs front by 1 to 2 inches | Only needed if not mounting directly under an eave |
| Front lip (optional) | 1.5 to 2 inches tall | Helps contain nest material; keep it low so robins can see out |
| Wood thickness | 3/4 inch (standard 1-inch nominal lumber) | Thicker insulates better; avoid thin plywood |
Step-by-step build instructions
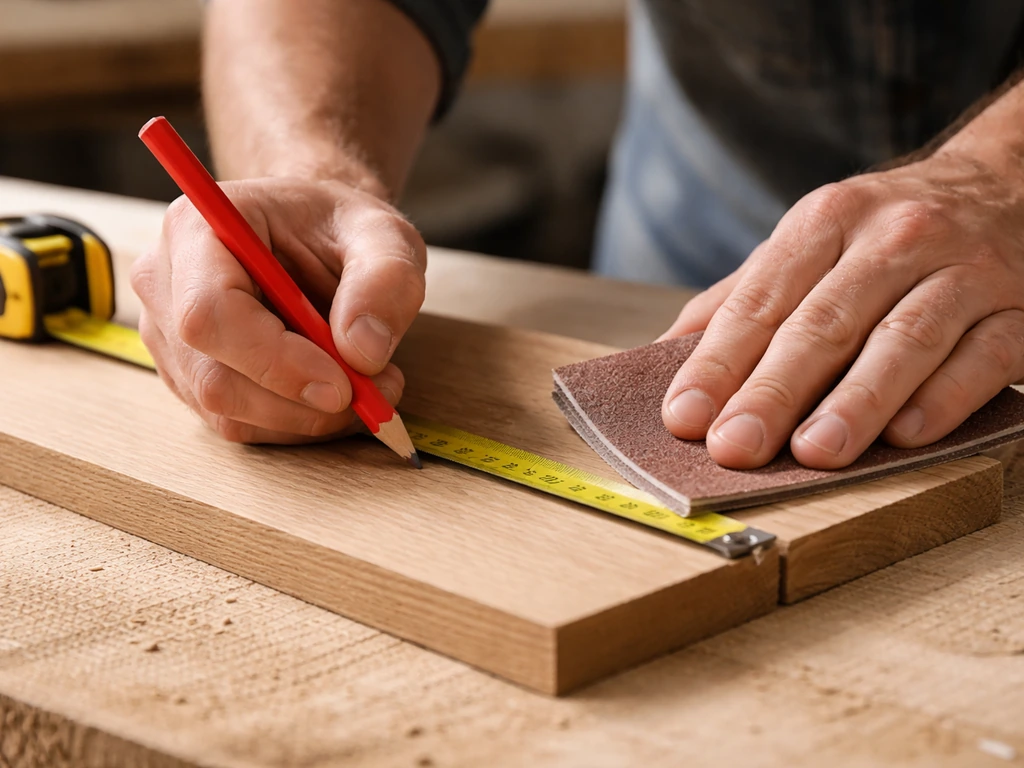
Before you start cutting, mark all your pieces on the lumber with a pencil and double-check your measurements. Cutting everything first and then assembling is a lot easier than going back and forth. Here's the sequence I follow, and it works whether you're using a hand saw or a circular saw.
- Cut the floor panel to 7 inches x 8 inches. Sand all edges lightly to remove splinters.
- Cut the back panel to 8 inches wide and 10 inches tall. This is what you'll screw to the wall or post, so make sure it's the full width of the shelf.
- Cut two side panels. Each should be 8 inches deep (front to back), 8 inches tall at the back corner, and tapering down to about 3 to 4 inches at the front edge. Mark the taper with a pencil and cut along the line.
- If you're adding a roof (for locations not under an eave), cut a top panel 8 inches wide and 9 to 10 inches deep so it overhangs the open front by an inch or two.
- Drill four drainage holes in the floor panel, positioned roughly 1 inch from each corner.
- Apply exterior wood glue to the joint between the back panel and the floor, then screw them together from the back using two 2-inch screws. Hold the pieces at 90 degrees while the glue sets, or use a clamp.
- Glue and screw the side panels to the floor and back panel. Use 1.5-inch screws through the sides into the floor edges, and 2-inch screws through the back into the rear edges of the sides.
- If adding a roof, glue and screw it to the tops of the back and side panels.
- If adding an optional front lip, cut a strip about 1.5 inches tall and 7 inches wide and attach it along the front edge of the floor.
- Let the glue cure for at least an hour before mounting. Check that all screws are flush and no sharp edges remain.
That's genuinely all there is to it. I built my first robin shelf in about 90 minutes including cleanup, and it's been occupied every spring since. One thing I got wrong early on was using plywood for the floor. It delaminated after two winters. Solid lumber, even basic pine, holds up much better outdoors, especially once the joints are properly glued.
If this is your first time doing any kind of bird housing project, it's worth knowing that the same basic approach, with modifications for species-specific needs, applies to a lot of other structures. For instance, the guide on how to make a bird nesting box goes into more depth on enclosed designs for birds that do need a cavity, which is useful context once you've got this robin shelf under your belt.
Where to put it: placement and mounting in your yard
Mounting location makes or breaks whether robins actually use your shelf. The ideal spot is under the eaves or soffit of your house, garage, or shed, somewhere that gives natural overhead protection from rain. Robins will also use a shelf mounted over an outdoor light fixture or under a covered porch beam. The shelter from above is what they're really after: it replicates the overhang of a branch canopy or a barn roof, which is exactly where they'd nest naturally.
Height-wise, aim for 6 to 10 feet off the ground. That's the sweet spot from the Henderson specs and it matches the range robins naturally prefer for nesting on human structures. You can go higher (robins nest up to 25 feet in trees), but 6 to 10 feet keeps it easy to monitor and clean, and it's still well above the reach of most ground predators.
If you're not mounting under an eave and instead want to put the shelf on a post or pole in the yard, add a predator baffle to the pole. A smooth metal pipe with a cone-shaped baffle about 4 feet up will stop raccoons and cats from climbing up to the nest. Avoid mounting on wooden fence posts or tree trunks if you can, because predators navigate those far more easily than a smooth metal pole.
Orient the open front away from the prevailing wind direction in your area, which in most of North America means facing southeast or east rather than northwest. This keeps the nest drier and gives the birds warmer morning sun. Avoid full south-facing exposure in hot climates where the afternoon sun could overheat the nest.
One more tip on location: place the shelf at least 4 to 5 feet away from a busy doorway if you're mounting it on your house. Robins are somewhat tolerant of human activity but they'll abandon a nest site if there's constant disturbance right next to it. A quiet corner of the garage or under a shed eave is usually perfect. If you're curious about other ways to observe nesting birds without disturbing them, the piece on how to build a bird hide has some good ideas for setting up a viewing spot at a respectful distance.
Finishing details and keeping it clean year after year
Weatherproofing the outside
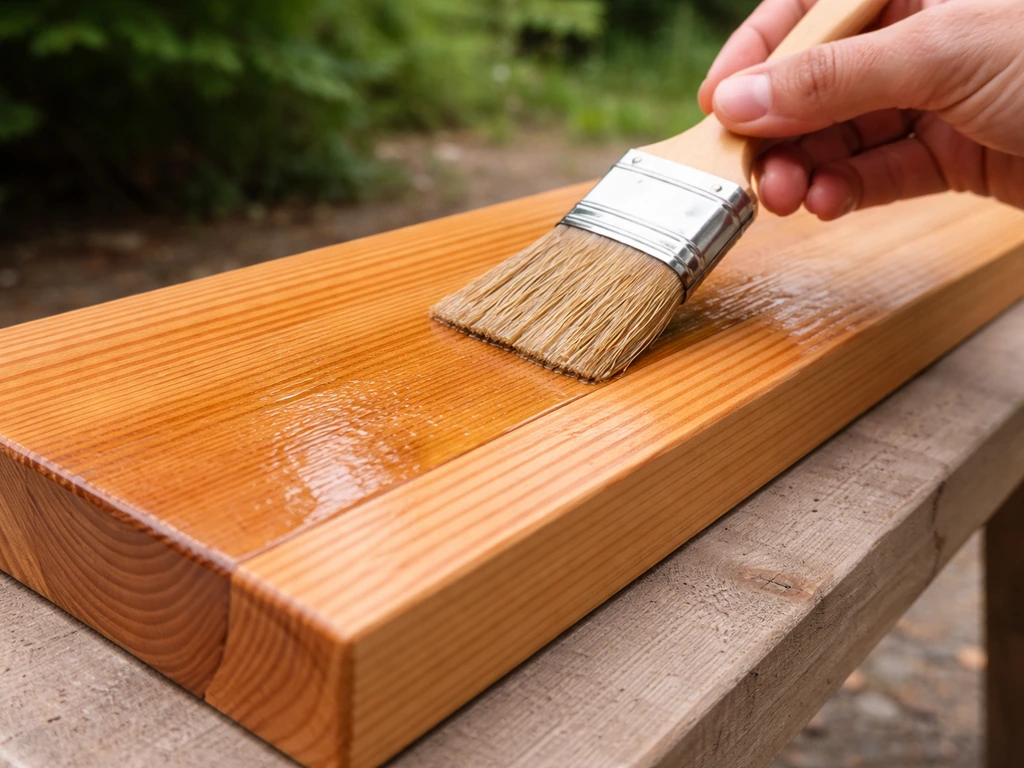
You can extend the life of your robin shelf by applying an exterior finish to the outside surfaces only. A couple of coats of linseed oil works well and doesn't introduce toxic fumes. You can also use an exterior wood stain or paint on the outside if you like, but keep the interior surfaces bare wood. Never paint, stain, or treat the inside of the shelf or the floor surface where the nest will sit. The birds don't need it, and the chemicals can harm them.
If you're building from cedar, you may not need any exterior treatment at all. Cedar's natural oils resist rot for years, which is one reason it's worth seeking out even if it costs slightly more than pine. Glued joints already go a long way toward keeping moisture out, so even a basic pine shelf with well-glued joints and exterior-only treatment will last many seasons.
Cleaning schedule and what to do after nesting season
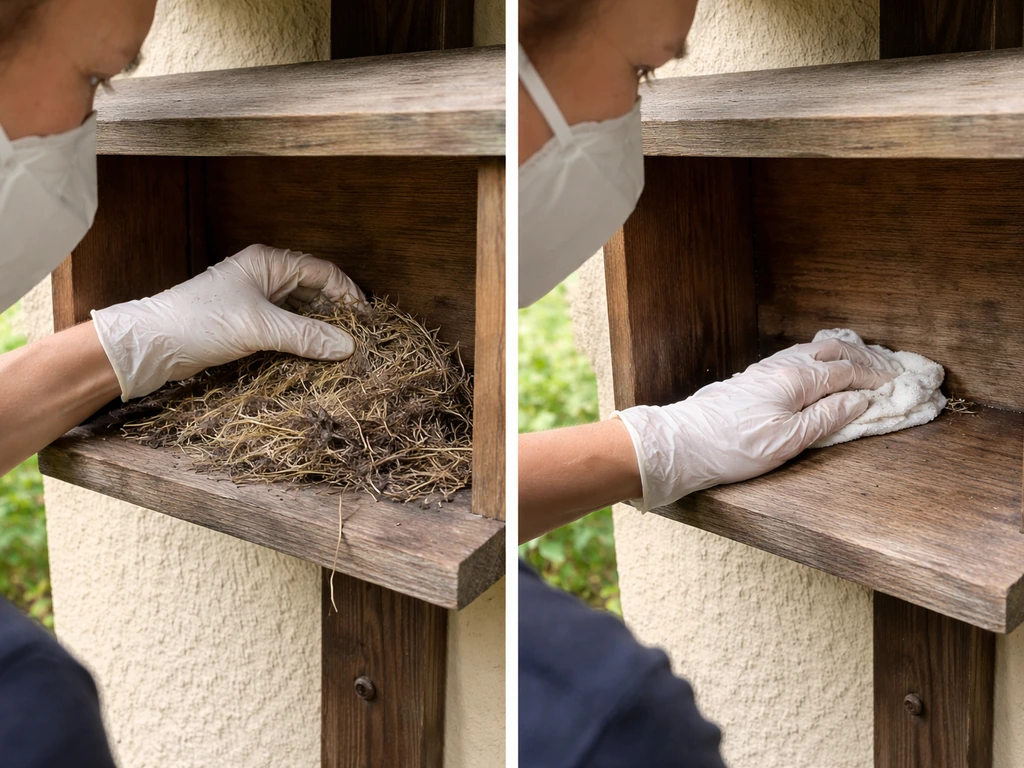
Clean the shelf once per year, ideally between September and February, after the breeding season ends and well before robins start scouting nesting locations again in early spring. Remove the old nest material completely. Robins typically won't reuse an old nest, and leaving it in place just takes up space and can harbor parasites and mites.
Wear gloves and a dust mask when handling old nest material, especially if mice have been in there over winter. Once the old nest is out, scrub the platform with a weak bleach solution, roughly 10 percent bleach to 90 percent water, then rinse it thoroughly and let it dry completely before closing it back up or rehung it. If you spotted evidence of lice or mites, spray the surface with the bleach solution, let it air out for a full day, and make sure it's bone dry before birds return. Vinegar diluted in water is a reasonable alternative if you prefer to avoid bleach, though the bleach solution is more effective against bacteria.
While you've got the shelf down, check for any loose screws, cracked wood, or degraded joints. A little exterior wood glue applied to any gaps and left to cure will keep things solid for another season. This annual check takes about 15 minutes and makes a real difference in how long the structure lasts.
A few things worth knowing before you start
Robins are one of the earlier nesters in spring, often starting in March across much of their range, so if you want to attract them this season, get the shelf up by late February or early March at the latest. They scout locations before building, so having the shelf in place early matters.
Don't be discouraged if robins don't use the shelf the first year. Sometimes it takes a full season for birds to notice and claim a new structure. Keep it in place and clean it in the fall, and there's a good chance they'll move in the following spring. Adding a water source (a shallow birdbath nearby) and keeping some open, muddy ground in your yard can also attract robins, because they need mud to build their nests.
If you find yourself wanting to build more bird housing around your yard, it's worth knowing that different species have very specific requirements. Sparrows, for example, do use enclosed cavity boxes, and if you want to try that project next, the article on how to make a bird box for sparrows covers those dimensions and design details. You might also enjoy reading about how to make a bird house with box construction if you want to combine a traditional birdhouse approach with a platform design for a multi-species yard setup.
For birds that need winter shelter rather than nesting space, a bird roosting box is a worthwhile companion project. And if you ever want to take your yard observations a step further, building a bird blind will let you watch nesting activity up close without spooking the birds.
Your build checklist
- Source untreated cedar or pine lumber (1-inch thick, 8 inches wide, roughly 6 feet needed for one shelf)
- Cut floor (7x8 inches), back panel (8x10 inches), two tapered side panels, and optional roof and front lip
- Drill four 3/8 to 1/2 inch drainage holes in the floor
- Glue all joints with exterior wood glue before screwing with galvanized or stainless steel screws
- Apply exterior finish (linseed oil or exterior paint/stain) to outside surfaces only; leave interior bare
- Mount at 6 to 10 feet high under an eave, soffit, or covered structure facing southeast or east
- If mounting on a post, add a predator baffle to the pole
- Place at least 4 to 5 feet from a busy doorway and near a water source
- Clean annually between September and February; remove old nest, scrub with dilute bleach, rinse, and dry completely
- Check and re-glue any loose joints each year before the season starts
Building a robin nesting shelf is one of those projects where doing it right is genuinely not complicated, the main thing is knowing what robins actually need (an open platform, not a cavity box) and avoiding the common pitfall of treated or painted wood. Get those two things right and you've got a structure that can host robin families for a decade or more with just a little annual attention. If you want to dig deeper into general nesting box construction principles that apply across species, bird blocks and perch designs are another fun direction to explore as you build out your backyard habitat.
FAQ
Will robins use a fully enclosed birdhouse if there is no entry hole and I only add a shelf inside?
Unlikely. Robins are choosing an open-cup platform that lets them build with access from the front, plus shelter from above. If you want a “box” look, keep the front fully or mostly open, and make sure the nest area is still an exposed platform rather than a deep enclosed cavity.
What thickness wood should I use for the floor and sides?
Use solid boards thick enough to stay flat outdoors, typically around 3/4 inch for the floor and similar thickness for the side walls. Thinner stock can warp and create gaps that trap water. If you use thinner lumber, increase the framing underneath and double-check drainage stays unobstructed.
How can I tell if my location is too exposed or too shady?
Watch rain behavior the first couple of storms. If water splashes directly into the nest area, or the platform stays wet for long periods after a dry day, adjust the placement under more overhang or re-orient away from wind-driven rain. Very deep shade can also delay nesting, so aim for morning light where possible.
Do I need to remove the old nest every year if it looks intact?
Yes, remove it after the breeding season. Robins usually do not reuse old nests, and leftover material can increase parasite load (mites and lice). A quick rule is to remove it once the last birds are done raising young, then disinfect and let it fully dry before the next season’s scouting.
Can I add a small lip on the front to stop nest material from falling out?
You can add a modest front lip, but keep it low enough that robins can still easily access the nest from the front. If the lip is too tall, it can make the nest feel like a confined space and reduce use. Keep the design primarily platform-based with only light containment.
Is it okay to use pressure-treated posts or a treated base if the nest area is untreated?
For the structure parts that the birds contact directly or that the nest material can touch, avoid treated wood entirely. If you use treated lumber only as a hidden support, keep the nesting shelf itself made from untreated wood and prevent any treated board surfaces from being exposed near the nest.
How do I prevent ants, beetles, or wasps from taking over the shelf?
Focus on moisture and cleanliness. Ensure drainage holes are clear, remove old nests promptly, and check in late winter for insect activity. Avoid adding attractant materials like sweeteners or oils on the exterior, and keep the underside dry so insects do not establish persistent habitats.
Should I attach the shelf to the siding with screws or should I mount it with brackets?
Brackets often make fine adjustments easier and can reduce stress on siding during expansion and contraction. If you screw directly into siding, seal and water-management details matter, and use corrosion-resistant hardware. Either method is fine, but prioritize solid mounting that does not loosen over seasons.
What if the shelf gets crowded by other birds, like starlings or sparrows, using the platform?
Robins are the target, and open platforms can attract other species. If you see repeated non-robin use during the nesting window, consider relocating the shelf to a quieter spot with more overhead shelter and better distance from doors and foot traffic. Avoid adding features that increase cavity-like cover, since that can shift which species attempts to nest.
How early is too early to put the shelf up?
Put it out by late February or early March when possible, but don’t disturb nests in progress. Once it is mounted, leave it alone until after breeding ends. If you mount it in mid-winter, ensure the underside is clear and stable so birds can inspect safely without you repeatedly moving it.
Can I use plywood again if I seal it well?
Better to avoid it. Plywood can delaminate outdoors after a couple of winters even when sealed, and that can create soft or splintering areas. Use solid boards for the nest floor, and make sure joints are glued and water is routed away through drainage holes.
Do I need a predator baffle if the shelf is under an eave?
It depends on how the shelf is accessed. Under an eave, predators often still reach from adjacent structures, roofs, or nearby branches. If cats, raccoons, or squirrels are common in your area, consider a baffle when mounting on a post or when the shelf is reachable via climbing surfaces.
Next Articles
How to Make a Bird House With a Cardboard Box
Step-by-step cardboard bird house and bird enclosure build with safe holes, ventilation, drainage, and weather tips
How to Build a Bird Box: Step-by-Step DIY Guide
Step-by-step plans to build and mount a wildlife-safe bird box on a house, with framing, prep, and optional singing craf
How to Make a Bird Nesting Box: Step-by-Step DIY Guide
Step-by-step DIY guide to build and install a safe bird nesting box, with specs, materials, and maintenance tips.