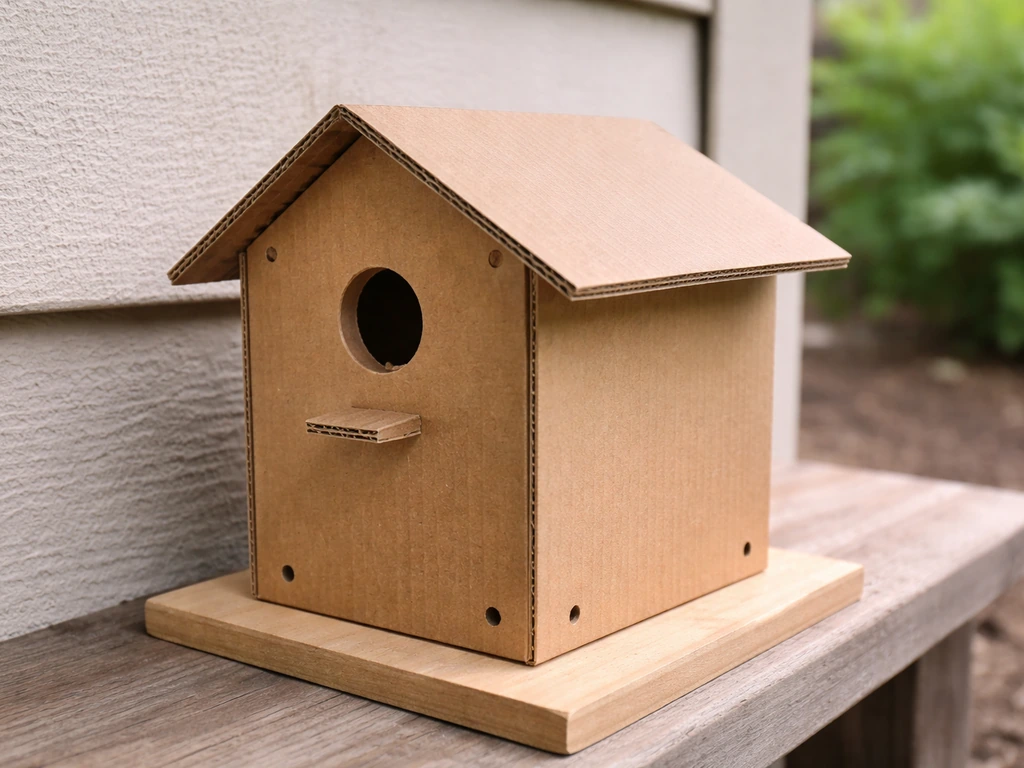
Yes, you can make a functional bird house from a cardboard box, and it's one of the fastest ways to get a nesting shelter up in your backyard today. Cardboard isn't going to last forever outdoors, but a well-built cardboard bird box can absolutely serve as a temporary shelter, a seasonal nesting spot, or a great first project to help you figure out sizing and placement before you cut into real wood. Here's everything you need to build one safely, get the entry hole right for the birds you want to attract, and understand exactly where the limits of cardboard as a material sit.
How to Make a Bird House With a Cardboard Box

Marcus Thornton
8 Apr 2026
What you can (and can't) safely make with cardboard
Cardboard is genuinely useful for temporary bird housing. Wildlife centers commonly use cardboard boxes as short-term containment for birds because the material is easy to work with, non-toxic when plain, and can be ventilated quickly. The Toronto Wildlife Centre, for example, considers a cardboard box suitable for temporary bird care as long as airflow is provided. That tells you something useful: cardboard works as a shelter material when you respect its limits.
What cardboard does well: it's lightweight, easy to cut without power tools, free or nearly free, and perfectly shaped for a quick nesting box prototype. A cardboard bird house put up in spring can give a pair of wrens or chickadees a place to nest during one season. What it doesn't do well is survive repeated rain, humidity, or direct sun over multiple seasons. It will soften, warp, and eventually collapse. That means you shouldn't use a cardboard box as a permanent solution, and you shouldn't house pet or rescued birds in a cardboard enclosure for more than a day or two.
The honest takeaway: cardboard bird houses are best used as seasonal backyard nesting boxes for small cavity-nesting species, placed under a sheltered overhang or inside a covered area where they won't get direct rain. For a longer-lasting version of the same idea, check out the guidance on how to build bird box using wood. But if you want something done today with materials you already have, let's get into it.
Materials, tools, and safety checks for cardboard bird housing
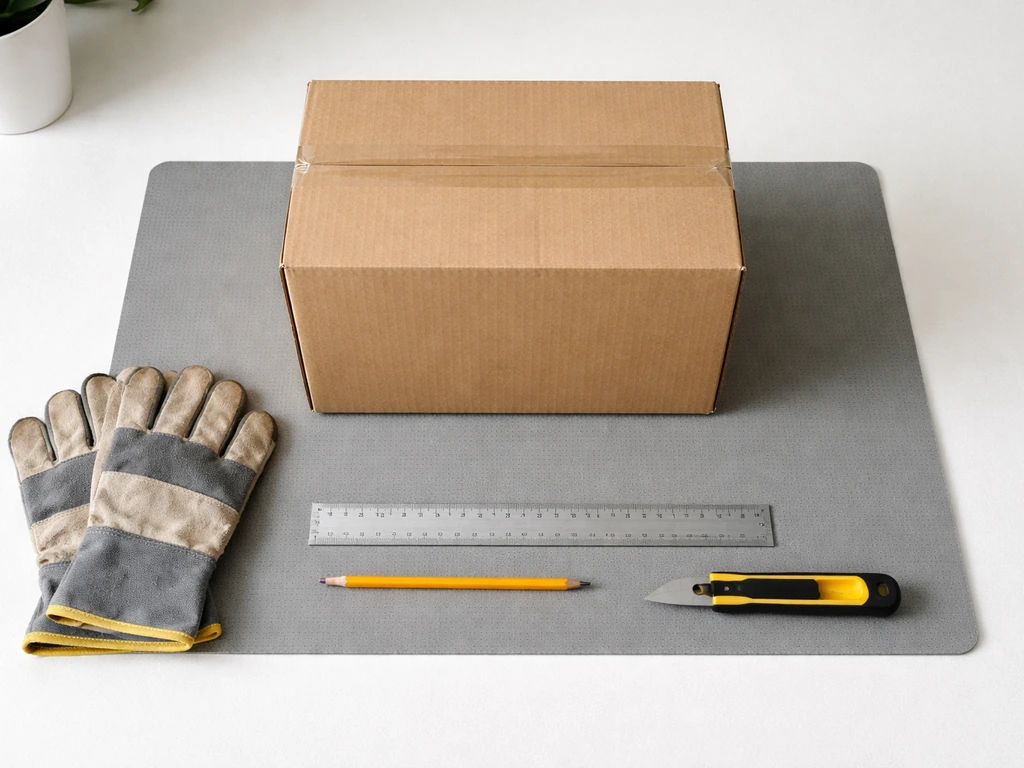
The best cardboard for this project is double-walled corrugated cardboard, the kind you get from appliance or moving boxes. Single-layer cardboard from cereal boxes or shoe boxes is too thin and will fail quickly. You want something at least 5mm thick so the walls hold their shape and provide a bit of insulation.
- One double-walled corrugated cardboard box, at least 30cm x 30cm x 30cm (a medium moving box or appliance box works great)
- Craft knife or box cutter with a fresh blade
- Cutting mat or spare piece of cardboard to protect your work surface
- Strong waterproof PVA glue or a hot glue gun
- Binder clips or bulldog clips to hold seams while glue dries
- A hole punch, drill with small bits, or a sharp pencil for ventilation holes
- A compass or round object (jar lid, coin) to trace entry hole shapes
- Optional: non-toxic, water-based paint or exterior wood glue brushed on as a sealant
- Twine or wire for hanging/mounting
- Ruler and pencil for marking cuts
Before you start cutting, do a quick safety check on the cardboard itself. Avoid boxes that have been used for chemicals, cleaning products, or anything with a strong residual smell. Ink and dye on plain cardboard printing is generally fine, but heavily coated, glossy, or wax-lined cardboard should be avoided since those coatings can off-gas when wet or warm. NestWatch notes there are no conclusive studies confirming whether residual fumes from certain finishes harm birds, so the safer call is to stick to plain, uncoated corrugated cardboard. Don't add any insulation materials like spray foam or fiberglass. A handful of dry natural material like straw or wood shavings placed inside is fine if you want to encourage nesting, but birds will bring their own nesting material anyway.
One more safety note on predator deterrents: don't improvise anything sharp around the entry hole. Tennessee Wildlife Resources Agency specifically warns against using razor blades or fish hooks as predator guards, noting they're not humane and can injure people too. Stick to simple physical barriers like adding a thick cardboard collar around the entry hole to extend the tunnel depth, which makes it harder for predators to reach inside.
Bird house design: getting the sizing, entry hole, ventilation, and drainage right
This is where most beginner builds go wrong, and it's also the most important part. Entry hole size directly controls which species can use your box and which predators can get in. A hole that's too big lets in starlings and house sparrows, which are invasive species that out-compete native cavity nesters. A hole that's close to the right diameter makes a real difference. USGS guidance specifically states that keeping the hole as close as possible to 1.5 inches helps bluebirds enter while excluding house sparrows and starlings.
| Species | Entry Hole Diameter | Floor Size | Entry Height Above Floor |
|---|---|---|---|
| Eastern Bluebird | 1 1/2" (38mm) | 5" x 5" | 6–8" |
| Black-capped Chickadee | 1 1/8" (29mm) | 4" x 4" | ~7" |
| Carolina / House Wren | 1 1/4" (32mm) | 4" x 4" | 6" |
| Carolina Wren | 1 1/4" (32mm) | 4" x 4" | 6" |
For a cardboard build aimed at robins, keep in mind that robins prefer open-fronted boxes rather than hole-entry boxes, which is a slightly different design. If robins are your target, you'll find more specific guidance in this article on how to make bird boxes for robins. For sparrows, the 1 1/4" entry works well, and there's more detail on sparrow-specific sizing in the guide on how to make a bird box for sparrows.
Ventilation
Ventilation is non-negotiable. A sealed box can overheat quickly in summer and kill nestlings. NestWatch recommends two 5/8-inch diameter holes on each side wall near the top, giving you four ventilation holes total. Missouri Extension backs this up with the same spec. For a cardboard build, use a sharp pencil, a hole punch, or a drill to make these holes. If you're not sure you can make clean round holes, cut small slits or slots near the top of each side panel instead. The Audubon bluebird box design also includes a 1/2-inch gap left at the top of the front panel as an additional ventilation channel, and that's easy to replicate in cardboard by simply not gluing that top edge all the way across.
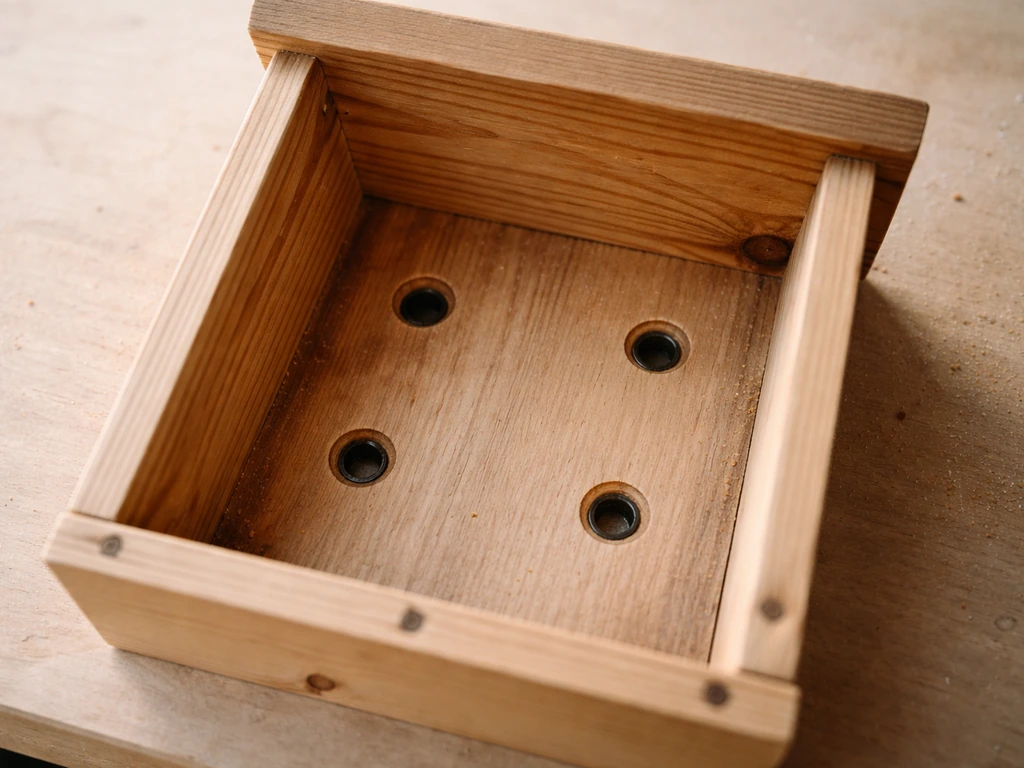
Drainage
Even under a sheltered spot, moisture gets in. NestWatch recommends at least four drainage holes in the floor, sized at 3/8 to 1/2 inch diameter. The Wildlife Trusts guidance goes as small as 1–2mm for drainage holes if the floor is slightly recessed, but the Cornell Lab's recommendation of 3/8 inch or larger gives better drainage in a cardboard build since the material itself will absorb some moisture. For cardboard, push a sharpened pencil through the floor panel in four corners, or use scissors to cut small X-shaped slits. Raising the floor slightly by gluing a thin cardboard frame underneath also helps airflow and prevents the base from sitting in pooled water.
Roof overhang

Roof overhang protects the entry hole from direct rain. Audubon's bluebird box spec calls for a 3 3/4-inch overhang on the front and 2 3/8 inches on the sides. In cardboard, you achieve this by cutting your roof panel larger than the box footprint on all sides. A 2–4 inch extension on the front is the most important dimension. Angle the roof panel slightly by scoring and folding the cardboard at a gentle slope so rain runs off rather than pooling.
Step-by-step: building your cardboard bird house
- Choose your box and plan your panels. A box roughly 12" tall, 6" wide, and 6" deep gives you a good starting size for wrens or chickadees. If your box is bigger, that's fine: you'll cut it down. Draw out all five panels (floor, two side walls, back wall, front wall with entry hole) on the flat faces of the box before cutting anything.
- Cut your panels. Using a craft knife and ruler, cut clean straight edges. Double-walled corrugated cardboard is tough, so take multiple passes rather than trying to force through in one cut. You'll end up with cleaner edges and won't drag the corrugation out of alignment.
- Cut the entry hole in the front panel. Use your compass or a round jar lid to trace the correct diameter circle for your target species (see the table above). Cut carefully with a craft knife, making small scoring cuts around the circle. A slightly rough edge is fine since birds don't mind, but fold any sharp paper flaps inward and glue them down so there's no exposed edge that could catch feathers.
- Add ventilation holes. On both side panels, punch or cut two 5/8-inch holes near the top edge. This is easiest to do before assembly while the panels are still flat.
- Add drainage holes to the floor panel. Push a sharp pencil through the floor panel in at least four spots, one in each corner area, or cut small X slits. If you want the floor slightly recessed (a nice touch), glue a narrow cardboard strip around the perimeter of the underside to lift the floor about 5mm off the ground.
- Assemble the box. Start by gluing the back wall to the floor, hold it square with binder clips, and let it set for a few minutes. Attach the two side walls next, then finally attach the front panel. Apply a generous bead of glue along every seam and reinforce corners with folded strips of spare cardboard glued on the inside like corner brackets. These internal brackets make a huge difference to structural rigidity.
- Build and attach the roof. Cut the roof panel with your overhang built in. Score a line across it about 1 inch from one edge to create a slight pitch. Fold along the score line so the roof has a gentle slope. Glue the roof down but follow the Audubon method of leaving a small gap (about 1/2 inch) at the top of the front wall unfilled to allow ventilation airflow. Don't glue the front edge of the roof directly to the front panel: leave that gap open.
- Reinforce all external seams with strips of spare cardboard or kraft tape. This adds weather resistance and structural integrity without adding any toxic materials.
- Let everything dry fully, at least two hours for PVA glue or 30 minutes for hot glue, before handling or mounting.
One thing I learned the hard way: don't try to rush the glue drying by putting the box in direct sun before it's fully set. The panels warp and you end up with a lopsided box where nothing sits square. Build it in the evening, let it cure overnight, and it'll be much more solid. If you're curious how the same design principles apply to a more permanent wooden version, the detailed walkthrough on how to make a bird nesting box covers the woodworking equivalent step by step.
Optional weatherproofing and placement tips to attract birds
The single biggest upgrade you can make to a cardboard bird house is a waterproof coating. Brush two coats of undiluted exterior-grade PVA glue over the entire outside surface, including the roof. Let the first coat dry completely before applying the second. This soaks into the corrugated layers and creates a semi-waterproof skin. Non-toxic, water-based exterior paint in a neutral earth tone (tan, grey, brown) applied over the top adds another protective layer and helps the box blend into its surroundings. Avoid bright colors, especially red or orange, since they can attract unwanted attention. Stick to the outside only: the interior should remain plain and untreated.
For placement, the species you're targeting matters. Bluebirds prefer boxes mounted 4–6 feet above the ground on a post in an open area facing a field or lawn. Wrens and chickadees are more flexible and will use boxes mounted on a fence post, tree, or shed wall at 5–10 feet. Always face the entry hole away from the prevailing wind and rain direction. In the northern hemisphere, a south-facing or southeast-facing entrance is generally recommended since it gets morning sun without overheating in afternoon heat.
Keep the box away from bird feeders. Feeders attract house sparrows and starlings, which are exactly the birds that will compete with or harass the native species you want nesting. If you're setting up a broader backyard habitat and want to watch birds without disturbing nesting activity, a bird blind set up nearby lets you observe without flushing nesting birds. That matters because guidelines from Canada.ca note that disturbing nesting birds increases predation risk and can cause adults to abandon eggs or young.
A predator guard is worth adding even to a temporary cardboard box. The simplest version is a thick cardboard collar glued around the entry hole, extending the tunnel by about 3/4 inch. This makes it harder for a raccoon or cat paw to reach through the hole. The U.S. Fish and Wildlife Service recommends a 3/4-inch thick predator guard at the entrance as a standard safety measure. You can build this in cardboard by gluing several layers together around the hole opening.
Check the box every week or two once nesting season starts (typically April through July in North America). After the brood fledges, remove and dispose of the cardboard box rather than trying to clean and reuse it. Old nesting material harbors parasites, and cardboard that has been through a nesting season is usually too degraded to reuse safely. Replacing it with a fresh cardboard box or upgrading to a wooden one is the better move.
If you want a structure that stays up through winter as well, a roosting box is a different animal. Birds huddle together in roosting boxes during cold nights, and the design is a bit different from a nesting box. The guide on how to build a bird roosting box covers that design specifically, including how to position the entry hole low (the opposite of a nesting box) to retain heat.
Building a cardboard bird "cage" or enclosure: what it's for and how to do it safely
People search for "bird cage out of cardboard" for a few different reasons. Sometimes it's for a craft or school project. Sometimes it's a temporary enclosure for a found or injured bird while waiting for a wildlife rescue. Sometimes it's a viewing or enrichment enclosure for a pet bird as a short-term playpen. What it's not suitable for is long-term housing for any bird, pet or wild. Cardboard provides no perch support, can't be sanitized, and breaks down quickly with bird droppings and moisture. That said, here's how to build a safe temporary cardboard enclosure.
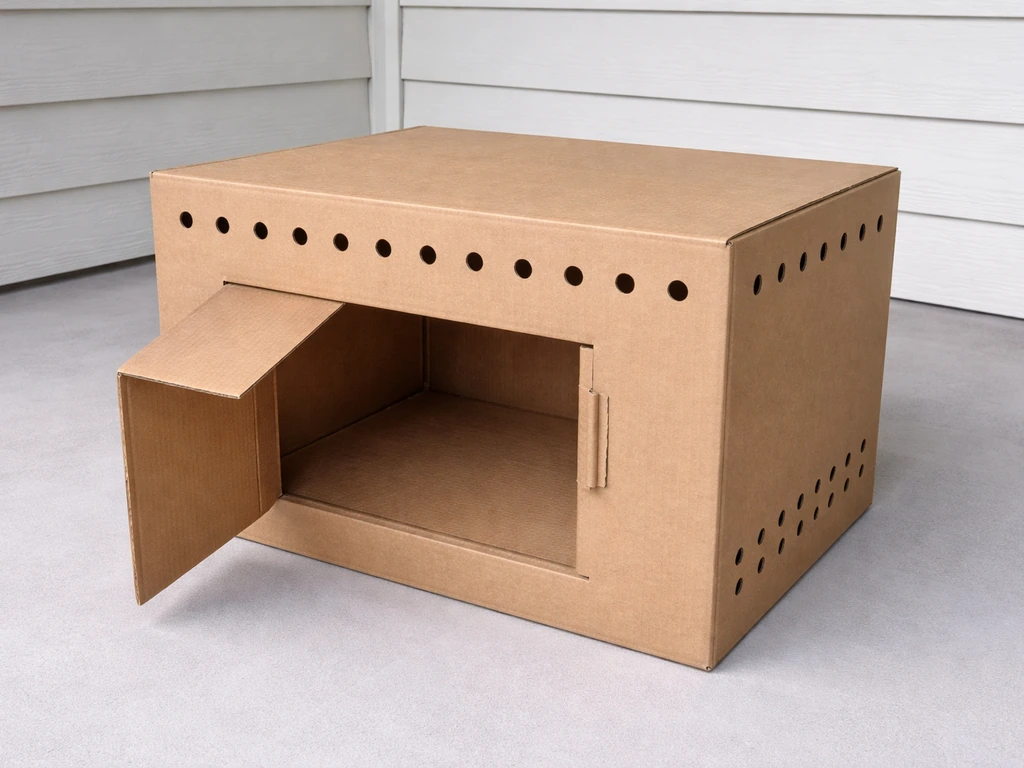
Ventilation in a cardboard enclosure
Ventilation is even more critical in an enclosed space than in a nesting box. Best Friends Animal Society advises poking air holes about the width of a pencil across the container when using a cardboard box for temporary wildlife containment. Ohio Wildlife Center's guidance on safely containing wildlife echoes this: add air holes so the animal cannot be trapped without airflow. For a bird enclosure, punch at least 10–15 pencil-width holes across both side panels and several across the top. If you want better airflow without large openings, cut rectangular windows in the panels and glue a layer of fine plastic mesh (cut from a kitchen strainer or produce bag) over the opening from the inside. This gives you airflow without escape gaps.
Secure access and door design
A temporary cardboard enclosure needs a door you can open and close without destroying the box each time. The simplest approach is to leave one panel (typically the top or front) unglued and held closed with binder clips or a strip of hook-and-loop tape (Velcro). Score and fold that panel so it opens cleanly along a straight edge. Make sure when it's closed there's no gap a small bird could push through or a curious cat could pry open. For a bird that can fly, the enclosure needs to be entirely closed with no gaps larger than 1/4 inch anywhere. Check all corners and seams carefully.
Limitations you need to know before you build
A cardboard bird enclosure is appropriate for: temporary containment of a found wild bird while you arrange professional help (contact a licensed wildlife rehabilitator, not a DIY solution), a short playpen session for a tame pet bird under direct supervision, or a craft/display project. It is not appropriate for: overnight housing of a pet bird, containing a bird that is sick or injured for more than a few hours without professional guidance, or any use where the bird might be left unattended. The structure simply isn't secure or hygienic enough for those situations. If you want to build something more substantial that gives birds real enrichment space, the concept of a bird hide for observing wild birds, or dedicated enrichment structures, moves you toward more durable builds.
Choosing the right size for your target species
Before you finalize your cardboard bird house build, it helps to know exactly which birds are likely to use it in your area. In most North American backyards, the main cavity-nesting candidates are Eastern Bluebirds, House Wrens, Carolina Wrens, and Black-capped or Carolina Chickadees. Each has a preferred entry hole size (see the table earlier in this article). Texas Parks & Wildlife Department’s nestbox guidance includes a 1.5-inch entrance hole and an entrance height of 1 to 6 inches above the floor for common cavity-nesters like bluebirds, chickadees, and wrens 1.5-inch entrance hole and entrance height of 1 to 6 inches. The floor dimensions matter too: a 4x4 inch interior floor is correct for wrens and chickadees, while bluebirds need closer to 5x5 inches. In a cardboard build you can easily adjust these dimensions when you're cutting panels, which is actually one of the advantages over buying a pre-made wooden kit.
If you want to go deeper on designing enrichment structures that keep birds engaged and healthy, the guide on how to make bird blocks covers foraging enrichment structures that pair well with a nesting box setup. And if you're ready to level up from cardboard to a permanent nesting solution, understanding the principles behind bird nesting box construction will make your next build last years instead of one season.
The cardboard bird house is a genuinely good starting point. You'll learn what size feels right, where birds in your yard actually want to nest, and whether your placement is working, all before investing in wood, hardware, and tools. Build one this afternoon, get it up before nesting season peaks, and see what moves in. That's the real value of working with cardboard: it gets you learning fast, with almost zero cost and zero regret if you get something wrong the first time.
FAQ
Can I use a regular single-wall cardboard box (like a shoe box or cereal box) for a bird house?
It will usually fail faster than you expect, especially with moisture and repeated nesting attempts. If you must use it, reinforce the walls with extra layers of corrugated cardboard on all sides and treat it as a very short seasonal shelter, not a month-to-month home.
What should I do if my cardboard already has shipping ink, tape residue, or a glossy coating?
Plain printed ink is generally the least risky option, but anything wax-lined, heavily glossy, or coated is harder to predict once it gets damp. If you see a shiny laminate layer, peel or avoid that panel, and choose uncoated corrugated sections for the walls and roof.
Is it safe to paint the inside of the cardboard bird house to make it look nicer?
Avoid painting or coating the interior. The article notes the inside should remain plain and untreated, because finishes can trap fumes and make the surface harder for birds to settle and nest on. Keep any paint or waterproofing on the outside only.
How can I tell whether the entry hole is too big after I cut it?
If you discover the hole is oversized, you should not leave it. The better fix is to rebuild that front panel with the correct diameter hole, since you want to exclude competitors like starlings and house sparrows. Patching with thin cardboard often still leaves gaps predators can use.
Can I use hot glue, tape, or a stapler instead of PVA glue?
For outdoor cardboard, hot glue and loose tape tend to loosen as the cardboard flexes and gets damp. PVA works better because it soaks into the corrugated layers and forms a stronger bond. If you use any fasteners, keep them minimal and ensure no sharp points are near the entry or ventilation holes.
How many ventilation and drainage holes should I add if I’m building a smaller or larger box?
Use the same principles, but keep the relative placement near the top for ventilation and spaced across the floor for drainage. The article specifies two side ventilation holes near the top and four drainage holes in the floor, and if you change the size, do not shrink them below those functional needs.
Do I need to waterproof the roof if I’m placing the box under an overhang?
Water resistance is still worthwhile. Even sheltered placements can get wind-driven rain and condensation, and cardboard softens when it stays damp. Applying two coats of exterior-grade PVA glue to the entire outside, including the roof, helps the box survive a wet spell.
Can I leave the box up through winter, or should I remove it after nesting?
For nesting boxes made from cardboard, the safer approach is to remove it after the brood fledges. The article notes leftover nesting material can harbor parasites, and the cardboard is usually too degraded to reuse safely. If you want something to stay out longer, switch to a roosting-box design instead.
Is a predator guard really necessary for a cardboard nest box?
It’s strongly recommended even for temporary builds. The article explains that a thick cardboard collar around the entry hole extends the tunnel depth and helps deter raccoons and cats. If you skip it, you may increase the chance of predators reaching inside.
What’s the safest way to check the box without disturbing the nest too much?
Make checks quick and consistent, then close it immediately. The article suggests checking every week or two during nesting season, and it also highlights that disturbing nesting birds increases predation risk. Avoid repeated “peek and linger” behavior and keep your visits short.
If I’m trying to attract bluebirds, do I need different box orientation or entrance placement?
Bluebirds are sensitive to access and exposure, so follow the species-specific guidance for hole sizing and mounting height, and face the entry away from prevailing rain and wind. Also consider morning sun benefits, a south- or southeast-facing entrance helps with warmth without overheating in afternoon heat.
Can I use a cardboard box enclosure as a bird rescue holding cage while I wait for help?
Only as a short, supervised temporary enclosure, and only with strong airflow. The article warns it is not suitable for sick or injured birds for more than a few hours without professional guidance, so your priority should be contacting a licensed wildlife rehabilitator and transporting promptly.
My temporary cardboard bird enclosure has large holes for airflow, can the bird escape?
If the gaps are too large, a flying bird can get out. The article notes that for a bird enclosure, it needs to be entirely closed with no gaps larger than about 1/4 inch anywhere, so use many smaller ventilation holes or mesh-covered openings rather than big cutouts.
Next Articles
How to Build a Bird Box: Step-by-Step DIY Guide
Step-by-step plans to build and mount a wildlife-safe bird box on a house, with framing, prep, and optional singing craf
How to Make a Bird Nesting Box: Step-by-Step DIY Guide
Step-by-step DIY guide to build and install a safe bird nesting box, with specs, materials, and maintenance tips.

How to Build a Chimney Swift Bird House DIY Guide
Step-by-step DIY plans to build a chimney swift bird house, with correct dimensions, placement, and weatherproofing for